-
Thanks!
I also worked on the ms3x that is controlling the engine. It has nice feature to log to SD card about what is happening on the engine. Too bad that the ms3x is missing the RTC that ms3pro has and the logs are just named like log001, log002, log003.. and after few weeks there is no telling which log is which and when those are driven. Really annoying. You can get separate rtc module that is horrifying 68usd plus shipping and import tax etc. Combining to something like +100usd for 5usd with of parts. Which I consider as robbery.
Well after some research the RTC module is based on mcp79410 IC and the ms3x RTC module is basically directly the reference design for that. After googling I did found that some have used the evaluation board for that chip with success. Unfortunately I couldn't find that anywhere but I did find this Pmod RTCC module for sale and it's only like 10usd:

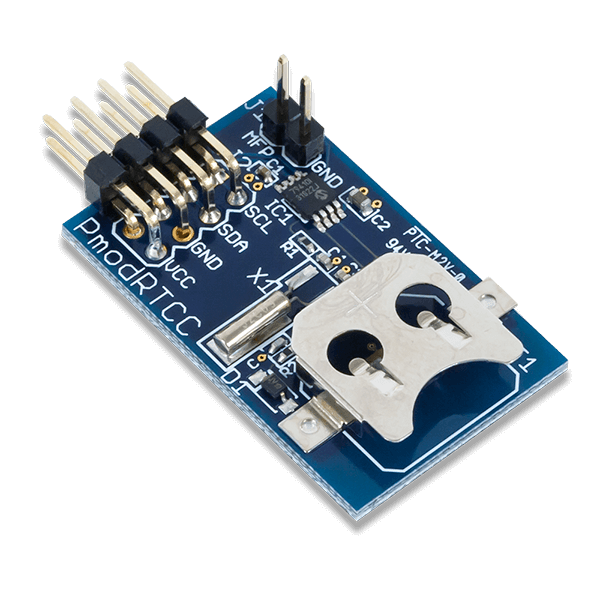
Well I was ordering stuff from mouser, so I got that too for testing:

In that pic I messed up the SDA and SCL lines that should go to H3 and H4 but still after fixing that it didn't work:

Bummer! Well again after googling, I did find more detailed pic of the ms3x RTC module. Well that picture doesn't exist in internet anymore, but it's almost identical to the Pmod RTCC module, but there is also R1, R2 and R3.
That are missing from Pmod version. R1 and R2 don't have markings, but those are between SCL and SDA lines and +5v line, so those are pull-up resistors. I2C bus uses 1k - 10k resistors depending on the bus speed. So I had 7.5k resistors and added those. R3 is directly on the SDA line and is showing marking 102 = 1k resistor. Probaply for some protection. So I added those too. Doesn't look neat, but it's there:

And now it works::

Logs now have date and time on them:

Now I have SD card logging all the time when engine is running with date and time. So I can always check the logs, if there is something wrong with the engine for example.
I also added this HC-06 bluetooth module, that I can use tablet or my phone to check out what is going on in the ECU if I don't have laptop with me:

Seems to work like a treat. But my ms3x starts to look even more like horrible mess with wires. I will probably move to using speeduino is some point when it has the features that I need. I have already done m52 PnP versions about that, which look much nicer than the rat nest of wires in my m52 PnP ms3x:
 Last edited by pazi88; 05-02-2019, 10:46 PM.
Leave a comment:
-
Then the front brakes. I bought stud kit for the car because it looks like I have to run spacers and using those with regular BMW bolts is really annoying. And I also started working on cooling ducting for the front brakes:

I did measure that the 10mm spacer is minimum that I can run, and those turned out bit hard to find as hub-centric. But I managed to get these fancy forged ones:

And I have played the game of tetris with the adapters, brakes and wheels for really long time. And had like 5 or 6 different 3D printed prototypes. Before finally everything fits:

And it rotates freely:

And as you can see, I also took apart the wheels to freshen up those:

I also need to do something for the front wheels, because the 10mm spacer and 2mm spacer behind brake disc bring the whole wheel outwards 12mm. Which is no go fi I plan to drive the car hard. I was then planning to mount the front lips on the back, giving me better clearance.

But damn, that doesn't look good. huge job to fit the brakes with those wheels and then ruin the whole thing like that.
Soo.. I had to order half inch narrower front lips for the wheels. These aren't cheap in radinox flavor, but I will never get any more aluminium outer lips in my cars, because those are horrible job to keep looking nice. For these radinox lips, I have not needed to do any maintenance, and they still look good as new.

Then the Brembo saddles. I took those fully apart and sandpalsted all the rot away. Some of the pistons were seized on the bores, and it was lot of job to get those out. And when I eventually got those out, 6 of the 8 pistons were totally busted and not fixable:

Ebay to the rescue and I got 6 brand new pistons:

And now the saddles are back together and ready to be installed to car.

For the adapters, I converted my 3D models to DXF and my friend cut those for me from 10mm steel:

Those require 4mm spacers, and those I TIG welded on. And also made m12x1.5 threads for new 10.9 grade bolts.

Test fit:


With disc:

Still need to finish the ducting, apply some paint for the discs and get new brake pads. But it's close to being ready now.Leave a comment:
-
For the rear I needed abs driveshafts and swing arms, but I couldn't find ones in good enough condition or with reasonable price. So I first got these new SKF driveshafts with ABS rings that cost less then rusty used ones:

Well surprise the casting is different and the ABS ring hits it, so I needed to make some room:

Then drill holes for ABS sensors:

Perfect:

I did get e36 ABS sensor for rear, because those are much cheaper than e30. Welded bracket for those and test:

And it works. Only thing left is to finish up the swing arms.Leave a comment:
-
Yes there will be. I'm currently editing the 4 clutch LSD upgrade, but later there will be full diff rebuilt too.
But at the mean time, I was wandering in the garage and I spotted pair of e36 328 rear brake carriers and tried to those on e30 swing arm:


Well dammit. It almost fits. Should be easy modification to make that work and use the e36 328 vented rear discs instead of the 325 non-vented. So I got pair of those:


Needs spacer/adapter:

But it's already on with just two new threads:

With saddle (well this is 325 but still good enough for test fit):


Perfect! So time to get new e36 328 saddles to fit with those:

Leave a comment:
-
hehe means that we will be getting videos soon. Hope you filmed the diff rebuilding, will be helpful.
Thank you again for sharing!Leave a comment:
-
After that I drew some pieces that my friend did cut out with waterjet:

2mm spacer to move the front discs away from tie rod end:

Now with second try of the adapter it fits much better. But not perfect yet :D

Then started working on the rear axle to get better 1/4 mile times. So out comes the old:

Those other pieces that were cut with waterjet, were raised suspension mounts for rear axle that work like this:


ok those were for e34 subframe. But you get the idea :D
This is the e30 one welded to second subframe I had laying around:

All welded:

Little bit trimming and those barely fit with Garagastic raised subframe bushes:


Then some paint:


And installed:

My diff also needed some work, because it started to act like open diff. So Racing Diffs 4 clutch upgrade kit it is:

All torn apart:

30 years of use is clearly visible in these :D


The thinner end cap is required to fit the 4 clutches. It's also much beefier than the stock one. Which is weak point at least in the typ168 diffs:

The 4 clutch kit installed and new bearings fitted:

Of course some shim adjustment was needed. Luckily I got quite a big lot of these from all junk diffs, I have had. So I was lucky to find right ones from those, so no need to wait for new ones.

And all assembled with proper bearing preload, tooth contact and backlash (0.07mm, when spec is form 0.06 to 0.14mm).

After that I started workin with the e36 ABS unit. I think this is good spot:

e36 bracket wasn't going to cut it, so I started making new one:

Should fit well:

Even with e90 booster:

And as expected, the e90 own reservoir hits the charge pipe.Leave a comment:
-
Moving on with my m52tbo e30. Time to do brake upgrade. For that I got e38 4-pot brembo brakes:

Disassembled those:
Test fit on my 16" wheels that really have 14" bottlecap "centers" :D Looks like 294mm mini brake discs could be doable:


So I got those:

the e38 brakes were made narrower to work with 22mm discs:


Then e36 rear discs for rear:

And Z3 brakes for those:

Rust go away:


More stuff appears. Like e90 booster and e36 ABS unit.

Some material taken off from the front discs to fit them to e30 hub:

Rings to center the rear discs to e30 hub:

The e36 ABS unit:

E9 resevoir for the E90 booster:

Adapter for the front brakes:

First try was total fail:


But at least rear brakes are bolt-on as expected:

Video of all that: https://www.youtube.com/watch?v=Bk1MHWRJ0XoLeave a comment:
-
Don't know the e39 readings but there night and day difference on the airflow if you try it with the hand. Never going back to the puny spal fan that had problems keeping engine temps level. With spal fan there was hardly any air going through the radiator. I needed to put my hand to the radiator to feel that. But with e39 fan there is breeze that you can feel even standing by the engine bay with hood open.Leave a comment:
-
-
And hopefully bigger next summer :D But it all matches, because mine and Petri's cam specs are almost the same, same displacement, almost same compression ratio, same boost pressure etc. and only 5hp difference on hp level.
Video of the vanos upgrade and other stuff from last post: https://www.youtube.com/watch?v=2IjBddEne4o
After that it was time for bimmerparty 2018. Here is video of that too: https://www.youtube.com/watch?v=Ux48FsFivBs&t=1011s
Unfortunately I don't have any pics from there. But I got third place in autoslalom:

The best time on 1/4mile was 12,445s speed was 205km/h
There was serious traction problems and I decided to tackle that by using the traction control in ms3. I already had speed signal from rear axle using vss output from instrument cluster to nitrous input at ms3. So I needed to add vss from front axle also. So I added abs sensor to drives side front hub:

That is vr-sensor so I needed vr-conditioner to be able to use the digital inputs in ms3. For that I made my own max9926 vr-conditioner boards, because the ready made ones were non existent or very expensive:

I have couple of those for sale if someone is interested. Or if someone want's to make own ones, the pcb project is here: https://easyeda.com/pazi88/vr-muunnin
Works like a treat (click for video):

The output signal goes to ms3x card in pt4 input, couple of settings in tunerstudio and it works (click for video):

The settings for front and back are not 100% right because different tire size, but close enough:
You can clearly see when car breaks traction:

After getting that, I tried to tune the traction control and went to try my luck on 1/4 mile: https://www.youtube.com/watch?v=jcU0vdnlShA
Best: 12.029 / 209 km/h
Other results:
13.403 184 km/h
12.158 207 km/h
12.626 210 km/h
12.283 208 km/h
13.436 141 km/h
12.372 198 km/h
12.286 207 km/h
So close to going elevens Well it clearly has it even with current setup, but I need to modify the rear axle more for better traction.
I did something like 10 pulls one after one with almost no waiting between without any problems. But later I found out that the lsd is not locking anymore and rear end was covered in oil:
It looks like the diff oil overheated in that heavy 1/4 mile use, started leaking and destroyed lsd disks. Well I need to do something for that also.Leave a comment:


Leave a comment: