

I commend you for tackling the headliner. Such a huge pain in the ass. I hated putting my suede one in! Looks like you got it in there just right so far! Now put on those mirrors...:up:
-
Reminiscing... -
Hey Josh !
A – Congrats on becoming a father.
B – Thanks for the nod on the taillight treatment idea. Fun to know it inspired someone.
C – Wow. Headliner. Ug. The thorough attention to detail on this car gets me excited to see its completion.
D - +1 on putting the m42 in the e21
E – Keep on, keepin’ on !Comment
-
Super Mega Hyper Ultra Uber Update...Part 2
After taking a brake, I decided to install the shifter. I elected to go with the UUC shift kit and their DSSR coupled with the standard E36 carrier. Installation was straightforward with the usual headaches like the bitch clip. The tiny screws used to lock the ring in place on the carrier drove me nuts. I had my wife tighten them as I got so frustrated...plus my fingers hurt from the headliner.
I installed the carrier in the car.


I know, I know, rusty. it'll get taken care of.
But the call of the headliner beckoned so I was forced to return...mainly because I limited use of Dad's time.
<sigh>
Back to the headliner....


At this point, Dad left the sunroof to me. Being a nervous wreck, I put my efforts to other uses so I could avoid it. Time to finish that shifter...


You know what else would be fun? Replacing all the engine mount hardware with the proper fasteners.


Yeah, my hands still hurt...


That was fun...
So next....driveshaft? Yeah lets install the driveshaft. (Can you tell I was really nervous about the sunroof?)

Used a rebuilt E30 M3 driveshaft. Went in no problem...like it was meant to be.

So sunroof now.... no I think we should install the mono wiper.
(Side note with 20/20 hindsight. Words cannot express how much changing out the wiper motor mechanism is. I should have gone with the sunroof)
So first, remove the blower motor....

Then you have to remove the housing by popping off some clips in the front and the back....

Not sure a flashlight really helped.
Disconnect the motor from the harness and remove...

Literally, these are the directions in the Bentley. You'll note a lack of pictures here because it took 2 hours to figure out!!!!!
Cliffs notes: You need to remove the wiper motor separate from the mechanism. Its the only way we could get it out.

F you wiper motor mechanism...F you right in the A.
I got the AKG mono wiper for christmas and it requires you to reuse the motor. So I swapped it to the new mechanism.


And put it back into the car....


Why didn't I do the sunroof instead?

but it's in...

Having put off the sunroof, it was time. I was terrified making these cuts.


The corners are the most nervewracking. I came REAL close to cutting too much material but I lucked out. Be super careful here. It's easy to cut too much.


I made it this far and needed a distraction. So for all those wondering when I was going to put M3 front sway bay links, I got some Turner adjustable ones on the car....

Brake lines still need some adjustment though.
Back on the headliner...


More distractions....

My sister-in-law got me some E36 318is badges for christmas. I think they'll look sharp.
And the headliner is glued in place. Time to install the sunroof....Do I remember how to reinstall it?


hmmm, that's not right.


Better. too bad my back is killing me!

sooo tired but finished.
Thus marks the end of the weekend. I'll get the following weekend's pictures up later this week. There the car gets reassembled and returns home!
Til then-Josh
Check out my build thread...
http://www.r3vlimited.com/board/showthread.php?t=131055
Need parts? Support the community!

http://www.gutenparts.com

http://www.blunttech.comComment
-
patience grasshopper. Some trim restoration is in order....
but yeah, I'll probably mount one this weekend to see what it looks like.
The lights came out pretty good and the effect is subtle but still noticeable. Like there is something about them that isn't quite stock. They still need to be wet sanded but I'll have some pictures in the next update.
And to all of you, yes, the headliner does suck installing but damn does alcantera look cool!-Josh
Check out my build thread...
http://www.r3vlimited.com/board/showthread.php?t=131055
Need parts? Support the community!
http://www.gutenparts.com
http://www.blunttech.comComment
-
Great to see your wife helping you.
She's a real trooper!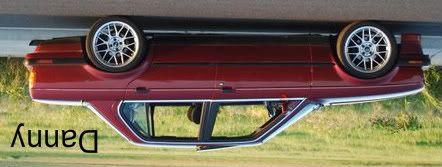
Comment
-
That black headliners looks amazing. I'm so glad I was blessed with the rare optioned factory black headliner cause that is something I don't think I'd ever want to tackle. Love seeing this car coming back together, and can't wait to see it finished.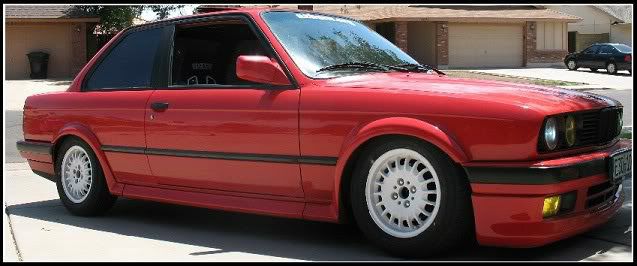
Comment
-
this is a great build! very nice attention to detail. i hope my '02 comes out looking this good ones a embark on body work and paint this summer. it will be an adventure.sigpic
"The bitterness of poor quality remains long after the sweetness of low price is forgotten."
Comment
-
-Josh
Check out my build thread...
http://www.r3vlimited.com/board/showthread.php?t=131055
Need parts? Support the community!
http://www.gutenparts.com
http://www.blunttech.comComment
-
Super Mega Hyper Ultra Uber Update...Part 3
Last weekend I went to Dallas...well Plano to be more specific. The trip was two-fold. One, my sister was having her wedding reception for those who didn't make it to her destination wedding and two, we would use the Tundra to haul Dad's new project, a '76 2002ti. One project must pass so that another may live.
Sunday I awoke to 8 inches of snow piled on my truck. Needless to say I was surprised, being the 1st day of spring and a little miffed that I had to clear it off. No matter, we set off, got the trailer, loaded the car and headed off to the barn. Upon our arrival, we started work immediately.
First unload the 2002.


There are some goodies going on this one but i'll wait until it's finished before divulging them.
It was time to move my car to prepare it for departure and move the 2002 to the paint prep area. That meant it was time for wheels. I had received some black lug bolts from (insert major parts carrier here...i don't remember) and the threads were slightly off. This made me irritated and I decided I would rather have studs anyway. I elected to go with Vorshlag and installed their studs onto the car.


Convenience even comes with that Fuh Raze look!

And yes the rust is sad but will be taken care of shortly.
With wheels on the car, we lowered onto some auto dollies so we could move it over a bay. This would be the first time the car had moved in almost a year. It was a significant event made all the more exciting because I knew it was finally coming back home.


It was late (well late for me having driven the whole way) and since it's scary as hell to walk from the barn to the house at night (no lights out there) we called it a night. The next day, the reassembly would begin in earnest.
The next morning began with the installation of the trunk lid.

The trunk is one of the more straightforward installations and took no time at all. To make it look more like a car, we installed the hood.


The gaps don't look too good. Better adjust.


The hinge needs repainting but will be addressed later on.

Gaps are looking better too.


The thing I really wanted to do was install the front valence because it would finally start looking like a complete car.
So I put the old man on the concrete floor and told him to get crackalackin'


Yeah, now we're cooking with propane! Needs something else though...


Ah, that was it!
My B-Pillar trim was pretty heavily cracked and started to crumble. I wasn't about to pay 150 bucks EACH for some new ones so we wrapped the existing B-Pillar metal in leftover alcantera.


Some trimming is necessary of course.
We wanted to put all the glass in so I needed to paint the shadowline for the back side glass. I had just enough SEM left over to give it a spray.

With the paint drying, I wanted to install the taillights so I could finally see what they look like.


Nice deep shade of red and you can just make out the black stripes.


I really like the way they came out. They have clear but still need sanding and polishing.

With the car on dollies, it's quite deceiving but it sits nice and low. Mind you won't see this on stanceworks but I am pleased with the rake and stance.
It was time to install the rear side glass. Many complain about this task as the rubber is difficult to work with. We employed the rope in the channel trick where you set it in place and pull the rope, pulling the rubber with it. Both windows installed in less than 10 minutes. I recommend it, as it was one less thing to get frustrated with.


I am a big fan of the SEM trim paint. I know there are others out there. Duplicolor sprays much nicer but I was pleased with the texture that the SEM generated. Both are great paints when you really get down to it.
We "attempted" to install the locking strips for the back glass and the front glass. Even with the locking strip tool, we struggled. It took us 3 hours to get the bottom strip and one side of the back window installed. In the end we took the old strip, cut it into pieces and placed them in the channel for transport. Our window guy didn't show up before I left so I will have to find one here in Mobile to get it done. It was miserable. There was much cursing and we walked away from it multiple times to prevent doing anything rash.


The old locking strip was not nearly as soft as the new locking strip which made it easier to install. Regardless, it still sucked.-Josh
Check out my build thread...
http://www.r3vlimited.com/board/showthread.php?t=131055
Need parts? Support the community!
http://www.gutenparts.com
http://www.blunttech.comComment
-
continued...
By now we were tired. We had also removed all of the 2002's suspension so dad could take it back to plano and get refreshed or in the case of his front control arms, replaced. They were scary cracked. Luckily BluntTech has been supplying him mucho parts. I haven't tried steve yet so I think my next batch of parts will be through him as everyone seems pleased with him.
Time to say goodnight to the car.


The next morning we worked on the rear locking strip but ultimately gave up and taped it to the glass. From there it was time to pack up and load the car on the trailer.


I wonder if I should get some Dekra decals?

It was fun getting the front wheel straps on!
And finally, after a long journey home...it was back!


So the good news is that updates should be coming more regularly now. I have a time table to get done (that baby thing in my sig is a constant reminder!) For now, it's just awesome to walk out into the garage and see the car. With the in-laws coming in this weekend I won't be able to work on it until sunday. But i've got music on the server and beer in the fridge and I can't wait.-Josh
Check out my build thread...
http://www.r3vlimited.com/board/showthread.php?t=131055
Need parts? Support the community!
http://www.gutenparts.com
http://www.blunttech.comComment
-
No way, I'm from Plano. haha. Currently in KC, MO though.Renting my rear wheel bearing tool kit. SIR
http://i25.photobucket.com/albums/c5...ps6debf0b0.jpg
Your signature picture has been removed since it contained the Photobucket "upgrade your account" image.Comment
-
-
Sweet baby jesus, that looks incredible. I love this build!
Reminiscing...Comment
-
Great work on this josh, When you get a free day give me a PM, id REALLY love to come over and take a look at it. I can offer an extra set of hands if you need em also. I really want to see a few things with those long tube headers you are running and where they terminate under the body. Plus, might give me a little motivation to get my swap going.
-Dan-DanComment
-
I find myself in awe.Comment


Comment