Announcement

Collapse
No announcement yet.

JackBenny's 1991 318is Project

Collapse
X
 
  • Filter
  • Time
  • Show
Clear All
new posts

    #61
    It's been a while...

    So the previous few weeks have been dedicated to visiting with in-laws and Easter holiday and not really much time to deal with the car. I hoped to resolve that this weekend. When we last left off, the engine bay was being prepped for getting sprayed. As time went on, a change of plans occurred. If I'm going through this much effort to get the bay sprayed, and i'm going to paint the exterior eventually as well, I might as well take the whole thing down and do it at once. So the preparation began on doing some light body work in anticipation of putting the car on a trailer and driving it to my family's barn in Louisiana. There I will spend a couple of long weekends getting the car painted. I've managed to recruit my father and my wife (she owes me after two straight weekends of in-laws) and we will start the project in early June and try and get it back in the garage by July for the engine swap. With that being said, let's look at some pictures of progress...

    The steam cleaning was working ok but sanding did a better job of taking off the cosmoline...


    It's a tad more yellow on this side


    We're getting better over on the passenger side but I think I'll remove those brackets.


    Both of the Coil Pack brackets were removed. Here's a good look at the difference between the removed cosmoline side and the untouched side.


    To really do a nice job, I needed to remove the ABS pump and all those brakelines.


    Each line was marked so that I would have a good chance of putting it all back together.


    That looks a bit nicer.


    Hmmmmm....


    For the record, I did consider an ABS relocation. In the end I decided against it. I intend on using the 535 airbox and I think I can make it work nicely with the ABS in its current home.

    Bored with the engine bay, I moved to the back of the car to further assess the damage. You might recall that the split metal looked something like this on my rear quarter panel.


    After a while of trying my hand at hammer and dolly, I managed to get it to look something like this:


    Better but still not where i want it.


    I continued to work the shape so that I can at least weld it. I'll continue to work it some more. This is the first time I've tried the hammer and dolly and the only real way to learn it is to go out and do it. It is better that it originally was and that makes me happy and tends to offset what i manage to screw up learning the proper techniques.

    Also thought I would continue to remove the rest of the bondo on the lower valance.


    It's pretty wrinkled. There's a dent on the spare tire carrier so the previous owner backed into a pole pretty good. I'm disappointed in the repair but we'll get it fixed this time around.

    Thought I might check and see where my rear tires are rubbing as well.


    Turns out it rubs right about here. how cool would it be if I could tuck 245's this high up! :D


    Where I would like to be ride-height wise.


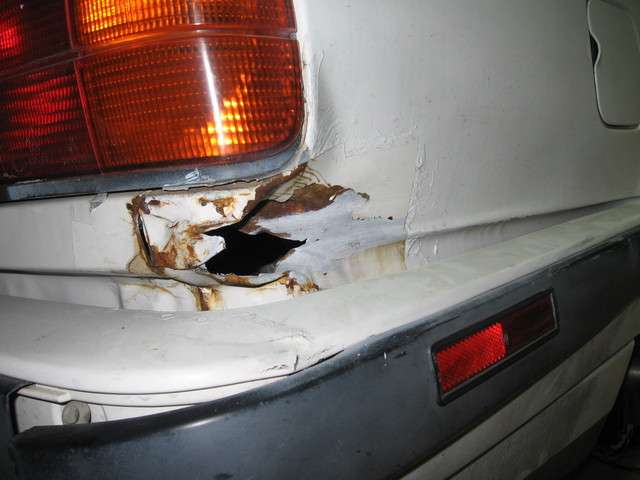
    And finally I took the rear bumper apart so I could better assess the damage.


    And that's about it for this weekend. I've got a new front valance on the way and I hope to get that ripped metal welded up next weekend. I'm sad that I won't be driving this until later in the year but I think it's going to look pretty sweet with some new paint and a straight body.
    Last edited by jackbenny; 04-19-2009, 12:44 PM. Reason: Added Pictures
    -Josh

    Check out my build thread...
    http://www.r3vlimited.com/board/showthread.php?t=131055

    Need parts? Support the community!


    http://www.gutenparts.com

    http://www.blunttech.com

    Comment


      #62
      i am definitely interested in seeing how this paint job is going to turn out, i am planning something similar this summer with my alpine 318is.

      Comment


        #63
        Nice progress! Like what you are doing here
        Mtech1 v8 build thread - https://www.r3vlimited.com/board/sho...d.php?t=413205


        OEM v8 manual chip or dme - https://www.r3vlimited.com/board/sho....php?p=4938827

        Comment


          #64
          great work on the bay and cleaning it up
          it will look great with the unnecessary brackets removed and the bay repainted.


          -
          Project
          Parts for Sale
          Feedback
          YouTube Channel

          Comment


            #65
            thumbs up from a fellow aerospace nerd
            Last edited by paulkeith; 10-05-2010, 09:36 AM.
            pull: '02 F-250 7.3L 6SPD 4x4, Chipped, Straightpiped, BFG MTKM2.
            turn: empty stable. lame.

            Comment


              #66
              Originally posted by jackbenny View Post
              Each line was marked so that I would have a good chance of putting it all back together.

              lol @ good chance. Sometimes, no matter how well you prepare, it always gets screwed up.

              Great progress, though. Keep it up!
              turk@gutenparts.com

              Originally posted by Janderson
              Properly placed zip ties will hold bridges together.

              Comment


                #67
                Originally posted by BrewCity11 View Post
                lol @ good chance. Sometimes, no matter how well you prepare, it always gets screwed up.

                Great progress, though. Keep it up!
                Tell me about it. I've got tons of labeled zip lock bags on the shelf and when I was sweeping up the bondo dust yesterday afternoon I found a bunch of locknuts. Oh well, hopefully the Bentley and RealOEM will sort out that little mystery when the time comes. ;)
                -Josh

                Check out my build thread...
                http://www.r3vlimited.com/board/showthread.php?t=131055

                Need parts? Support the community!


                http://www.gutenparts.com

                http://www.blunttech.com

                Comment


                  #68
                  I have a friend that uses the 10% rule:
                  Guestimate the number of nuts and bolts you removed in that specific project. As long as the leftover # of nuts/bolts is less than 10% of the total, he says its good.
                  ex. 20 screws/nuts/bolts involved doing a cluster and hvac panel swap, and he had 2 leftover. He was ok with that.
                  I, on the otherhand, always seem to come up short and need to dip into the spare nut/bolt container.
                  turk@gutenparts.com

                  Originally posted by Janderson
                  Properly placed zip ties will hold bridges together.

                  Comment


                    #69
                    Yeah, so it's been awhile. Work has been progressing slowly which is not good if I am going to trailer the car to Louisiana for paint for the first weekend in June. But the wife needed to stain and finish some furniture and I needed to help a friend on his '48 Ford Truck in exchange for some work he did on my car. Not to mention there was this to occupy my free time:


                    Just finished building my first computer (sad isn't it) which is our new media server. We've been duplicating all our DVD's and Blu-Rays and will have an HTPC in the living room when all is said and done running a media center add-on called MediaBrowser. It's been working nicely on the wife's laptop as a test. 4 drive bays are filled right now and I have 26 to go when I need it. 4.5 TB is nice and after all the issues I had getting it going, I'm pleased with how it works. Just running Windows Home Server for now. I know there are better ways of doing it but it works for me and the Mrs. so I am pleased.

                    Regardless, I have pictures so lets dive right in.

                    I needed to get that nasty hole welded up on the passenger rear corner. While waiting for my friend and his welder, I elected to start stripping the interior.


                    My dash looks horrid in my opinion. Multiple cracks and faded. I managed to find one and the crack free dashes seem to be getting harder and harder to find. It should arrive this coming Tuesday but in the meantime, time to get that bad boy out of the car.


                    Thought it would be a good idea to remember how the harness is routed.


                    And out... I thought.


                    I hadn't seen this harness routing in any of the write-ups. I was forced to remove some of the ductwork to get the remainder of the harness free.

                    Regardless, it's now out of the car. That was a nasty job to do. I found popping the dash over the steering column to be the biggest challenge. I wonder if dropping the column would make reinstallation infinitely easier?

                    Might as well strip the rest of the interior, right?


                    The tub is in pretty good shape. One hole with a little bit of rust needs to be sealed/welded up. And the passenger side carpet was soaked but overall I'm pleased. Lot of tar to remove but it seems to be progressing.

                    Around then my buddy and his welder showed up. We had lots of issues welding so I will spare him the embarrassment of his welds and show some of the aftermath.


                    He wasn't very happy with it but I think it's workable and it's sealed up which is the most important thing.

                    This weekend I started to remove the trim on the car. That's when the bad happened. Removing the front fender bumper strip, I heard a loud pop from my right knee. Hurts pretty good, can't push off on that leg. Might be a torn meniscus as there is a lot of stuff moving around under my knee cap. I decided to press on with the shadowline trim and when I bent one of the pieces, I decided to admit defeat and press on a later day.


                    So it's going to be interesting. Still have quite a bit to do in order to prep the car for paint. Memorial day weekend is out as I'll be visiting friends and family in Texas so I'm going to have to be efficient in my time, especially if my knee doesn't get any better.

                    But for now, I'm iced up, uploading movies to my server, and feeling pretty good.
                    -Josh

                    Check out my build thread...
                    http://www.r3vlimited.com/board/showthread.php?t=131055

                    Need parts? Support the community!


                    http://www.gutenparts.com

                    http://www.blunttech.com

                    Comment


                      #70
                      amazing build progress, good luck!

                      Comment


                        #71
                        Awsome Li Lan case was going to get one my self what motherboard are you running there? Anyways to the important stuff. Love the car and those wheels are the bomb can't wait to see what they look like on. Wish i had the garage, tools and money to do what your doing keep it up you are great insparation.
                        sigpic

                        Comment


                          #72
                          Originally posted by Massimo View Post
                          Awsome Li Lan case was going to get one my self what motherboard are you running there? Anyways to the important stuff. Love the car and those wheels are the bomb can't wait to see what they look like on. Wish i had the garage, tools and money to do what your doing keep it up you are great insparation.
                          Foxconn A78AX-S if i remember correctly. I had an ASUS board that will now go towards the HTPC asit didn't support windows server 2003 which is what WHS is based on. I struggled forever with that board but had no issues with the Foxconn. Guess i didn't do enough research. Learned my lesson though.
                          -Josh

                          Check out my build thread...
                          http://www.r3vlimited.com/board/showthread.php?t=131055

                          Need parts? Support the community!


                          http://www.gutenparts.com

                          http://www.blunttech.com

                          Comment


                            #73
                            Hope your knee is alright. I had a devastating injury to my r knee, so i always sympathize when it comes to knee injuries.

                            Which trim piece did you bend?
                            turk@gutenparts.com

                            Originally posted by Janderson
                            Properly placed zip ties will hold bridges together.

                            Comment


                              #74
                              Originally posted by BrewCity11 View Post
                              Hope your knee is alright. I had a devastating injury to my r knee, so i always sympathize when it comes to knee injuries.

                              Which trim piece did you bend?
                              It feels pretty good today. I've got most of its range of movement back so hopefully it was just a tendon popping.

                              I bent the trim piece that is along the bottom of the window. If there was one to bend at least i bent one that is supposed to be straight. Since I'm repainting all the trim I should be able to hammer it back into shape. Everything else came off smoothly and when I bent it (and it's just slightly bent) I was smart enough to walk away before i did anymore damage.

                              Thanks for the support though regarding my knee though. :D
                              -Josh

                              Check out my build thread...
                              http://www.r3vlimited.com/board/showthread.php?t=131055

                              Need parts? Support the community!


                              http://www.gutenparts.com

                              http://www.blunttech.com

                              Comment


                                #75
                                this is how write ups should be done.
                                that little 318 is going to be tearing shit up in no time...

                                Comment

                                Working...
                                X