Announcement

Collapse
No announcement yet.

The MR E30 Project Thread - E36 M3 Edition

Collapse
X
 
  • Filter
  • Time
  • Show
Clear All
new posts

    #31
    August 7th, 2020

    Over the past two days I have accomplished a few tasks and invested numerous hours into research for future engine plans.

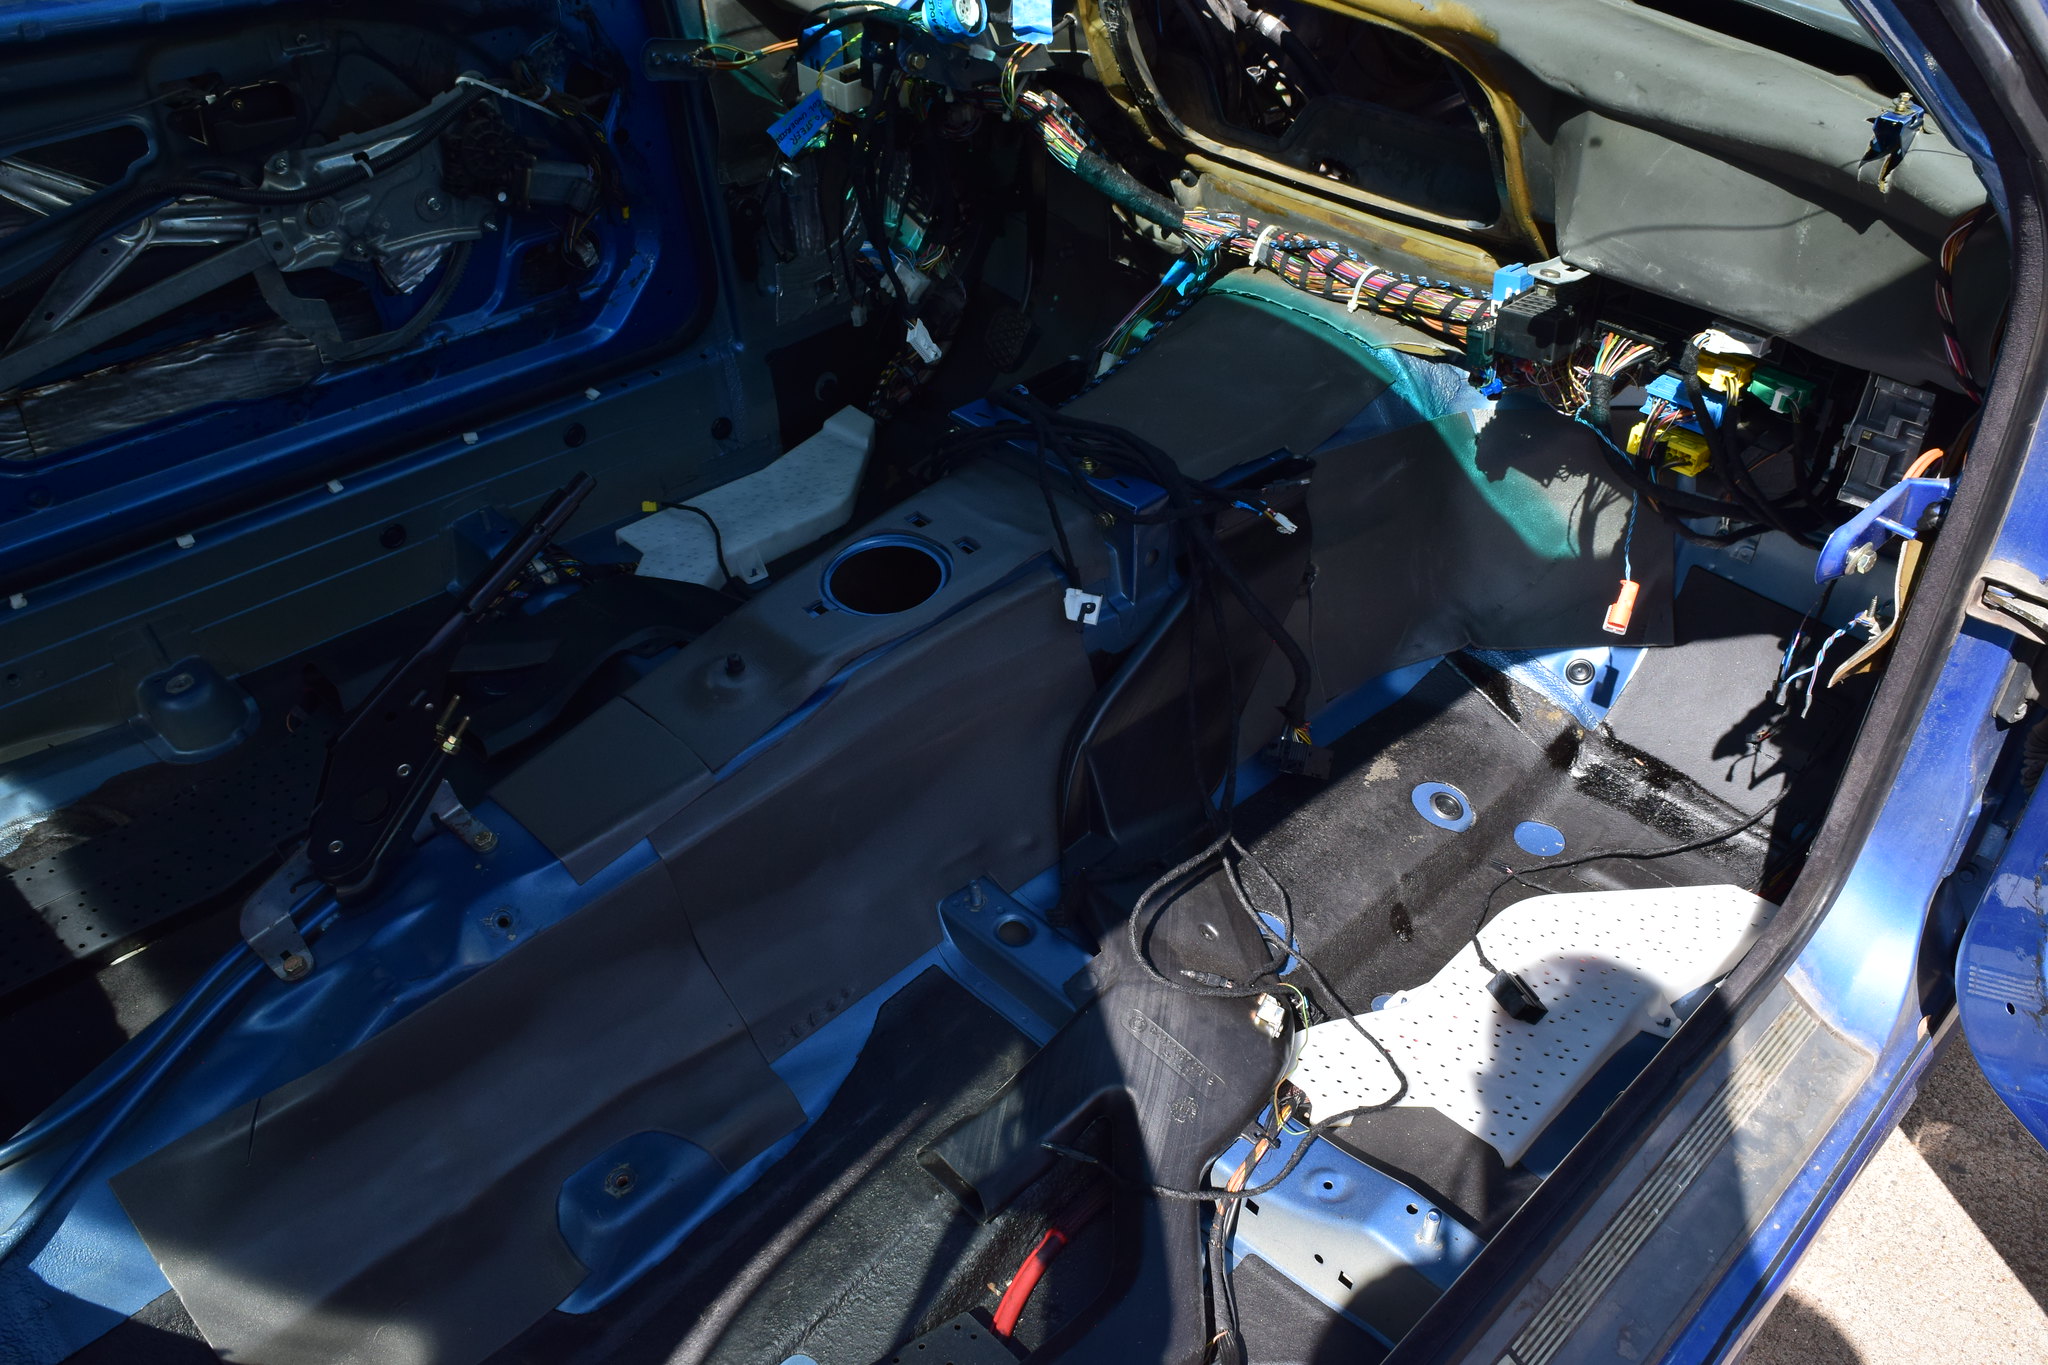
    My Tesa tape arrived, and I was able to wrap all of the interior wiring that I wanted to cover. The stuff works great, is pretty sticky, and really cleans up the wiring by tying it all together.

    The rear seat area was vacuumed, scrubbed, and vacuumed again. I cleaned up and installed the sound deadening mat over the back seat.

    I reviewed how to properly solder and fixed the modified fuel pump wiring by connecting in a piece I pulled from a junkyard car. I need to do the same thing to the cigarette lighter wiring, but realized I won't have enough wire leftover to reach the outlet, so I will cut off another chunk from a junkyard car next time I go out. I need an accelerator pedal anyways, so I have to go back out to snag one.

    I have a ratcheting e-brake handle that got cleaned, lubricated with lithium grease, and installed. Happy to report that the emergency brake functions as intended, and I can now remove the wheel chocks from behind the rear wheels. Small victory, but fun none the less.

    Pulled the rear parcel covering as it needs to be dyed black due to the fact that it is grey, and that is no good for me. One of the PO's enjoyed sound systems (I have a bunch of receipts in my huge stack) and modified the rear shelf by putting weatherstripping around the edges and stuffing a full size towel underneath it. Haha, now I have a new garage towel to destroy.

    Ended today by pressure washing my interior carpet to be dyed. My search for a black coupe carpet is coming up empty, and I need the carpet back in to install the dash, so I will attempt the dying option and see how I like it. Nobody local has any, so I'll be ordering SEM from online.

    I'll spend a lot of time tomorrow prepping all of the dash components for install so they're ready to go when the time comes. I'll focus on the steering column and disassembling and cleaning that as well.

    Approximate Hours Invested in Project Since Purchase: 58
    My previous build (currently E30-less)
    http://www.r3vlimited.com/board/showthread.php?t=170390

    A 2016 Toyota Tacoma TRD 4x4 Offroad in Inferno is my newest obsession

    Comment


      #32
      August 8th, 2020

      A buddy let me know he was going by the local junkyard this morning, so I had him pocket the cigarette lighter wiring for me so I could wrap that repair up.

      It ended up coming out pretty well, definitely an improvement over the multiple connectors it had before.

      01 - Soldered Cig lighter Wiring by Michael Rickerd, on Flickr

      I attempted to make a conduit/pull cord system from the drivers footwell back into the trunk, by following the stock wiring harness to the back of the car. Unfortunately, after finding a piece of conduit small enough to fit beneath the wiring covers pictured above, there was too much friction between the pull cords for the system to work. So I scraped it and I'll try to think of something else before installing the carpet.

      Ordered carpet dye and also ordered some dynaliner for the transmission tunnel. Should arrive this Tuesday.

      Did some research on heater core replacement practices so I can be ready when I order a new Behr heater core from RMEuropean. Figured for 70 dollars I might as well replace it while the heater box is on a shelf. Especially since the part is Behr, which is the OEM. I will throw in a new cabin filter as well at that time.

      Wrapped up the day by cleaning up the steering column. This included cleaning and repairing and wrapping all of the wires for the turn signals, cruise control, and windshield wipers. The column was wiped down and the splined section that mates to the steering knuckle got violently attacked with a bristly brush until it was as shiny as I could make it.

      02 - Shiny Steering Column and Knuckle by Michael Rickerd, on Flickr

      It was rust brown before, due to the dissimilar metal contact between the column and the knuckle.

      Next step is to get the carpet and rear parcel shelf dyed black and then installed so I can begin putting the interior back together. While I wait for that to arrive I think I am going to dive into the passenger door and begin cleaning that up and fixing anything that needs attention so that it can function properly well into the future.

      Approximate Hours Invested in Project Since Purchase: 64
      My previous build (currently E30-less)
      http://www.r3vlimited.com/board/showthread.php?t=170390

      A 2016 Toyota Tacoma TRD 4x4 Offroad in Inferno is my newest obsession

      Comment


        #33
        August 11th, 2020

        Things have still been moving along with the M3, though this is a busy time of year for rental maintenance for me, so a lot of my time has been spent upgrading appliances, doing yard work, painting, things like that.

        Anyways, I thought I found the transmission I need for my engine swap, but learned after researching that it wouldn't work without a lot of new parts, so I am continuing the search.

        My heat insulation pads arrived today and I'll install them tomorrow or Thursday.

        I've been doing a lot of cleaning of parts outside of the car. A lot of the trunk plastic has been shined up right, and I just switched to the heater box. I am working to disassemble the entire thing as far as it will go and fix/clean each piece. The flaps near the blower motor don't slide smoothly, for example, and the blower motor itself doesn't spin as well as I think it should. Linkages are getting cleaned and lubricated for ease of use. It's a fun time diving into this box, as it provides a lot of crucial comfort and I think it's important that it functions as well as it can.

        Dye arrival was postponed til Thursday, so I have to wait a couple more days to see if I can modify the color of the carpet to an acceptable feel.

        Approximate Hours Invested in Project Since Purchase: 68
        My previous build (currently E30-less)
        http://www.r3vlimited.com/board/showthread.php?t=170390

        A 2016 Toyota Tacoma TRD 4x4 Offroad in Inferno is my newest obsession

        Comment


          #34
          August 12th, 2020

          The ‘Let’s Make This Wayyyyy Too Complex’ Steering Column to Interior Firewall Gasket Creation


          As I was tinkering around in the garage working on my heater box, I noticed that the lower bracket that holds the steering column to the firewall has an old, dilapidated foam gasket on the firewall side.

          Instead of trying to find a new gasket online, I figured, let’s make ourselves a new one from scratch. The heat insulation I had just purchased had a sticky side and is very close in thickness to the foam that is on the bracket already.

          So, I grabbed the bracket and plopped it down on a sheet of paper to trace out the gaskets shape.

          One problem. There is a spherical portion of the bracket that bites onto the ball that is on the column, so you can’t get a clean trace of the shape.

          03 - Non Flat Bracket by Michael Rickerd, on Flickr

          Alright, so I’ll try to peel the gasket off and just trace that. Despite my best efforts, this was also not possible, as the gasket was too frail and simply disintegrated as it was being pulled off.

          So my brain started going, thinking I was going to have to square the bracket to my camera lens, snap a photo, upload it to AutoCAD, get a reference dimension, scale and then trace the image, print out the lines on a piece of paper and then finally transcribe that to the foam.

          But as I was thinking through all of this It occurred to me that if I can simply get an accurate hole in the new gasket that corresponds to the spherical portion of the bracket, I would then be able to effectively trace the shape.

          So, I head into the kitchen and I find a set of perfectly round cookie cutters of all sizes. And lo and behold, one of the rounds is precisely the right size. With a word of caution from my wife about not getting it greasy, I take it out to the garage and transfer it to the foam.

          04 - Round Template by Michael Rickerd, on Flickr

          Transfer that round to the insulation, X-Acto knife it out, and place the insulation on the bracket, which is now flush and easily traceable. Trace around the outside and get to cutting.

          After a few minutes you have created a new gasket

          05 - Finished Product by Michael Rickerd, on Flickr

          Is it perfect? Not really, you can definitely tell it wasn’t cut by a machine. Is it worth it? Arguable, as nobody will ever know that this was done when looking at the car. But hell, I’m somebody, and I know, so screw it. Is it better than it was before? You bet, and I suppose that’s all we can really do. Attempt to put some time and effort into things to make them just a bit better than they were initially.

          To me, it was a fun mini project. The exact type of thing I am looking at doing with this car.

          I am working through a very definitive heater box teardown and reassembly, so hopefully it goes well, but that will be my next big post after the carpet gets dyed.

          ‘til next time.

          Approximate Hours Invested in Project Since Purchase: 69 (nice)
          My previous build (currently E30-less)
          http://www.r3vlimited.com/board/showthread.php?t=170390

          A 2016 Toyota Tacoma TRD 4x4 Offroad in Inferno is my newest obsession

          Comment


            #35
            This thread delivers!

            Comment


              #36
              Originally posted by mike.bmw View Post
              This thread delivers!
              Thanks Mike! It's a bit slow relative to some epic threads that R3v has had, but I am purposefully taking this thing slow, so thanks for sticking by.
              My previous build (currently E30-less)
              http://www.r3vlimited.com/board/showthread.php?t=170390

              A 2016 Toyota Tacoma TRD 4x4 Offroad in Inferno is my newest obsession

              Comment


                #37
                August 13th, 2020

                A visit from the local USPS driver around 11 this morning brought with it a surprise box of goodies that I had recently ordered. It was time to change the color of the carpet and see how it turns out!

                But first, here is a picture of the heat insulation I added to the transmission tunnel. I added it in areas of the transmission tunnel that had lower levels of backside foam on the carpet. Not attempting to go overkill here and cover every square inch of the interior, I would just like to help mitigate some heat if possible.

                06 - Trans Tunnel Heat Insulation by Michael Rickerd, on Flickr

                The insulation was easy to work with and easy to cut/shape. It has high levels of stickiness, so it stayed planted where it was placed. One thing I noticed is that I couldn’t get too aggressive with rubbing it into the crevices/nooks of the chassis, so I swapped from a rubbing motion to more of a dab and press motion to get it into the gaps. Remember to only pull a small portion of the backing off at a time and work it down/over into all the grooves as you go.

                With that small task out of the way it was time to try out this color modification.

                This is the stuff I purchased from Amazon.

                07 - Carpet Dye by Michael Rickerd, on Flickr

                It states that it covers 7 sq. ft, but that is a vast compliment for these cans. 3 sq. ft would be much more accurate.

                Shake those cans up and set up your well ventilated work area. I used a cindery area near my garage. Grabbed a pad to kneel on, a blanket for underneath the carpet, the paint (with handy paint sprayer attachment), shopvac for cleaning as you go, and a nylon brush to work the paint into the fibers as you spray.

                08 - Dye Station Setup by Michael Rickerd, on Flickr

                The color out of the cans initially came out very grey, and I was concerned that it wasn’t the ‘black’ (a very easy color to create IMO) that the can said it was, a complaint I had read about in online reviews. You can see here that it doesn’t appear to be super dark, which is what I was after.

                09 - Partially Dyed by Michael Rickerd, on Flickr

                However, it didn’t feel bad to the touch. I couldn’t really discern a difference, except a minute one, between dyed and undyed portions of the carpet. I was excited about this, as my hunt for a black coupe carpet was still turning up empty.

                Also, the paint darkened as it dried, which was a nice plus.

                The key here is to work slowly, spraying a small section and then working it into the fibers with the brush, though not too aggressively as I found out early. Thankfully, I had the foresight to start on unseen sections (i.e. under the heater box, under where the floor mats will be, and under the seats) so I learned as I went along, before doing the more visible sections like the sides of the trans tunnel (an area that you will always see).

                I figure, once seats are in, the center console and dash, and the floor mats, any differences in color due to how hard I scrubbed or how long it had been since I sprayed will be broken up and difficult, if not impossible, to see. However, this is speculation, so time will tell once I begin reassembly.

                After a long couple of hours, you end up with this:

                10 - Fully Dyed by Michael Rickerd, on Flickr

                It’s pretty uniform throughout, though the picture highlights different shades on the carpet, but I think this is a by-product of the brushing aspect of this modification.

                As of now, I am pleased with it. I will let it bake in the sun the rest of today and tomorrow morning, and I’ll get it into the car sometime tomorrow afternoon.

                After that it is time to get this heater box all spruced up.

                Ah, I ran by the local junkyard today and was able to grab more black interior plastic pieces that my M3 either didn’t come with or were damaged in some way. My JY does not value interior bits that much as I walked out with (4) speaker covers, knee bolster, and some trunk trim for $10.70. Plus all of the little clips and bolts and nuts that I could get my greazynux on, of course. These parts will get cleaned up and put on the shelf for later.

                ‘til next time.

                Approximate Hours Invested in Project Since Purchase: 74
                My previous build (currently E30-less)
                http://www.r3vlimited.com/board/showthread.php?t=170390

                A 2016 Toyota Tacoma TRD 4x4 Offroad in Inferno is my newest obsession

                Comment


                  #38
                  August 14th, 2020

                  The carpet is back in! Had to look at some old photos to figure out where all of the wiring popped through the carpet, but it wasn't too bad. Not having an engine in the way let me stand in the engine bay and pull on the carpet through the hole for the heater box to get it in place with ease.

                  It looks better in the car, and i'ts good to have the floor covered up so I can move on to the next thing.

                  Speaking of that, I tore down the heater box, documenting each step as I went. It took a few hours to do this, and another two hours and 3600 words to write up the tear down portion of the how-to guide. I'll host that on Bimmerforums in the E36 subsection, as that makes the most sense, but I will link to it here in this thread in case any of you care to check it out.

                  Ordering parts from RMEuropean now, and I'll get to cleaning all of the heater box components tomorrow.

                  I'll also prep and recolor the rear parcel shelf tomorrow to get that, along with the black speaker covers I found at the JY, reinstalled in the interior.

                  While I am waiting for the heater core to arrive I will begin working on the trunk. I originally said I would dive into the doors next but I changed my mind.

                  'til tomorrow.

                  Approximate Hours Invested in Project Since Purchase: 81
                  My previous build (currently E30-less)
                  http://www.r3vlimited.com/board/showthread.php?t=170390

                  A 2016 Toyota Tacoma TRD 4x4 Offroad in Inferno is my newest obsession

                  Comment


                    #39
                    August 17th, 2020

                    The heater box has been fully disassembled and cleaned. One of the hinge components for the passenger side blower motor door was cracked, so I need to go to the JY and find a replacement from one of the (3) E36's they have. Parts were ordered and should arrive later this week. The write-up should be done soon after the parts arrive.

                    In the meantime I was able to get the rear parcel shelf changed to black, install the black speaker covers I found, and clean and install the C-Pillar covers after cleaning and rewrapping the wiring for the C-Pillar lights inside the car. It looks much much better back there now.

                    Haven't spent nearly as much time with the M3 this past week, as I rode my mountain bike 81 miles in 7 days.

                    I'll keep pulling parts out of the trunk and cleaning them so I can tackle the refurbishing of the trunk space.

                    Been taking it slow, which I am still finding to be an enjoyable way of doing things.

                    Approximate Hours Invested in Project Since Purchase: 84
                    My previous build (currently E30-less)
                    http://www.r3vlimited.com/board/showthread.php?t=170390

                    A 2016 Toyota Tacoma TRD 4x4 Offroad in Inferno is my newest obsession

                    Comment


                      #40
                      Take it at the pace you want. I've been telling my friends "car will be running this weekend" for the last 3 weekends, but its still not there. I dont want to skip steps or cut corners so they will just have to wait haha
                      Simon
                      Current Cars:
                      -1999 996.1 911 4/98 3.8L 6-Speed, 21st Century Beetle

                      Make R3V Great Again -2020

                      Comment


                        #41
                        Originally posted by 2mAn View Post
                        Take it at the pace you want. I've been telling my friends "car will be running this weekend" for the last 3 weekends, but its still not there. I dont want to skip steps or cut corners so they will just have to wait haha
                        Exactly. I've cut wayyy too many corners in my days.
                        My previous build (currently E30-less)
                        http://www.r3vlimited.com/board/showthread.php?t=170390

                        A 2016 Toyota Tacoma TRD 4x4 Offroad in Inferno is my newest obsession

                        Comment


                          #42
                          August 18th, 2020

                          My comprehensive How-To guide for the E36 heater box refresh has finally been completed! You can find it linked on Bimmerforums below:

                          https://www.bimmerforums.com/forum/s...0#post30533060

                          With that out of the way (for now, box still needs reassembled after heater core shows up), I'll be spending a good chunk of today on continued cleaning of the trunk space.
                          My previous build (currently E30-less)
                          http://www.r3vlimited.com/board/showthread.php?t=170390

                          A 2016 Toyota Tacoma TRD 4x4 Offroad in Inferno is my newest obsession

                          Comment


                            #43
                            August 18th, 2020 Round 2

                            After finishing up the guide linked above I was able to spend several more hours working on the M3.

                            A lot of boring stuff happened, like reorganizing things on the garage shelves so I could finish pulling parts out of the trunk. Then it was onto cleaning those parts pulled out of the trunk and stashing them on the emptied shelf space.

                            I took some Rust-Oleum 2x Flat Black paint to the windshield wiper arms in my very professional painting setup.

                            10 - Painted Wiper Arms by Michael Rickerd, on Flickr

                            I grabbed an extra grey center console piece that is too damaged to be reused and I hit it with the same flat black paint as the wiper arms and compared it to the OEM black piece in the picture below and was satisfied with the match. The photo after the first coat looks close, but after a second coat it looked much better in real life. So I have this alteration figured out.

                            11 - Rustoleum 2X Flat Black Comparison by Michael Rickerd, on Flickr

                            I touched up some of the black interior pieces I snagged from the JY to give them a nice fresh sheen. Worth the effort.

                            I found this firewall insulation in the trunk and I need to determine what to do with it, as it is too cracked, and literally crumbling apart, to simply reinstall. Any ideas? I figured I'd peel the crumbly bits off and attempt to source a new piece of shielding to attach to the metal backing.

                            12 - Engine Heat Shield by Michael Rickerd, on Flickr

                            With all of that out of the way it was finally time to jump into the now empty trunk.

                            Started out by vacuuming it out and pulling off all of the old wiring tape. Found some electrical taped tubing for the trunk to trunk lid wiring. Pulled all that off.

                            13 - Butchered Trunk Wiring by Michael Rickerd, on Flickr

                            This was the initial condition of the trunk.

                            14 - Trunk Condition Right by Michael Rickerd, on Flickr

                            15 - Trunk Condition Left by Michael Rickerd, on Flickr

                            Nothing out of the ordinary, just dirt and some small bangs and bumps. I bet the trunk was used without any carpeting of plastic pieces (this is how the car was sold to me) by the previous one or two owners and whatever was thrown back there just bounced around.

                            Got that all cleaned up and all of the wiring retaped like everywhere else on the chassis. It looks much better now, though I will have to visit the JY again, probably tomorrow, to pick up a few missing trunk plastic pieces that I want, including the battery tray shelf. After I get those I can put back together most all of the trunk for now and get all of that stuff off of my shelving.

                            One issue I did notice involved what I believe to be a battery acid spill, as the paint is completely gone, and this is located right next to where the battery lives.

                            16 - Battery Acid Damage by Michael Rickerd, on Flickr

                            It is just surface rust, so for now I am going to sand the rust away and then clear coat the area to keep it protected. This part of the trunk gets covered by a plastic piece, and I don't feel like addressing any paint issues right now (the exterior will require a lot of attention one day), so I'll clean it, protect it, and leave it be.

                            My new heater core arrives tomorrow so I'll be able to get the heater box put back together. I'll have to do another order for trunk shocks and a trunk gasket soon as well.

                            Approximate Hours Invested in Project Since Purchase: 91
                            My previous build (currently E30-less)
                            http://www.r3vlimited.com/board/showthread.php?t=170390

                            A 2016 Toyota Tacoma TRD 4x4 Offroad in Inferno is my newest obsession

                            Comment


                              #44
                              I’m glad I didn’t keep track of my hours. Yikes! Lol
                              Simon
                              Current Cars:
                              -1999 996.1 911 4/98 3.8L 6-Speed, 21st Century Beetle

                              Make R3V Great Again -2020

                              Comment


                                #45
                                Originally posted by 2mAn View Post
                                I’m glad I didn’t keep track of my hours. Yikes! Lol
                                No kidding. After I tallied the cost of parts for my last E30, and compared it to what I sold it for I was pretty sad.

                                Yet here I am again, tracking time as well this time around. Guess I'll never learn!
                                My previous build (currently E30-less)
                                http://www.r3vlimited.com/board/showthread.php?t=170390

                                A 2016 Toyota Tacoma TRD 4x4 Offroad in Inferno is my newest obsession

                                Comment

                                Working...
                                X