
I'm cross positing this from another forum but even though it's no E30, I figured you guys might like it. Also Mods, move if you want to.
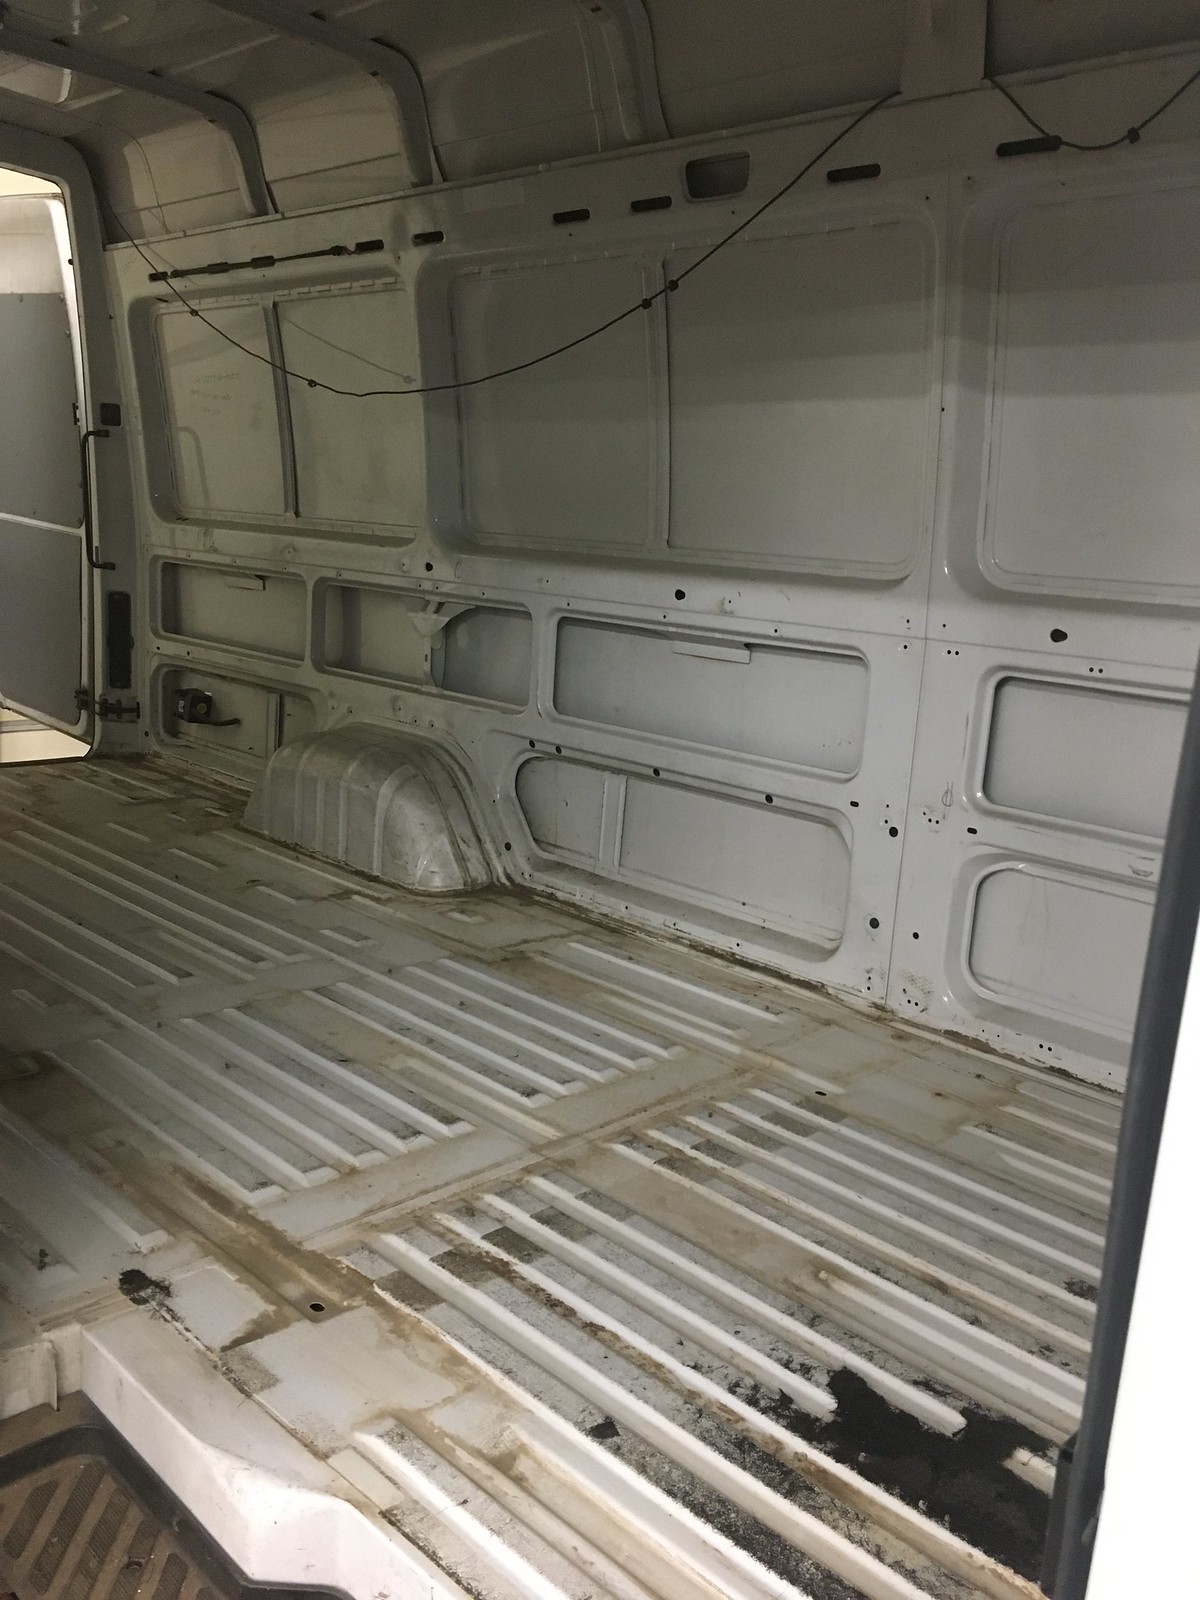
I'm quite a ways along with this project. TL;DR it went from this:
 Untitled by Nick Smith, on Flickr
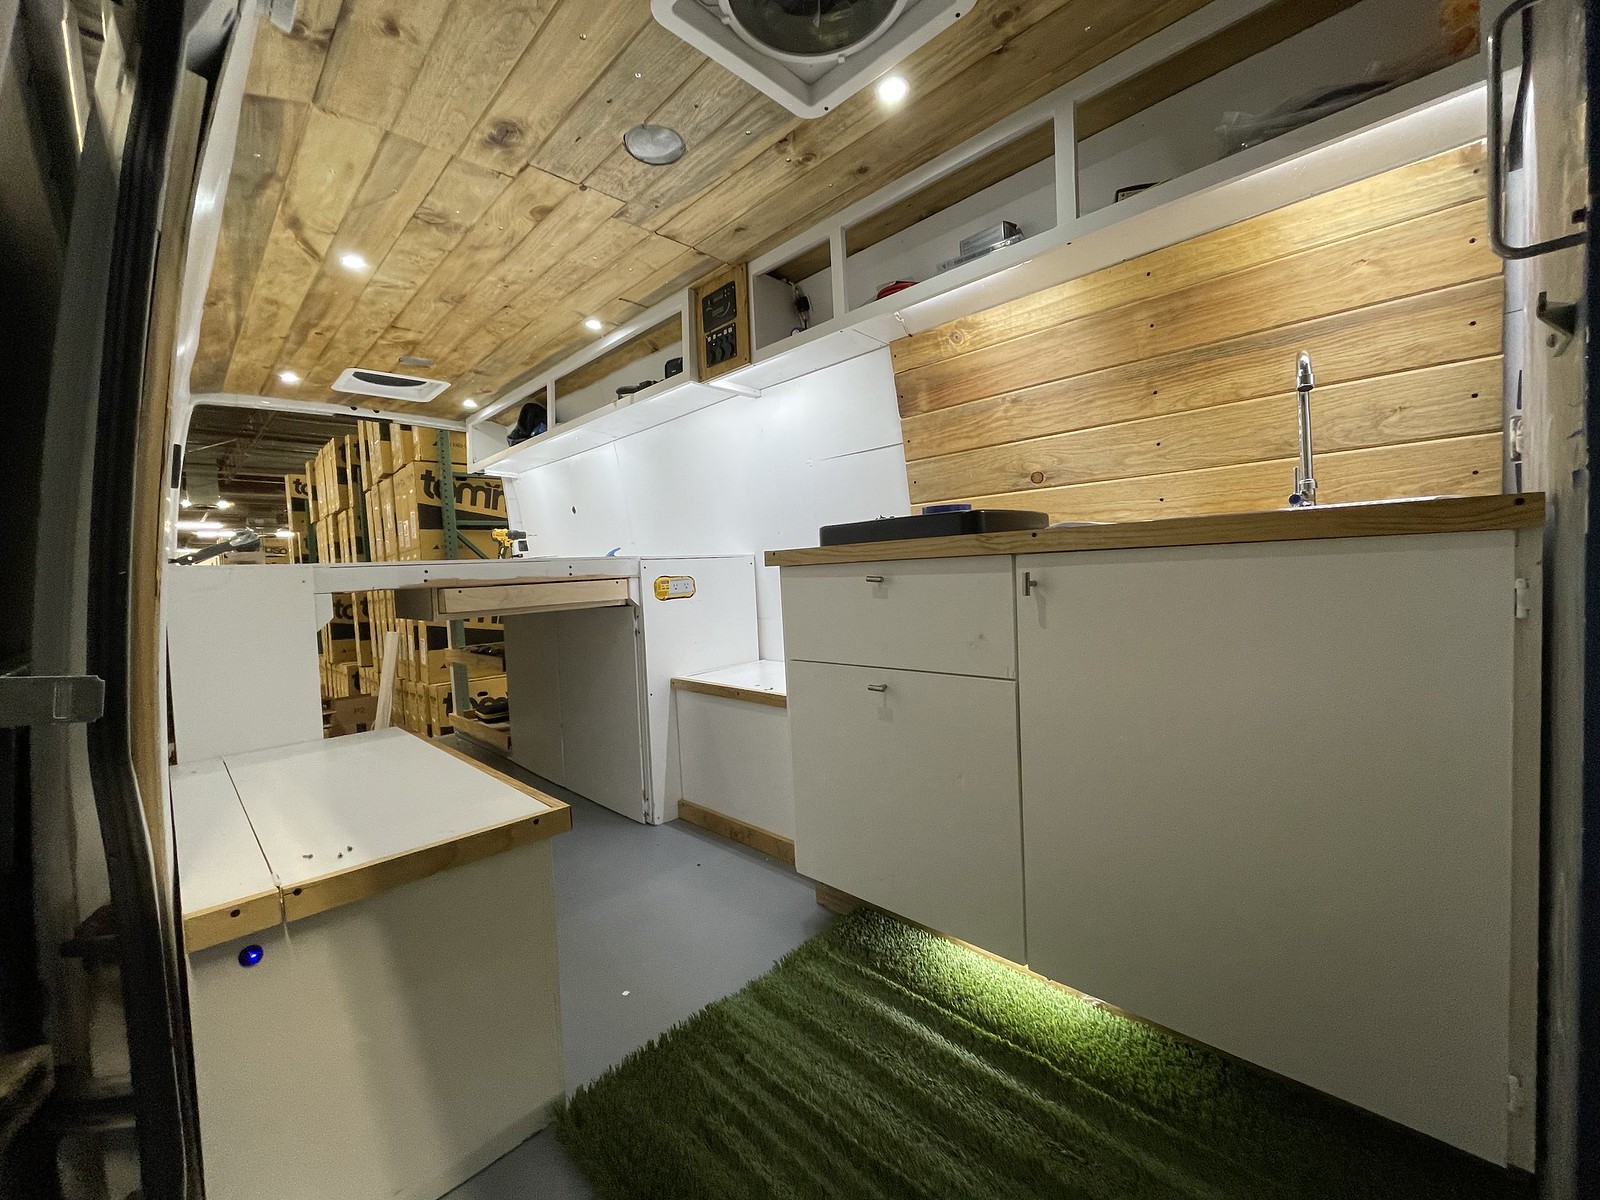
To this:
 Untitled by Nick Smith, on Flickr
Read on if you're interested...
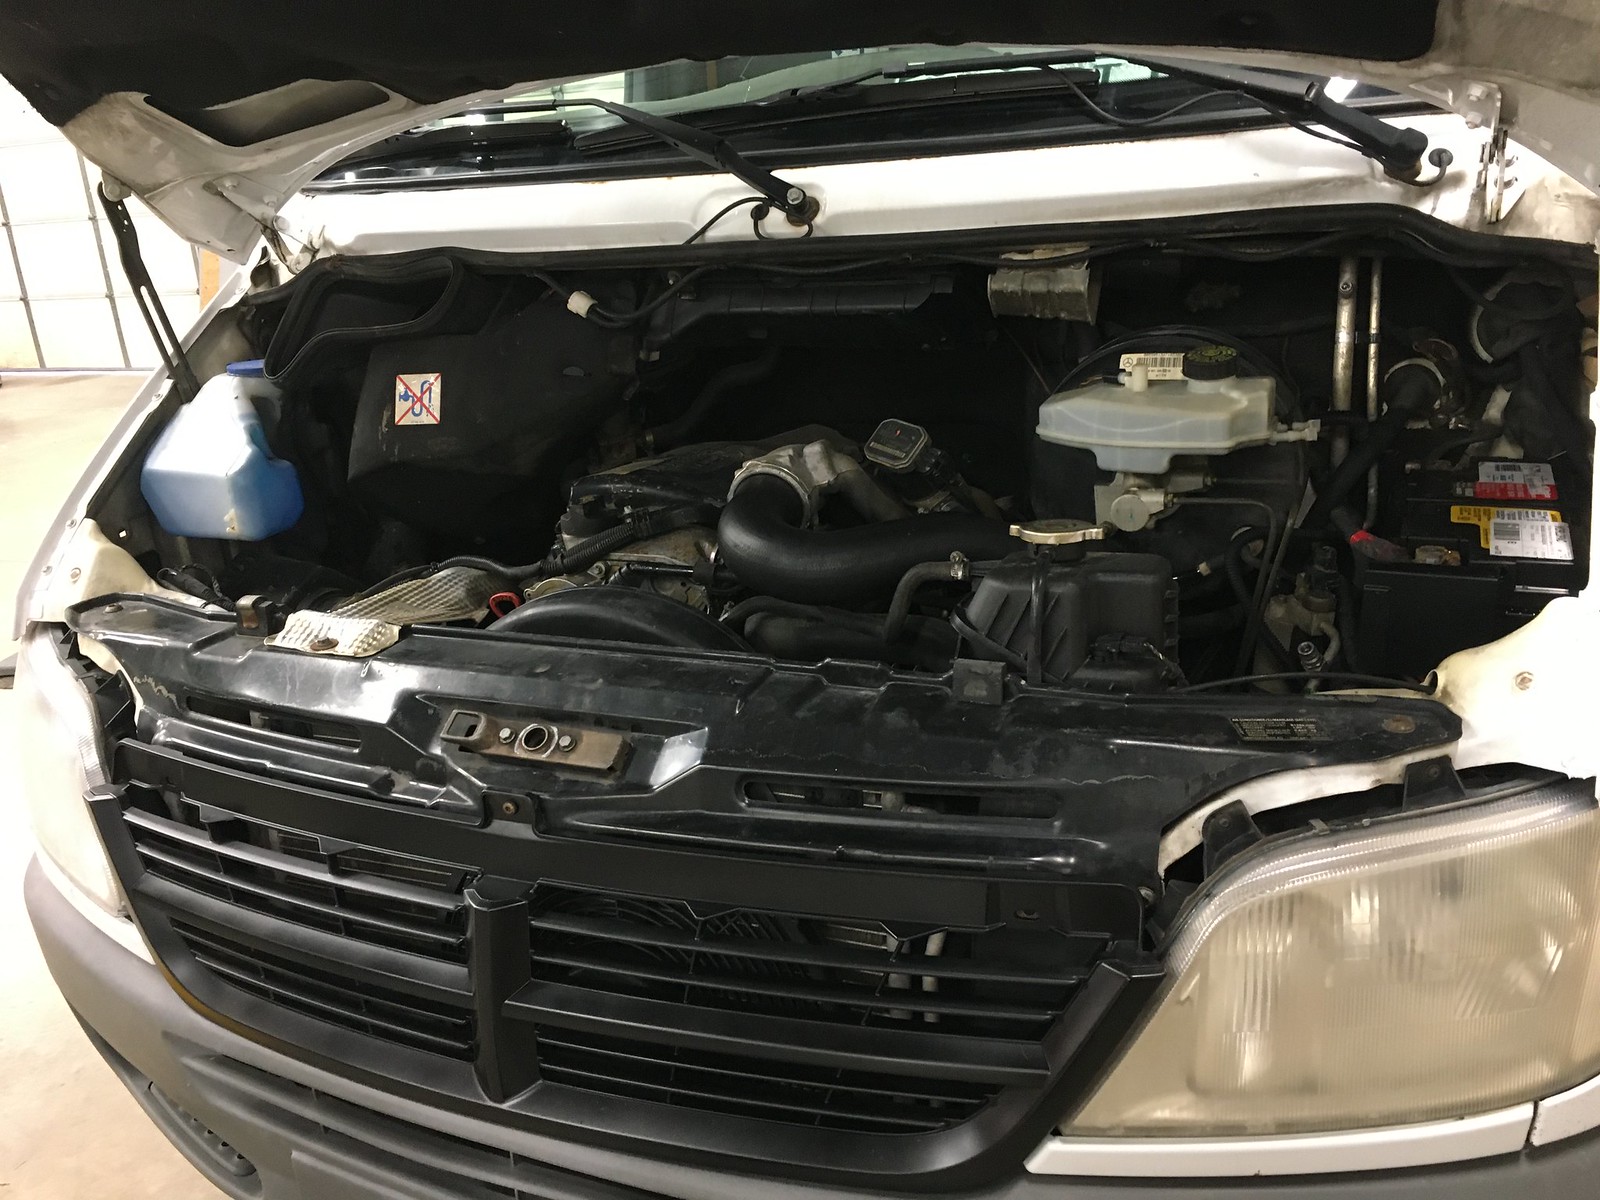
Welcome to Nick’s Covid/Quarantine/Lockdown/Winter project. It’s a 2005 Dodge 2500 Sprinter with the legendary Mercedes diesel engine, albeit with 336K miles. A bit of back story first: I started at my current job which is a fairly small, consumer direct, mostly Amazon based bicycle /cycling brand a little over 5 years ago. When I started they had just bought an old FedEx van to use for….I really have no idea why they bought it. For the last 5 years it’s been used mostly to help the half of dozen of us who work there move a few times and then sat for 2 years before someone tried to steal it by ramming a screwdriver in the ignition which didn’t work but rendered it immobile. Then a few months later someone tried to “syphon” gas from it by stabbing the gas tank with a screwdriver a few dozen times. Fast forward to October and I'm in charge of fixing it so we can sell it. I have it towed to a Mercedes repair shop where $6500 later it was repaired. New ignition, gas tank, fuel pump, glow plugs, a tire, a few intercooler hoses and a battery later, it was repaired. The shop noted it was in exceptional condition for its age and mileage and I suppose being a FedEx fleet vehicle meant they fixed any and everything that went wrong.
We get the van back and I start cleaning it up to sell it and my boss walks by and sort of kiddingly says “we should turn this into a camper van!”...my brain immediately goes into project mode and starts thinking of every camper van build I’ve drooled over for the last number of years. I have wanted to build out a sprinter van for YEARS. Living in Colorado and regularly recreating in the mountains means every other car on the road is either a Subaru, or a camper van. We chat about it with the group and he asks if anyone but myself would use it...the other 5 dudes all say hell yea they would! I'm an avid BMX/MTB rider, one of the other guys is huge into backpacking and climbing and everyone ski’s regularly and just loves the mountains and camping. So my boss gives me the green light and a very loose $7500 budget for the build. I’m so stoked, I get to finally build a van! Best yet, is it’s not my money I’m spending and not my own vehicle I’ll be cutting holes all over! It’s a blank slate with a modest budget and learning tool for if/when I do my own as well as something to keep my hands busy in the winter months. I’ve got detailed spreadsheets with links and quantities for everything I’ve bought from the battery to the amount of lumber needed, and the amount of screws I’ve bought. I should also say I’m extremely fortunate in that I get to work on this while I’m at work as well as have 24hr access to the large, heated warehouse space I have to work in. Very thankful for this!
With all that being said let's get to the project!
DISCLAIMER:
I am NOT a carpenter, I am NOT an electrician, I am NOT a professional mechanic...but I do have some know how, an imagination and Google so here we go!
I should note, I started this like a month and half ago but initial progress was slow and wanted to wait till I had a fair amount of progress done before I shared.
Goals of this project is to create a multipurpose, 3...maybe 4 season, all in one camper shared amongst a few people. This isn’t going to be one of those insane vans with a shower, tv, toilet etc. It’s going to be relatively basic with ample solar power to charge devices, run all sorts of lights, a small sink, camp stove, plenty of ventilation and be a warm, dry, secure place to park anywhere out in the mountains. It’s starting out as bare bones as can be. Stout engine/trans but very little in the way of options. No stereo, no cruise control...nothing. Has A/C but probably still needs service.
Blank and I mean BLANK slate. It does already have two 12v ceiling lights installed with a switch at the front and back doors, those will be staying. Being an ex FedEx van it has a hefty lockable bulkhead door that we decided to keep. 1. To make it more secure 2. To help keep the van temp manageable. First order of business I took it to a carwash and washed the outside and the engine. Once back I pulled and painted the grill from a horrible faded chrome, to a nice satin black.
 Untitled by Nick Smith, on Flickr
 Untitled by Nick Smith, on Flickr
 Untitled by Nick Smith, on Flickr
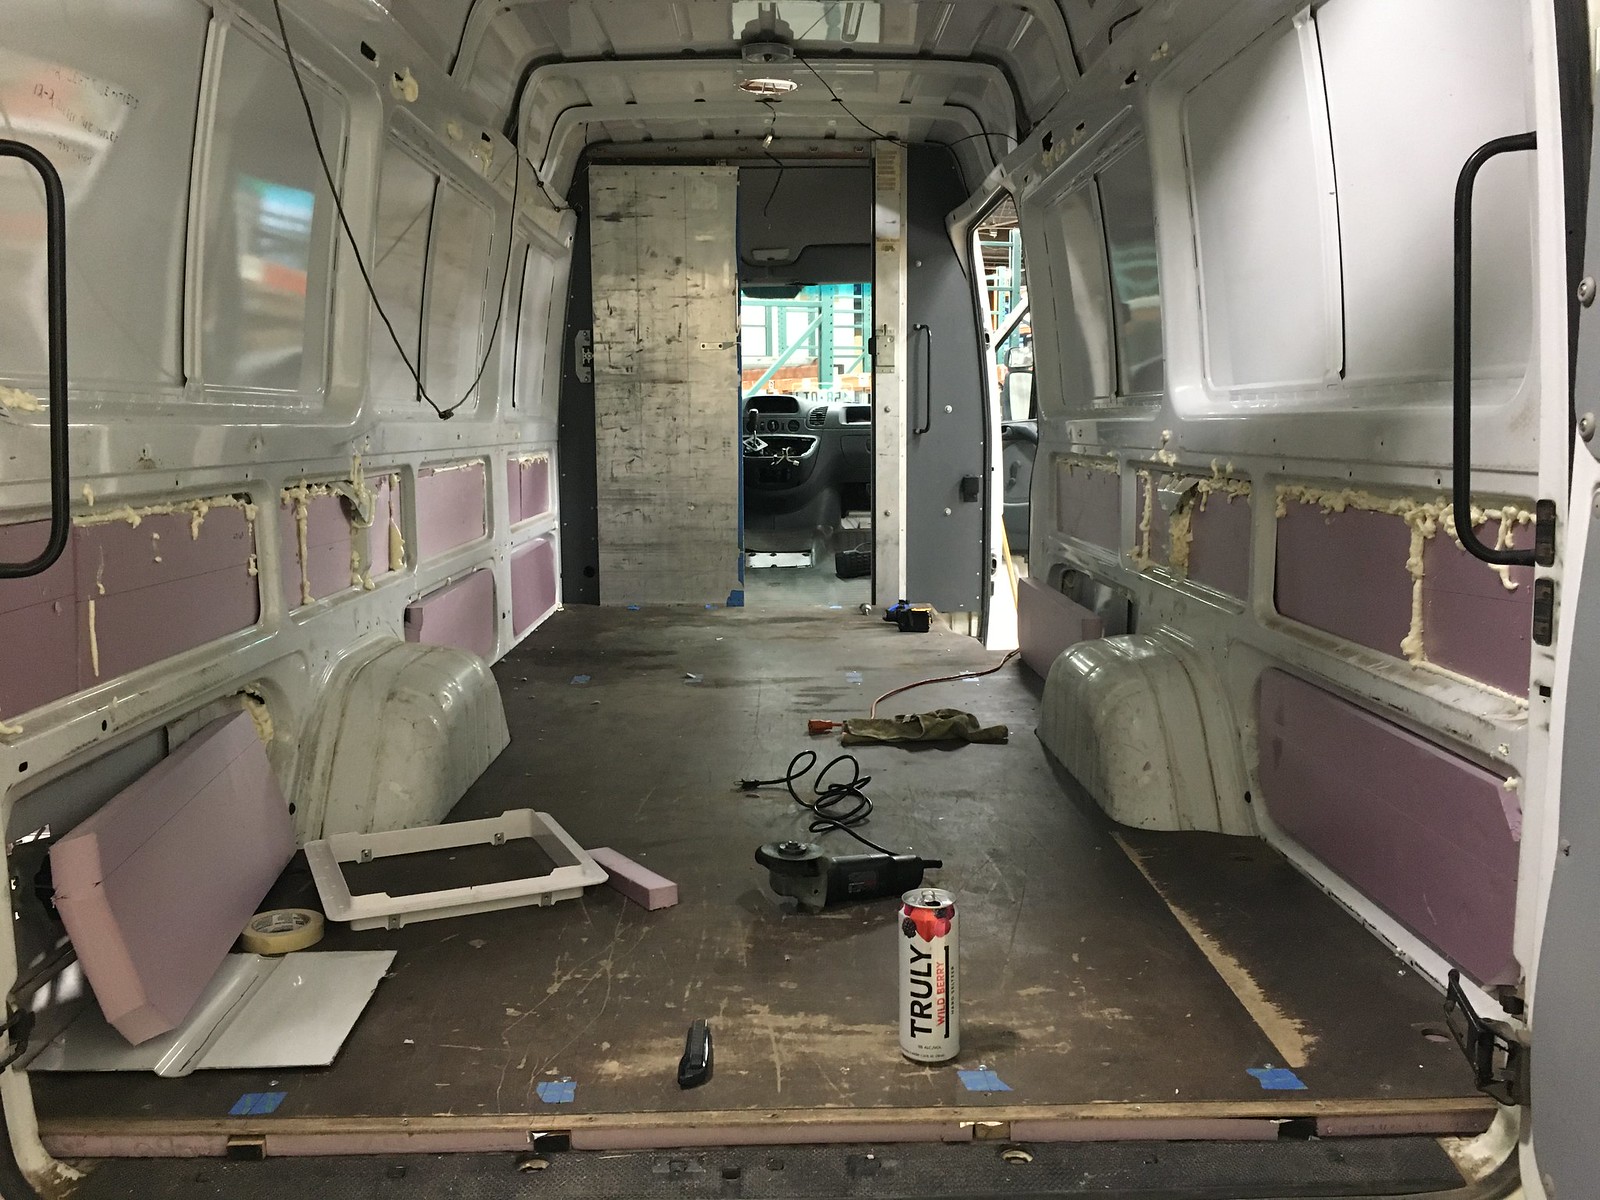
I started the interior off by pulling up the floor. It already has a perfectly cut out floor made from some sort of composite wood, masonite or something so I drilled the rivets out and pulled it up to save for later. No sense in throwing away a perfectly cut template.
From here the van was down to bare sheet metal so I swept it out and wiped all the walls with a heavy concentrate of simple Green to get rid of 15 years of cargo van duty dirt.
Untitled by Nick Smith, on Flickr
What I’m left with is a few wires for the old crappy fan that's getting replaced with a MaxxAir and the backup camera I’m replacing as well...so I pulled them all out and pulled the fan out.
I decided to insulate the floor with 1in owens corning foam board. To do this I ran a few 1X2 boards front to back in the van to give it some sort of frame to build off and attach things too. After checking under the van to make sure I wasn’t about to screw into the fuel tank or a brake line, I ran a handful of self tapping metal screws through the boards to secure them to the floor.
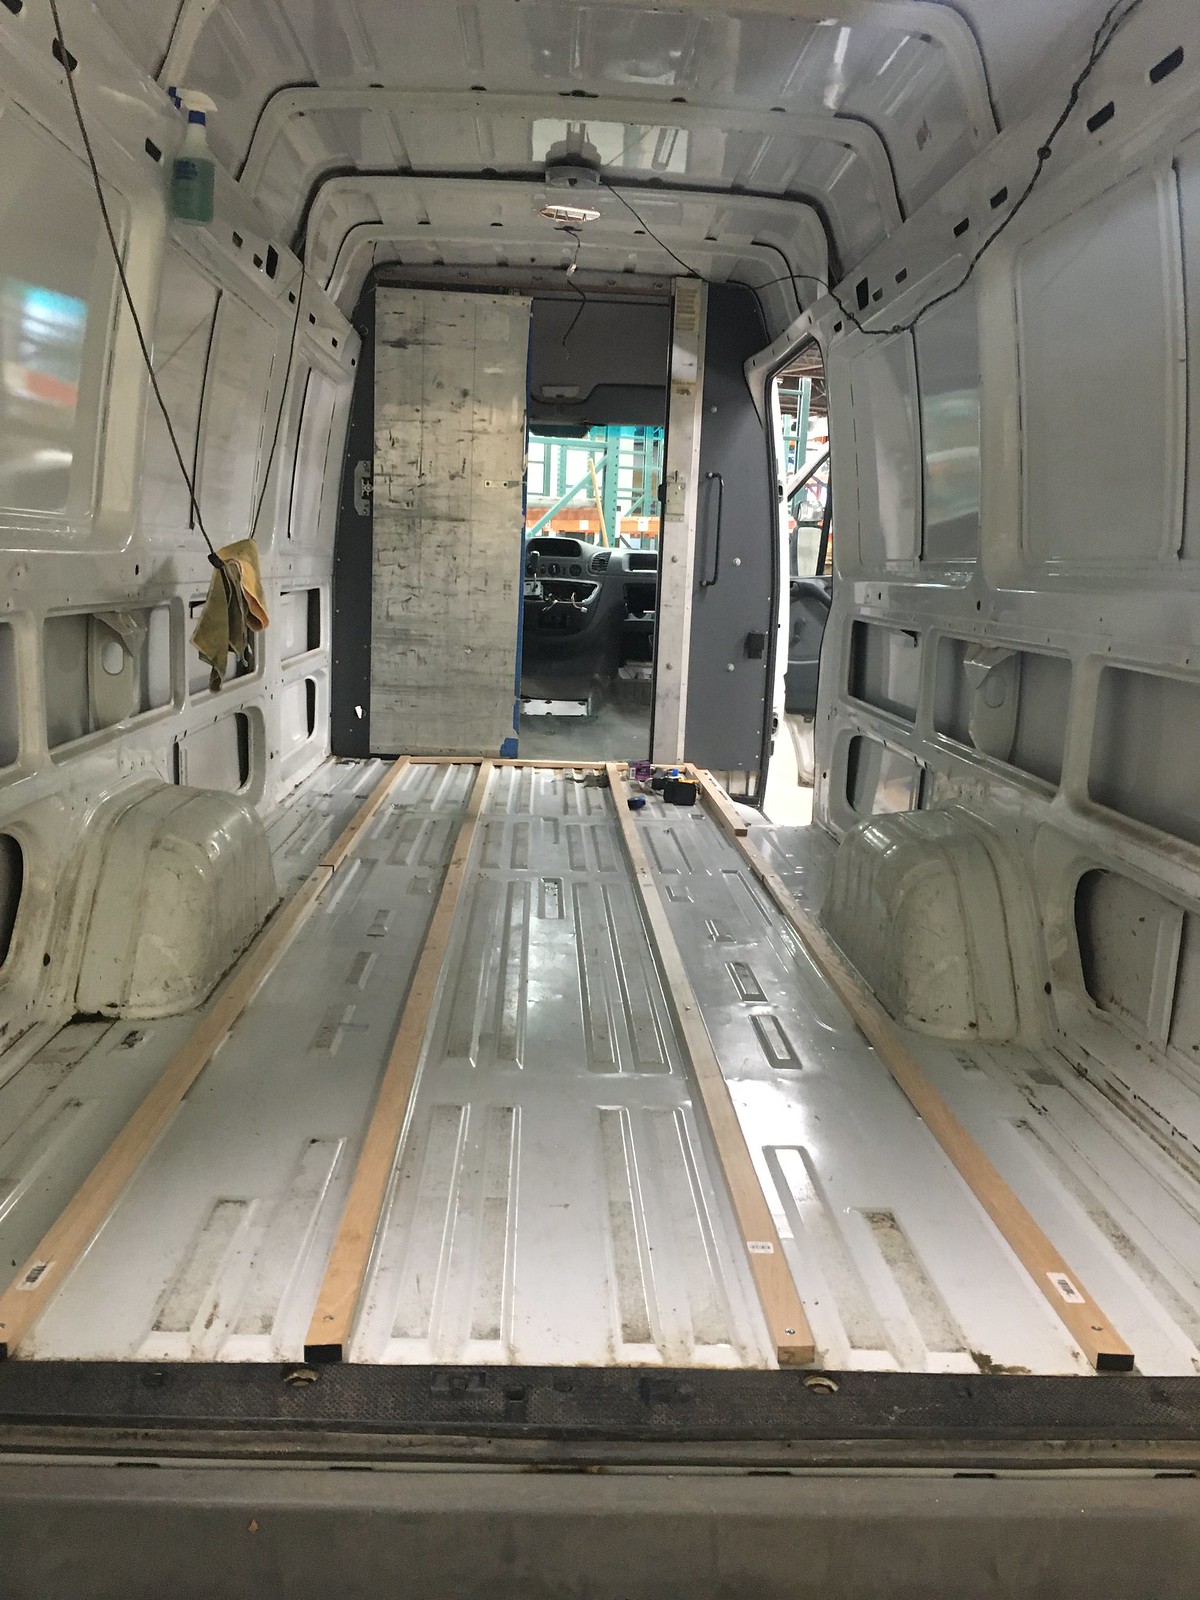 Untitled by Nick Smith, on Flickr
After this I cut the insulation to fit between them and finished it off with some insulation tape
 Untitled by Nick Smith, on Flickr
With the floor insulation and “framing” done, I put the original floorboard I mentioned earlier back in and screwed it to the wooden boards now on the floor. With that done, the floor is complete unless I decide to put a laminate down or something. Having this perfectly precut floor saved me hours of trimming and cutting. It’s probably 1/8in thick hardboard so I may end up just painting it and calling it a day.
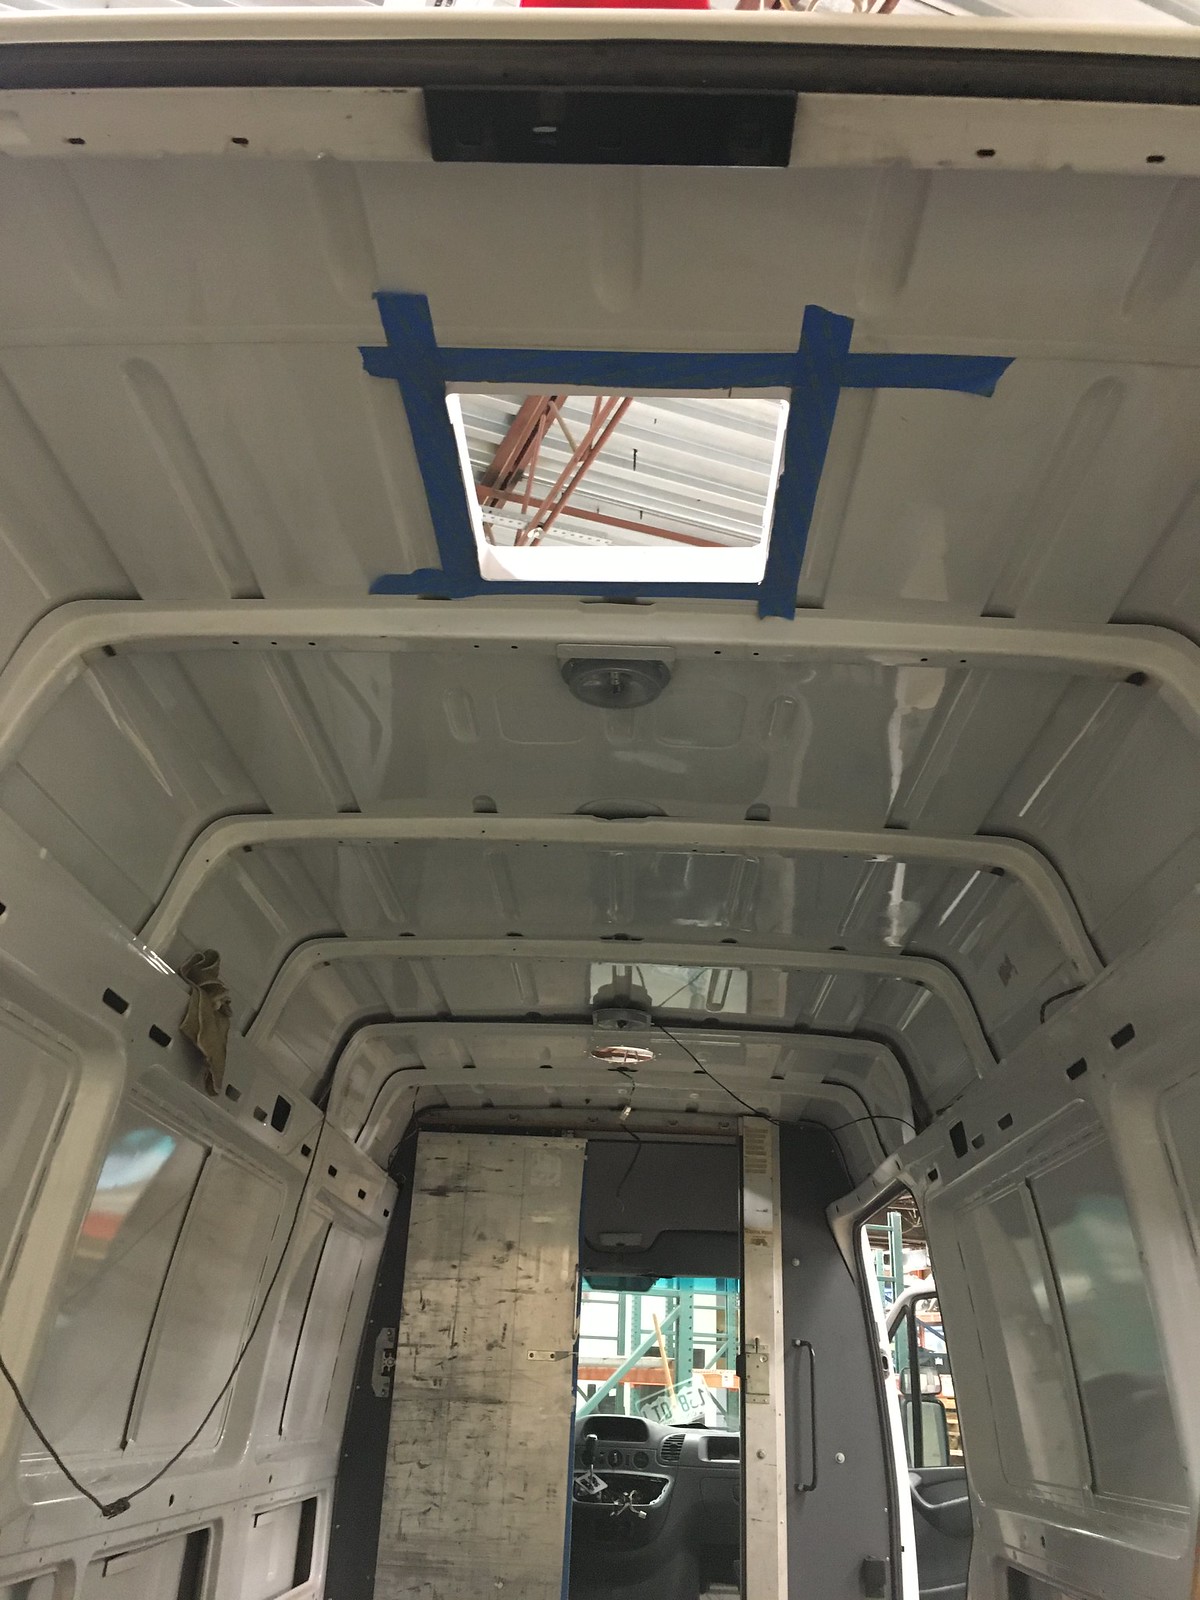
I was really eager to cut some holes in this thing for some reason. First up was going to be the opening for the rear fan. The van is going to have two fans, one intake, one exhaust. The rear is the top of the line MaxxAir remote controlled fan with auto open and close and a like 12 optional speeds. I wanted it to be as far back as possible to create as much air flow as I could since this currently has no windows… I marked the template and cut the 14in opening from the inside. Although the only place to cut in the rear was over one of the ribs on the roof so I put a 2X4 under it wedged to the floor , heated it and pounded it flat. It was also around this point I realized I had basically no idea what I was doing.
 Untitled by Nick Smith, on Flickr
 Untitled by Nick Smith, on Flickr
One of my best friends converted an almost identical van a few years back and another friend lives full time in a van in Steamboat Springs, CO so I had some long chats with them before I went much further...even though I still have little clue what this will actually entail….
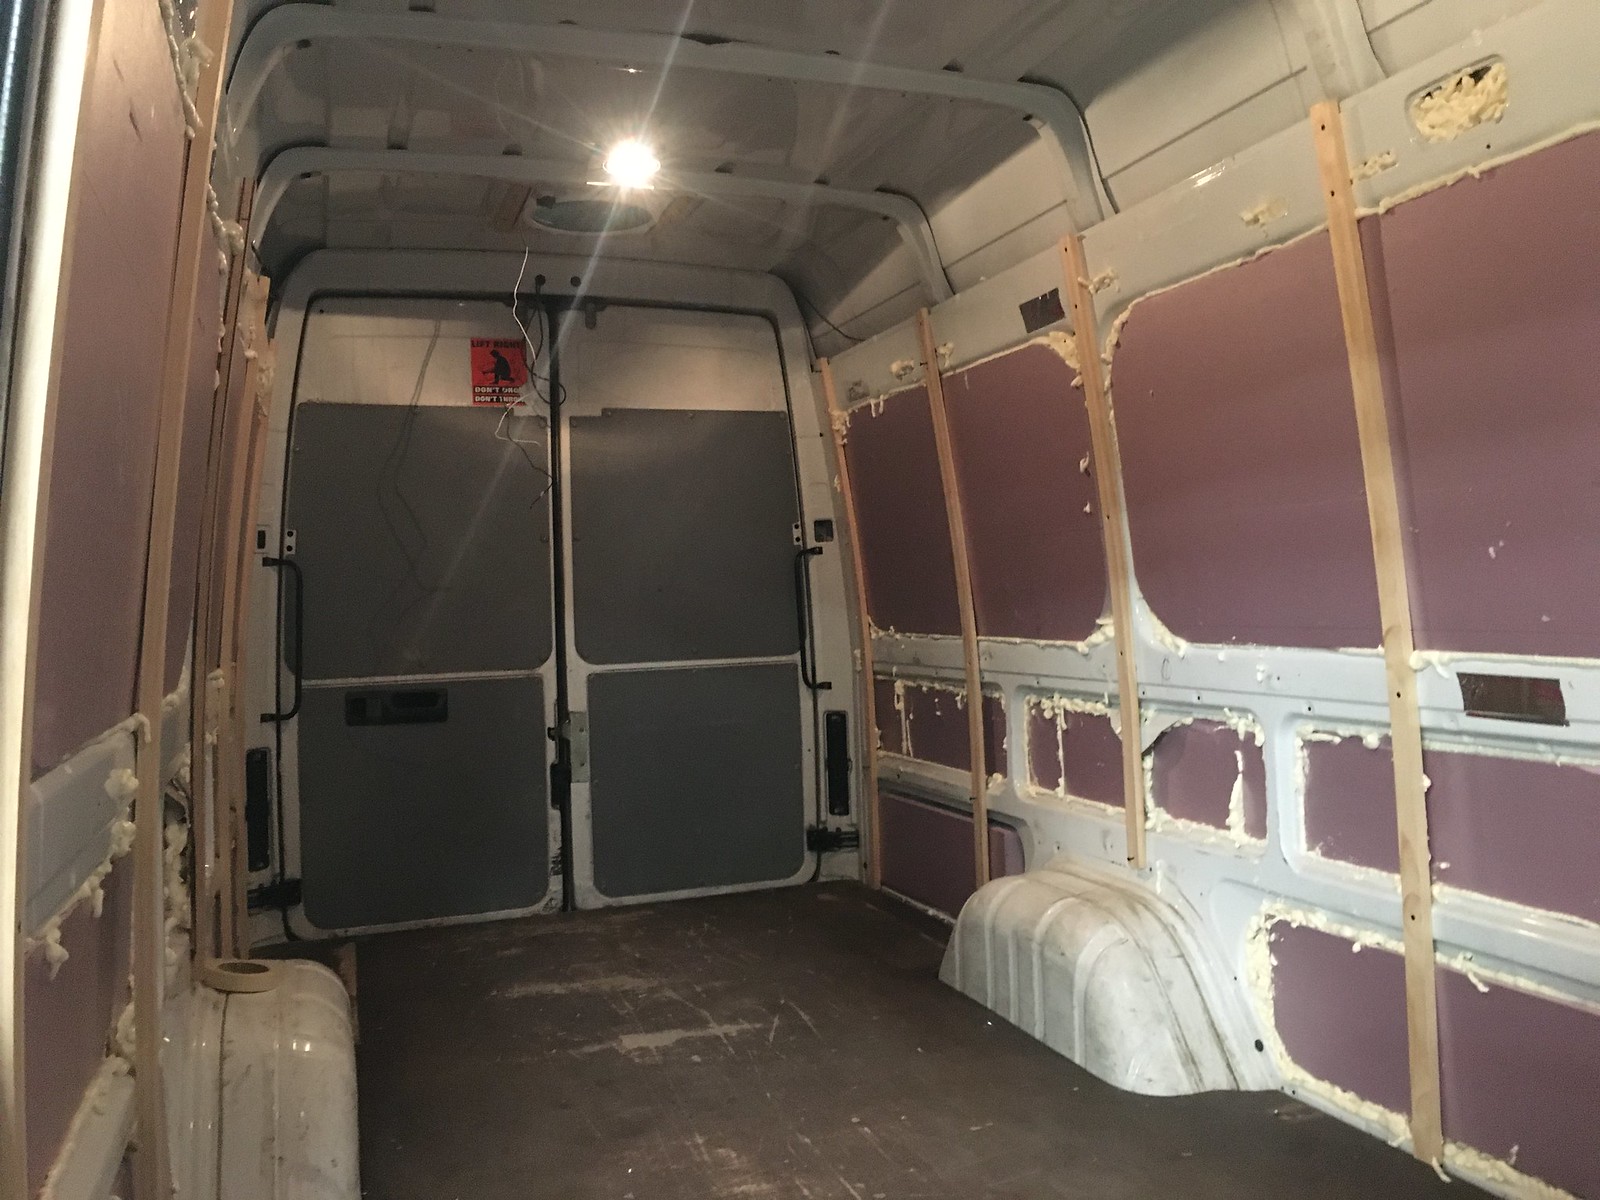
Floor complete I moved to the walls. For these I bought 2in, R10 rated owens corning insulation boards and a dozen cans of expandable foam. There’s a lot of debate on insulation but for the needs and budget of this project, this will hopefully suffice. I made a simple cardboard template and started to cut out the foam to fill the large voids in the walls. Once those were cut I used basic 1 X 2 Pine boards and matched them up to the supports on the ceiling to hold the foam boards in and also start to give some structure to the final walls that will go up later.
 Untitled by Nick Smith, on Flickr
 Untitled by Nick Smith, on Flickr
 Untitled by Nick Smith, on Flickr
With the foam insulation in I set about filling in any voids with spray foam. I could for sure have cut the foam boards more precisely to fit but again, this is a learning project. I tried to fill any void I couldn’t reach with foam and create some sort of barrier from the sheet metal to the walls. Cutting and filling this took much longer than anticipated which is starting to be a theme in this project….
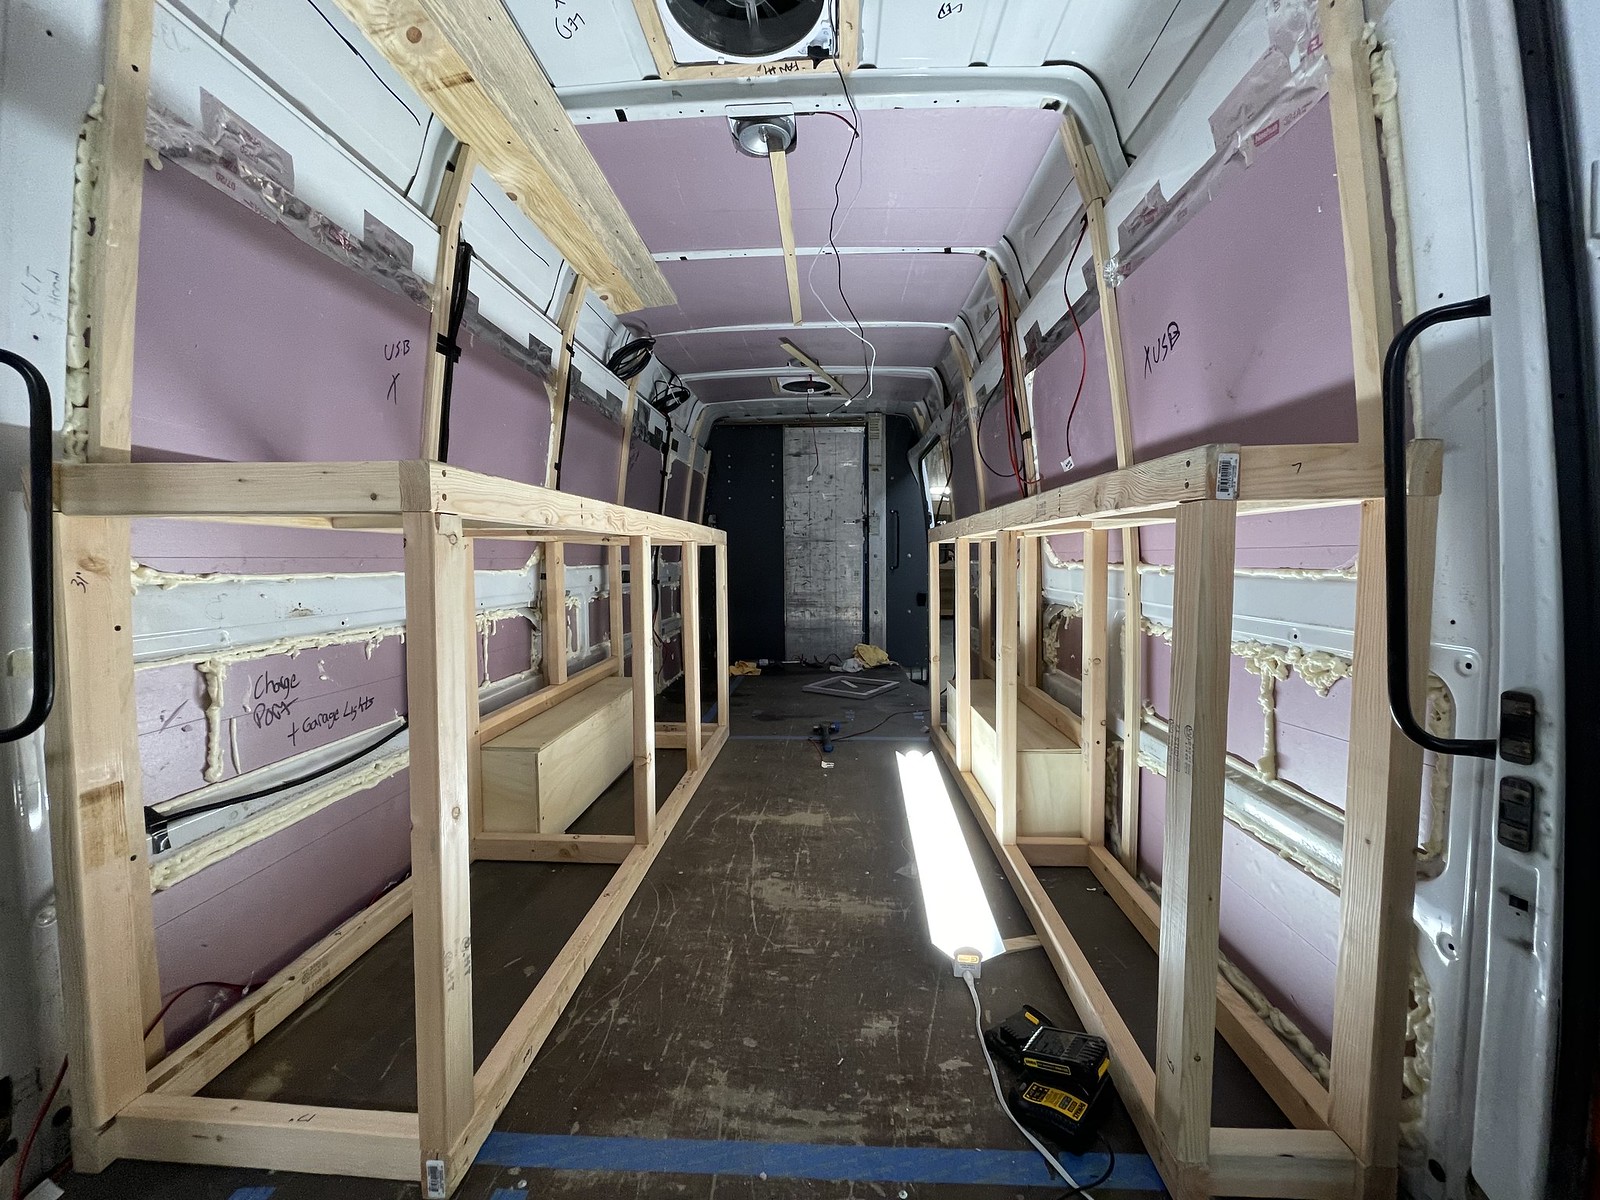
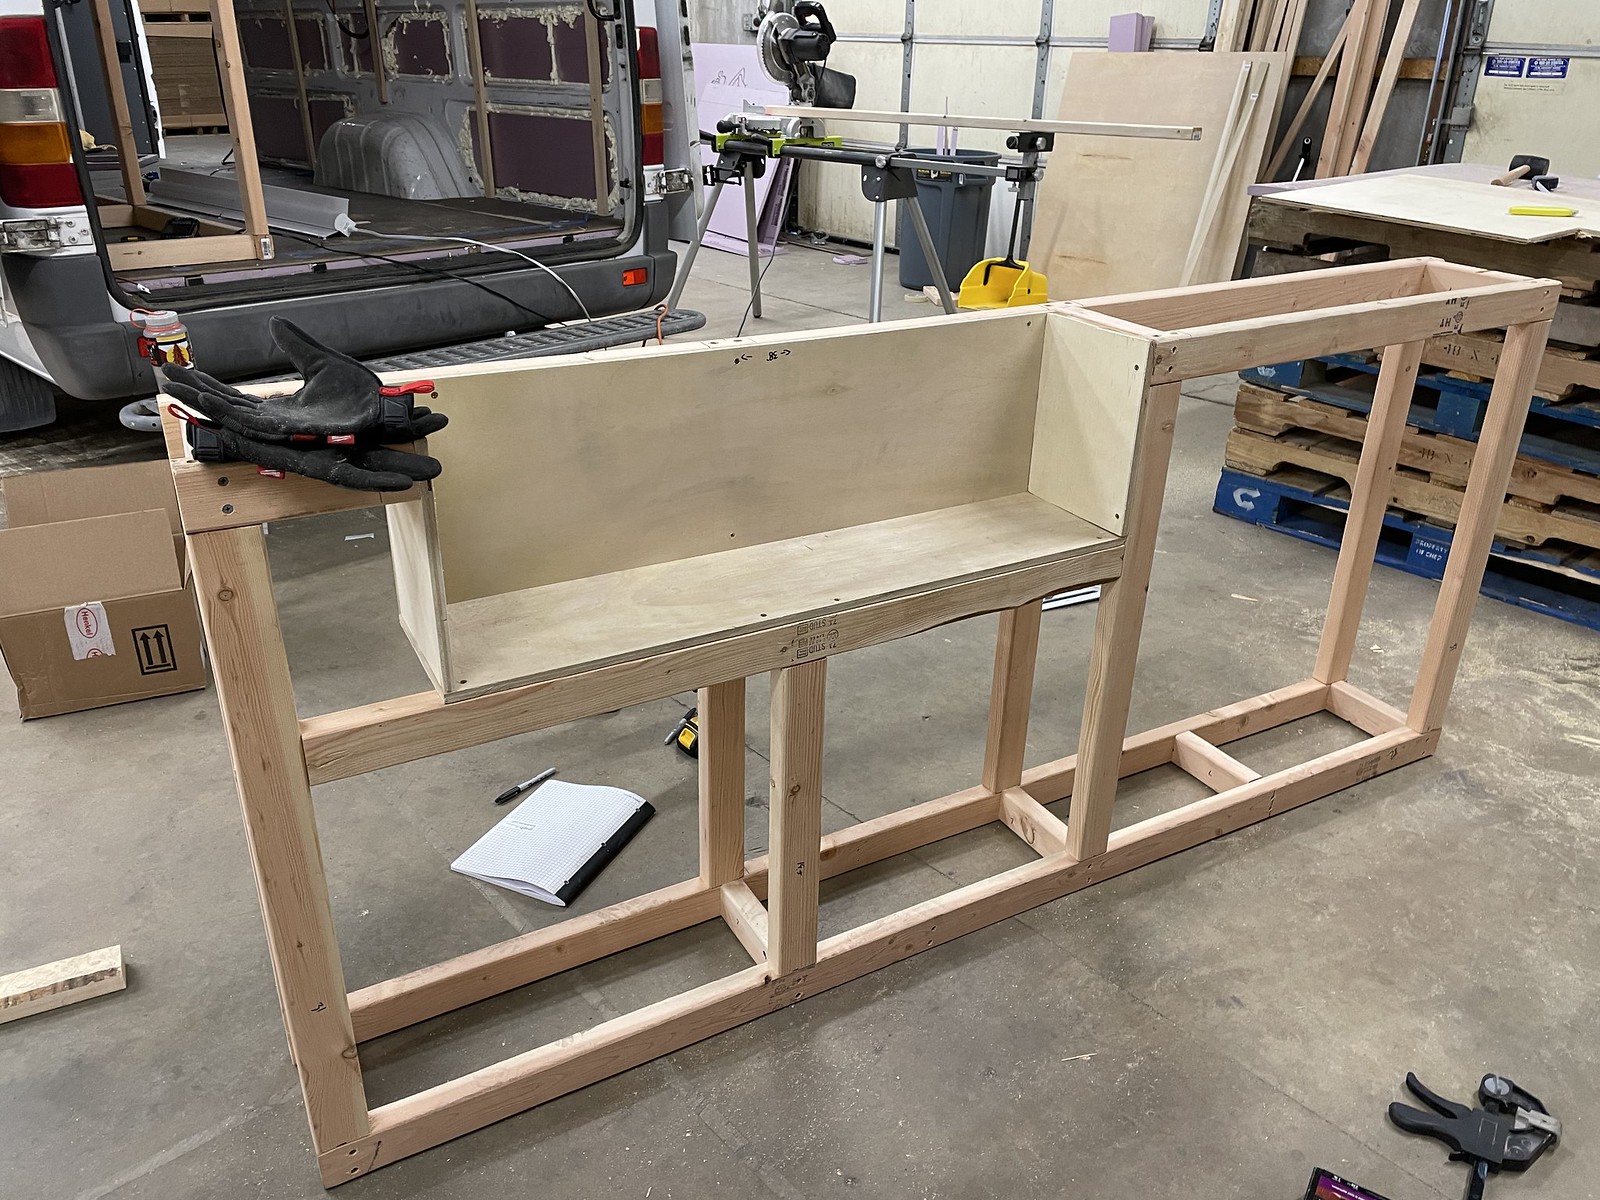
Now that the basic shape was starting to come together I decided to start on the bed platform in the back. I wanted to build a platform that was elevated for ample storage underneath for bikes and gear and will also house all the electrics. The driver side stand measures 20” deep and the passenger side 10”, this should leave just enough room for a twin inflatable mattress under the platform for added sleeping for a guest.
 Untitled by Nick Smith, on Flickr
 Untitled by Nick Smith, on Flickr
Also starting cutting insulation for the ceiling.
 Untitled by Nick Smith, on Flickr
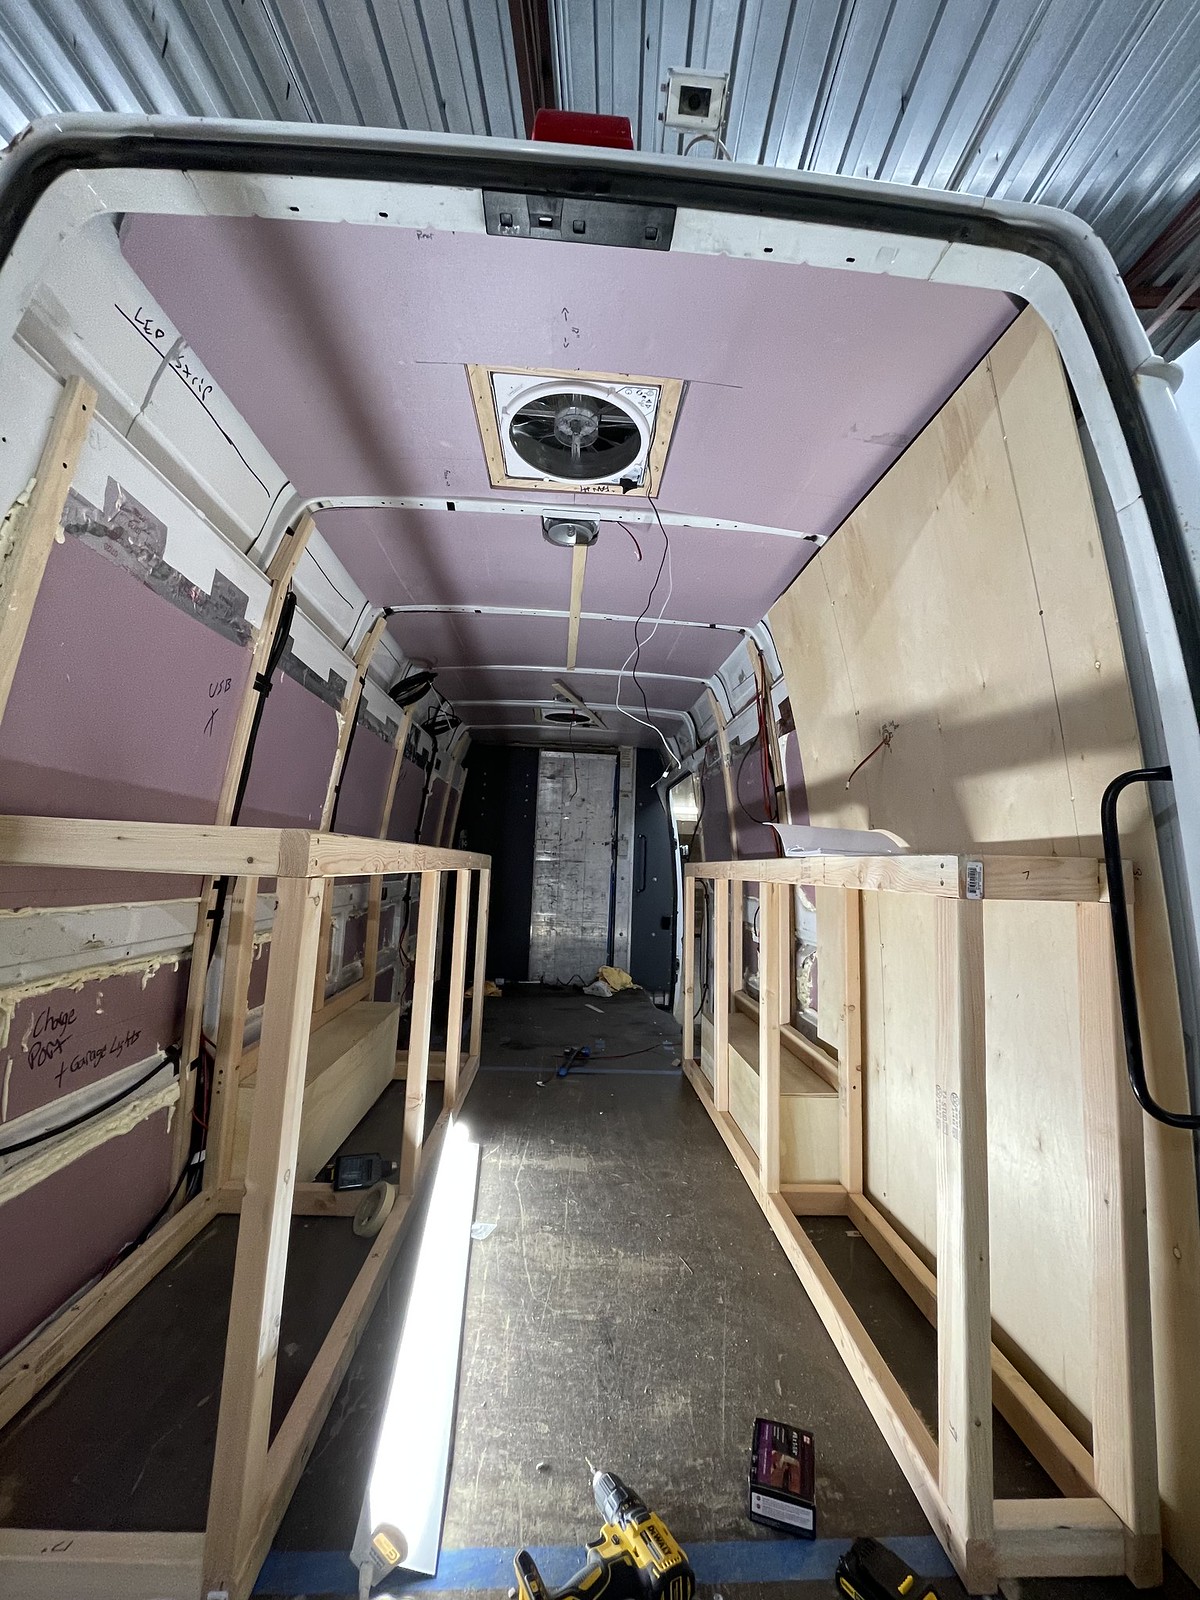
Wall insulation done and basic framing in, I turned my attention to running wires for the electrics I plan to use. This is going to be a fairly basic build with mostly USB and 12V cigarette lighter style charge ports so most of the wires ran are for lights, USB ports or the fans.
My plan is for the drivers’ side of the bed platform to house the electrics with the massive 120lb battery sitting directly over the axle. I have a marine grade fuse block with 12 fuses up to 30amp each that will power everything as well as a 1500 watt inverter that will sit on the passenger side to run or charge anything else.
 Untitled by Nick Smith, on Flickr
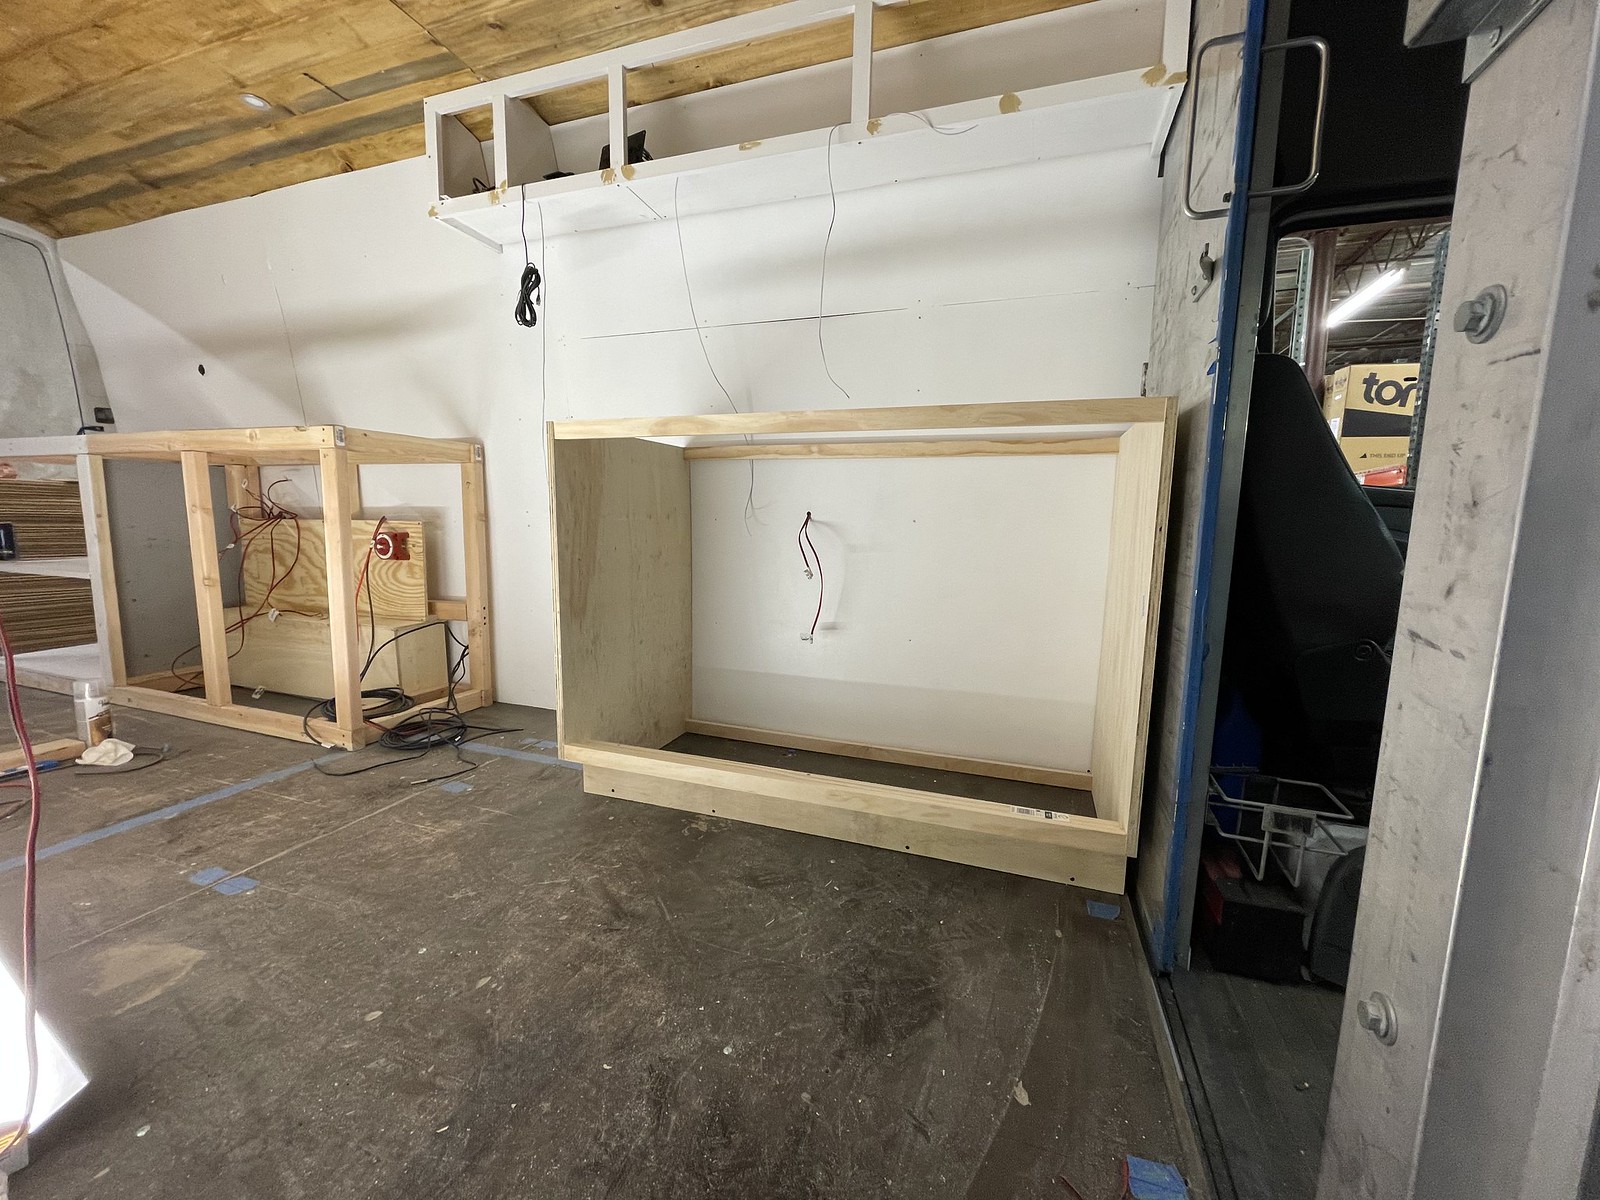
Wiring ran it was time to start putting the walls up. I decided to go with 1/8in birch plywood because it bends really easy and light weight. I found out later it likes to splinter a good bit when you cut it with a jig saw.
 Untitled by Nick Smith, on Flickr
 Untitled by Nick Smith, on Flickr
NEXT POST.....
I'm quite a ways along with this project. TL;DR it went from this:
Untitled by Nick Smith, on FlickrTo this:
Untitled by Nick Smith, on FlickrRead on if you're interested...
Welcome to Nick’s Covid/Quarantine/Lockdown/Winter project. It’s a 2005 Dodge 2500 Sprinter with the legendary Mercedes diesel engine, albeit with 336K miles. A bit of back story first: I started at my current job which is a fairly small, consumer direct, mostly Amazon based bicycle /cycling brand a little over 5 years ago. When I started they had just bought an old FedEx van to use for….I really have no idea why they bought it. For the last 5 years it’s been used mostly to help the half of dozen of us who work there move a few times and then sat for 2 years before someone tried to steal it by ramming a screwdriver in the ignition which didn’t work but rendered it immobile. Then a few months later someone tried to “syphon” gas from it by stabbing the gas tank with a screwdriver a few dozen times. Fast forward to October and I'm in charge of fixing it so we can sell it. I have it towed to a Mercedes repair shop where $6500 later it was repaired. New ignition, gas tank, fuel pump, glow plugs, a tire, a few intercooler hoses and a battery later, it was repaired. The shop noted it was in exceptional condition for its age and mileage and I suppose being a FedEx fleet vehicle meant they fixed any and everything that went wrong.
We get the van back and I start cleaning it up to sell it and my boss walks by and sort of kiddingly says “we should turn this into a camper van!”...my brain immediately goes into project mode and starts thinking of every camper van build I’ve drooled over for the last number of years. I have wanted to build out a sprinter van for YEARS. Living in Colorado and regularly recreating in the mountains means every other car on the road is either a Subaru, or a camper van. We chat about it with the group and he asks if anyone but myself would use it...the other 5 dudes all say hell yea they would! I'm an avid BMX/MTB rider, one of the other guys is huge into backpacking and climbing and everyone ski’s regularly and just loves the mountains and camping. So my boss gives me the green light and a very loose $7500 budget for the build. I’m so stoked, I get to finally build a van! Best yet, is it’s not my money I’m spending and not my own vehicle I’ll be cutting holes all over! It’s a blank slate with a modest budget and learning tool for if/when I do my own as well as something to keep my hands busy in the winter months. I’ve got detailed spreadsheets with links and quantities for everything I’ve bought from the battery to the amount of lumber needed, and the amount of screws I’ve bought. I should also say I’m extremely fortunate in that I get to work on this while I’m at work as well as have 24hr access to the large, heated warehouse space I have to work in. Very thankful for this!
With all that being said let's get to the project!
DISCLAIMER:
I am NOT a carpenter, I am NOT an electrician, I am NOT a professional mechanic...but I do have some know how, an imagination and Google so here we go!
I should note, I started this like a month and half ago but initial progress was slow and wanted to wait till I had a fair amount of progress done before I shared.
Goals of this project is to create a multipurpose, 3...maybe 4 season, all in one camper shared amongst a few people. This isn’t going to be one of those insane vans with a shower, tv, toilet etc. It’s going to be relatively basic with ample solar power to charge devices, run all sorts of lights, a small sink, camp stove, plenty of ventilation and be a warm, dry, secure place to park anywhere out in the mountains. It’s starting out as bare bones as can be. Stout engine/trans but very little in the way of options. No stereo, no cruise control...nothing. Has A/C but probably still needs service.
Blank and I mean BLANK slate. It does already have two 12v ceiling lights installed with a switch at the front and back doors, those will be staying. Being an ex FedEx van it has a hefty lockable bulkhead door that we decided to keep. 1. To make it more secure 2. To help keep the van temp manageable. First order of business I took it to a carwash and washed the outside and the engine. Once back I pulled and painted the grill from a horrible faded chrome, to a nice satin black.
Untitled by Nick Smith, on FlickrUntitled by Nick Smith, on FlickrUntitled by Nick Smith, on FlickrI started the interior off by pulling up the floor. It already has a perfectly cut out floor made from some sort of composite wood, masonite or something so I drilled the rivets out and pulled it up to save for later. No sense in throwing away a perfectly cut template.
From here the van was down to bare sheet metal so I swept it out and wiped all the walls with a heavy concentrate of simple Green to get rid of 15 years of cargo van duty dirt.
Untitled by Nick Smith, on FlickrWhat I’m left with is a few wires for the old crappy fan that's getting replaced with a MaxxAir and the backup camera I’m replacing as well...so I pulled them all out and pulled the fan out.
I decided to insulate the floor with 1in owens corning foam board. To do this I ran a few 1X2 boards front to back in the van to give it some sort of frame to build off and attach things too. After checking under the van to make sure I wasn’t about to screw into the fuel tank or a brake line, I ran a handful of self tapping metal screws through the boards to secure them to the floor.
Untitled by Nick Smith, on FlickrAfter this I cut the insulation to fit between them and finished it off with some insulation tape
Untitled by Nick Smith, on FlickrWith the floor insulation and “framing” done, I put the original floorboard I mentioned earlier back in and screwed it to the wooden boards now on the floor. With that done, the floor is complete unless I decide to put a laminate down or something. Having this perfectly precut floor saved me hours of trimming and cutting. It’s probably 1/8in thick hardboard so I may end up just painting it and calling it a day.
I was really eager to cut some holes in this thing for some reason. First up was going to be the opening for the rear fan. The van is going to have two fans, one intake, one exhaust. The rear is the top of the line MaxxAir remote controlled fan with auto open and close and a like 12 optional speeds. I wanted it to be as far back as possible to create as much air flow as I could since this currently has no windows… I marked the template and cut the 14in opening from the inside. Although the only place to cut in the rear was over one of the ribs on the roof so I put a 2X4 under it wedged to the floor , heated it and pounded it flat. It was also around this point I realized I had basically no idea what I was doing.
Untitled by Nick Smith, on FlickrUntitled by Nick Smith, on FlickrOne of my best friends converted an almost identical van a few years back and another friend lives full time in a van in Steamboat Springs, CO so I had some long chats with them before I went much further...even though I still have little clue what this will actually entail….
Floor complete I moved to the walls. For these I bought 2in, R10 rated owens corning insulation boards and a dozen cans of expandable foam. There’s a lot of debate on insulation but for the needs and budget of this project, this will hopefully suffice. I made a simple cardboard template and started to cut out the foam to fill the large voids in the walls. Once those were cut I used basic 1 X 2 Pine boards and matched them up to the supports on the ceiling to hold the foam boards in and also start to give some structure to the final walls that will go up later.
Untitled by Nick Smith, on FlickrUntitled by Nick Smith, on FlickrUntitled by Nick Smith, on FlickrWith the foam insulation in I set about filling in any voids with spray foam. I could for sure have cut the foam boards more precisely to fit but again, this is a learning project. I tried to fill any void I couldn’t reach with foam and create some sort of barrier from the sheet metal to the walls. Cutting and filling this took much longer than anticipated which is starting to be a theme in this project….
Now that the basic shape was starting to come together I decided to start on the bed platform in the back. I wanted to build a platform that was elevated for ample storage underneath for bikes and gear and will also house all the electrics. The driver side stand measures 20” deep and the passenger side 10”, this should leave just enough room for a twin inflatable mattress under the platform for added sleeping for a guest.
Untitled by Nick Smith, on FlickrUntitled by Nick Smith, on FlickrAlso starting cutting insulation for the ceiling.
Untitled by Nick Smith, on FlickrWall insulation done and basic framing in, I turned my attention to running wires for the electrics I plan to use. This is going to be a fairly basic build with mostly USB and 12V cigarette lighter style charge ports so most of the wires ran are for lights, USB ports or the fans.
My plan is for the drivers’ side of the bed platform to house the electrics with the massive 120lb battery sitting directly over the axle. I have a marine grade fuse block with 12 fuses up to 30amp each that will power everything as well as a 1500 watt inverter that will sit on the passenger side to run or charge anything else.
Untitled by Nick Smith, on FlickrWiring ran it was time to start putting the walls up. I decided to go with 1/8in birch plywood because it bends really easy and light weight. I found out later it likes to splinter a good bit when you cut it with a jig saw.
Untitled by Nick Smith, on FlickrUntitled by Nick Smith, on FlickrNEXT POST.....
 Untitled
 Untitled
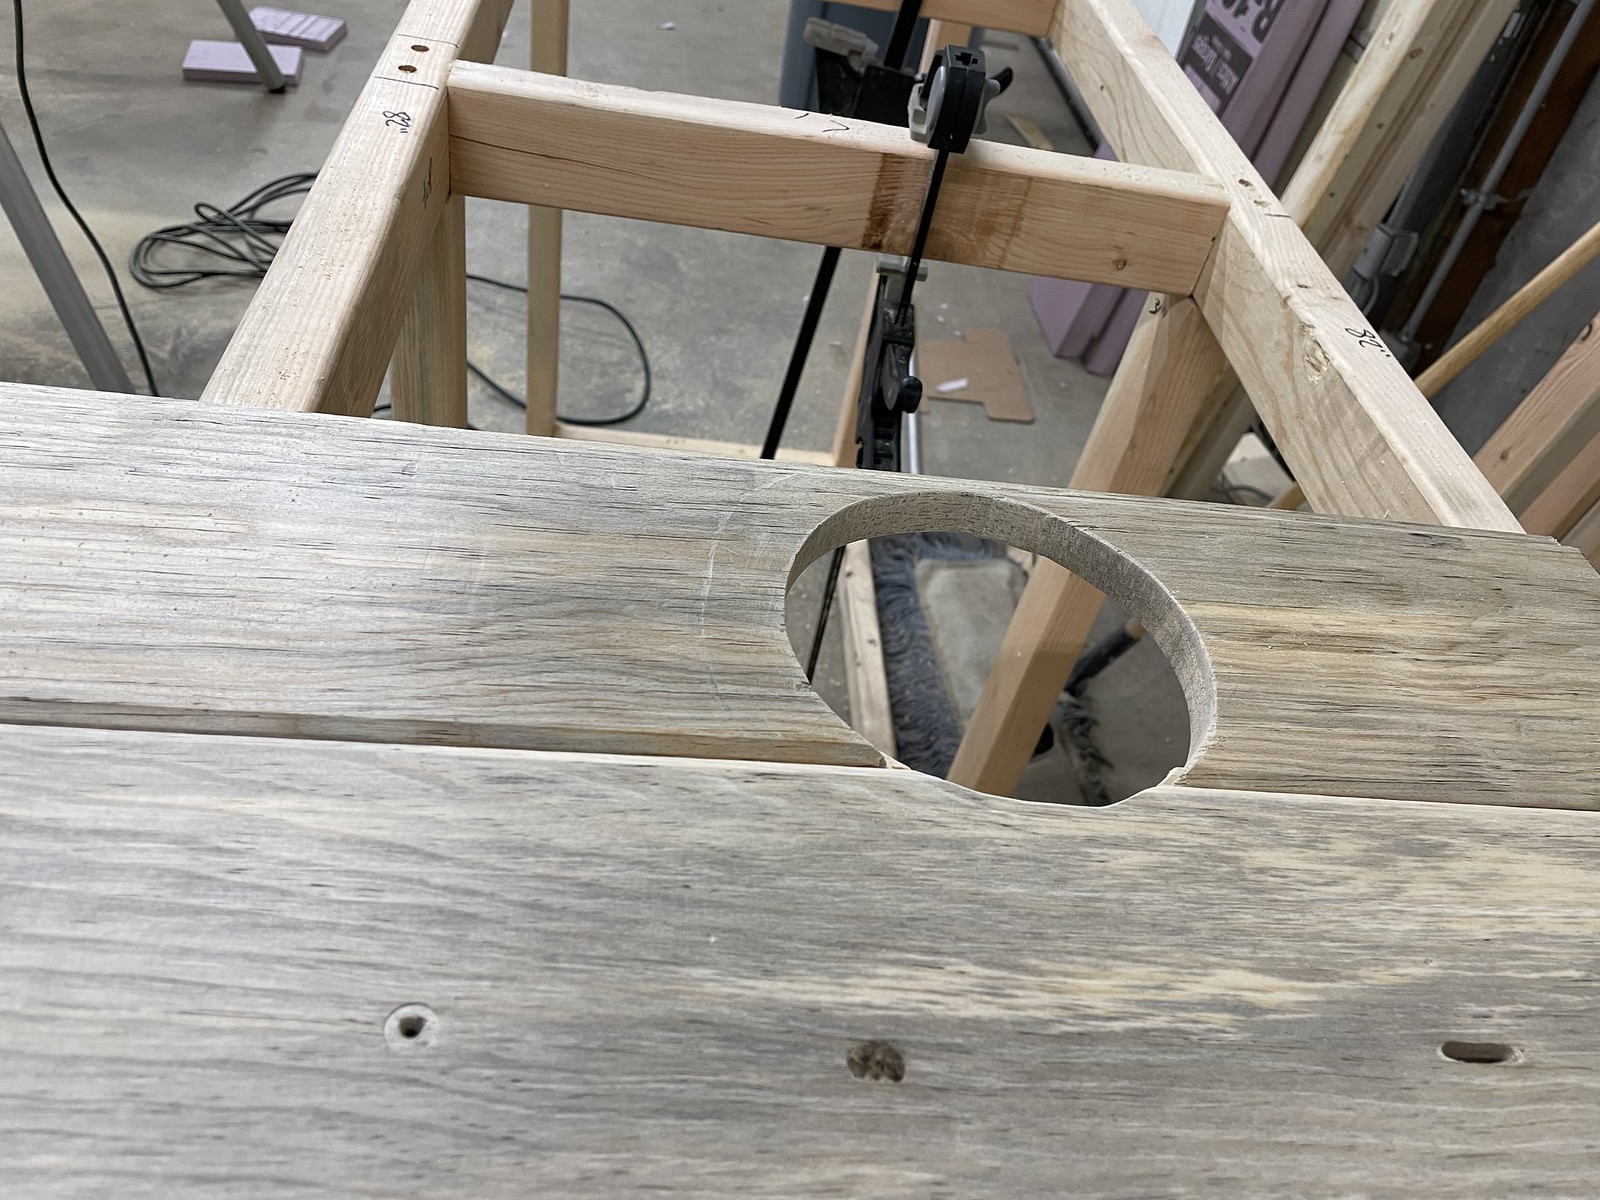 Untitled
 Untitled
 Untitled
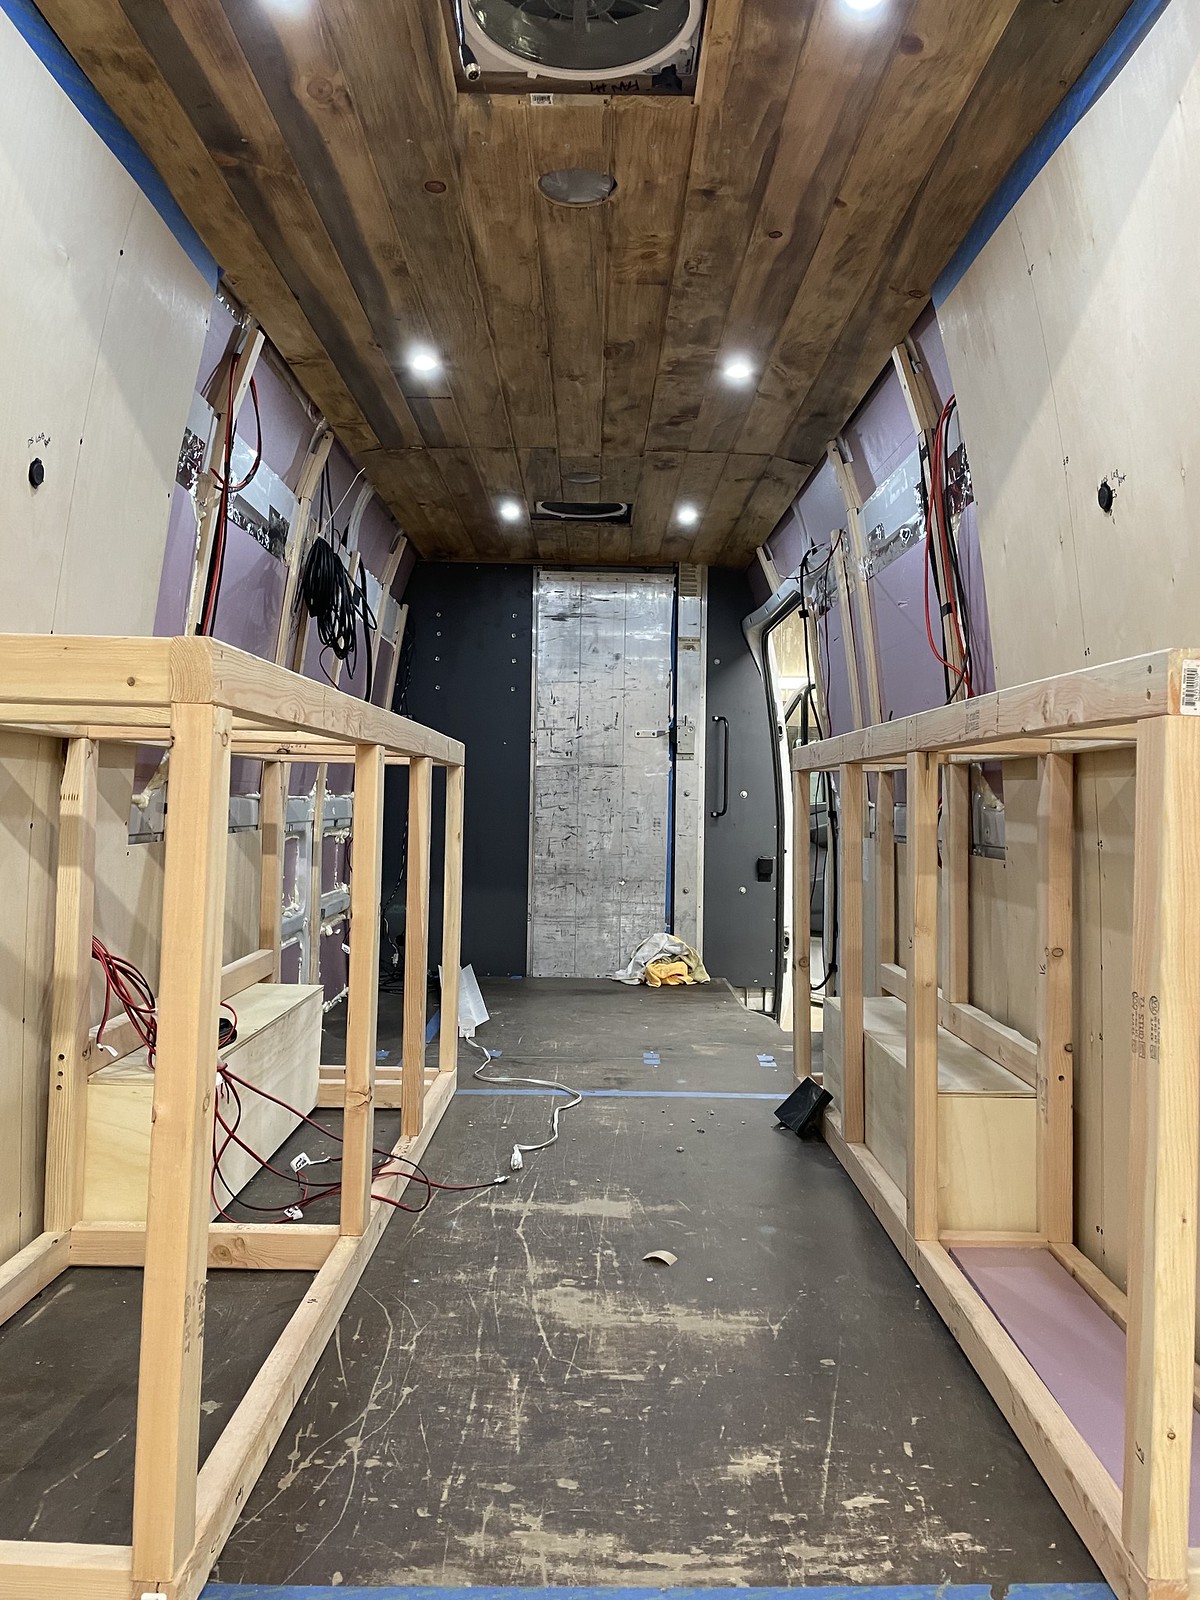 Untitled
 Untitled
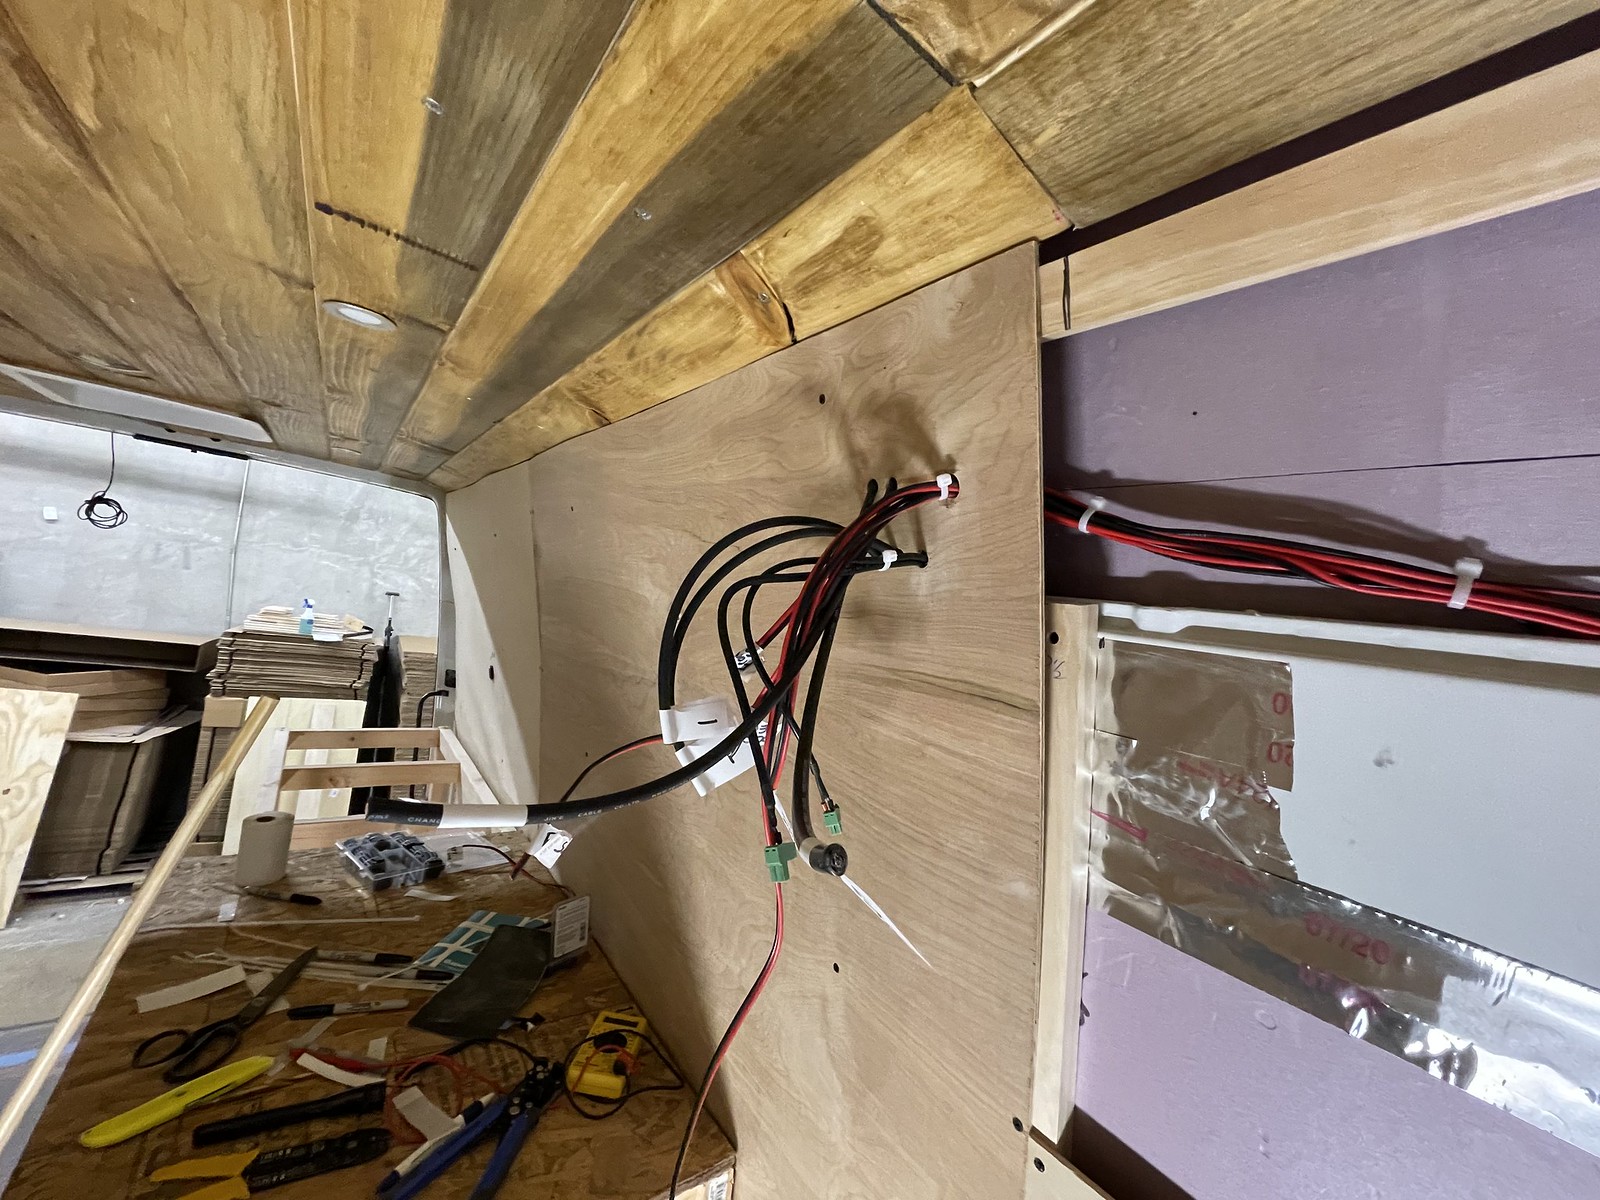 Untitled
 Untitled
 Untitled
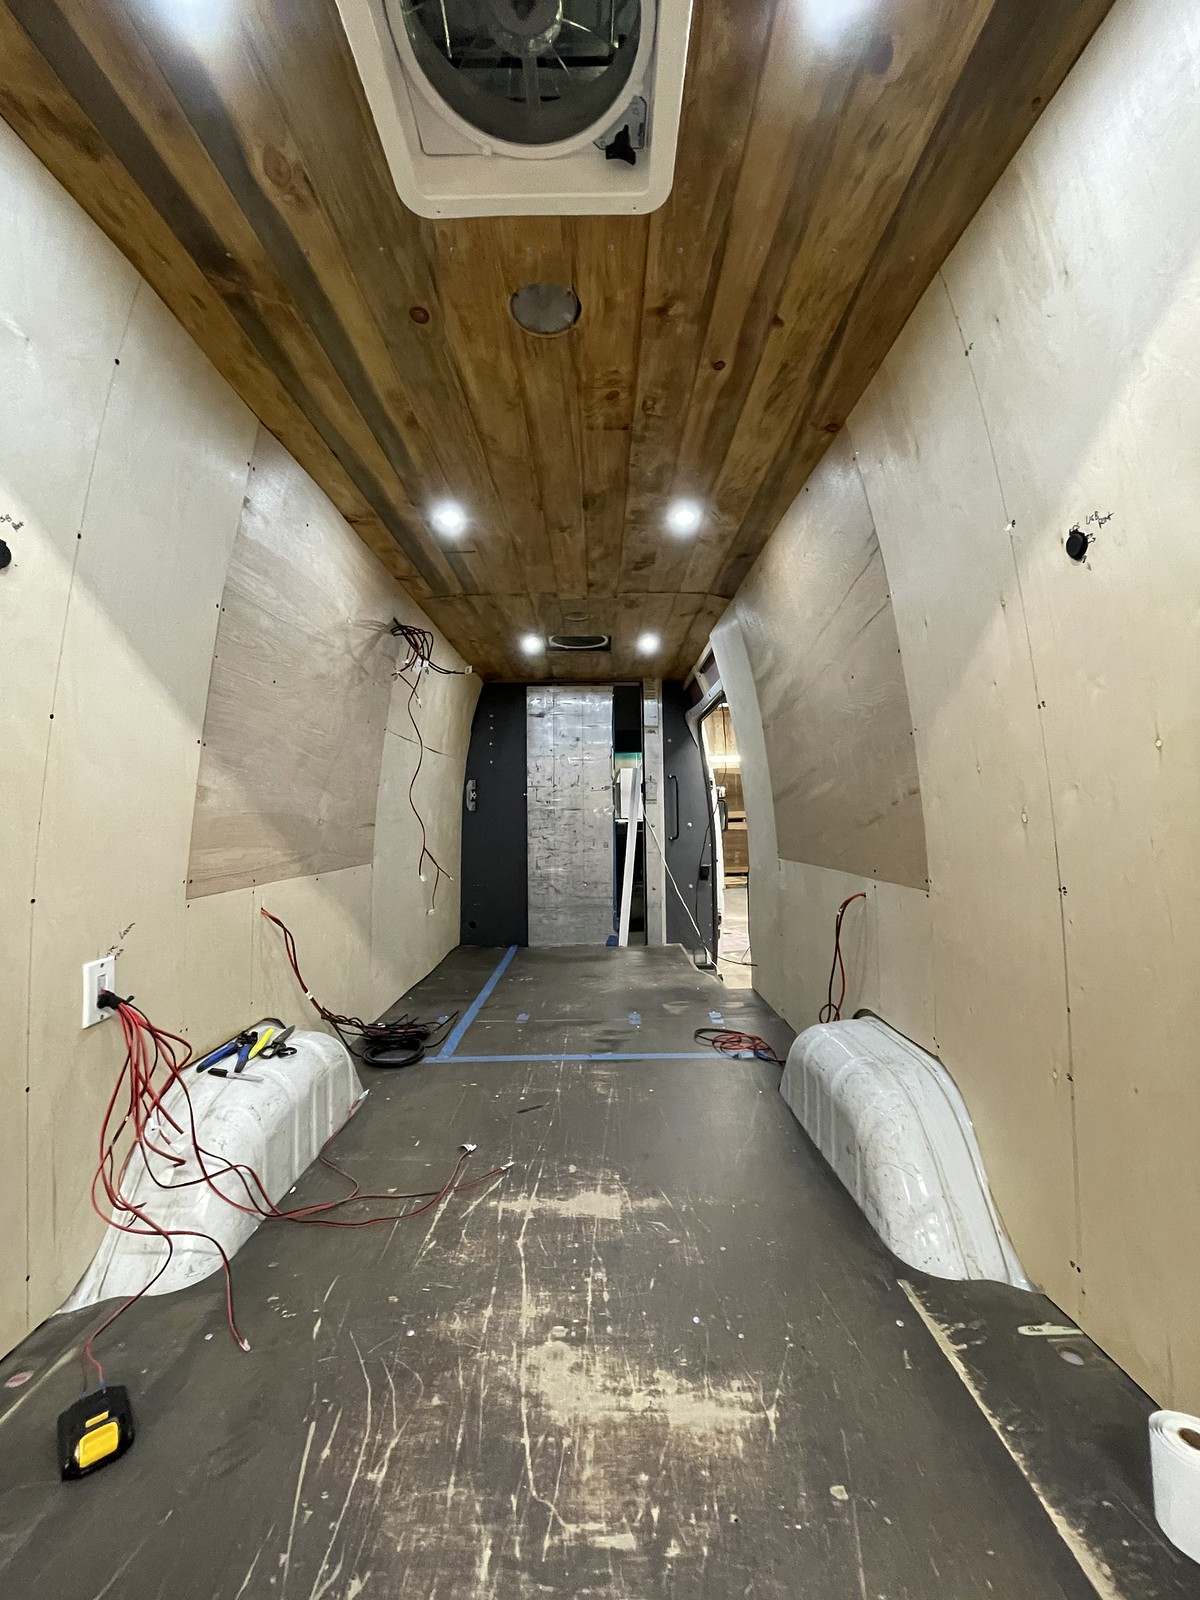 Untitled
 Untitled
 Untitled
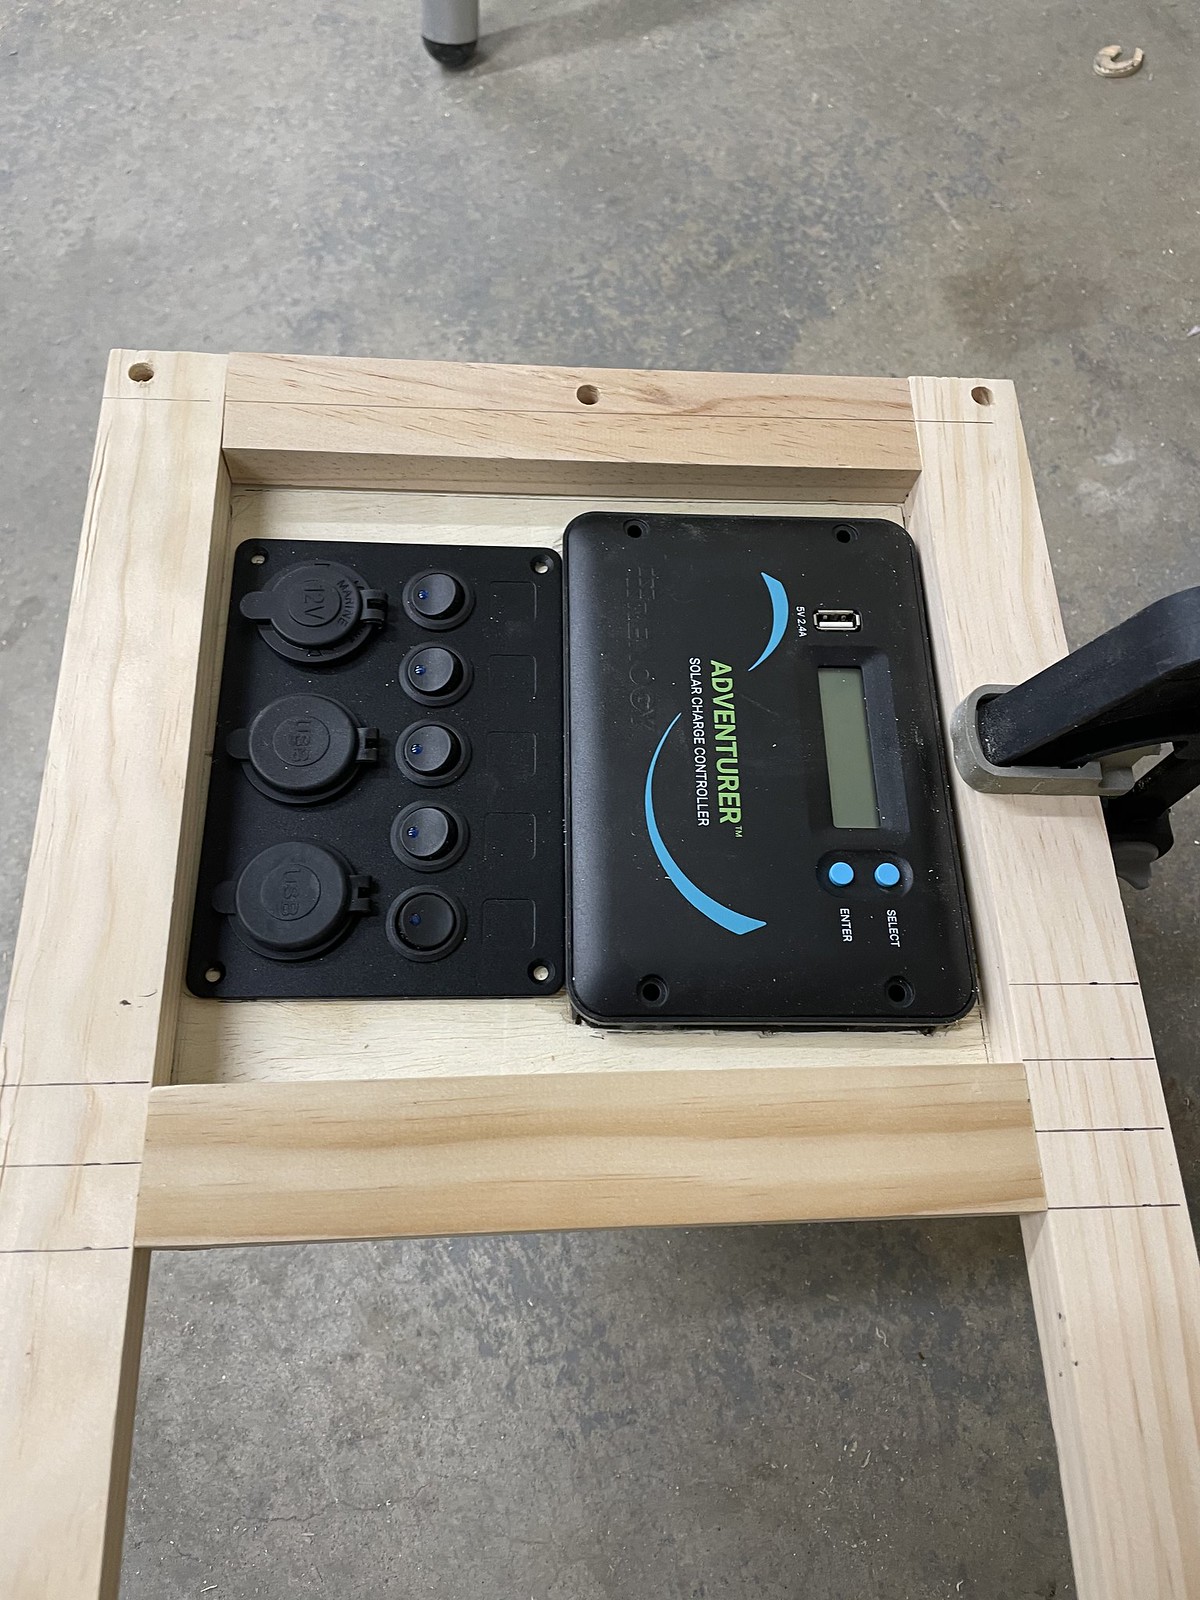 Untitled
 Untitled
 Untitled
 Untitled
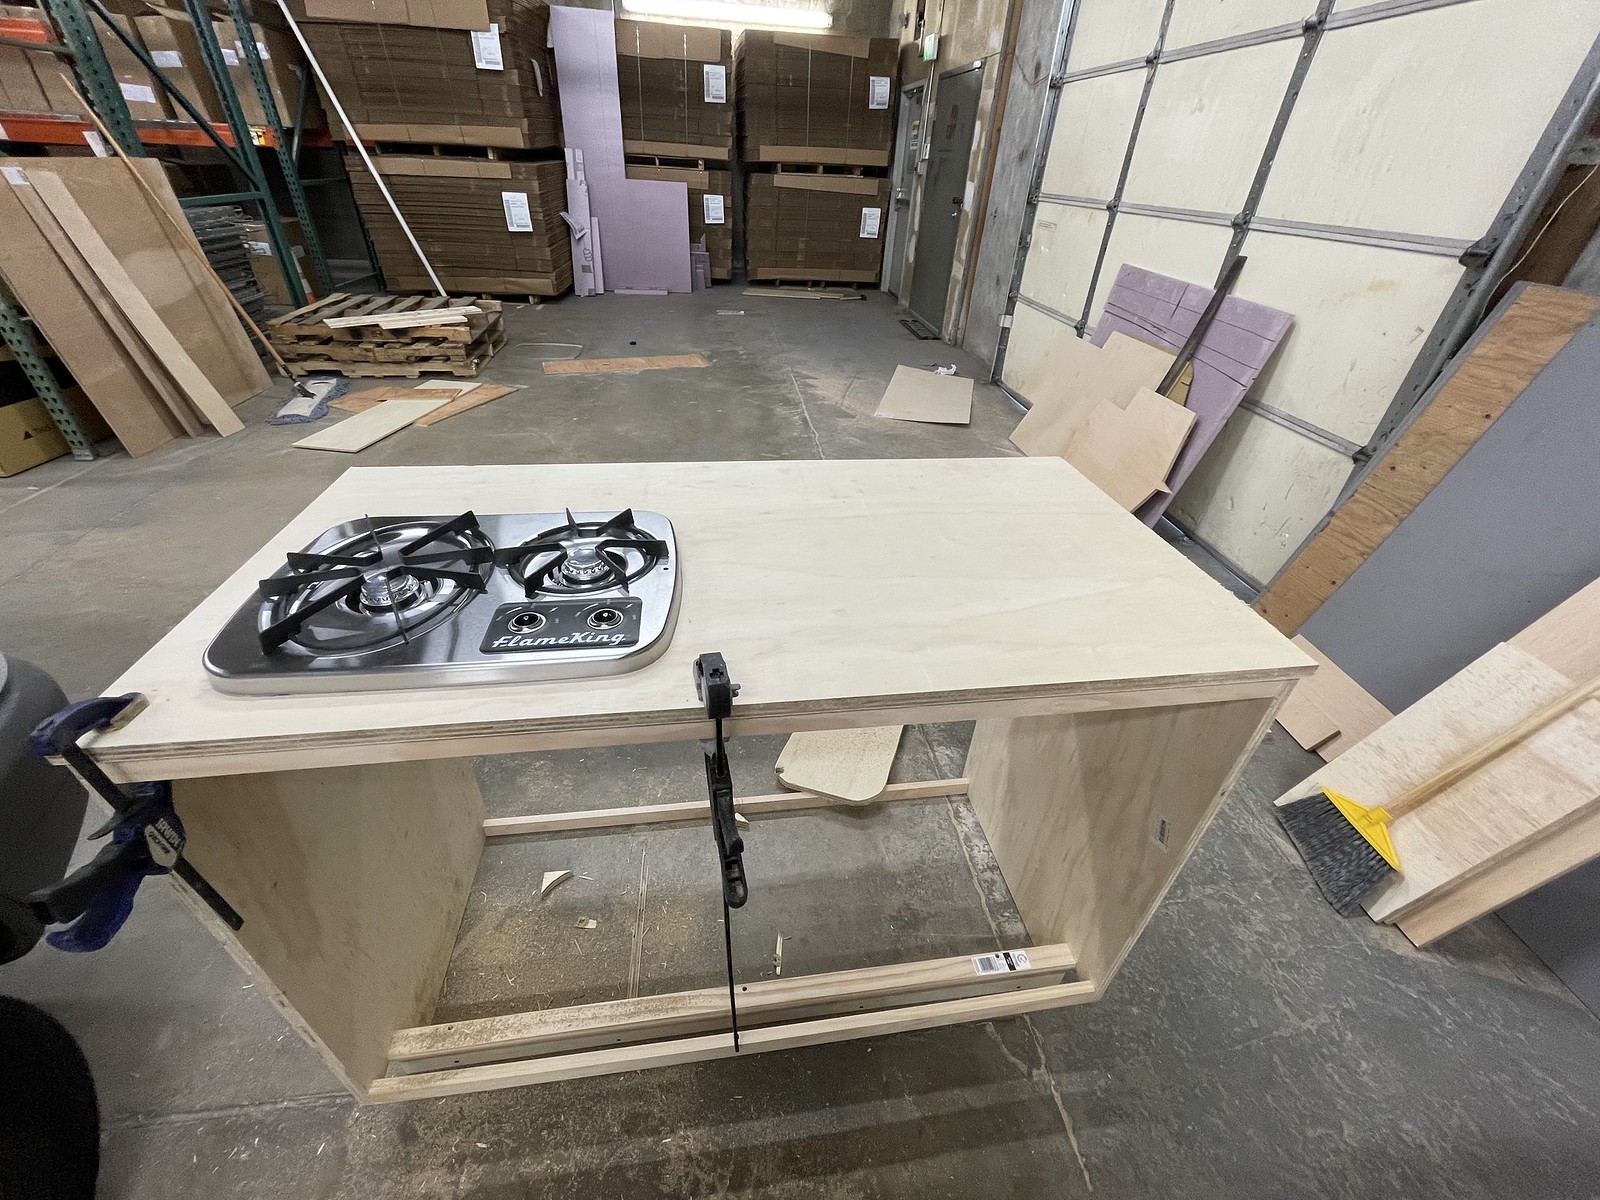 Untitled
 Untitled
 Untitled
 Untitled
 Untitled
 Untitled
 Untitled
 Untitled
 Untitled
 Untitled
 Untitled
 Untitled
 Untitled
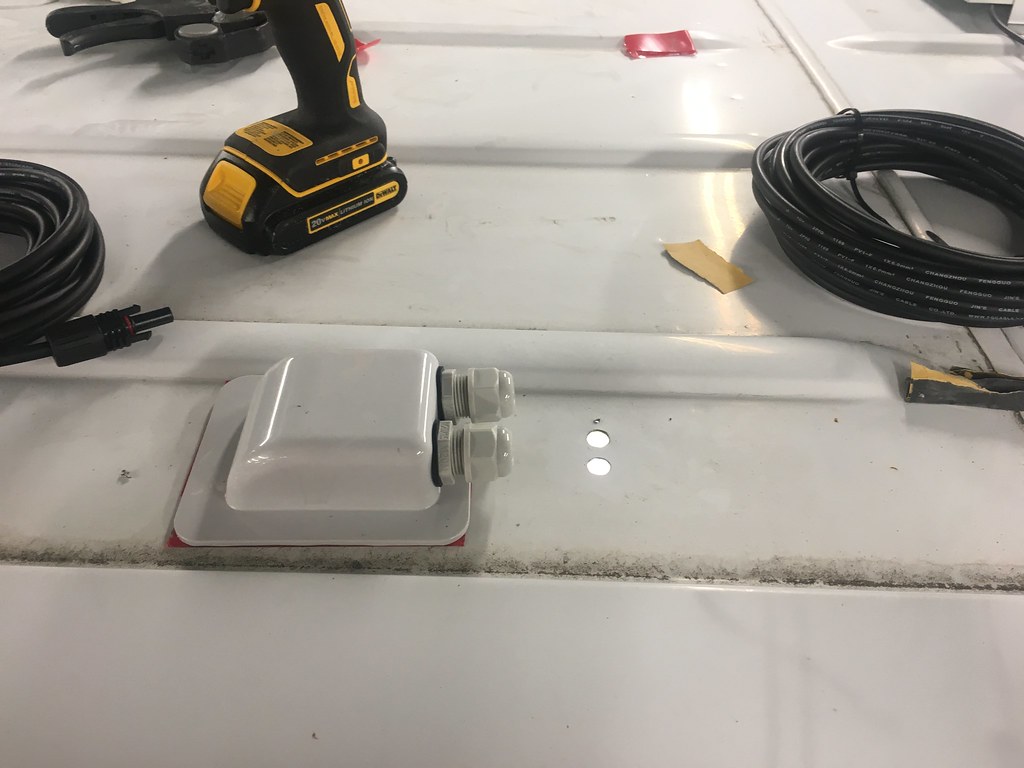 Untitled
 Untitled
 Untitled
 Untitled
 Untitled
 Untitled
 Untitled
 Untitled
 Untitled
 Untitled
 Untitled
 Untitled
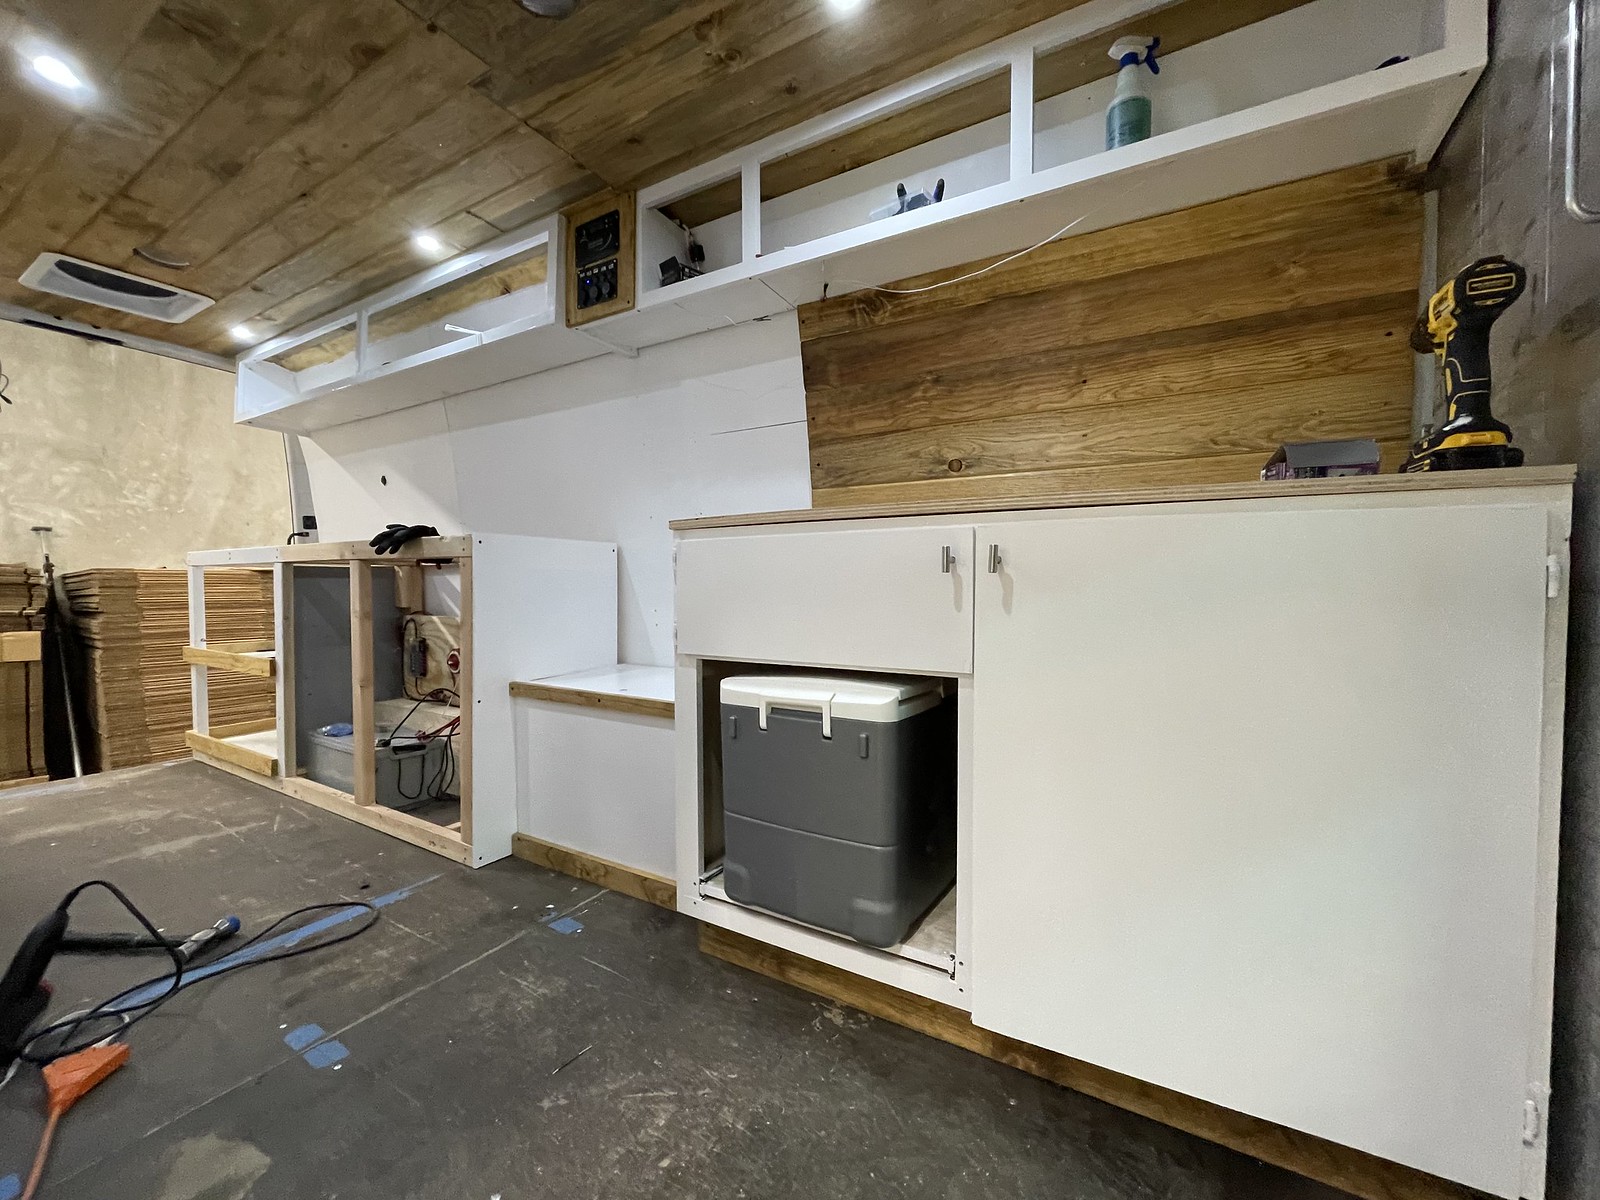 Untitled
 Untitled
 Untitled
 Untitled
 Untitled
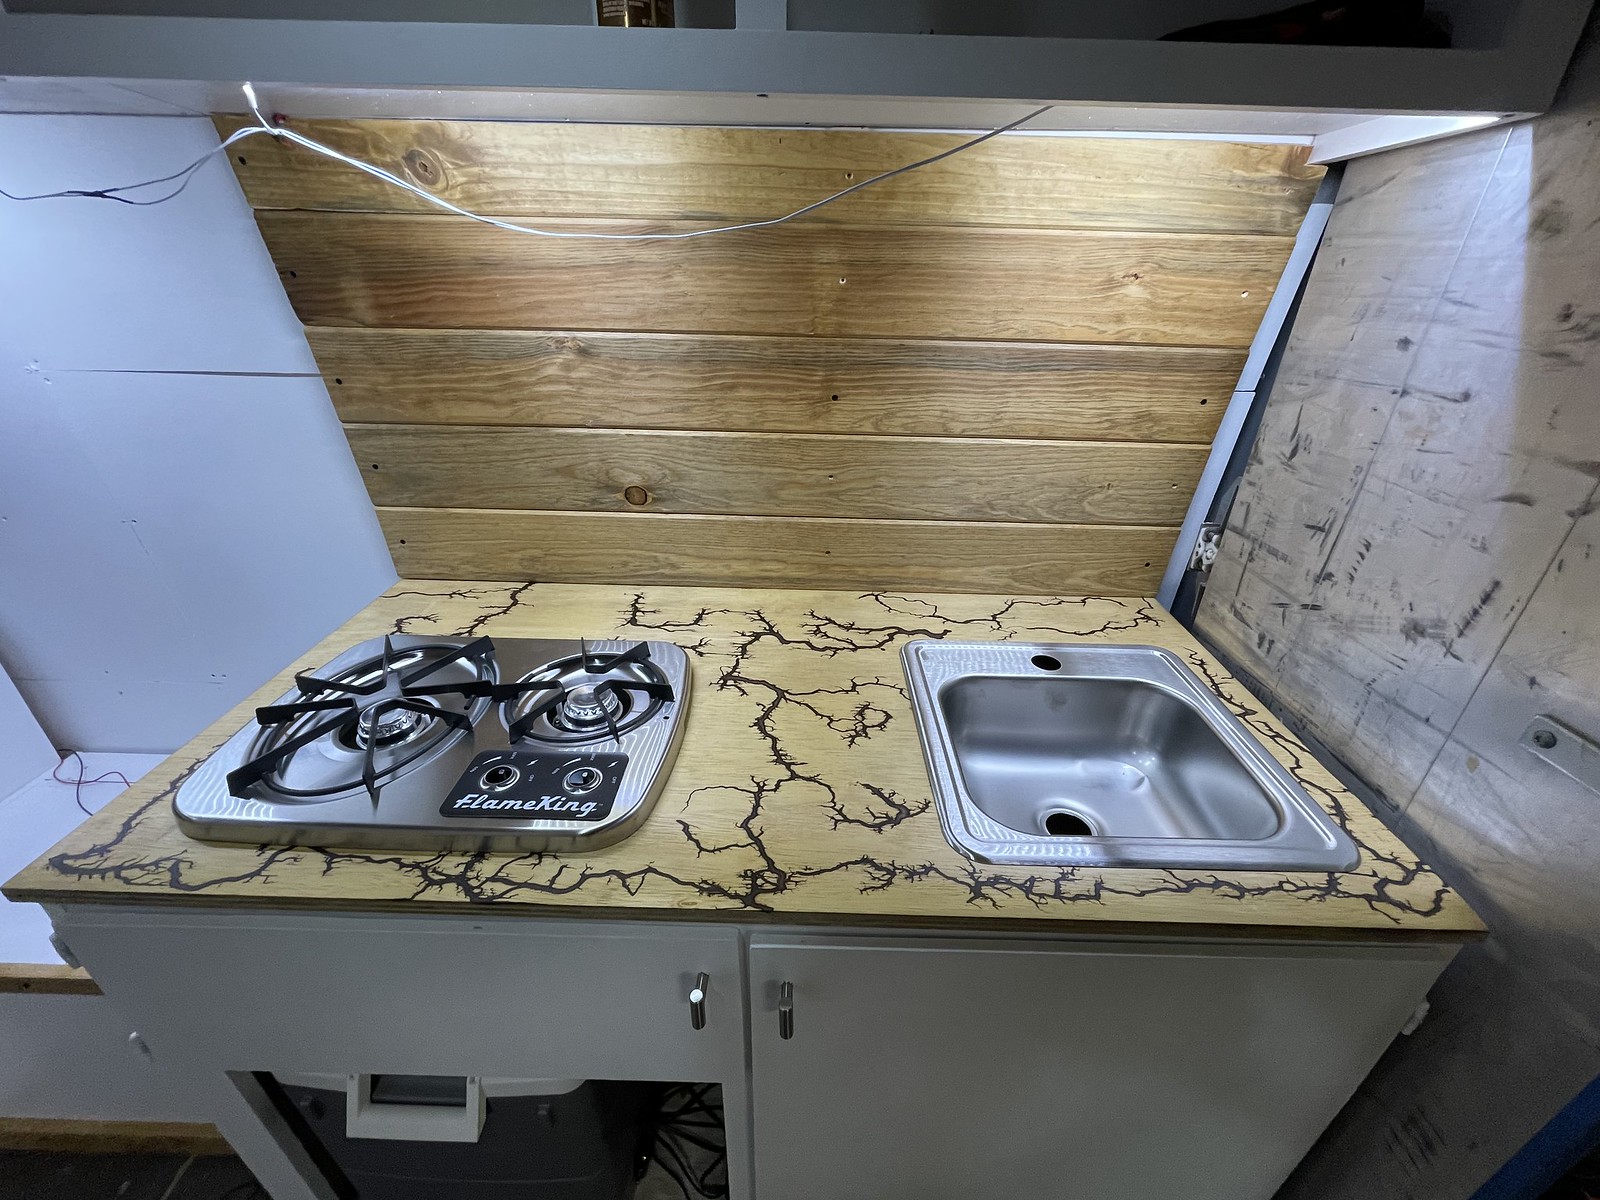 Untitled
 Untitled
 Untitled
 Untitled
 Untitled
 Untitled
 Untitled
 Untitled
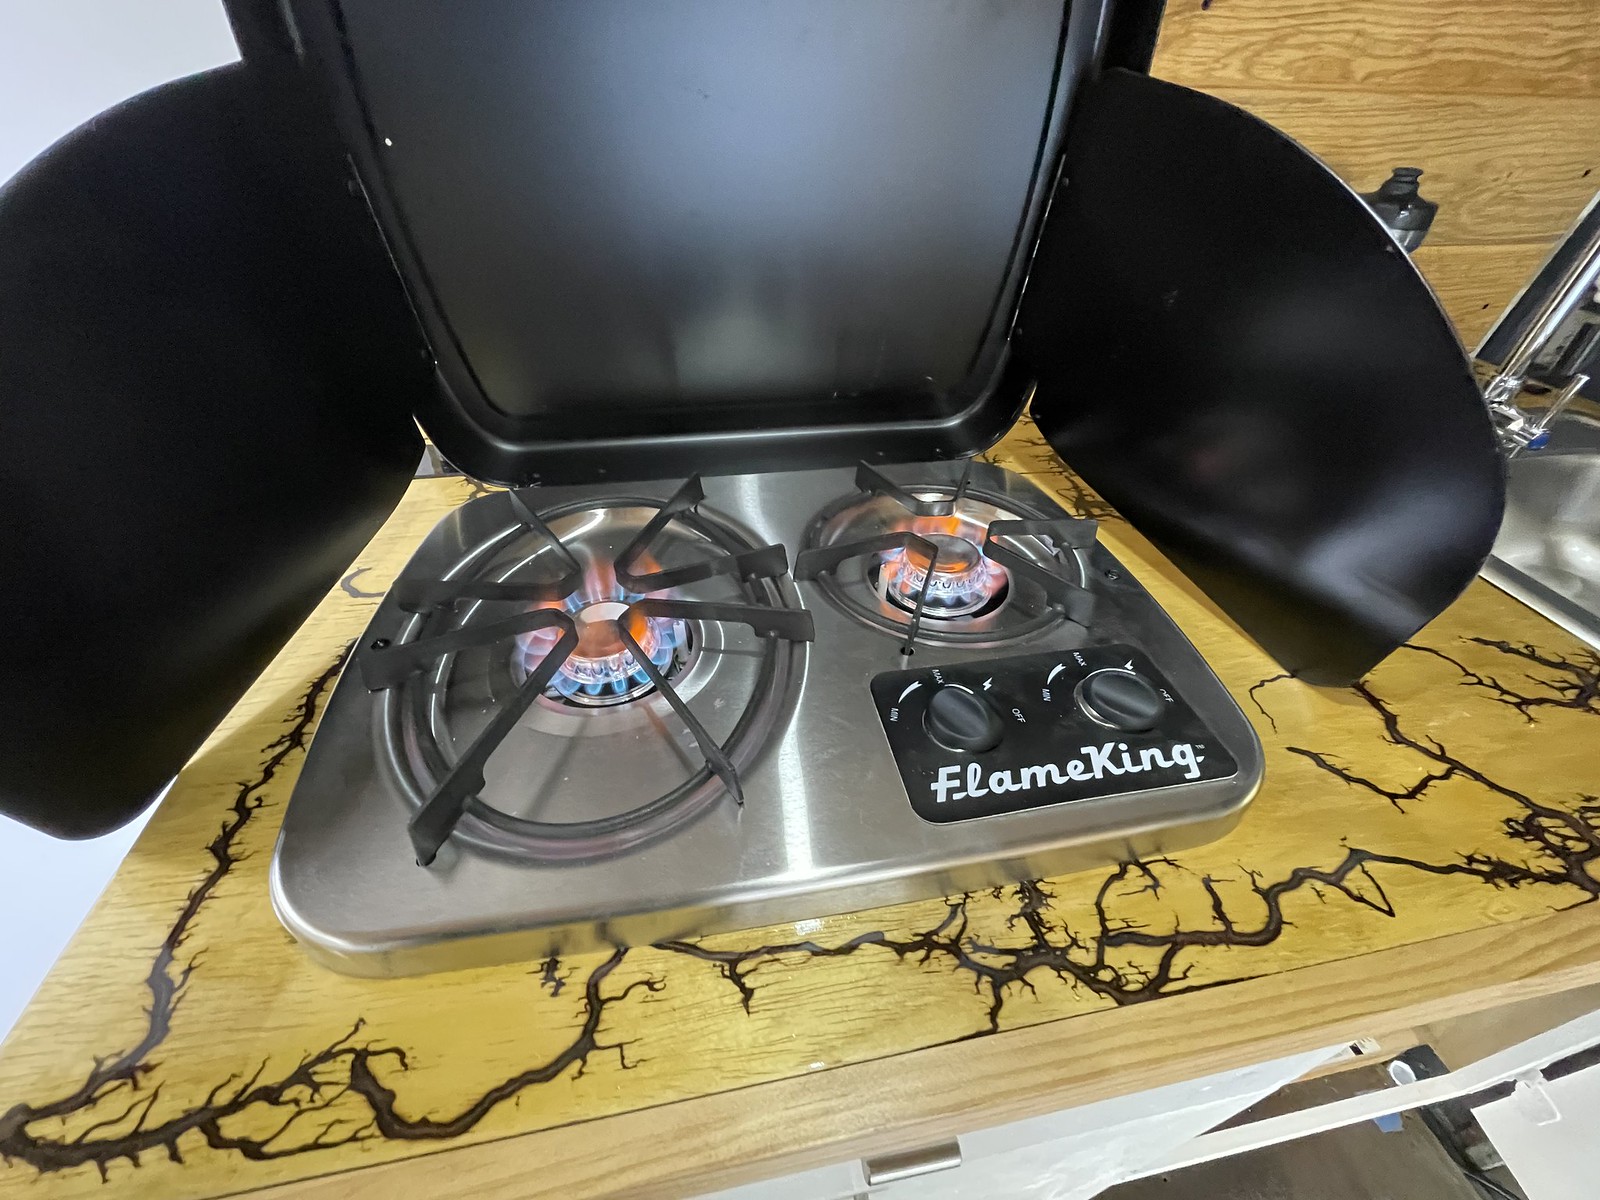 Untitled
 Untitled
 Untitled
 Untitled
 Untitled
 Untitled
 Untitled
 Untitled
 Untitled
 Untitled
 Untitled
 Untitled
 Untitled
Comment