
Yes, exactly....goofy-ass VAG
-

Closing SOON!"LAST CHANCE FOR G.A.S." DEAL IS ON NOW
Luke AT germanaudiospecialties DOT com or text 425-761-6450, or for quickest answers, call me at the shop 360-669-0398
Thanks for 10 years of fun! -
Wow, strange. Never worked on a VW, Thanks for teaching me something new.Comment
-
Reversing a hackjob - the stereo portion of my E30 M3 restoration
My next step is to bypass the amp - Luke is there a post with the M3 amp bypass method you referenced above?
A couple other things:
- I saw that Geno only had the top speaker wires installed (only the + lines, not the negatives) Was there a reason for this? I installed both + and -. Here's Geno's wiring.
- I installed using the guide below exactly. Any issues with how i did this?
Edit * Removed, wasnt correct
- Do I need a case ground? I dont have one now.
- Right now i have the blue power antenna cable attached to my white Amp power cable. Is this wrong? Can i remove the blue cable from the harness when i bypass the amp?
- I need to get an adapter for the radio antenna cable itself. Any recommendations?

Luke if its easier to discuss on the phone I can try to call you Monday afternoon when my work gets sane.Last edited by CurrusDei; 12-21-2014, 06:45 PM.Comment
-
You need to jump switched 12v onto the blue wire from the metro harness, if you're not using an amp or power antenna just cut the white off and cap it. If at a later date you need to add an amp you'll pull that 5v from the pre amp output section into a mini relay like SE1 said.
I don't know why he did that, maybe he left his fader in or wasn't done wiring it up. Factory VW radio does have preamp outputs for the speakers though, so that's one reason why someone would.Comment
-
and to make that even more fun, BMW used "fader" harnesses with an adapter to use them as a "faderless" harness in lots of M3s and later E30s, right around 1990.
Premium amps only care about 4 positive inputs, they use chassis ground as a reference.
The earliest ones (85-88) used 5 signal wires, that being 4 positives and a single ground. Later ones used 6 wires (88-90), that being the 4 positives and 2 input grounds, then the last of them (89-92) used 8 wires, being 4 positives and 4 negatives.
I have seen the later 6 wire harness in '91's and the full "late" 8 wire harness in 89's. Can't help that part, we just have to work with what you got. Sometimes I think those fuckers did this maliciously...
I can see the scene now...."Vell, it's toosday, lets use dis harness, zose Amerikans vill never know ze difference!"
I am sure they had their reasons, I am just grateful most of that fuckery stopped after the E30.
Luke
Closing SOON!"LAST CHANCE FOR G.A.S." DEAL IS ON NOW
Luke AT germanaudiospecialties DOT com or text 425-761-6450, or for quickest answers, call me at the shop 360-669-0398
Thanks for 10 years of fun!Comment
-
Yeh i think I'm one of the 8 wire harness on an '89 guys. I'm on a flight to Detroit for work now, back tomorrow. Maybe I'll have some time to work on the radio then. Next Steps are:
- Bypass Amp: Luke, do you have a link to the way to bypass the amp on the M3 without cut/crimp? If not i can just do it the normal way cutting and crimping at the back.
- Disconnect blue Metra wire from White OEM Amp wire. Cap OEM white wire, Use Blue Metra wire as jump to 12v constant (red)
- Hope it works
- Get radio antenna adapter - any ideas here guys?
Thanks again for all the help. Once this is done I'm going to make a dummy proof step-by-step DIY.Comment
- Bypass Amp: Luke, do you have a link to the way to bypass the amp on the M3 without cut/crimp? If not i can just do it the normal way cutting and crimping at the back.
-
I was looking at an E30 amp today, I don't think I have pins that small.
Basically a series of 8 jumper wires that fit the plug would do it...
and the adapter you need is a Metra 40VW20
Closing SOON!"LAST CHANCE FOR G.A.S." DEAL IS ON NOW
Luke AT germanaudiospecialties DOT com or text 425-761-6450, or for quickest answers, call me at the shop 360-669-0398
Thanks for 10 years of fun!Comment
-
Thanks Luke! Just ordered the adapter.
On jumper wires, do you have any "best practices" on how to add a jumper wire? It looks like some of the jumps on the forum are just pieces of wire shoved down into the socket beside the pin. I want to make sure it is reliable and safeComment
-
Yellow is constant, red is switched, blue is cut from white and jumped to red.
Sent from my iPad using TapatalkComment
-
Reversing a hackjob - the stereo portion of my E30 M3 restoration
I'm clear on that, my question was the actual jump wire installation process. I tried to remove the pins from the harness last night with some small screw drivers but it wasn't having it. Going to check radio shack for some pin removers. Is there a special wire end you put on the blue wire to make the connection to red or are you just stripping off some red insulation and twisting on the blue wire or something else?
However, the big news today is...
THE STEREO IS WORKING!
Amp bypass was very easy. My wire colors were a bit different as you can see below. My final writeup will have a color chart.


I just jammed some wire into the pins to make a temporary jump (looking to improve on this)

And to kick it off, Led Zeppelin - Rock and Roll. I'm betting it's been a long time been a long time been a long lonely lonely loney lonely lonely time since these speakers had any life whatsoever. Much less from a Bluetooth streaming iPhone

Sent from my iPhone using TapatalkLast edited by CurrusDei; 07-16-2014, 06:10 AM.Comment
-
Hey, good to see you got it working. Sorry I didn't get a chance to reply to your PM.... work has been stupid lately.
For the jumper on the power harness, I was able use a small jewelers screwdriver to push the tab out of the way - the connector pin will slide out from the back of the plastic connector block. The tab as to be pushed down from the "face" of the connector and if I remember, it is on the same "side" as the crimped wire on the back. Just don't get too rough with it - the metal is kind of cheap on the connectors and you can break the tab off if you pull too hard. I wound up soldering the jumper wire on to the connector pins.-Geno
'87 325is (s52'd)
'95 525iT
'02 Range Rover 4.6 HSE
'98 Disco 1Comment
-
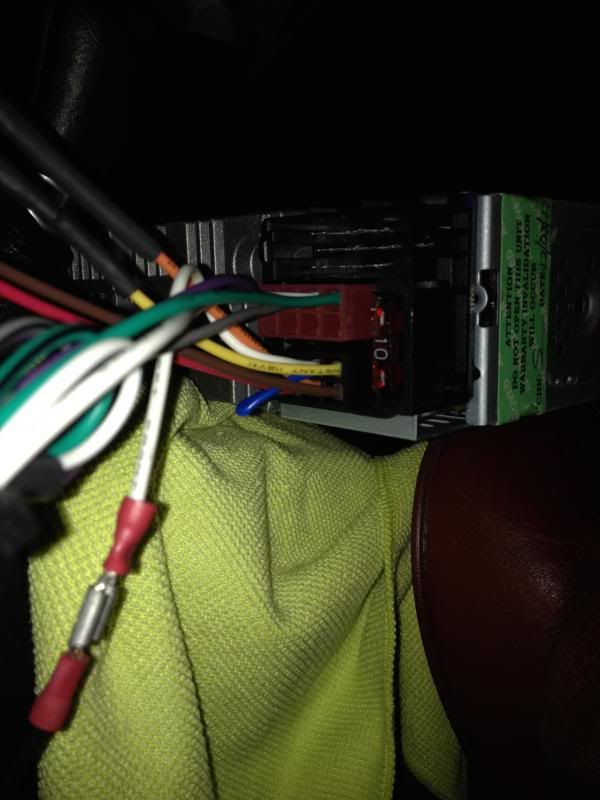
Alright gents, the wiring is done.
I got the pins out, you need to insert something small on the side of the pin like so. NOTE: i had already pulled the pins here so don't pull the pin I have the key in, this is for demonstration ONLY.

You are trying to depress two metal tabs on the side of the pin itself (that stick out onto catches in the plastic housing) back into the pin housing. See below for these pins - think wings on an airplane. The tabs you need to push back into the pin housing are the small ones pointing down in the picture below.

My first foray into soldering...
I opened up the pin housing of the red cable to provide better room to solder

To power the safety terminal I used the blue wire from the Metra harness. Stripped it to expose the bare wire, taped it on top of the red wire to hold its position.

Then after practice on scrap pieces of wire (which my PO graciously gave me much of) I went for the solder (sorry for the crappy pics)


Then re-close the red pin housing

And fire it up (with new radio adapter installed as well)

And do some heat shrinking
Amp bypass wires:

Dash wires behind head (you can see the power wire still isn't heat shrunk - gives an idea of how much they shrink down)

Next up! TESA TAPE AND DASH INTEGRATION.
Sent from my iPhone using TapatalkLast edited by CurrusDei; 07-28-2014, 05:59 AM.Comment
-
Reversing a hackjob - the stereo portion of my E30 M3 restoration
It lives. The install is finished. And when I say finished I mean as far as it's going before my new dash arrives tomorrow. Still, here are some crappy iPhone pics of the first fit.


And the fabrication of the mounting bezel.
Cut off the old one

Make sure to get the metra pack with several mounts in it. The smallest one was too thin. I cut down the slightly larger one to fit perfectly


Test fit, trim, test fit, trim. KEY POINT here. I found that once you cut off the factory bezel, mounting the new one so that the front edge of the new one presses up against where the rear edge of the original one was (there is still a slight lip) is perfect placement.


Measure lip - 7mm

Measure head unit - 7mm (I obviously measured beforehand as well)

The clips on the back need to be snug, as you can see here, there's a gap.

Stack the smaller bezel on back of the main bezel, trim till it clicks and has a tight fit

Now for glue. In my research, the best glue for ABS is... ABS. I used the original bezel that I cut off the car...
Chopped it to pieces

Melted with acetone

And use as glue. I love that the glue for the new bezel IS the old bezel. That's some Lion King circle of life stuff right there


First test fit, dead on.


I'll consolidate all this into an easy DIY later, thanks to Luke, Geno, and everyone else who helped!!
Here's the result of your input!

 Last edited by CurrusDei; 07-28-2014, 05:47 PM.
Comment
-
Damn, that looks awesomely OEM. Good job man
Originally posted by ROLLingKINGOriginally posted by slammin.e28Comment
-
I'd have to say this is the best effort I've seen yet to update an OEM radio setup with something looking factory. Sweet job on the ABS glue and flush mount!I BUY/SELL REFURBISHED CM5907s & CM5908s
HOWTOs:
DB vert plastic bumpers
OEM Keys
MTech1 docs
88 ix Lach/Card
91 ic Calypso 3.1
86 Cosmo 2.7
OEM+ or bust!

reelizmpro: I will always be an e30 guy.. I still do all of my own labor
TrentW: There's just something so right about a well-built M20 in an E30
e30m3s54turbo: I save my money for tuner parts.Comment

Comment