
What's needed:
Floor jack
19mm deep socket
17mm socket
Tire iron
Loctite (blue or red)
Impact gun/impact driver cordless (this is not NEEDED but it DRAMATICALLY helps in the removal of the top strut nut)
Jack the car up on a safe, level surface. Use jack stands to make sure the cars going no where.
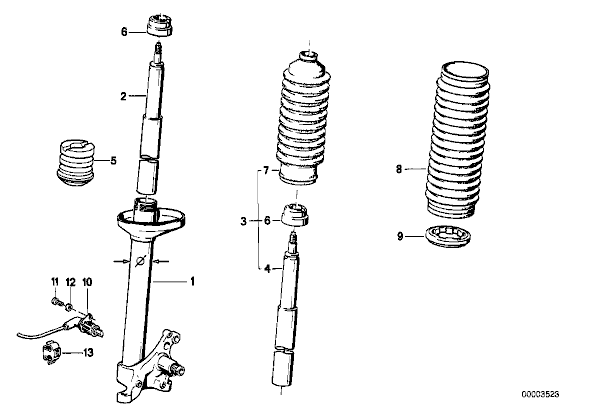
Start by removing both front tires. Then move under the car and remove the sway bar end link that connects to the countrol arm (17mm nut iirc). Place your floor jack under the strut knuckle as it makes it much easier. Now if you have an impact gun of any variety, pump the jack until it's resting against the knuckle and remove the top strut nut (part # 6 in the first diagram) which is 19mm. Now, if you don't have an impact wrench, pump the jack up until the spring is fairly compressed and give it another go. It's a pain, because it'll rotate in it's perch. Again, an impact gun is very, very handy here.
Once you've removed the 19mm nut on the shock tower (part #6 in the first diagram), slowly lower the strut down. Be careful to keep an eye on your brake lines.
(*NOTE* I did not have to disconnect them as the suspension I'm running is H&R race springs and really didn't have to drop it down much to remove the original spring hat)
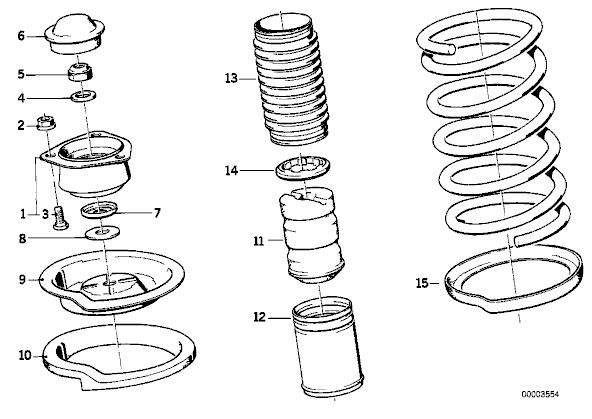
Once you've lowered the jack down enough to work, remove the stock spring hat (part #9 second diagram), washers and if you want (part #8 second diagram), you can also remove the upper spring pad (part #10 second diagram).
(*NOTE* I removed all of those with no ill effects what so ever. Also removed the lower spring pad while there was no pressure on the suspension)
Now take your new drop hats and negotiate them over the top of the shock threads so it sits on top of the shock. Take the washer(s) supplied and place them over over the shock shaft/threads.
(*NOTE* I recommend using the supplied washers to give you the clearance for the drop hat to sit properly on the springs and rotate correctly while turning/driving)
At this point jack the strut up and navigate the strut back into the shock tower. Place the 19mm top nut on and thread it a little bit. Now you're going to want to position the springs and the drop hat so they sit where and how they are supposed too. I ran into a few problems with this due to the shortness of the H&R race. "Wishno" suggested jacking the strut up and compressing the springs slightly to figure out where everything needs to sit. Use your discretion here so as not to jam a finger or hurt yourself.
Now reconnect the sway bar end link and tighten. Go back up top and thread the top strut nut down a bit with your fingers. You're going to want to drop the car down and make sure the drop hat is sitting properly before torqing down the top strut nut, otherwise, it'll just spin in it's perch. I had to use an impact gun and then check it with a torq wrench. Be sure to not over tighten the top strut nut otherwise the shock and drop hat will not rotate as they should (freely according to the turning etc etc)
Get your wheels on and all that jazz and give it a test. You'll know if your springs are not sitting correctly very soon if anythings wrong. It's intimidating when you first get into it, but once you're looking at all the pieces, it makes a lot more sense. Let me know how it goes and I hope this helps!
Pictures of the process to come. Hope it helps.
Floor jack
19mm deep socket
17mm socket
Tire iron
Loctite (blue or red)
Impact gun/impact driver cordless (this is not NEEDED but it DRAMATICALLY helps in the removal of the top strut nut)
Jack the car up on a safe, level surface. Use jack stands to make sure the cars going no where.
Start by removing both front tires. Then move under the car and remove the sway bar end link that connects to the countrol arm (17mm nut iirc). Place your floor jack under the strut knuckle as it makes it much easier. Now if you have an impact gun of any variety, pump the jack until it's resting against the knuckle and remove the top strut nut (part # 6 in the first diagram) which is 19mm. Now, if you don't have an impact wrench, pump the jack up until the spring is fairly compressed and give it another go. It's a pain, because it'll rotate in it's perch. Again, an impact gun is very, very handy here.
Once you've removed the 19mm nut on the shock tower (part #6 in the first diagram), slowly lower the strut down. Be careful to keep an eye on your brake lines.
(*NOTE* I did not have to disconnect them as the suspension I'm running is H&R race springs and really didn't have to drop it down much to remove the original spring hat)
Once you've lowered the jack down enough to work, remove the stock spring hat (part #9 second diagram), washers and if you want (part #8 second diagram), you can also remove the upper spring pad (part #10 second diagram).
(*NOTE* I removed all of those with no ill effects what so ever. Also removed the lower spring pad while there was no pressure on the suspension)
Now take your new drop hats and negotiate them over the top of the shock threads so it sits on top of the shock. Take the washer(s) supplied and place them over over the shock shaft/threads.
(*NOTE* I recommend using the supplied washers to give you the clearance for the drop hat to sit properly on the springs and rotate correctly while turning/driving)
At this point jack the strut up and navigate the strut back into the shock tower. Place the 19mm top nut on and thread it a little bit. Now you're going to want to position the springs and the drop hat so they sit where and how they are supposed too. I ran into a few problems with this due to the shortness of the H&R race. "Wishno" suggested jacking the strut up and compressing the springs slightly to figure out where everything needs to sit. Use your discretion here so as not to jam a finger or hurt yourself.
Now reconnect the sway bar end link and tighten. Go back up top and thread the top strut nut down a bit with your fingers. You're going to want to drop the car down and make sure the drop hat is sitting properly before torqing down the top strut nut, otherwise, it'll just spin in it's perch. I had to use an impact gun and then check it with a torq wrench. Be sure to not over tighten the top strut nut otherwise the shock and drop hat will not rotate as they should (freely according to the turning etc etc)
Get your wheels on and all that jazz and give it a test. You'll know if your springs are not sitting correctly very soon if anythings wrong. It's intimidating when you first get into it, but once you're looking at all the pieces, it makes a lot more sense. Let me know how it goes and I hope this helps!
Pictures of the process to come. Hope it helps.


Comment