Announcement

Collapse
No announcement yet.

The 5 Year Restoration - E30 M3 Reborn

Collapse
X
 
  • Filter
  • Time
  • Show
Clear All
new posts

  • CurrusDei
    replied
    Alright, update time.


    My subframe stuff is all back from the powder coater. Very, very pleased. Huge difference.


    Glad to see this guy go


    Now for some quality time with the ground…


    Adhesive padding around this wire to keep it from being pinched between the body and the tank (the factory did this, but it had deteriorated, so new padding it is)


    Center bolt in the driveshaft tunnel


    So much room in here all of a sudden. A few pieces left (transfer tube on the tank and hose from the tank to the filler pipe)


    Found a good passenger tail light


    Got my plastic rivets for the bumper


    Did some more zincing. ABS rings were fun…


    These too…


    Clutch slave cylinder


    Got a new slave cyldiner and grommet, but man it’s a pain to put in with the pedals and brake servo already in, so no pics of that process…


    New line to brake booster is black


    Cleaned up hardline, new rubber line from master cylinder to slave cylinder


    Radiator to coolant overflow tank line.


    New elbow


    Clamps on the straight rubber line are being cleaned up, reinstalled this weekend. Thinking I’ll zinc them.


    Oh yeah, remember the nasty steering rack? RackDr said I’m lucky it didn’t kill me. It was missing internal components, stuff was in backwards, etc… consistent with that zip tie on the right


    Anyways they cleaned it up, rebuilt it from the inside out, pressure tested it, and its working perfectly now. Looks a lot better too. I wish they could’ve kept the original zinc finish, but apparently they have to put it in some clamps to get it to come apart and the cast paint looks a lot better. Pretty cool having the original rack as so many of these go over to Z3 or E36 parts.


    Ashtray back in – got new little bulbs for all the gauges and the cig lighter


    New install hardware too


    Anthracite E30 Floormats from Germany. OEM. I think NLA?


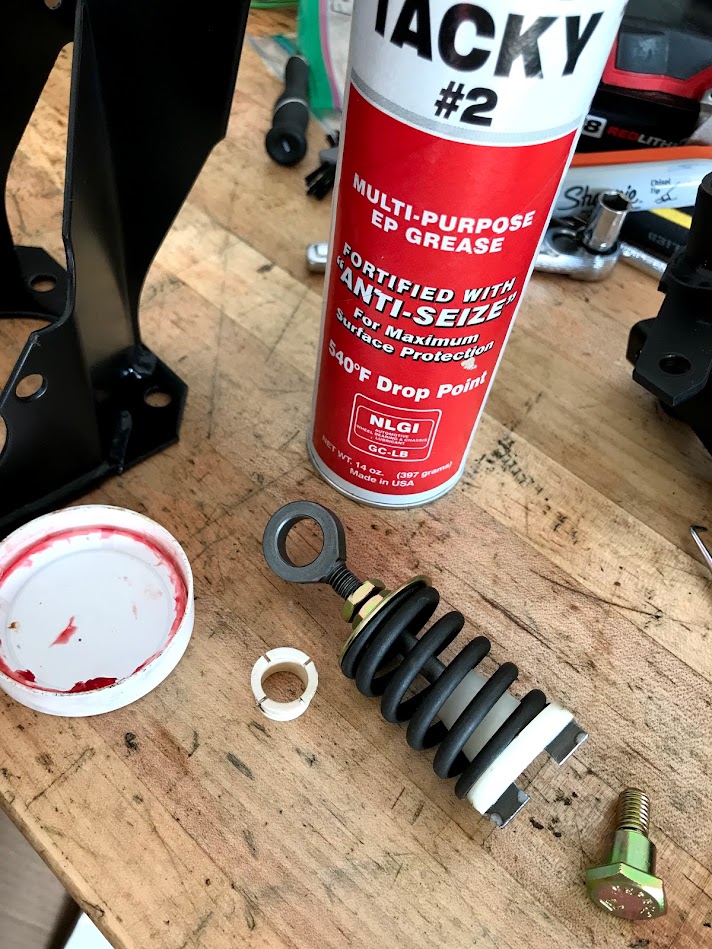
    And now time for some bushings and bearings.


    oooOOooo shiny and satiny


    Teflon grease for rubber bushings


    Wheel bearings in too (other arm shown)


    For this weekend, ball joints, subframe bushings, shock inserts, more zinc.

    Leave a comment:


  • CurrusDei
    replied
    Well, the odometer on the restoration is rolling over the 4 year mark this month. My garage is packed with nice shiny parts instead of old greasy ones. Update coming shortly...

    Leave a comment:


  • chucko
    replied
    ^Oh, I see. Awesome. Thank you for that pic. I never would have thought that rubber piece would compress like that.

    Leave a comment:


  • CurrusDei
    replied
    Like this...


    Sent from my iPhone using Tapatalk

    Leave a comment:


  • CurrusDei
    replied
    I got a set of metric drill bits and then used the one that was the closet fit to that rubber plug (i forget what size it was, but i just used my caliper). When you put the screw into that rubber plug, it threads into the metal threads at the far end. Then when you continue tightening, it squishes the whole thing down, so you end up with the rubber flange on one side, and kindof a rubber donut on the other.

    Leave a comment:


  • chucko
    replied
    Originally posted by CurrusDei View Post

    This one was exciting, and nerve wracking, and tedious
    Evo 3 Undertray - OEM


    All told, I had to drill 46 holes in my new, freshly painted bumper. Like I said, nerve wracking. The metric drill bits I bought got were great, and definitely broken in by that point.


    And then, I put 3 coats of touch-up paint in each of those 46 holes to prevent moisture getting under the paint,

    First off - Love the thread and your attention to detail.

    I'm going to be mounting the EVO3 undertray and splitter to my US bumper and am wondering what size holes you drilled for mounting the splitter? I can't seem to find a post that indicates the size of the holes that need to be drilled.
    Also, I'm curious how the splitter stays mounted to the bumper...does the rubber plug expand in the hole when mounting bolt screwed in?

    This plug:


    Thanks!

    Leave a comment:


  • CurrusDei
    replied
    Thanks. I have a fair amount of parts inbound now - new fuel lines, pumps, filters, etc, some brake stuff, all my subframe stuff is at the powder coater, bought another dash (the first one cracked), got a crack free passenger tail light, steering rack is back from rack doctor, etc. Will put more updates together soon.

    Leave a comment:


  • BMG
    replied
    Congrats on the new arrival. Great to see another update on this build and proving very helpful for someone trying to do the same but some way behind you.

    Leave a comment:


  • konig
    replied
    Great thread, thanks for all the detail. I will be taking the drill to my bumper soon to fit the Sport Evo splitter and your information is invaluable.

    Leave a comment:


  • CurrusDei
    replied
    Originally posted by alistairolsen View Post
    Thank you very much for that!

    So either all shells came with the holes already, or they are simple enough to replicate. I was concerned that Aircon shells might have had different bracketry welded on which would be now almost impossible to source.
    No if i had to guess I'd wager the holes are probably there. There are a ton of unused holes in mine - including provisions for RHD vehicles

    Leave a comment:


  • alistairolsen
    replied
    Thank you very much for that!

    So either all shells came with the holes already, or they are simple enough to replicate. I was concerned that Aircon shells might have had different bracketry welded on which would be now almost impossible to source.

    Leave a comment:


  • CurrusDei
    replied
    Originally posted by alistairolsen View Post
    Lovely work as always!

    If you havent obscured them with further work, could you post some pictures of any mounts on the shell for the AC condensor - imagine you had a non AC car and a new condensor, what would be missing inbetween?

    Thanks

    You'd need the right trim pieces (mine are 5 and 6)


    The condenser itself sits on these the rubber feet (8) held in by the rivets (9)


    You can see both in this pic.


    The top mounts for the AC condensor are above the radiator (the speed nuts go in the vertical slits and the bolts go through the circular holes).


    Installed

    Leave a comment:


  • alistairolsen
    replied
    Lovely work as always!

    If you havent obscured them with further work, could you post some pictures of any mounts on the shell for the AC condensor - imagine you had a non AC car and a new condensor, what would be missing inbetween?

    Thanks

    Leave a comment:


  • CurrusDei
    replied
    Hey guys, I'm still here - things have just been CRAZY around the house lately. We had our third kid due in early December and he decided to show up the night of Halloween. He was tiny when he was born but has almost doubled his weight since then.

    In keeping with the tradition of taking pictures of my boys in engine bays, here he is...


    For those of you who dont remember, this is my two year old son (soon to be 3) almost 3 years ago...


    I have made some progress over the past few months...

    Cleaning up some electrics that were fouled


    That probably doesn’t conduct well…


    better


    Brand new AC Blower, zinc plated the retaining clip, wires clean and carefully routed.


    Goodbye for now…


    Close contender for the price shock award. $35 piece of rubber drain…


    More covers..


    Time to fill in the front a bit


    New radiator surround trim, on top of freshly painted/cleaned gas tank


    New rubber feet for radiator and AC condensor


    Upper trim (restored with Eastwood plastic restorer)


    Christmas present from 3 years ago…I think


    Freshly zinced hardware back on. Put new washers on the lower left bolt stoppers


    Satisfying


    AC Condensor from that same Christmas…


    New gaskets for front signals. The old ones were hard, brittle, and rectangle. I was surprised that at one point they were soft, flexible, and circular.


    And new covers installed


    Cleaned up Mr. Jack. Elected not to repaint over the few scuffs on it. I’m obviously not going for patina on this build, but keeping the tools original seemed true to the story of the car, even if it has been completely overhauled otherwise. Plus I can always do it later.


    What am I up to here….


    Of course, what else would that be


    Fits perfectly.


    I liked this one. Super detailed. Replaced the push on screw thread protectors that are on the lip under the fender.


    Trim to fit…


    Some painty…


    Covering the new fuel ventilation lines. New fasteners


    Expansion tank cover on


    Brrrake booster time! I thought about replacing the booster and the master cylinder, but decided to try restoring them first. The vacuum booster holds a good seal (tested with shop vac). The calipers, pads, and rotors were all in such poor shape before the teardown that I think the poor braking issue stemmed from somewhere downstream of the master cylinder. If I’m wrong, I’ll replace, but I don’t think I am.

    Yucky dirty.


    Hows the air filter looki..oh nevermind.


    Pulled apart, overflow tank off, seals out


    Replacing this seal as well. Piston compresses freely, pushes out fluid (very dirty, brown fluid)


    Clean it up. New overflow tank seals


    And new overflow tank. Much better.


    Booster cleaned


    Tried to scuff and paint, didn’t work. Tried again, didn’t work. Finally, it got serious…

    Bare metal


    Wurth primer


    Sticker replication


    Fabricated new foam filter


    Got new rubber accordion boot. New old stock – on the shelf since ’85.


    Before I can put it back in, have to handle the other side – pedal box.
    Clutch return spring. Re-plated months ago


    Took some patience and some very small tools to get this clip back on


    All together


    Clutch pedal (I re-painted all the pedals and the pedal box)


    New rubber pads as well


    Last we’ll see of these parts for a long time…


    Spring in


    Almost looks too pretty to hide and then step on repeatedly.


    The shine at the top of the brake pedal is just some grease – cleaned up nicely.


    Ok, now together with the new gaskets…


    And new padding


    In (sticker still coming)
    Last edited by CurrusDei; 01-07-2018, 06:52 PM.

    Leave a comment:


  • Court M3
    replied
    Seats came out nice, trimmers did a great job!

    Leave a comment:

Working...
X