Announcement

Collapse
No announcement yet.

Panici's E36 M3 - Realistic Dream Car

Collapse
X
 
  • Filter
  • Time
  • Show
Clear All
new posts

    #16
    Originally posted by Northern View Post
    Man what a great pickup. All things considered, the car looks to be in great shape.
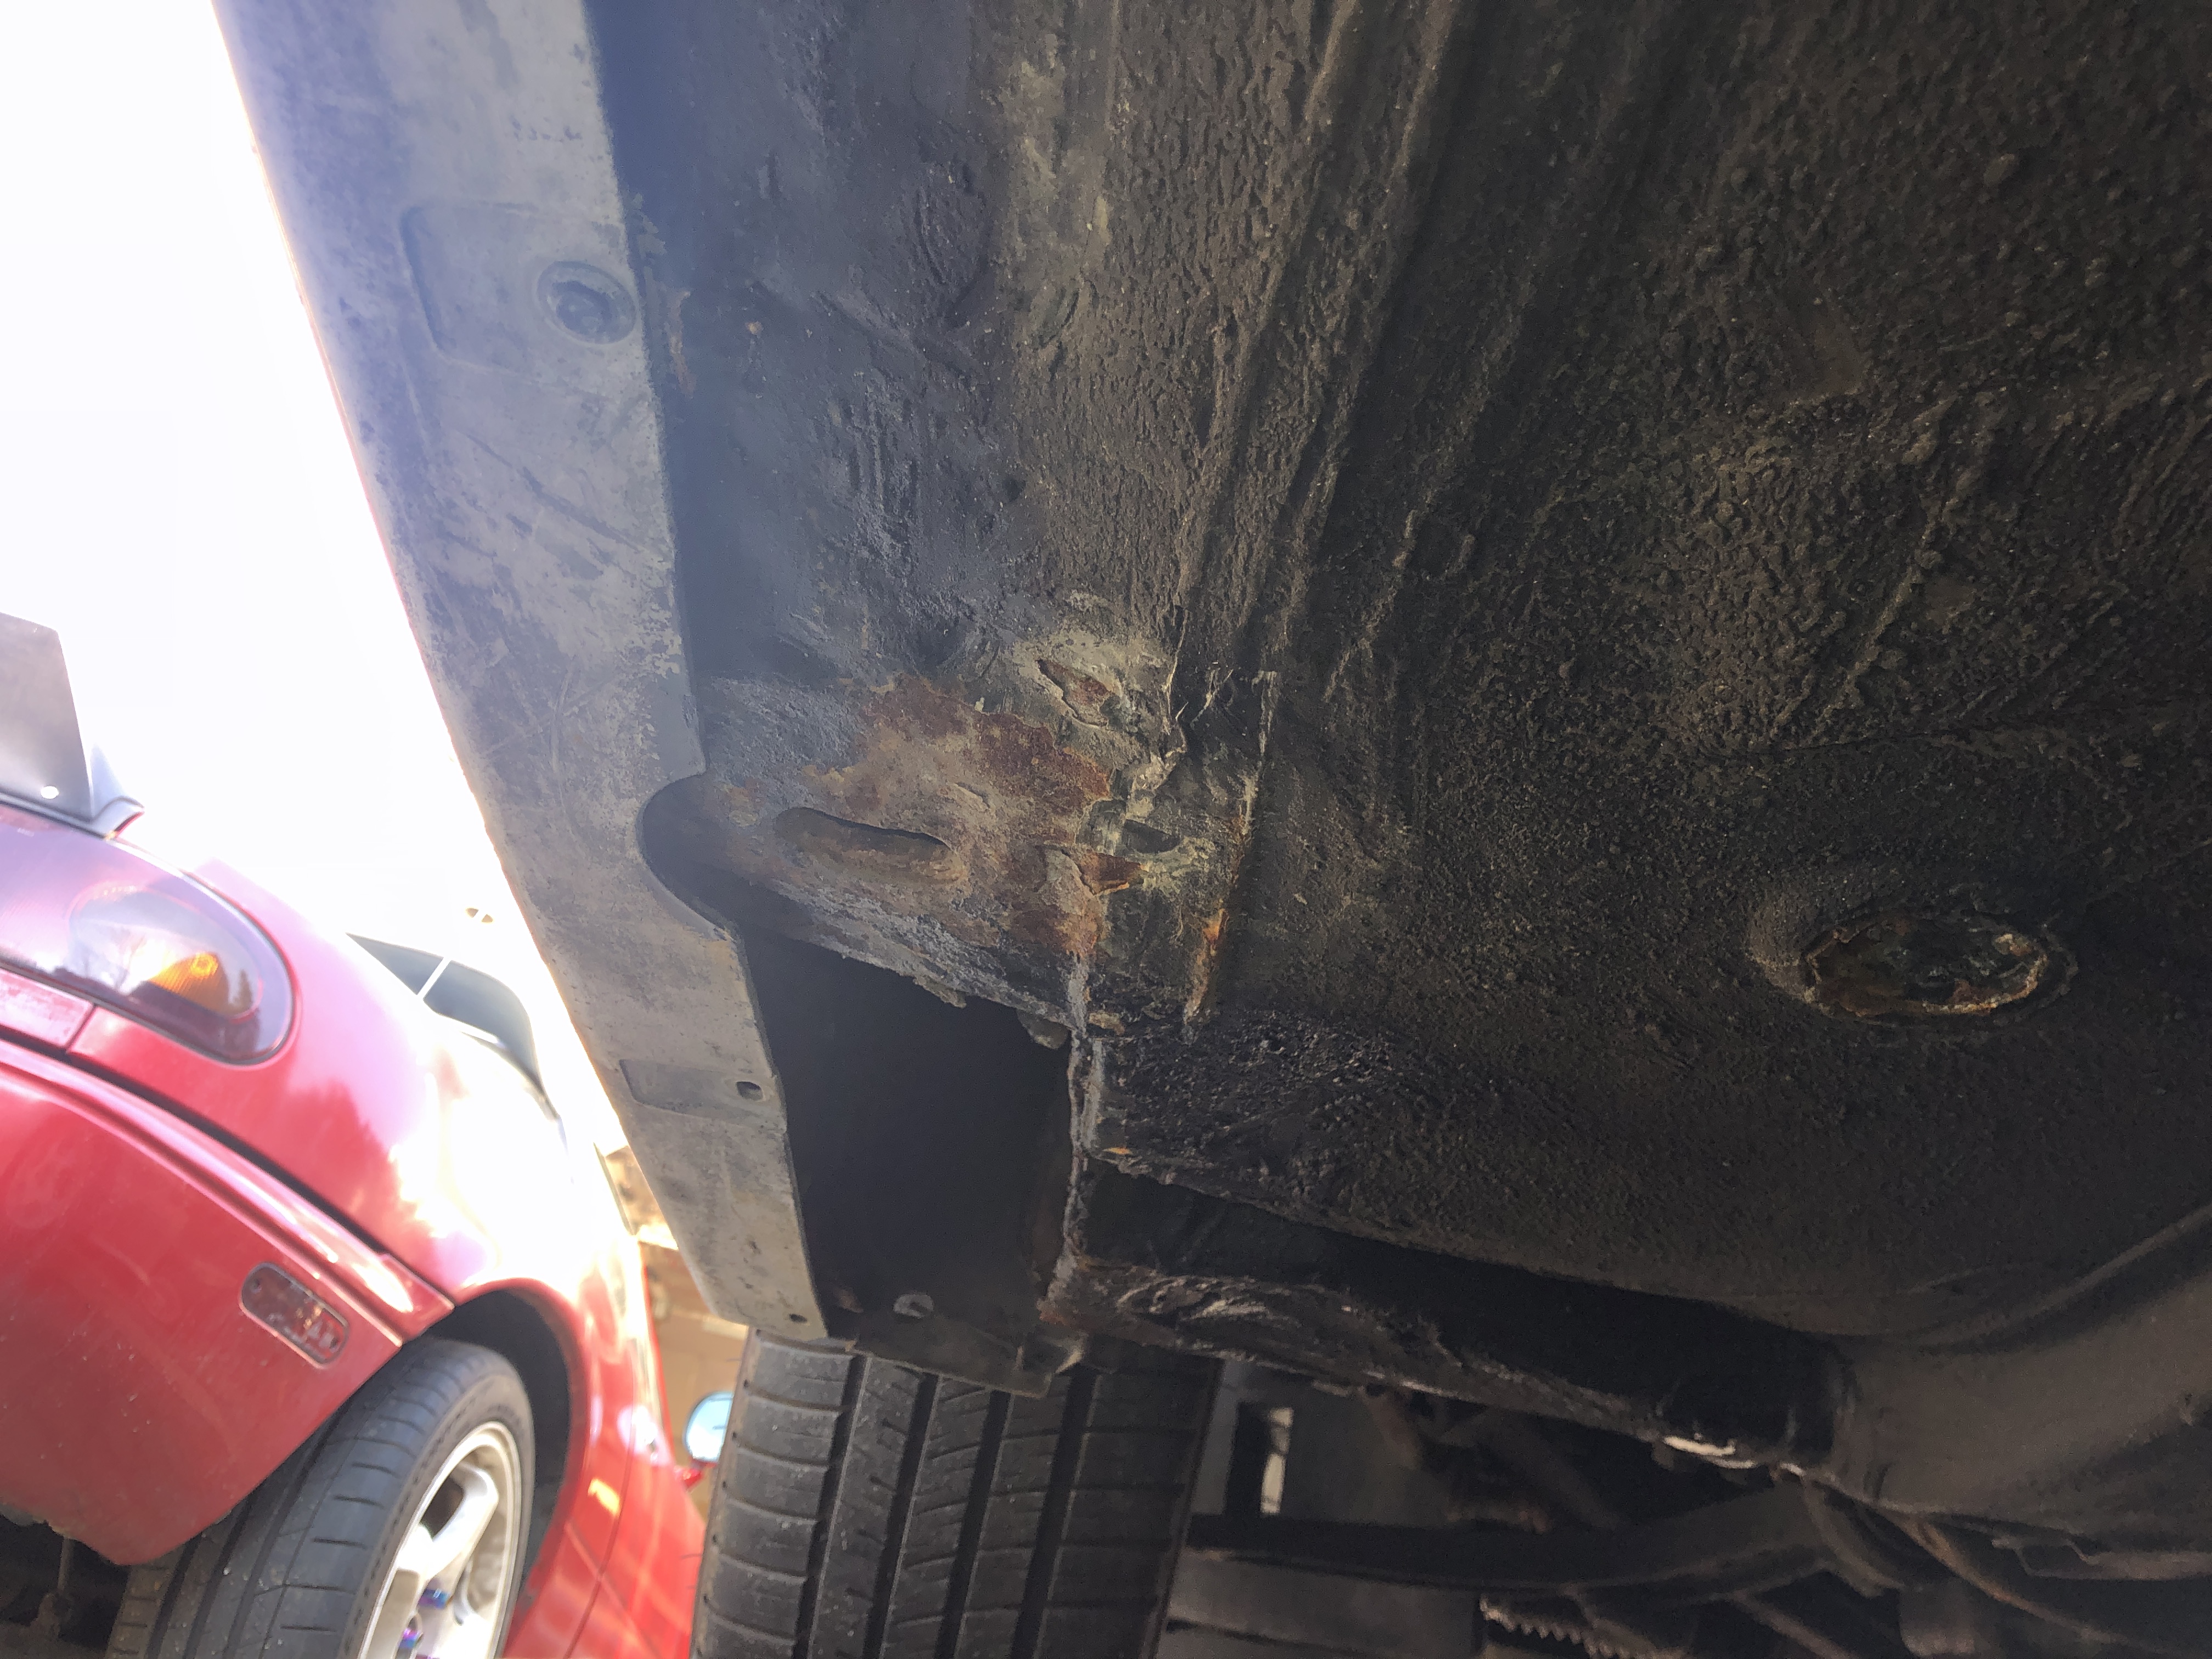
    I can't say for certain it's in great shape, haven't dug into it yet (and have only driven it once). I'll say "good" shape is a safe bet.
    Kind of anticlimactic to get a car but not be able to drive it. An unfortunate fact of life in this area with all the road salt.

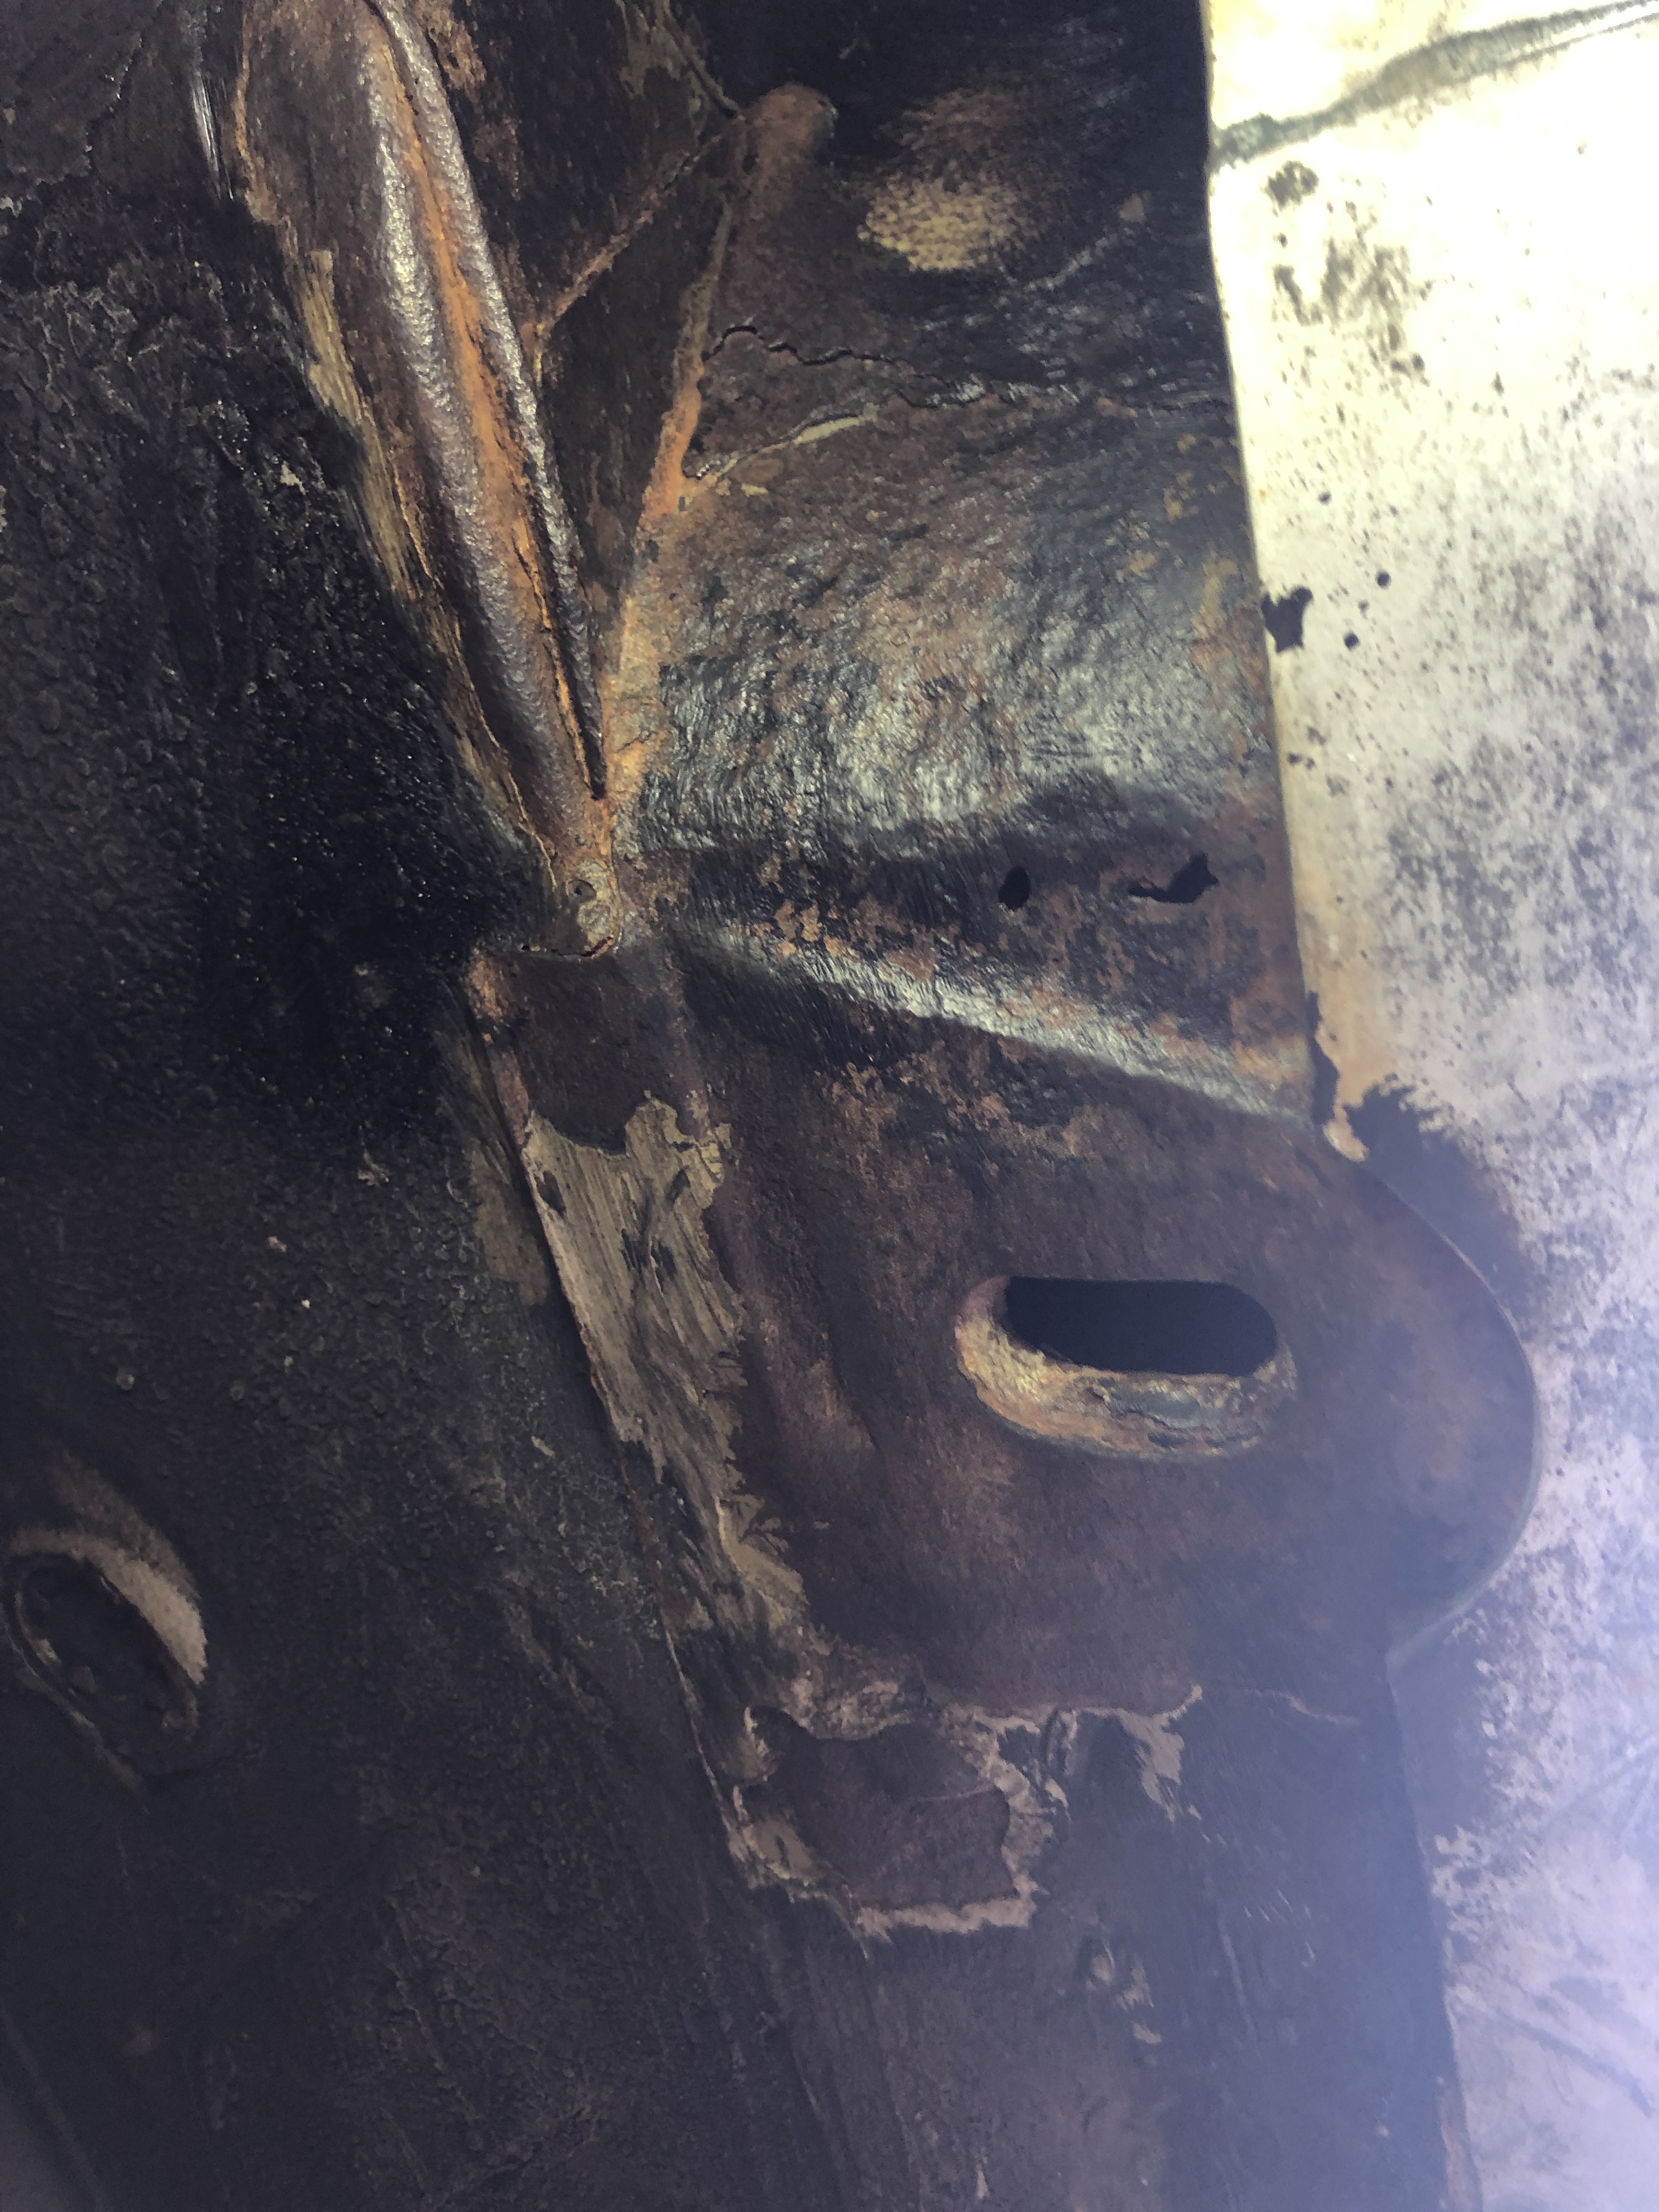
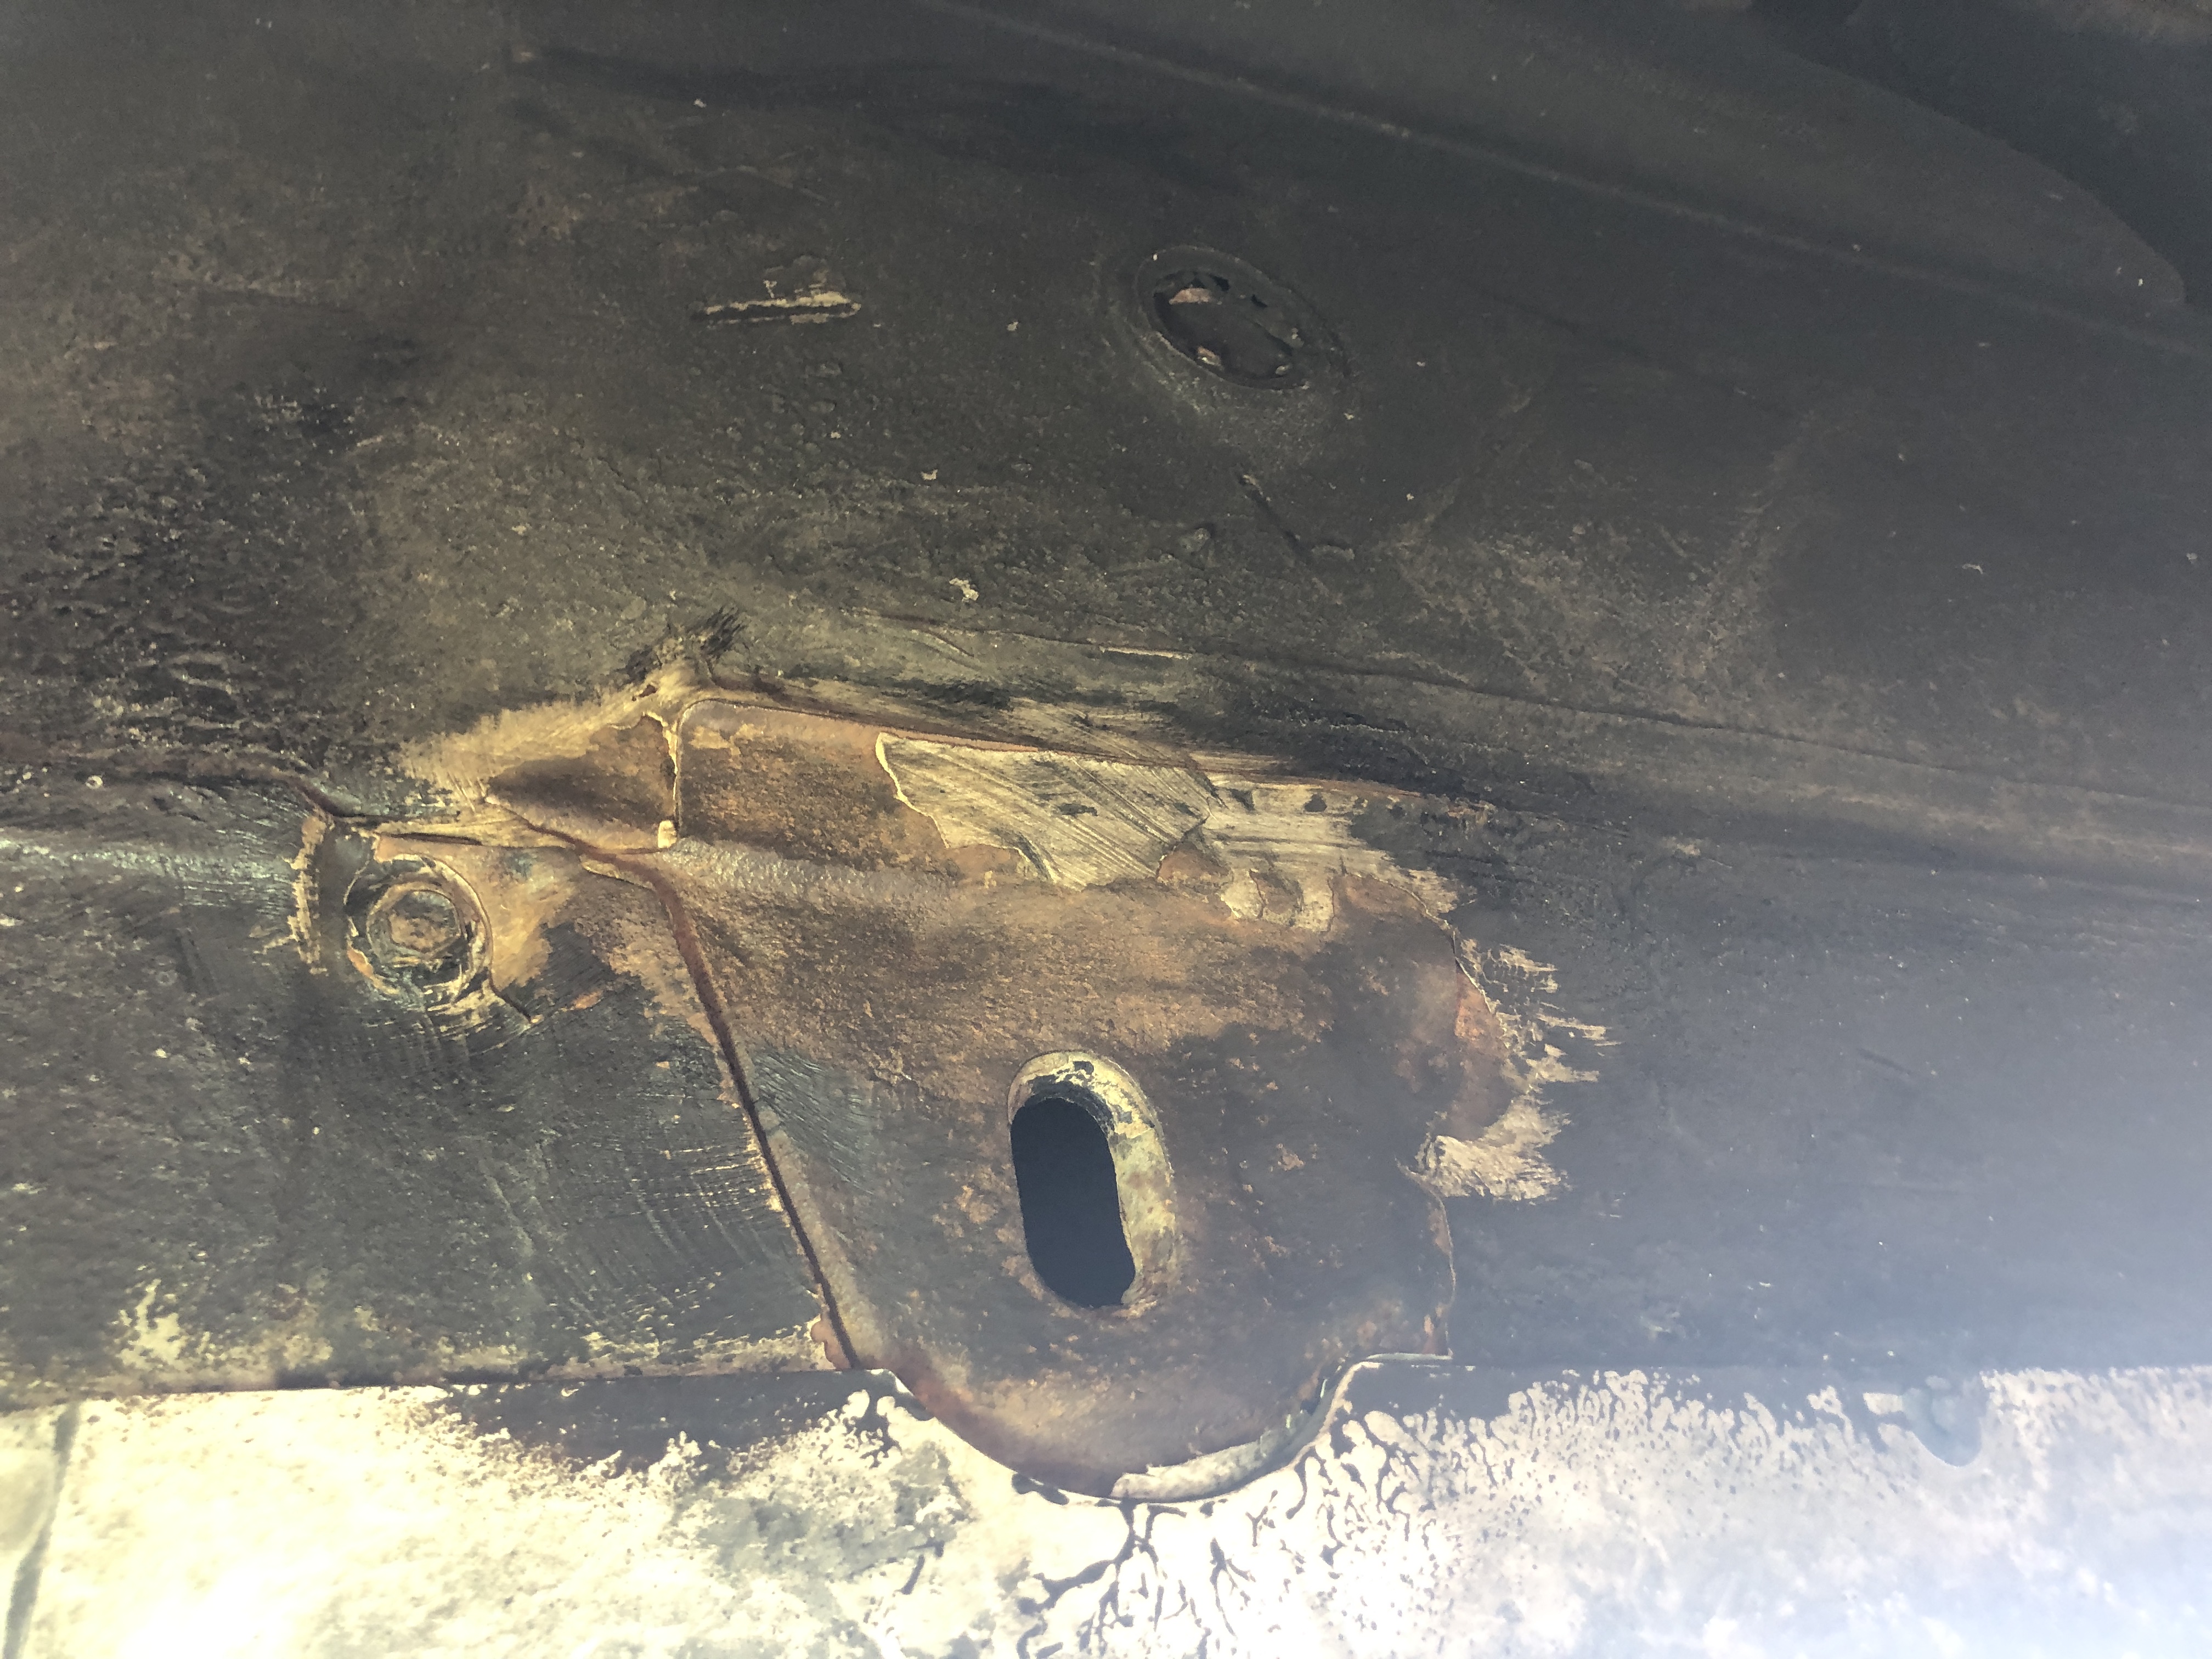
    Rear has had paint and bodywork, you can see the colour mismatch on the rear quarter panels. And those miss-rolled rear arches really catch my eye when I walk by. Will eventually have an opportunity to correct them as there are some small rust bubbles starting in that area, but hopefully won't need to address that for a while.


    That said, it is largely original, interior is decent, and it feels tight when driven.
    It's certainly worth what I paid even though the market has softened significantly in the past year or so.

    Really any way you slice it, it's a dream come true for me. If it needs significant work to refresh or restore that's just part of the fun.

    Comment


      #17
      Weather is starting to warm up here, so finally got the M3 up on ramps.

      Front end is "Canada Mint", meaning no rust holes through the floor.
      Oddly enough the lower part of the driver's side fender is gone, looks like it was cut off. Easily fixed with some sheetmetal and a welder when I have a chance. Jack points are solid and with some cleanup and paint will last for a LONG time. Still need to look at the rear end.


      Changed the oil with Rotella T6 5w40 & Mahle Filter.

      Found my Aux fan to be inoperable when jumping either of the temperature switches. Bit of an issue since I deleted the clutch fan.
      Took out the front undertray & "porkchops" (which I was surprised were all original and in place).

      Now with access to the fan connector, I applied power directly and still no action.

      Grabbed my 16" SPAL 30101517 Pusher Fan (that used to be in the E30), and mounted it directly to the Aux fan shroud after cutting the original fan out.
      This JUST fit behind the bumper bar with some force. If you are attempting I would recommend the thinner SPAL 30100401. It was useful to have the orange 328i for reference on this step.
      Had to cut part of the alternator cooling duct for clearance, but you can’t see it with the piece installed.

      Wired the SPAL to the high-speed relay with the connector cut from the dead Aux fan, and paralleled the wiring at the radiator temp switch.
      The fan kicks on at the lower temperature setting of 91°C / 195°F.
      Since I had the front kidneys out for the fan install, I swapped back to the original chrome ones (kindly included by the previous owner).

      Most of the road salt is gone now, so I took the car out for about a 20mi drive. Went well except for a rattly center console, and a rad cap that pushes out a little coolant. Before I left I spent more time cleaning out the aftermath of the chemical explosion from last year (little white spots everywhere).


      Last edited by Panici; 04-03-2024, 05:54 AM.

      Comment


        #18
        Dropped the knee bolster under the dash today to get at the wiring.


        DRLs were added to the car when it was imported into Canada years ago.
        They used the CDN DRL module, but opted for vampire wire taps to get into the headlight wiring.
        Also, found that the Green/Yellow headlight wire was cut and just twisted back together with some electrical tape thrown on top.

        I set about putting things right with solder and heat shrink. Made additional wiring modifications as below:


        1. DRLs Disable:
        Connected both Pin 1 (Yellow) and Pin 5 (Green/Red) of the DRL relay module to Pin 12 (Green/Red) from Fuse 25 going into the headlight switch.

        2. Yellow wire repair:
        Opted for liquid electrical tape & 3M Super 33 after the tap was removed, as there was no damage to the conductor, only the insulation.

        3. Independent Fog lights:
        Connected Pin 2 (Yellow/Violet) on the fog light switch to Pin 8 (Green/Yellow) on the headlight switch going to Fuse 22.
        This allows the fog lights to turn on independently (ignition in Run or Start), without needing the amber running lights or headlights on.
        Will also meet the legal requirement for DRLs if anyone ever checks.
        Additionally, the fog lights still turn off properly when the highbeams are turned on.


        4. Disable clutch pedal starter interlock:
        Connect Pin 2 (Brown/Black) to Pin 3 (Purple/White) which goes to Fuse 45.


        5. Unplugged wiring to the Chime Module.


        Here is a before picture of the wiring.
        I forgot to take a photo when I was done, but imagine marine grade heatshrink and solder instead of wire taps, and the added blue wires following the path of the original harness.


        Last edited by Panici; 04-01-2024, 03:56 AM.

        Comment


          #19
          Put the kick panel back together today.
          Swapped the leaky rad cap for a used spare one that seals.
          Installed a strobing LED third brake light.
          Trimmed and taped up the worn-through sport steering wheel.
          Typed in the radio code (31131) for the first time.

          Also installed a set of TYC Smoked Front Corner Lamps.

          One of the tabs was broken on a bulb holder, but I retrieved a spare from my parts hoard and it works great after a thorough cleanup and transfer of seal from the broken holder.

          Left side doesn't fit perfectly, think if I remove the headlight I can get it perfect. But that's a job for another day. The foam surrounds are larger on the aftermarket TYC lenses, which accounts for some of the fitment issues.


          Speaking of steering wheels, do I need anything special (slip ring?) to install the M-Tech 2 wheel in the M3?
          Pictures below of the backside and with the horn pad removed.


          Last edited by Panici; 04-07-2024, 01:41 PM.

          Comment


            #20
            Drove the M3 some more this week. Grabbed a picture just as the eclipse was going on!

            Good:
            Driver's side Vader seat heat works well
            Harmon-Kardon sound system is great after some adjustment.
            Repainted the shield for my CAI, recoated the filter (with K&N oil). Installed the AFE Cold Air Intake. Adds some nice induction noise growl.
            Tax refund came, so I ordered a steering wheel extender, and set of wheel spacers for the M3.

            Bad:
            Airbag light came on, bought an Amazon special reset tool. Code was 02, 11 for Passenger Seat Belt Buckle Switch.
            A/C doesn't work.
            Slight grumble from center of car for the first few miles. Corresponds with vibration in shifter. CSB possibly on it's way out?

            Other:
            Set of Bosch Icon wiper blades costs $63CAD now?!
            Little terminal at the store recommended a 21" driver's side and 20" passenger side.
            Needed to exchange the passenger side to a 19", and driver's side could maybe squeeze a 22" on there. (For my future reference I used a 21A driver and 19A passenger.)
            Goes to show you those little terminals aren't accurate for a 25 year old car!


            Last edited by Panici; 04-13-2024, 05:09 AM.

            Comment


              #21
              Swapped my chassis cross brace with the slightly cleaner one from my departed Bostongrun 328i.

              Quick (after work) job yesterday of scraping, and wire wheel on the jack points. Got all the loose edges of undercoating off which were trapping water against the metal.

              I followed up by applying brush-on black oil-based rust paint.
              Will need to pull off sideskirts and front fenders to do a complete job.


              Driver's side front is by far the worst spot.
              Worked three small holes into the area, and there are thin spots remaining. In addition to the front fender which is missing the entire lower return section.


              Other three jack points cleaned up extremely well. I am still very happy with the condition of this car, it's definately a keeper!


              Driver's side front after wire wheel:


              Driver's side rear after wire wheel:


              Passenger's side front after wire wheel:


              Passenger's side rear after wire wheel:


              Driver's side front with fresh paint:


              Chassis brace, original M3 on left:

              Comment

              Working...
              X