

-
Hey sure thing. I use an Iwata Kiwami 4 HVLP gun, 1.3mm tip. It works great for both base and clear, just different settings for each. I also use a dedicated primer gun, a cheap Harbor Freight hvlp with a 2.0mm tip for shooting high solids 2k primer. My current compressor currently is a cheaper Harbor Freight unit that I replaced my old reliable with when it died. It sucks and spews more moisture into the lines than I've every experienced before. Bottom line, don't cheap out on an air compressor or else you will be sorry like I am!Leave a comment:
-
Looks excellent, well done. Do you mind sharing the specs on your compressor/gun
(Iwata?)/paint choices? Thanks.Leave a comment:
-
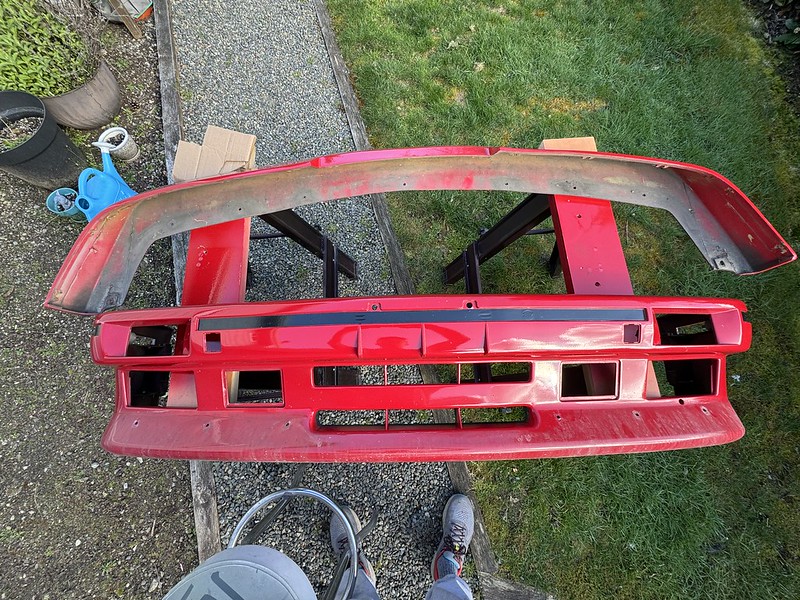
The next project I decided to tackle was the condition of the front end. The bumper had been repainted in the past, along with the Evo II chin spoiler. The paint had cracked in several spots and it looked like a corner of the chin spoiler had been bumped at one point, leaving some nasty spiderweb cracks.
I pulled the front bumper and disassembled everything:
 Untitled by IronJoeT16S, on Flickr
 Untitled by IronJoeT16S, on Flickr
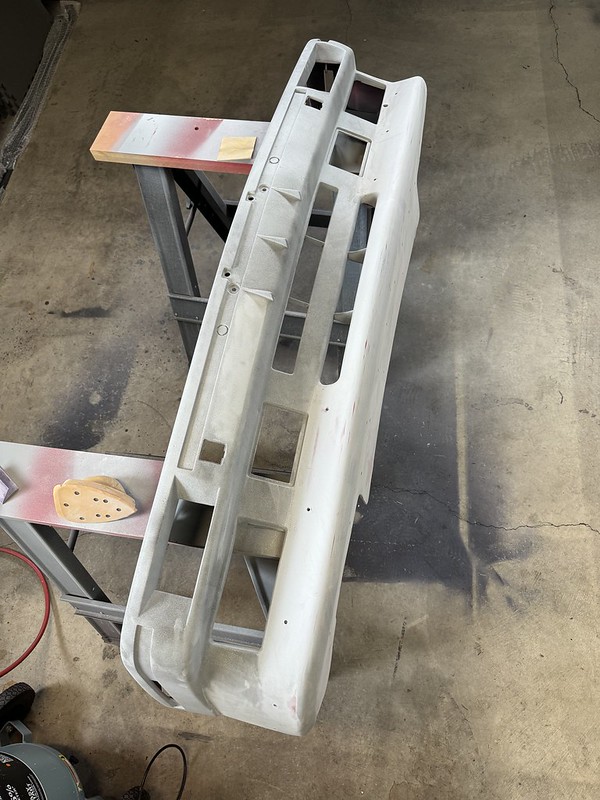
I don't have a lot of photos for this part, but I sanded and primed the bumper, lip, and what they call the "carrier" (it isn't a carrier, it's the little strip of metal between the bumper and grills. This appeared to be original paint on the carrier and it was badly pitted from 35 years of road use.
 Untitled by IronJoeT16S, on Flickr
 Untitled by IronJoeT16S, on Flickr
 Untitled by IronJoeT16S, on Flickr
I then applied three coats of Zinnoberrot base coat, then 4 coats of 2k clear via my HVLP gun.
 Untitled by IronJoeT16S, on Flickr
 Untitled by IronJoeT16S, on Flickr
 Untitled by IronJoeT16S, on Flickr
At this time I decided to add smoked crosshair smileys:
 Untitled by IronJoeT16S, on Flickr
I reassembled the bumper, bolted the lip back on, and it was ready to reinstall:
 Untitled by IronJoeT16S, on Flickr
 Untitled by IronJoeT16S, on Flickr
Back on, with bumper tape installed.
 Untitled by IronJoeT16S, on Flickr
Yes, I also added cheap matte black kidneys. Not sure how we feel about it yet :)
 Untitled by IronJoeT16S, on Flickr
And one last shot, with a teaser of the NEW new wheels!
 Untitled by IronJoeT16S, on Flickr
I did a lot of work to get the 16" style 5s where I wanted them, but at the end of the day they just weren't aggressive enough for my vision of the car. I decided I needed to step up to 17s. I agonized over what to put on the car as it seems the BBS RS has been done to death. Yes it looks great, but also I felt the need to stand out a bit more. I ended up building 17x8.5 front, 17x9.5 rear custom wheels. I'm not quite ready to reveal them just yet as the car is currently undergoing another modification that fits with the "theme" and they go together.
 Untitled by IronJoeT16S, on Flickr
Leave a comment:
-
Correct, these are brand new made from Startec, not New Old Stock. A few retailers are gouging insane prices for these but I bought mine from Schmiedmann for a very reasonable price. In the end I got a brand new set of lights for cheaper than many of the used cracked ones I see going up for sale. Are they as pink as I'd like them? No. But I'm still considering it a win.
Leave a comment:
-
they're being made again. I've seen a couple ads in IG - I think Garagistic is a dealer?Leave a comment:
-
Startecs and carbon gurney flap really tie the back end together.
Looking great!Leave a comment:
-
Next was a sentimental upgrade for me. I loved running the Startec taillights on my Henna M3, but I remember at one point I grew weary of having them on a car that I drove so frequently. I ended up trading them away to a friend because I was afraid of them getting damaged... sure enough, the worst did happen to me. Those tails are still out there somewhere so I am so glad they weren't on my car when I was rear-ended.
So for this build I had to get another set. A few used sets came and went, I wasn't happy with the condition for the current asking prices so I pony'd up for a brand new set from Startec. A lot of people call these "reproductions" but I don't think that's accurate - they are by Startec, not copies from another company, so I'd just call them the "new run" or "current run" Startec tails.
They are on the darker side compared to my old pink set but I don't mind. They look incredible.
 Untitled by IronJoeT16S, on Flickr
About the same time, I went about sorting the exhaust. At some point in this car's life, the factory catalytic converters were cut out of the center section and replaced with resonators. It was loud and a hack job, so I replaced it with a Supersprint resonated non-cat stainless center section. This was great, but then my exhaust note was almost too quiet. So I swapped out the Rogue Engineering muffler I'd just bought in November for a Supersprint race muffler, and now we're right about where I want to be. Not too loud and no drone on the highway, but when you get on it from a low RPM it sounds great.
Startecs, Evo III wing+gurney flap, stainless exhaust. What a combo.
 Untitled by IronJoeT16S, on Flickr
Leave a comment:
-
Update time! I've done a lot of work to the car since the interior was finished, here's a summary of the jobs done.
To finish off the interior update, I was able to get a nice used OEM anthracite carpet from my friend e30austin which finished off the interior perfectly.
 Untitled by IronJoeT16S, on Flickr
 Sport Evolution interior by IronJoeT16S, on Flickr
One more glamour shot:
 E30 M3 Sport Evolution interior by IronJoeT16S, on Flickr
One final interior upgrade for my passengers, rear headrests!
 Untitled by IronJoeT16S, on Flickr
Next up was the two-piece Evo style with the carbon gurney flap. I've lusted after one of these for a very long time, but I was never brave enough to do it on the Henna car.
Test-fitted:
 Untitled by IronJoeT16S, on Flickr
Look at that glorious carbon weave:
 Untitled by IronJoeT16S, on Flickr
Since I had to paint it, I took the opportunity to remove and repaint the passenger side skirt at the same time. I had an unfortunate incident with the factory scissor jack that slipped on me due to a folded-over pinch weld, so I ended up cracking the paint on that side. Luckily the factory side skirt was pliable enough to not be damaged!
 Untitled by IronJoeT16S, on Flickr
30+ years of gunk? Had to get the pressure washer out after this!
 Untitled by IronJoeT16S, on Flickr
Side skirt sanded, primed, and ready for paint:
 Untitled by IronJoeT16S, on Flickr
Three coats of base coat, color sanded, then 3 coats of 2k clear. Shot through my Iwata HVLP in my garage.
 Untitled by IronJoeT16S, on Flickr
Installed. I'm in love!
 Untitled by IronJoeT16S, on Flickr
Last edited by IronJoe; 04-19-2024, 10:30 AM.
Untitled by IronJoeT16S, on Flickr
Last edited by IronJoe; 04-19-2024, 10:30 AM.Leave a comment:
-
beautiful work. just dropped in to tank up on my daily dose of jealousy lolLeave a comment:
-
I'm sure reskinning the rear seats also involved a fair amount of swearing, but damn, that's amazing looking!Leave a comment:

Leave a comment: