Announcement

Collapse
No announcement yet.

After a year of searching, an Alpineweiß story

Collapse
X
 
  • Filter
  • Time
  • Show
Clear All
new posts

    I'm excited for this.
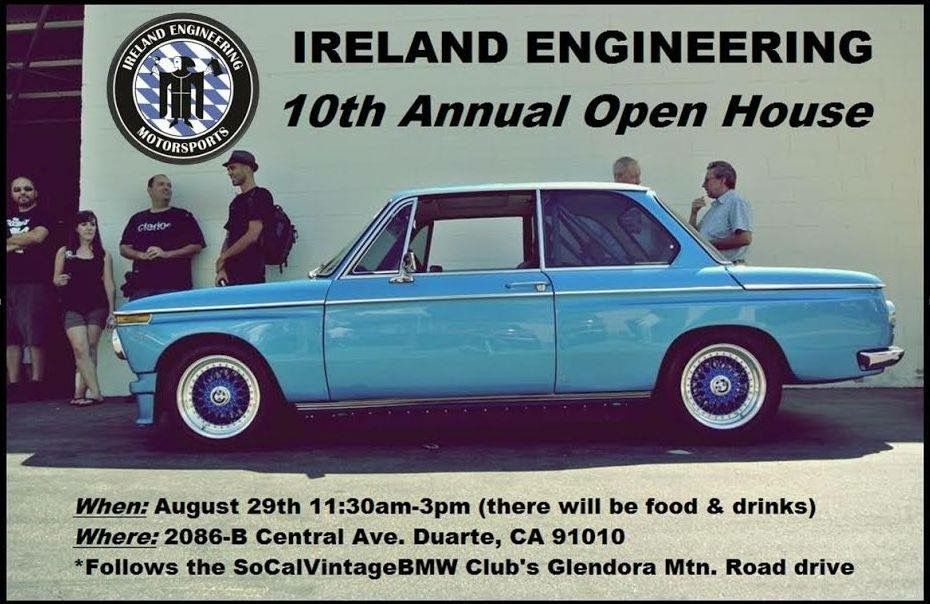
    I Have the weekend off so I can do some mountain road driving and then BBQ at the open house.


    -
    Project
    Parts for Sale
    Feedback
    YouTube Channel

    Comment


      Was swapping wheels when I noticed an exhaust hanger at the muffler missing.
      Ordered one and finally got around to installing it.


      This is quite a challenge to do. Someone may have a suggestion on better tools to use for this job.
      I use a door panel removal tool and a 2 flat heads


      Done and installed. Yet crooked. Love the Stromung exhaust and that it uses factory mounting points but this one and the figure 8 rubber near the subframe are slightly off and add stress to the rubber.
      But at least the exhaust tips are centered in the rear valance.


      5mm wheels spacers from Motorsport hardware needed to clear my 15x8 tire rack c1's with bfg rivals in 205/50/15


      Wheel clearance with the spacer on.
      Before it wouldn't quite touch but you couldn't fit a .025 feeler gauge between.


      -
      Project
      Parts for Sale
      Feedback
      YouTube Channel

      Comment


        Originally posted by iwantspeed View Post

        This is quite a challenge to do. Someone may have a suggestion on better tools to use for this job.
        I use a door panel removal tool and a 2 flat heads
        I used the same tools basically and it was a bitch too. Id keep an eye on yours because it definitely is getting stressed from the get go with it not being perfectly aligned. I cant get the figure 8 hanger on, but the rest are perfect so I never bothered installing that one. My exhaust is a combo of 24v parts (OBD2 manifolds, S50 downpipe) and M20B25 Ansa OEM cat back.
        Simon
        Current Cars:
        -1999 996.1 911 4/98 3.8L 6-Speed, 21st Century Beetle

        Make R3V Great Again -2020

        Comment


          Im going to have to copy your rear seat setup dude. Im going to be one of those original copycats but i cant help it. Only thing ill do different is have a hole for my lukebox, as I just cant live without the jams haha.

          Plus this way ill only have to get two new front seats/reupholster the fronts, instead of all 3.
          1989 BMW 325is | 2019 Ford Ranger FX4
          willschnitz

          Comment


            Originally posted by 2mAn View Post
            I used the same tools basically and it was a bitch too. Id keep an eye on yours because it definitely is getting stressed from the get go with it not being perfectly aligned. I cant get the figure 8 hanger on, but the rest are perfect so I never bothered installing that one. My exhaust is a combo of 24v parts (OBD2 manifolds, S50 downpipe) and M20B25 Ansa OEM cat back.
            Very cool. I love the exhaust on this car. I drove in it from one of the spectrum to the other ;)
            You bring up a good point. Maybe I can weld a large washer to the stock muffler strap and drill a hole in the correct spot to keep it aligned and under less stress.
            Originally posted by Wschnitz View Post
            Im going to have to copy your rear seat setup dude. Im going to be one of those original copycats but i cant help it. Only thing ill do different is have a hole for my lukebox, as I just cant live without the jams haha.

            Plus this way ill only have to get two new front seats/reupholster the fronts, instead of all 3.
            Go for it. Post up some credit when you did it.
            It would be cool to coin it something like the Alex rear seat delete or something clever and when people refer to it in the future they would know who do it.
            I'm all about sharing ideas on this forum to make these old cars better.


            -
            Project
            Parts for Sale
            Feedback
            YouTube Channel

            Comment


              Originally posted by iwantspeed View Post
              Very cool. I love the exhaust on this car. I drove in it from one of the spectrum to the other ;)
              You bring up a good point. Maybe I can weld a large washer to the stock muffler strap and drill a hole in the correct spot to keep it aligned and under less stress.


              Go for it. Post up some credit when you did it.
              It would be cool to coin it something like the Alex rear seat delete or something clever and when people refer to it in the future they would know who do it.
              I'm all about sharing ideas on this forum to make these old cars better.

              My brake duct setup will be called the "iwantspeed ducts" :rofl:
              Simon
              Current Cars:
              -1999 996.1 911 4/98 3.8L 6-Speed, 21st Century Beetle

              Make R3V Great Again -2020

              Comment


                Nice will do, I think I want to bodymatch my cage though. Think it might look cool.
                1989 BMW 325is | 2019 Ford Ranger FX4
                willschnitz

                Comment


                  Originally posted by 2mAn View Post
                  My brake duct setup will be called the "iwantspeed ducts" :rofl:
                  Nice:)
                  Originally posted by Wschnitz View Post
                  Nice will do, I think I want to bodymatch my cage though. Think it might look cool.
                  I almost did mine in body color then decided the satin black would draw less attention.


                  -
                  Project
                  Parts for Sale
                  Feedback
                  YouTube Channel

                  Comment


                    went to the gmr and ireland engineering open house


                    -
                    Project
                    Parts for Sale
                    Feedback
                    YouTube Channel

                    Comment


                      Had an awesome time today in the canyons of la.
                      got to drive with my buddy Simon (2man)
                      We drove through
                      The Angeles crest Hwy
                      Sand Canyon
                      Little Tujunga
                      Canyon Drive
                      Aliso canyon
                      & Soledad canyon.

                      he we had a little mechanical problem from one of the drivers in an e21 when it popped a radiator hose.

                      overall great day,
                      they just paved part of Angeles crest highway
                      very fast full throttle 3rd gear and 4th gear turns.
                      we stopped for gas and in n out.


                      -
                      Project
                      Parts for Sale
                      Feedback
                      YouTube Channel

                      Comment


                        That would be an awesome trip!
                        1990 325is
                        m52b28
                        3.73lsd
                        g260 (1987 325is 5spd tranny)

                        Comment


                          Originally posted by TeXJ View Post
                          That would be an awesome trip!
                          sure was

                          more pictures here


                          -
                          Project
                          Parts for Sale
                          Feedback
                          YouTube Channel

                          Comment


                            Haven't posted in a while.
                            My wife and I just moved to a new condo in Irvine Ca. And it has a way bigger garage!!!
                            Been busy moving and working overtime.

                            Shortly after driving hard in the la canyons I noticed a coolant leak.

                            Ended up being the water pump gasket.

                            In the design of the m20 you have to removing the timing belt and tensioner to remove the water pump to replace the gasket.

                            Started to tear everything apart to access the water pump and I stripped these rotors screws. I hate these with a passion even when the bolts are brand new the size of the Allen in the screw is in between sizes metric wise. Example 3 fits loose and 4 is to tight. I don't remember the exact size.
                            And an sae wrench fits a little better but still not perfect.

                            I hammered in this sae Allen wrench then grabbed it with vice grips and broke the bolts free finally.
                            A 2 min thing turned into an hour ordeal.
                            I replaced the bolts with some zinc plated steel
                            Bolts of the appropriate thread pitch and length.
                            With the new bolts the tool fits nicely into the Allen head.


                            Success!!!


                            This time I'm trying a new product. Will disclose more info after it proves it self to be reliable.
                            Coated the
                            water pump
                            engine block wear pump bolts to
                            Water pump gasket
                            Valve cover gasket

                            I hate leaks!


                            Before people give me shit about the victor reinz product. I have tried the BMW genuine valve cover gasket and BMW genuine rocker shaft plugs and have tried to Goeze and elring valve cover gasket all have leaked.

                            The experiment was getting the victor reinz and coating both sides with this new product and hoping it doesn't leak.


                            Replaced the cam seal and cam o ring
                            Cam seal also got a layer of the product before pressing it in


                            I always write the date on the tensioner and water pump using a black paint pen to help remember when it was done. I also keep the invoice but it's always nice to just be able to read it.

                            Here is a picture with everything replaced ready to start reassembly.
                            Rotor Allen screw upgraded to steel
                            cam seal
                            o ring
                            Water pump
                            Water pump gasket
                            Timing belt
                            Tensioner
                            Valve cover gasket
                            Rocker shaft plugs
                            Valve adjustment
                            Oil filter
                            And some total racing oil


                            -
                            Project
                            Parts for Sale
                            Feedback
                            YouTube Channel

                            Comment


                              I ordered a special interest 1960 legacy plate mid August this year and just got notice that it had arrived at my
                              Local DMV. Went the next day of course and picked it up.
                              Growing up I always had a fond appreciation for the Porsche GT3RS. Working through Richards BMW shop peaked my interest in race cars. And when BMW released it's M3 GTS version I made it my goal to build my e30 with the GT3RS and M3 GTS as the goal for the end result. Lightweight, caged,recaros,louder, wider, lower, more powerful and better handling the most important of all. Natalie finally gets some custom plates.


                              Natalie with her new plates and in the new garage it's a foot wider and 8 feet deeper not including the work bench I just built.


                              When I was doing my timing belt I noticed that mishimoto radiator was in poor condition.
                              I purchased the radiator December 2011 and it's been good from day 1
                              The threads for the drain and the sensor on the side where a little loose so you need to wrap the plugs a few extra times with Teflon tape to prevent leaks.
                              The upper outlet on the driver side is way to close to the overflow hose causing difficulty to install them.

                              All of those little issues have been solved with there new product.
                              I took some pictures and filed a warranty claim through mishimoto's website. After 2 days I submitted a payment of 55 for shipping and they overnighted the radiator.

                              Yuck


                              Was considering fabricating. A new mount. My upper plastic radiator mount always looked stressed and bent upward. I really like these ideas from
                              Vorschlag and one from a member on bimmerforums.


                              So stoked on this free radiator


                              Prepping the new radiator with the Spal pusher fan and the Massive Lee trick fan bracket mounts.


                              Use a spring loaded center punch to make sure the drill doesn't start to walk and puncture your radiator.


                              All prepped and ready to go in.
                              Lots of cash in this picture.
                              -Mishimoto radiator 340
                              -Spal fan 115
                              -Massive Lee spal fan bracket mounts 75
                              -E36ti temperature switch 30
                              -cutoff stock auxiliary fan wiring hard wired to the spal


                              Wrap a lot of Teflon tape to help prevent leaks.


                              On the e36 sensor I found this combo to work well.
                              Lots of Teflon tape
                              A green m14 cork washer and an aluminum m14 crush washers to help seal the sensor properly.


                              New radiator mounts for the core support


                              To fill the system I bought a new fluid
                              Pump per the recomendation by fello r3v member tim88325is
                              The technique is detailed here

                              This method requires a small hole to Be drilled in the thermostat housing
                              I used one gallon of Full Strength coolant One gallon of distilled water

                              Harbor freight gallon fluid hand pump


                              1)
                              I primed the pump by just pumping a little to get coolant to the tip of the hose. Point the hose in the resivoir to Prevent spilling.

                              2)
                              Unplug the overflow hose on the top of the radiator

                              3)
                              Plug the vinyl hose into the overflow spot on the radiator.

                              4)
                              Slide all vents to open in the dash and turn the dial to max heat

                              5)
                              Use a 8mm box wrench and open the bleeder screw

                              6) start pumping slowly

                              7)once you see coolant come out of the bleeder screw close it.

                              8)keeping pumping slowly until you see it start to fill the overflow bottle.

                              9) quickly remove the vinyl hose from
                              The pump and reinstall the stock overflow hose and make sure the clamp
                              Is already on the hose. Some coolant will spill out when you do this.

                              10) place the cap on the overflow bottle and tighten it.

                              11)
                              start the car
                              Turn the fan speed to 4 with dial at max heat
                              check for leaks and monitor your water temp gauge.
                              Once it gets close to the middle crack the bleeder screw. I didn't notice any air bubbles at all. Very impressed with this method.

                              A few pics of how it went.
                              Pump primed and ready with coolant and plugged into the overflow nipple on radiator.


                              Coolant dribbling out of the bleeder vent. Rag is there to soak the moisture


                              Dem late nights. Probably close to 3am here.
                              Filling with distilled water now almost done.


                              Success. No bubbles. Bleeding the engine with the engine off and completely cold at 3 in the morning with out pissing the neighbors off. So awesome.


                              -
                              Project
                              Parts for Sale
                              Feedback
                              YouTube Channel

                              Comment


                                Those vintage plates are wicked awesome! I hope we eventually get legacy plates like that in Jersey...

                                Your e30 looks great!

                                RICHTER MOTOREN

                                1987 e30 325is Zinno - Restoring
                                2004 e46 325xi Alpine - Daily
                                2003 e46 330ci Topaz - Sold
                                1988 e30 325is Zinno - RIP
                                2007 Honda Ody - Family Truckster


                                '87 325is Restoration Build


                                Comment

                                Working...
                                X