Announcement

Collapse
No announcement yet.

My 87 325e <3

Collapse
X
 
  • Filter
  • Time
  • Show
Clear All
new posts

    #16
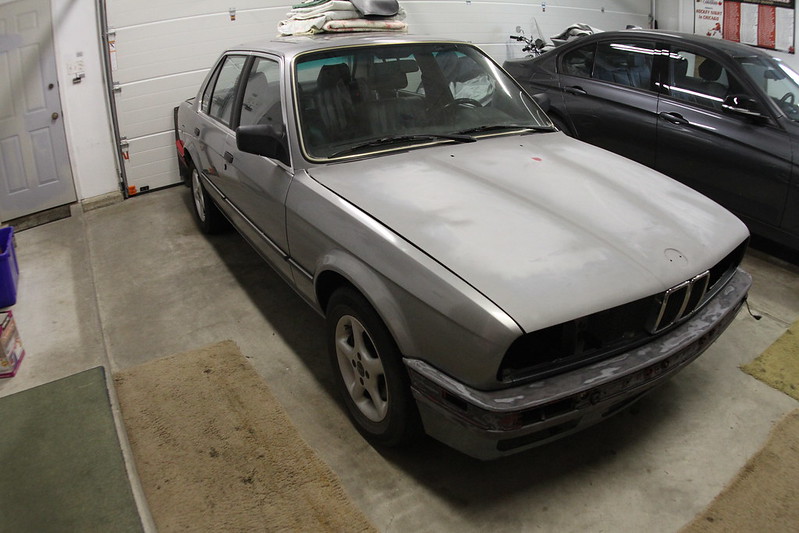
    The past few months I have been working on replacing my radiator core support, and while I was there I decided to make it removable. This definitely was way more involved than I thought it would be, but so has everything else...


    I started with a new radiator core support that I got from blunt ($290 shipped I think) and I had a rough idea of what I was going to do. I have yet to see a properly done OEM style removable core support, but I did have a couple threads to reference.


    ^^^ Good for reference


    The first is just half-ass'ed, sorry JGood. And the second is race car... Both were good food for thought to think of something more subtle and proper. On to the photos...


    IMG_4547 by Los Pantelones!, on Flickr


    IMG_4550 by Los Pantelones!, on Flickr


    IMG_4548 by Los Pantelones!, on Flickr

    To make it short and sweet, removal of this thing sucked... There are 48 ish spot welds to drill out and some are really fun to find. I didn't bother welding anything between the frame rails since I figure if its that bad then its going on a frame rack anyways. Turns out I am fine though :D


    IMG_4554 by Los Pantelones!, on Flickr


    IMG_4555 by Los Pantelones!, on Flickr


    IMG_4561 by Los Pantelones!, on Flickr


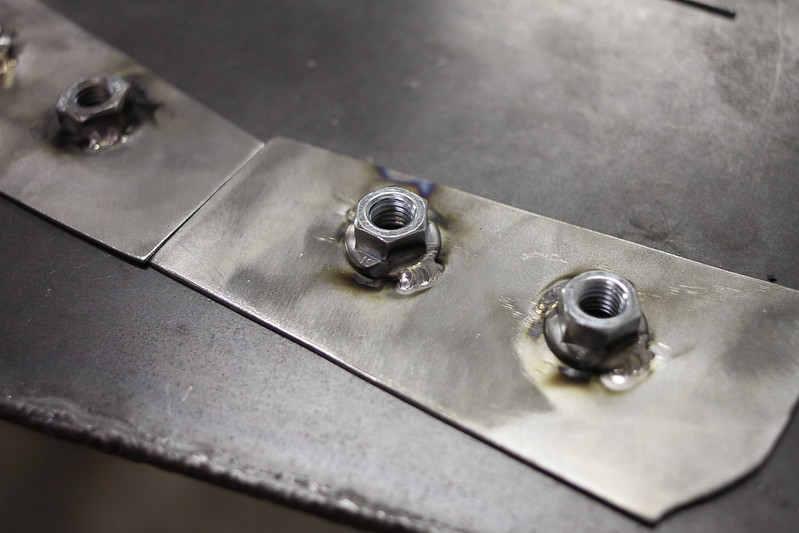
    This was the first trial cut and fitment... It ended up being the first of many hahaha Pretty much the idea is to box the lower part of the core support with 16ga and have ears that will attach to the frame rails. I would have gone straight down, but I wanted to retain the lower mounting points for the valance.


    IMG_4575 by Los Pantelones!, on Flickr


    IMG_4576 by Los Pantelones!, on Flickr


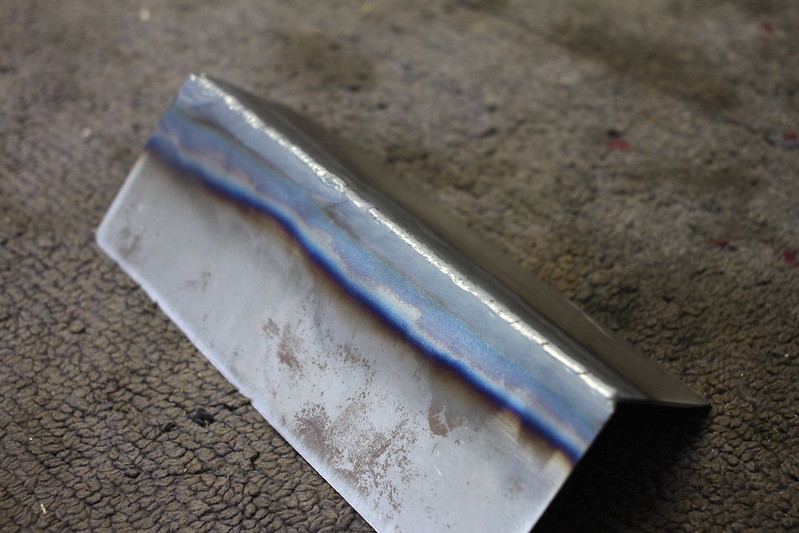
    I did some practice welding today to get used to the material, positions, and joints. I took some photos of the 20/16ga edge in #2 position, and I also did the 20/16ga lap in the #2 and 3 positions but did not take any photos. I have not worked with a whole bunch of thin stuff, but man is it hard. Everything has to be seamless fit before it is welded, and I have to constantly let it cool so that the puddle stays consistent and so it doesn't warp. I then proceeded to do some destruction testing :hitler:


    IMG_4577 by Los Pantelones!, on Flickr


    IMG_4578 by Los Pantelones!, on Flickr


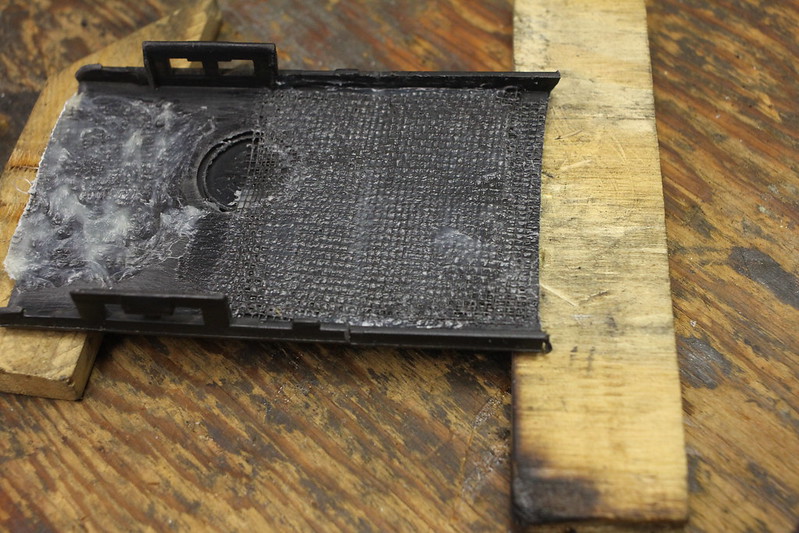
    Some slight separation, but I royal fudged up the second half of that bead and was running way too hot. Overall, practice went well and I should be starting fitment and finnish welding.


    IMG_4579 by Los Pantelones!, on Flickr


    IMG_4580 by Los Pantelones!, on Flickr


    IMG_4581 by Los Pantelones!, on Flickr


    IMG_4583 by Los Pantelones!, on Flickr


    IMG_4584 by Los Pantelones!, on Flickr


    The thing fits great minus the left side... The measurements were originally off a 1/4" on the left side, and now I have everything roughly fitted and squared according to the drawing. I think that the gap is what was off, and I have to add material to make it work. I wish that I had taken some detailed photos about the hood fitment to aid in problem solving in the latter stages. Anyone have any ideas? Also if you are looking at my notes and wondering were #4 went, I have no idea hahaha... I had a brain fart and just ran with it. More to come in the next couple of days!
    sigpic

    A man chooses, a slave obeys... Would you kindly?

    Comment


      #17
      Wow, Proper job! Keep it coming

      Comment


        #18
        Wow, looks awesome! Great work...this is inspiring me to get out there myself and do work.

        -'87 325 - ratbox swap http://www.r3vlimited.com/board/show...77#post3250277 << Check out my Wanted thread

        Comment


          #19
          Well, so much for an update in a few days... I have been really busy getting ready for school and, kicking the bum out of our basement...

          Anyways, I have a small update with some photos. I didn't document it in too great of detail due to the lack of time I had to finish the project. I should have taken a bunch of photos before I painted the core support, but I'll take some when I go home next. On to what really matters, photos or it didn't happen right? hahaha


          IMG_4585 by Los Pantelones!, on Flickr


          IMG_4586 by Los Pantelones!, on Flickr


          I took a little bit too much material off this side... And this was a fun task to learn! Basically laying 1/16" filler on top of a 20ga edge. Fun, fun, fun...


          IMG_4588 by Los Pantelones!, on Flickr


          This is how my plating turned out (just tacked in the photo), and I would say the it actually went pretty well. The only joints that were really difficult were the 16/20ga fillets and the over-lapping 20/20ga sections. I quickly learned that blowing a hole is VERY easy with thin material. I was semi-happy with how the welds turned out, but they aren't the prettiest.


          IMG_4591 by Los Pantelones!, on Flickr


          IMG_4590 by Los Pantelones!, on Flickr


          IMG_4589 by Los Pantelones!, on Flickr


          Speaking of blowing holes, I didn't realize that these little bent over tabs had the filler gunk behind them... Lesson learned the first time around, ugh I hate these little surprises. And I will note that not having the front end up in the air made plating the frame rails stupid hard. In hind sight, I should have tacked something between the rails to keep it in line so I could have jacked up the front without distorting the frame. Oh well...


          IMG_4592 by Los Pantelones!, on Flickr


          IMG_4593 by Los Pantelones!, on Flickr


          On to the top...


          IMG_4598 by Los Pantelones!, on Flickr


          IMG_4597 by Los Pantelones!, on Flickr


          IMG_4600 by Los Pantelones!, on Flickr


          Flanged nuts is where it's at! Ace only had three and I was pissed, but I needed to get it done...


          IMG_4602 by Los Pantelones!, on Flickr


          IMG_4604 by Los Pantelones!, on Flickr


          IMG_4605 by Los Pantelones!, on Flickr


          IMG_4606 by Los Pantelones!, on Flickr


          I was much more pleased with the way the top turned out. This was also what I was most disappointed with in the two threads that I used for reference. Neither one was well done at all... Mine is though :pimp:

          That's it for now. As I stated before, I will take more photos when I come home from school. Hopefully I will have it ready to be painted too! Anyone want to buy it? hahaha By the time it is done will have $12,000 into the car and I can only reasonably ask 6-7k... Honestly it's beyond depressing how much time and effort I have put into the car, and I wont even see half of it back...
          sigpic

          A man chooses, a slave obeys... Would you kindly?

          Comment


            #20
            I came back from "school" a bit early due to having a health issue that was effecting my diet; long story short I had to drop out this semester and I am doing the bare minimum in order to get the car sold. :( What was going to be a semi-depressing loss on the car is not going to be quite substantial. Having already spent about $500 in parts just to get the car put back together I was looking at another $700-$1000 to have it properly painted and matched to the rest of the car. I do not have the money to paint it, and I have had enough of my mothers nagging about how she is going to "part it out"... Now, being that the car is going to be sold as a project I will have a much smaller market, and I will have to come down on the price substantially. If I get more than 5k for it I will be okay with it I guess...

            Anyways, I have a few photos of the recent work. Basically I was in the middle of prepping, and fitting the plastic bumpers and finishing up the removable core support. Being originally quoted over $1,400 to do the paint and prep, I started to prep everything for primer, but just ran out of good weather and motivation to finish it.

            Bumpers are fun... The front was a shitty red literally just sprayed over Diamond Schwartz. That meant that everything had to come off... The rear was original and only needed sanding (not done in photo...)


            IMG_4620 by Los Pantelones!, on Flickr

            Especially the parts that NEED to be sanded properly for the paint to stick and not peal!


            IMG_4622 by Los Pantelones!, on Flickr


            IMG_4621 by Los Pantelones!, on Flickr


            Then it was on to straitening the front valance, and I had most of it straight but it's not perfect. Now that I have it on the car I may try and get it a little bit closer, but it really needs heat and I don't have anything to heat it with... Which would mean more money, and more nagging to deal with, so it will probably be left for the next owner.


            IMG_4628 by Los Pantelones!, on Flickr


            This side was REALLY bad before I started working on it. When I used my 1" diameter by 1' bar stock and clamps I could get the metal straight, but being that it is under tension it would not stay in that position. With careful heat, and a longer slightly bent piece of bar stock I could easily forum the valance to the bar and relieve the stress. This would allow it to settle right where it was clamped.


            IMG_4627 by Los Pantelones!, on Flickr


            Again the preheat, clamp, heat, and cool (maybe post heat as well) would work very well to straighten this section as well...


            IMG_4626 by Los Pantelones!, on Flickr


            And this side is perfect...


            IMG_4625 by Los Pantelones!, on Flickr


            Have you ever wondered what $50 in OEM hardware looked like? Now you know ;D New hardware and painted the bumper brackets...


            IMG_4629 by Los Pantelones!, on Flickr


            I bought new euro trim for the front since the front pieces were trashed, and I am making DIY euro trim for the rear :) It actually is going to work very well! I cut two pieces out of the front piece and fitted them nicely into the rear side markers. Now, while I was at the body shop I had picked the guys brain about the rear sectioning and bonding that is required. He IMEDIETLY told me to stay away from bondo and especially FIBERGLASS! Instead recommending a two part epoxy (Plastic Weld variant) and window screen and/or pantyhose as a fiber reinforcement. I did a test and it worked very well. I was greedy and broke it before it was 100% cured, but it held up to way more flex than I would ever subject the trim to in sanding or installation :) I will make sure to document the final product since it will be actually quite helpful.


            IMG_4630 by Los Pantelones!, on Flickr


            I also had got fogs and brake ducts/ducting for the bumper conversion. I need to polish the one fog or something to make them match a bit better. The other is really nice!


            IMG_4631 by Los Pantelones!, on Flickr


            And how she sits now... Tonight and tomorrow I will be fitting the rear bumper and then doing a valve adjustment before I put the hood back on. After that, she will be ready for sale :(


            IMG_4638 by Los Pantelones!, on Flickr
            sigpic

            A man chooses, a slave obeys... Would you kindly?

            Comment


              #21
              Today I fitted the bumpers, and spent a lot of time staring at the rear bumper... I really hated the idea of using a ton of bondo like Jordan did in the DIY on the tech page of this site, and after I had trimmed the rear bumper I had an idea! I was lucky enough to cut the section off both sides almost perfectly in one shot, and I was left with this little piece that just so happens to fit pretty well.


              IMG_4660 by Los Pantelones!, on Flickr


              At first I wasn't sure if it would work and I didn't want to use it, but I decided to just cut it off and play with it. Sure enough it actually fits perfect! I glued it on temporarily just to get a better visual reference and it actually looks fine how it is. Once it is bonded with the epoxy I will sand the contour of the wheel well into it. I also just set the trim on the bumper to again get some visual reference for what I want to change and how I should go about it...


              IMG_4663 by Los Pantelones!, on Flickr


              IMG_4662 by Los Pantelones!, on Flickr


              IMG_4661 by Los Pantelones!, on Flickr


              Again this is just mock up and I will make it a bit more flush and better fitted. Though I will say, I really don't like the way Jordan did his; not only is the gap inconsistent with the rest of the body lines on the car, but the ends look really out of place being so "perfect". I want it to look more OEM and mass produced so to say instead of being a show car.

              Here is the rest of the bumper... The right side needs more finesse than the left, but it's still really close to how I want it to look.


              IMG_4655 by Los Pantelones!, on Flickr


              IMG_4658 by Los Pantelones!, on Flickr


              IMG_4659 by Los Pantelones!, on Flickr


              And a quick one of the front... I need to move it up a little bit due to it resting on the valance, but otherwise it fits pretty good!


              IMG_4654 by Los Pantelones!, on Flickr


              After playing with the rear bumper I moved on to doing another test for joining the section in the trim, and filling in the side markers. My first test was quick and sloppy, but this time around I devised a much better plan. I still started off with a straight cut and bevel...


              IMG_4665 by Los Pantelones!, on Flickr


              Then proceeded to sand (80 grit), and wash with soap and water. I also found that the semi-melted shavings work great for filler when I tack it together. I added a small amount shown here...


              IMG_4666 by Los Pantelones!, on Flickr


              Then I used a soldering iron to tack weld the pieces together. Do NOT glue or use any other method other than welding the plastic together to secure the pieces. Any form of contaminate will mix with the epoxy giving you a contaminated bond. After tacking, I sanded the tacks so the epoxy can adhere to the surface. One is sanded, and one is freshly tacked in this photo...


              IMG_4667 by Los Pantelones!, on Flickr


              Again, after sanding clean with soap and water. After it is dry you are ready to bond. I used initially four pieces of window screen, but immediately took one off as it was clearly excessive. Before laying down the screen I placed a small amount of the two part epoxy in the joint, mixed thoroughly, and then layered in the screen. I used a piece of hard cardboard to spread the epoxy and added more as needed. I ended up with a much cleaner and better bonded joint than my first attempt, and I am eager to see how it looks tomorrow morning :) My mesh was a bit excessive in size as well haha Tomorrow I will better size the screen for the joints...


              IMG_4668 by Los Pantelones!, on Flickr


              Also, my dad had his project of the last 25 or so years uncovered and I figured I should take a few photos of it! ;D


              1956 Chevy Belair 2 door hard top...


              IMG_4651 by Los Pantelones!, on Flickr


              IMG_4650 by Los Pantelones!, on Flickr


              272 stroked to 293ci with some tasteful mods. No idea what it actually puts down, but when the 5.11 was in the rear end it did wheelies! No lie, I really wish I had a photo...


              IMG_4652 by Los Pantelones!, on Flickr


              And, rust bubbles! This is why I cannot stand shitty body work and improper rust repair. Not to say that he did a shitty job because it is a flawless paint job, but he learned the hard way that you can't just shrug off rust! I think he said it showed after 10 years of being painted, and he had a bad feeling that it would bubble. FUCK bondo!


              IMG_4653 by Los Pantelones!, on Flickr
              sigpic

              A man chooses, a slave obeys... Would you kindly?

              Comment


                #22
                I have been pretty busy working on getting everything in order to get this as well sorted as I can before it goes up for sale. I finished the rear bumper mods and I will say that it came out looking pretty good, not perfect, but good :) I will just get on to the photos since they are all pretty self explanatory...


                One thing that I will note is that I changed my tacking method from using shavings, to using little chunks of the same plastic. It just worked with the soldering iron better, and they were "pure" and not contaminated like some of the shavings.


                IMG_4670 by Los Pantelones!, on Flickr


                IMG_4671 by Los Pantelones!, on Flickr


                IMG_4672 by Los Pantelones!, on Flickr


                These were a ROYAL pain in the ass to tack by the way...


                IMG_4673 by Los Pantelones!, on Flickr


                This is the stuff I have been using... Versa Chem Plastic Weld, window screen, a stick welding rod to mix, and a piece of cardboard to work in/apply.


                IMG_4674 by Los Pantelones!, on Flickr


                Sanded, washed, and ready to bond!


                IMG_4675 by Los Pantelones!, on Flickr


                Bonded! And these were a pain in the ass too! I had not done a practice 90* joint and I really should have... Oh well, they still turned out nice.


                IMG_4677 by Los Pantelones!, on Flickr


                IMG_4678 by Los Pantelones!, on Flickr


                Now, when I got to doing the trim I had noticed something that was pretty neat. The front bumper end pieces are PERFECT matches for not only the wheel arch diameter, but also the contour lines of the fender/body and they make up for the gap that the late model trim produces.


                IMG_4679 by Los Pantelones!, on Flickr


                IMG_4680 by Los Pantelones!, on Flickr


                IMG_4681 by Los Pantelones!, on Flickr


                On to prep for bonding...


                IMG_4683 by Los Pantelones!, on Flickr


                IMG_4685 by Los Pantelones!, on Flickr


                IMG_4686 by Los Pantelones!, on Flickr


                IMG_4687 by Los Pantelones!, on Flickr


                While the plastic weld was curing I painted the bare metal spots on the hood with my left over weld thru primer, and started on my valve adjustment...


                IMG_4682 by Los Pantelones!, on Flickr


                I was really happy with how the adjustment turned out. I probably checked it 10 times between the previous night with a friend of mine, and the next morning by myself. OCD never hurts when it comes to these type of things...


                IMG_4688 by Los Pantelones!, on Flickr


                Spark plugs didn't look too bad either.


                IMG_4689 by Los Pantelones!, on Flickr


                And the hood primed and dry.


                IMG_4692 by Los Pantelones!, on Flickr


                The trim turned out great! I am really happy with it and it is VERY strong.


                IMG_4690 by Los Pantelones!, on Flickr


                IMG_4691 by Los Pantelones!, on Flickr


                IMG_4694 by Los Pantelones!, on Flickr


                IMG_4695 by Los Pantelones!, on Flickr


                Oh, and I had bought a new rear piece a looooong time ago. So here is the finished set.


                IMG_4696 by Los Pantelones!, on Flickr


                The car currently sits awaiting some body nuts for the headlights from a local guy on the forum. Thanks again for helping me out Dan!


                IMG_4763 by Los Pantelones!, on Flickr
                sigpic

                A man chooses, a slave obeys... Would you kindly?

                Comment


                  #23
                  I just got done fixing my sway bar links after being told they were installed wrong, and then today reading how they should be installed... This post had good photos that made everything make sense!


                  Originally installed like this...


                  link by Los Pantelones!, on Flickr


                  Then I slammed the link and it still wasn't short enough...


                  IMG_4769 by Los Pantelones!, on Flickr


                  IMG_4768 by Los Pantelones!, on Flickr


                  So I cut about a half inch off of each end and was left with this... Initially thought it was too short, but it was almost too long hahaha


                  IMG_4771 by Los Pantelones!, on Flickr


                  And this is how it ended up. Again, almost too high still, but it's close enough and I am happy with it.


                  IMG_4772 by Los Pantelones!, on Flickr
                  sigpic

                  A man chooses, a slave obeys... Would you kindly?

                  Comment


                    #24
                    nice build so far. looks like a ton of work. PB+bigger arches and small tails looks so clean
                    Much wow
                    I hate 4 doors

                    Comment


                      #25
                      Originally posted by Cabriolet View Post
                      nice build so far. looks like a ton of work. PB+bigger arches and small tails looks so clean

                      Thanks! It would all be worth it if I was in a position to keep it, but unfortunately I have to let her go... Personally, if I were to do it again I would go with euro bumpers, but the more I look at the plastic bumpers the more I like them... The car should be getting painted this week so I can finally see how it looks finished :nice:
                      sigpic

                      A man chooses, a slave obeys... Would you kindly?

                      Comment


                        #26
                        The car is now sold. Unfortunately I did not get the chance to finish it, and the new owner will be taking care of the paint over the next couple of weeks/months. I gained a whole bunch of knowledge though the process of building this car, and it was very insightful as to what it really takes to restore/build a car. I will probably have another e30 at some point, but I am going to wait until I can be more financially stable to do another build... I also out grew the capabilities of the chasse; my next in-depth build will be a Porsche or a Vet and strictly a track car. Making a "fun" street car is too tempting and just not practical for a guy like me. hahaha
                        sigpic

                        A man chooses, a slave obeys... Would you kindly?

                        Comment


                          #27
                          :-( Sad day...

                          Comment


                            #28
                            Originally posted by gome123 View Post
                            :-( Sad day...
                            It's bitter sweet... The car went to a good home, and that's all I really wanted. I don't have the money right now to make it into the car I envisioned at the beginning of the project, and I couldn't bring myself to daily drive the car here in Illinois salt rich winters. And anyways, a track rat 911 or 90's Corvette is a much more interesting build thread
                            sigpic

                            A man chooses, a slave obeys... Would you kindly?

                            Comment


                              #29
                              Originally posted by pantelones View Post
                              It's bitter sweet... The car went to a good home, and that's all I really wanted.
                              Yes, and I love it! I am so happy to have an awesome car, and I am enjoying working on it and finishing it up over the next few weeks.
                              sigpic
                              1987 325e Lachssilber w/ MarkD chip and late bumpers, Zender EVO spoiler, s3.25 LSD

                              Originally posted by nando
                              I don't think there's really strong evidence that ZDDP harms cats.

                              Comment

                              Working...
                              X