Announcement

Collapse
No announcement yet.

butters 318i project, S54door...

Collapse
X
 
  • Filter
  • Time
  • Show
Clear All
new posts

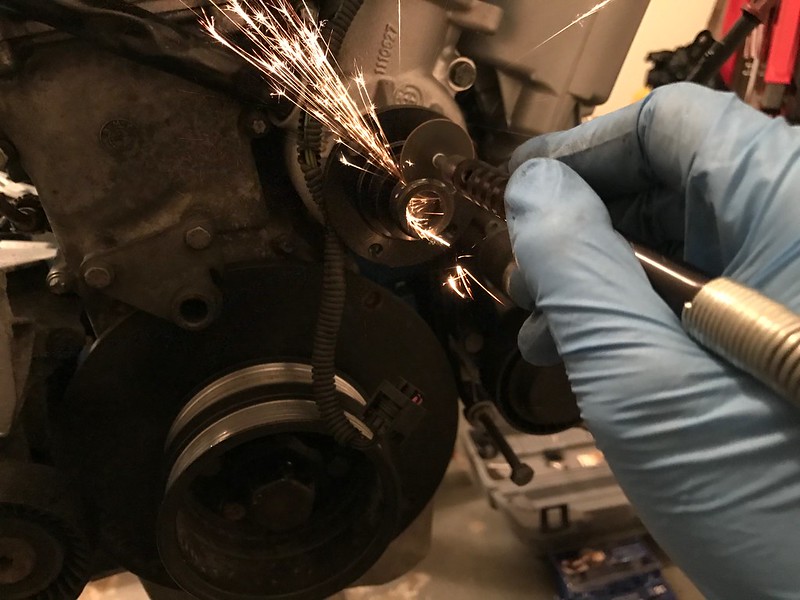
    These little air pipes for the idle control/evap plenum aren't really visible, but I gave them a brushing before putting on new o-rings.


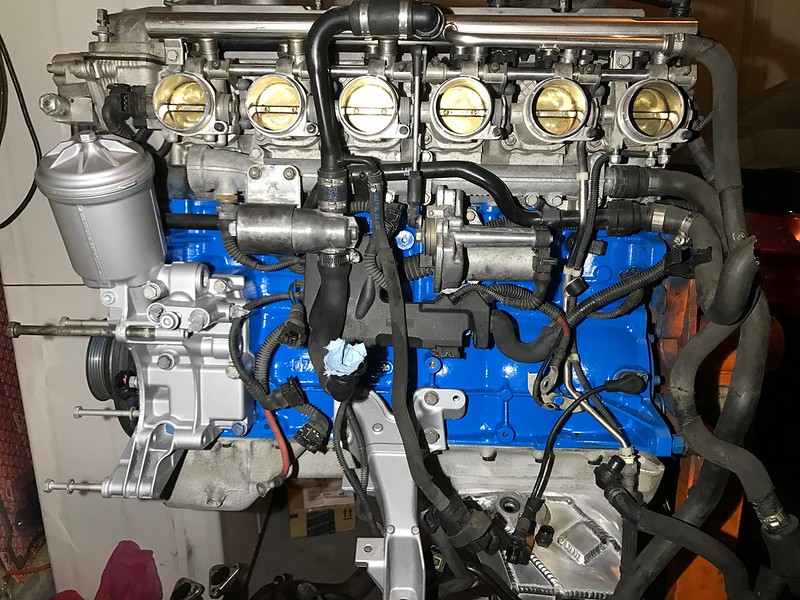
    The plenum and the fuel rail shined up easily with just a good wipedown..


    Got the rebuilt injectors in, after I realized they need to be squeezed into the throttle bodies first before they go into the fuel rail.


    Comment


      Just finished reading every post. Awesome work so far!
      I'm glad to see you got this baby out on track and the new engine is coming along.


      -
      Project
      Parts for Sale
      Feedback
      YouTube Channel

      Comment


        Cool! Happy to see more S54 swaps happening. I am thinking I'll be doing another in the not too distant future
        - '88 m54 coupe

        <3

        Comment


          I got fed up trying to scrub the oil filter housing and picked up some aerosol engine degreaser. I must have forgotten how well this stuff works! I didn't snap a pic of the housing yet, and although it is now degreased I think I may end up painting it along with the thermostat housing. Polishing is going to take too much time.

          I did clean up the valve cover which was a bit oily:


          I plan on starting the Beisan lockdown this week, so the VC is not installed yet.


          I also wanted to get the oil pan on so I gave it a final rinse as per Tyler's instruction, then let it dry for awhile and took my Metro Sidekick blower to it until I was sure there was no water left. I could reach into the sump pretty well to blot any remaining drops, and stuck my phone in to snap photos from a better view.

          Level sensor and dipstick tube side (driver's):


          Oil separator drain side (passenger):


          Satisfied that it was good to go, I installed the new lower seals and bolted it on with a new gasket and a little blue RTV at the front and rear cover mating surfaces. Maybe it would have been ideal to do the rear main seal before this point, but for me it'll wait until the engine is off the stand and be one of the last steps before the trans is bolted up.

          My oil pump nut was very tight so I opted not to remove it for Loctite, having read that it's not a common issue on the S54, but I did dimple the closest thread I could see just for extra peace of mind.

          As for the rod bearings, I initially assumed that I would need to replace them and factored it into my budget. However, the motor still had a full sump of oil when I brought it home, so I took a sample while draining and sent it to Blackstone for analysis. Trace elements came back well within acceptable limits (copper, lead, etc.), and with at most 70k miles on the bearings I'm confident enough to try and go at least a couple of years before I really need to do them. I'll continue monitoring with Blackstone of course, but in the mean time I took the money for rod bearings and put it into the Beisan Vanos parts.

          With that, here's my last look at the bottom end for what I hope to be a long time:


          Unfortunately, one of the 2 bolts that goes into the timing cover seemed to have pulled the threads out of the cover itself:


          I was looking at time-sert and helicoil solutions, but stumbled upon one suggestion to tap with 1/4-20 thread and put an SAE bolt in place. I still had my thread kit on loan so I gave it a shot and it seemed to work out, so I'm leaving it at that and I'll know where to look if I see any dripping.
          Last edited by butters; 10-25-2016, 01:50 PM.

          Comment


            Last night I picked up silver engine enamel and went to town. Here's the oil filter housing after I cleaned it as much as I could:


            And here you can see how it looks after paint. I did the motor mount arms as well as the thermostat, and the brackets for the vanos accumulator and AC compressor. In this photo, the exhaust side motor mount only has its first coat of paint.


            I feel better already..

            Comment


              I also popped in a new constant pressure valve, which I got from ECS in their "enthusiast" kit with an uprated Viton o-ring to replace the Buna rubber that comes with the valves.

              Clearly the old o-ring was permanently deformed and flattened over time and heat cycling:


              Comment


                Originally posted by Northern View Post
                I like those swaybar reinforcements on the newer AA subframes.

                Unfortunately they are much too low, going to cut mine off and weld plates to the frame as seen here:
                http://www.r3vlimited.com/board/show...1&postcount=40

                Comment


                  Originally posted by R3Z3N View Post
                  Unfortunately they are much too low, going to cut mine off and weld plates to the frame as seen here:
                  http://www.r3vlimited.com/board/show...1&postcount=40
                  I did come across that, I'm hoping that I don't run into that drastic of a clearance situation.


                  I think I figured out how to make the E46 wiring harness work with mounting the DME in the factory location, of course I won't know until I finally get to the point of installing the motor in the car.

                  The main loom runs out of the back of the plastic box that is bolted to the block, and in the E46 it's angled down and to the left when facing the intake side of the motor. If the plastic box is opened up, the rubber loom connection to the box can be reversed, to angle it up and to the right towards the rear knock sensor. Re-arranging the wires a bit helps to do this cleanly, and I didn't have any issue putting it all back together.


                  After that arrangement, the primary loom can hug the block and run above the knock sensor behind the water, fuel, and vacuum lines, then around the back of the cylinder head on its way to the E30 DME mount. It's the bulkiest loom in this photo:


                  The throttle actuator bolts in just fine over top of the wiring, but I think I may have to take it off again for an easier time extending the MAF connector which branches out of that main loom (at this point it branches out somewhere behind the head).


                  I rented a "thread restorer set" from autozone and chased/tapped the formerly unused bolt holes in the block for use with the E36 mount arms, and got them bolted up along with the oil filter housing. I feel a sense of relief with the motor now starting to look like it's coming together, but I do have a lot of work left between the vanos, valve adjustment, and getting the chassis ready with brakes, throttle pedal, and oil cooler retrofit.
                  Last edited by butters; 10-23-2016, 08:54 AM.

                  Comment


                    Originally posted by butters View Post
                    I did come across that, I'm hoping that I don't run into that drastic of a clearance situation.
                    I don't think hope is enough of a fix ;-) We have the same subframe....

                    I might mimic this from here

                    Comment


                      I had to get back into my wiring after I realized the MAF connector still needed to be re-routed after the swap in configuration of that main loom.

                      This is the MAF connector and its 4 wires:


                      My approach was to cut all 4 and run them back to the plastic box and then out to the MAF region with sufficient slack. I took the easy way out with Andrew's swap harness adapter, so I'm not an expert on this. As it turns out, 2 of the wires already run down to the ignition loom and another sensor, so they can just be tapped locally. The other 2 I crimped a wire extension and pulled it through the main loom into the box:


                      Sorry for the blurry photo there.

                      I thought I had a pic of the arrangement before I closed up the plastic box again, but what I did was re-bundle these 4 wires and run them out of the empty third slot at the bottom edge of the box. I suppose that third opening is where the MAF connector comes out on the Z3. I checked all my connections for continuity and, fingers crossed, it should be ready to go now.

                      Comment


                        Now it's time for the vanos job. I have to get this buttoned up by the end of the week in order to make the return deadline for bimmertools.com.

                        Shout out to Beisan Systems for a fair-priced solution to every vanos degradation issue, along with crazy detailed step-by-step instructions (http://www.beisansystems.com/procedures/).

                        Here's the "before" shot, hopefully I can get this pretty well cleaned up. I think it's safe to say that there were some persistent leaks and seeping oil out of the vanos area:


                        First thing I did was pull off the solenoid coil pack and valve body from the bottom of the vanos unit:


                        The pressure regulating valve O-rings looked pretty well aged, as did the oil filter on the end of it:


                        From there, the crank is rotated to TDC, and the cam bridge installed into the intake cam. Unbolting the vanos unit is very straightforward, and as it's pulled out the exhaust cam is rotated to allow installation of its pin through the bridge.


                        The oil pump driver tabs on the exhaust cam are a subject of great concern, as they are at risk of breaking off and falling into the timing chain. Happily, mine appear in good shape:


                        Disconnecting the splined shaft from the vanos pistons allows complete removal:


                        This is just nasty:


                        Behold the double vanos in all its glory:


                        Minor evidence of wear on the oil pump disc, which is nice:


                        but I did get the Beisan disc since I'm in here already and at $150 I call that a no-brainer for added reliability against this level of risk.

                        Comment


                          The replacement uprated cam sprocket sleeve bolts are in, along with a new upper chain tensioner guide, and I did some cleaning of the timing cover area below the vanos..


                          Doing the splined shaft bearing anti-rattle kit from Beisan was.. interesting. This consists of replacing the bearing ring and washers that surround the thrust bearings of the cam-side vanos adjustment shafts. The replacements are better material, and can/must be sized to fine-tune the fit of the bearing without having any axial play which equals rattle. Sizing consists of tightening the assembly, feeling the fit, and then sanding the washers or ring to adjust. I got the first one right with one sizing effort, but the second one took 4, maybe 5? I lost count...


                          Once the fit feels right, the splined shafts are taken back apart, cleaned again, red loctite applied to the cover threads, and torqued to spec.


                          S62 sprocket hub diaphragm springs and pressure plates went into the cam hubs, all of the vanos seals have been replaced, and the Beisan oil pump disk is in.


                          Unfortunately one of the exhaust seal's teflon rings broke, I must not have stretched it enough before sizing it in the bore. Beisan is very fast to respond, and has already shipped out a replacement. Unfortunately I'll miss my tool rental window, but I think they'll allow me an exception.
                          Edit: total coincidence the r3v sticker on my tool cart is in this frame:

                          Last edited by butters; 10-29-2016, 09:01 PM.

                          Comment


                            My experience with Beisan was typical in that it was great. I had the replacement Teflon ring very quickly, got it in and installed the vanos.


                            Fresh O-rings went into the sealing plate:


                            I completed the valve clearance check and luckily only needed to adjust 4 clearances, with none of them terribly out of whack. I found a handy spreadsheet template via e46fanatics:


                            I would have used metric but my shim set from Schwaben is primarily English, so it was easier to target the inch measurement.

                            I cleaned up the water pump area and fitted a new o-ring on the water pipe:


                            then installed my expensive Genuine BMW water pump with a new gasket:


                            Here's how the front of the motor looks now:


                            The Technica water pipe adapter with sensor port came in, but I can't install yet since the port is tapped to M12x1.5 thread. I thought I looked around sufficiently and determined that the sensor was M12, but I was wrong and it's M14. I ordered a tap since it's somewhat unusual, so that delays me until Thursday at best.

                            Last week one other item I checked off was a throttle adjustment. I wanted to check out the synchronization and found throttles 4 and 6 to be grossly out, with the idle stop gap called to be .005 where mine was 5-6 times that. I'm a little nervous with how touchy this procedure was, but I feel it needed to be done.


                            I'm starting to think I could put the motor in the car this weekend and work the rest out from there, but I'm trying to be as sure as possible that the motor is totally ready to go. I pulled the stock throttle pedal out of the car and realized my E46 pedal is missing the body mount, luckily it's only $20 so that's on my next order along with an S14 coolant bottle and R134a condenser.

                            Comment


                              I went ahead with a test fit of the subframe and motor mounts, and was not happy with the fit using E28 mounts. I couldn't even get everything tightened up, I think the weight of the motor would be required to totally seat the mounts.

                              These images show the gap between the subframe and mounts with the motor mount arm snugged and sitting flush on top of the mount.

                              Left side (driver's):


                              Right side (passenger's):


                              I did try with the stud in the hole rather than the slot just to be sure, and it was worse.

                              I can't accept this, so I'm sending the E28 mounts back and I have AKG poly swap mounts en route. The E28s can work, I know firsthand, but I won't be able to relax now that I've seen just how much bending is required to get them seated. The extra $150 is worth it to me, not to mention AKG providing a lifetime guarantee. The S54 does put out 100 more horsepower and nearly 50 additional lb-ft of torque over the US S50.

                              In the mean time, the SAP blockoff plate is installed:


                              As is the dipstick with 3 new O-rings and power steering pump after a good scrubdown:


                              I cut off a good 1/4" of the water pump fan threads to see what the Dremel cutoff wheel could do, and to improve the clearance which I know is going to be tight:


                              I probably should have installed the pulley first, but it's on there now.

                              Comment


                                Excellent stuff.

                                It's funny to see how similar the S54 is to previous M engines (apart from vanos obviously), and how well they organized all the stuff that goes on under the IM.
                                My previous build (currently E30-less)
                                http://www.r3vlimited.com/board/showthread.php?t=170390

                                A 2016 Toyota Tacoma TRD 4x4 Offroad in Inferno is my newest obsession

                                Comment

                                Working...
                                X