
An M30 air box on an M42?

As everyone knows by now, the M42's air box and AFM are plenty big for this spunky, but small, engine. Well, the stock one anyway. A 2.1L version with hot cams, head porting, bigger valves, higher compression and a host of other stuff that is supposed to make ~205bHP might need to breathe a little more freely. Back in April 2012 when my original engine died of timing failure, I decided to go with a fully loaded Metric Mechanic Rally 2100 M42. FULLY, all the bells and whistles, and I ended up with a couple of things that they don't even advertise. I have wanted one since 2006 when I was a broke engineering intern that could barely imagine being free of student loans, let alone buying a crazy expensive engine for his E30.
Well, a lot can change in 6 years and since I had been earning decent money but still living like a mostly broke college kid all along, I had cash stashed and suddenly I had the motivation and means to call up Metric Mechanic. There was a laundry list of things I needed to do with the car in preparation for the new engine, but the air box retrofit was a lot of fun and I took lots of pictures to share. I won't stand for cone filter bullshit and other nonsense that both looks crappy and lets dirt into the intake. So here it goes!
Originally, I had looked into using the air box from a 325e since it uses the same filter panel as the E30 M3 but with the inlet tube behind the headlight instead of against my radiator. I can't recall exactly how much more surface area the M3 filter had than the M42's, but it was on the order of 175% or something. The down-side was that the internal flow path looked pretty restrictive, and it would be even more so after my mods to build-in a velocity stack for the MAF. I also picked up an E34 M30 air box and filter, which turned out to be a reasonably good fit since it was about the same width as the M42 box, and "just" 15cm longer. It had LOTS of room for a velocity stack (I have been tweaking a custom MAF conversion for the last 6 years and they definitely need a VS in front to work well).
All of this was done with the old engine in the car while the new engine was being built, hence pictures of a dirty engine.

Here are some measurements from the M42 and M30 stock air filters (I would NEVER run a K&N or similar one, they let all sorts of particulate shit through).
M42: 68 pleats x 46mm x 137mm
M30: 112 pleats x 46mm x 137mm
So, the M30 filter has 65% more surface area. Nice!
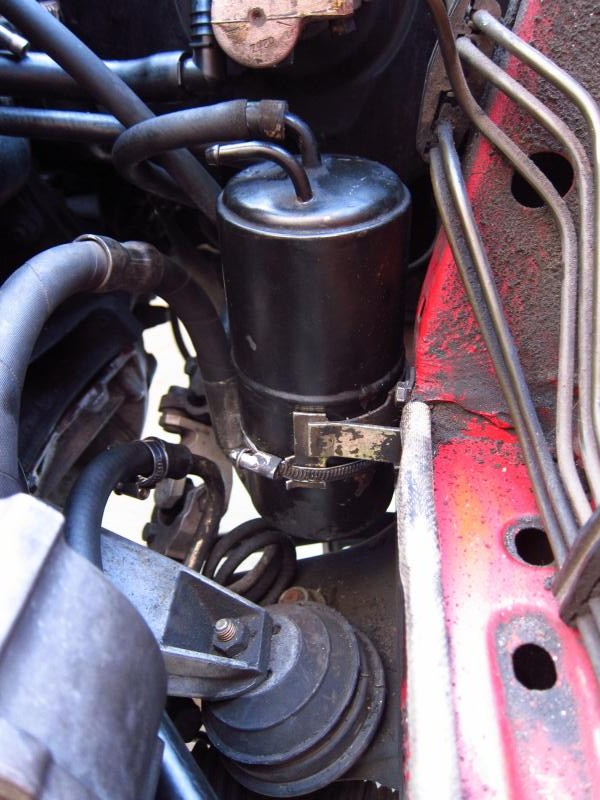
Hey, that PS reservoir bracket looks a little odd! I needed to mod the bracket to hold the reservoir about 25mm higher and 13mm further back. Some drilling, MIG welding and filing was all it took.

The throttle cable had to sit at a slightly steeper angle to clear the PS reservoir, and I later chopped off the part of the bracket that (obviously) interfered with it.


These sorts of tools are pretty useful for car projects. Actually, the most useful tool is not even visible; the 48" Clausing lathe.

I worked on the hoses' positioning a lot so that they would not touch anything, especially brake lines. In the end, I rotated the reservoir and rotated the banjo fitting on the pump to get everything cleared (not shown).
It is very close to the radiator, but it makes it.

Clears the alternator just fine.

The box's original rubber feet actually sat on the hem in the chassis, but I did not like that and later came up with my own solution for the bottom mounting.


It was also a little close to the ABS unit. I carefully bent the top hard line by about 4mm to make some clearance without collapsing it where it exits the flare nut.

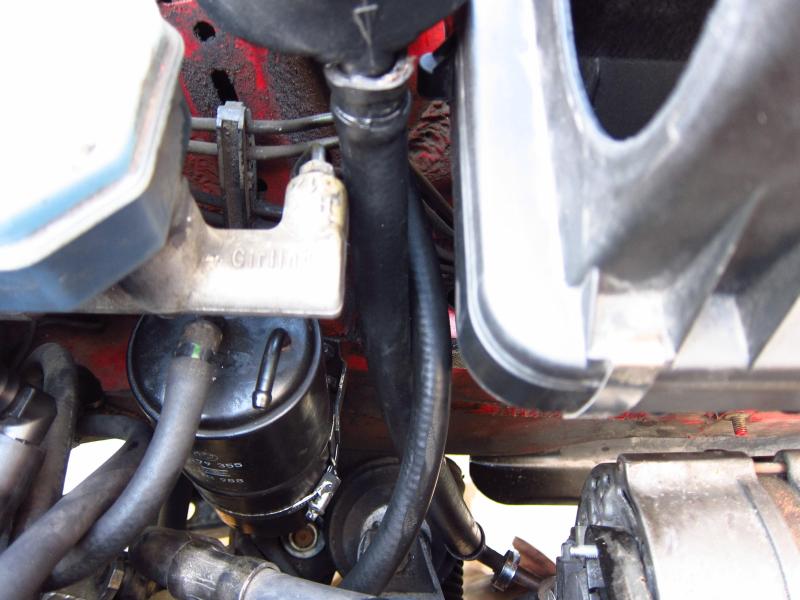
I also needed to move the charcoal canister back a good 10cm. That was SUPER easy. All you do is remove the bracket that holds it, flip it upside-down and reinstall everything. Voila!
So here's the new, extra-spacious home for the air box.

To get the box level and where I wanted it, I needed to do a little washer-stacking. Note that the M30 box has its mounting holes on the other side in its stock application, and I made some new ones so it would bolt to the stock E30 bracket.

A little bit of cutting was required to get the stock chassis mounts into position. Because things were so tight with the radiator and PS reservoir, I had to put the mounts wherever they lined up with the stock bracket. I also needed to chop off a few ribs to clear the brake lines up by the ABS unit.

The front mount ended up in the perfect location. The box's stock clip got reused right next to a rib.

The rear one was almost on top of a rib. I really didn't want to chop it out since that would weaken things, so I ground-down a nut and got things together. I guess I was just being anal retentive since this box isn't exactly a structural piece and it really doesn't matter.

Original feet and stuff were later cut off with a hack saw and then cleaned up with a chisel.

A host of other plastic protrusions were cut off. There was no real reason, but I wanted it to look clean and deliberate in there.


Interestingly, the stock E30 intake snorkel fit the box. That wasn't going to fly in the car though since a) the radiator was in the way, and b) the tube's inlet would be jammed into a headlight.

Test-fitting the MAF, it was obvious that I would need to do some chopping of the air box's top.

Using a ruler and marker, I did my best eyeball-job for what the cut would need to be.

I did a rough cut with a hack saw, with the intent of cleaning it up on the mill.

I ended up moving the cut about 25mm further up than I had originally intended, for two reasons. First was that I would need more room for a silicone coupler to mate the MAF to the VS. Second, the 1" end mill that I was using caught the plastic and ripped a big chip out of it lol. I got impatient and tried to make too heavy of a pass on a work piece that was both flexible, and (clearly) not ideally clamped. Patience eventually got me a clean cut, though.


In order to have room for the planned velocity stack, I had to chisel out some of the internal ribs.

As everyone knows by now, the M42's air box and AFM are plenty big for this spunky, but small, engine. Well, the stock one anyway. A 2.1L version with hot cams, head porting, bigger valves, higher compression and a host of other stuff that is supposed to make ~205bHP might need to breathe a little more freely. Back in April 2012 when my original engine died of timing failure, I decided to go with a fully loaded Metric Mechanic Rally 2100 M42. FULLY, all the bells and whistles, and I ended up with a couple of things that they don't even advertise. I have wanted one since 2006 when I was a broke engineering intern that could barely imagine being free of student loans, let alone buying a crazy expensive engine for his E30.
Well, a lot can change in 6 years and since I had been earning decent money but still living like a mostly broke college kid all along, I had cash stashed and suddenly I had the motivation and means to call up Metric Mechanic. There was a laundry list of things I needed to do with the car in preparation for the new engine, but the air box retrofit was a lot of fun and I took lots of pictures to share. I won't stand for cone filter bullshit and other nonsense that both looks crappy and lets dirt into the intake. So here it goes!
Originally, I had looked into using the air box from a 325e since it uses the same filter panel as the E30 M3 but with the inlet tube behind the headlight instead of against my radiator. I can't recall exactly how much more surface area the M3 filter had than the M42's, but it was on the order of 175% or something. The down-side was that the internal flow path looked pretty restrictive, and it would be even more so after my mods to build-in a velocity stack for the MAF. I also picked up an E34 M30 air box and filter, which turned out to be a reasonably good fit since it was about the same width as the M42 box, and "just" 15cm longer. It had LOTS of room for a velocity stack (I have been tweaking a custom MAF conversion for the last 6 years and they definitely need a VS in front to work well).
All of this was done with the old engine in the car while the new engine was being built, hence pictures of a dirty engine.
Here are some measurements from the M42 and M30 stock air filters (I would NEVER run a K&N or similar one, they let all sorts of particulate shit through).
M42: 68 pleats x 46mm x 137mm
M30: 112 pleats x 46mm x 137mm
So, the M30 filter has 65% more surface area. Nice!
Hey, that PS reservoir bracket looks a little odd! I needed to mod the bracket to hold the reservoir about 25mm higher and 13mm further back. Some drilling, MIG welding and filing was all it took.
The throttle cable had to sit at a slightly steeper angle to clear the PS reservoir, and I later chopped off the part of the bracket that (obviously) interfered with it.
These sorts of tools are pretty useful for car projects. Actually, the most useful tool is not even visible; the 48" Clausing lathe.
I worked on the hoses' positioning a lot so that they would not touch anything, especially brake lines. In the end, I rotated the reservoir and rotated the banjo fitting on the pump to get everything cleared (not shown).
It is very close to the radiator, but it makes it.
Clears the alternator just fine.
The box's original rubber feet actually sat on the hem in the chassis, but I did not like that and later came up with my own solution for the bottom mounting.
It was also a little close to the ABS unit. I carefully bent the top hard line by about 4mm to make some clearance without collapsing it where it exits the flare nut.
I also needed to move the charcoal canister back a good 10cm. That was SUPER easy. All you do is remove the bracket that holds it, flip it upside-down and reinstall everything. Voila!
So here's the new, extra-spacious home for the air box.
To get the box level and where I wanted it, I needed to do a little washer-stacking. Note that the M30 box has its mounting holes on the other side in its stock application, and I made some new ones so it would bolt to the stock E30 bracket.
A little bit of cutting was required to get the stock chassis mounts into position. Because things were so tight with the radiator and PS reservoir, I had to put the mounts wherever they lined up with the stock bracket. I also needed to chop off a few ribs to clear the brake lines up by the ABS unit.
The front mount ended up in the perfect location. The box's stock clip got reused right next to a rib.
The rear one was almost on top of a rib. I really didn't want to chop it out since that would weaken things, so I ground-down a nut and got things together. I guess I was just being anal retentive since this box isn't exactly a structural piece and it really doesn't matter.
Original feet and stuff were later cut off with a hack saw and then cleaned up with a chisel.
A host of other plastic protrusions were cut off. There was no real reason, but I wanted it to look clean and deliberate in there.
Interestingly, the stock E30 intake snorkel fit the box. That wasn't going to fly in the car though since a) the radiator was in the way, and b) the tube's inlet would be jammed into a headlight.
Test-fitting the MAF, it was obvious that I would need to do some chopping of the air box's top.
Using a ruler and marker, I did my best eyeball-job for what the cut would need to be.
I did a rough cut with a hack saw, with the intent of cleaning it up on the mill.
I ended up moving the cut about 25mm further up than I had originally intended, for two reasons. First was that I would need more room for a silicone coupler to mate the MAF to the VS. Second, the 1" end mill that I was using caught the plastic and ripped a big chip out of it lol. I got impatient and tried to make too heavy of a pass on a work piece that was both flexible, and (clearly) not ideally clamped. Patience eventually got me a clean cut, though.
In order to have room for the planned velocity stack, I had to chisel out some of the internal ribs.


Comment