-
nice build. and very detailed troubles and learning process thx for share your experiences , wtf the piston #6 fail. that was scary. you make a refound for that fail? -
A couple of things:
-Overboost. After reading the analysis on using these as boost control, it seems like Spark cut would be the smarter option. If you truly have more boost than desired, fueling may be lean or cylinder temps may be higher than you want. The spark cut would be good since you have the fuel cooling the cylinders (as opposed to a lean condition in each cylinder) after a situation where you have uncontrolled boost.
-Rich surge after throttle tip-in. I have read about this and I'm not sure how much you can avoid it. But getting an AFR of 11.2 is slightly richer than you want. I know from experience that this rich condition will cause the engine to stumble a bit. Aim for 12:1 or so.
-Wastegate creep. The MBC or EBC once set will help to control this by preventing the wastegate from opening during those 10 seconds until 6psi is reached. But the creep you have there makes me wonder if that swing of 1.5psi could be due to the nature of a weak spring, or if it really is that the wastegate is too small for the air you are pushing at 4000rpm (not sure that makes sense for the wastegate you have).
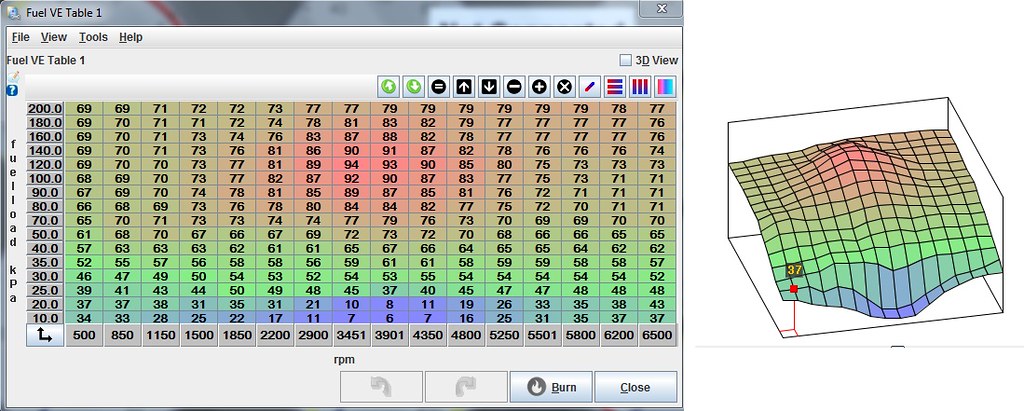
-AFR. It looks like there's a hump at ~13 AFR and ~5psi. I would suggest adding some fuel here as you should be closer to 12 or 12.5:1 above atmospheric.
-MAP value. Do you have this signal taken from a separate place than the wastegate? Just wanted to confirm where you take this signal from.
I would suggest trying to take the MAP value from the intake manifold (rather than compressor housing). This will give you a realistic value for MAP values into the intake/engine.
Also, being that the map signal is down stream of the throttle plate, when you shift, you would get the vacuum signal of the intake manifold as opposed to the positive pressure signal (being relieved by BOV) from the compressor housing.
Something to consider, but I could be wrong in my thinking.
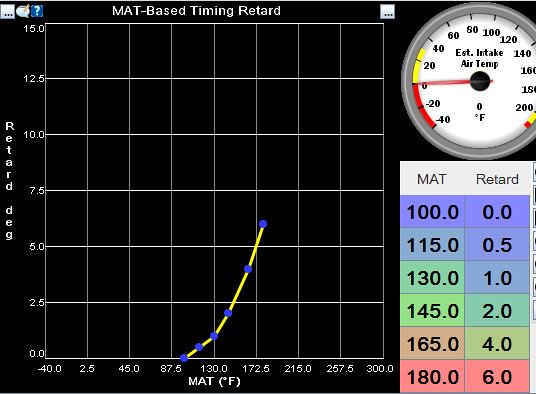
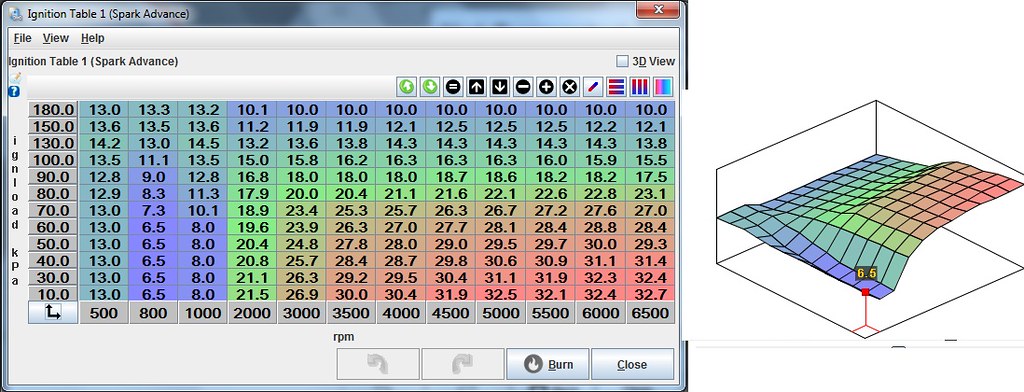
-MAT timing. 6* seems like a lot to remove, even at 180F. 2-4 degrees makes a big difference. What I wondered about this setting is if it takes out this amount through the whole rpm range or not.
Also, 115F seems like a very reasonable MAT value in the summer. I'm not sure I would take out .5* until I got to 130F. Set your tune on the safe side timing wise and you shouldn't have to worry. It might be smart for now until you drive it in the summer though.Leave a comment:
-
I checked all my fuses and thought I was crazy when I would get a 1 amp draw for a few seconds and then it would drop to .07 amps shortly. None of the fuses were the culprit. I then checked the fuses under the dash tied into constant 12v and found the mystery was the radio loading a cd every time I put the multimeter in series. I changed batteries thinking maybe the battery was just sort of dead, so we will see after I drive it some more. With the radio fuse unplugged I am getting 60milliamps which is about right. I checked a couple wires like the glove box light and taped then up again in case that was the draw.
In the mean time I ordered the MPX4250AP 250 kpa pressure sensor and it came yesterday. I found a local company who could remove and replace the sensor with the new one and they did it for me today for free which was cool. So I plugged the unit back in and made some corrections. First of all, I had set the boost limit to be 120 kpa (what the old sensor could read) and with the 6 psi spring I would get boost cut pretty easily. I calibrated the MAP/baro for the 4250 and started her up. I also changed the boost cut to 130 kpa which should be close to 7 psi, to see if I'm getting any wastegate creep. Initial readings were alright but after driving I was reading a bit lean so I enabled autotune and all of my fuel values increased by about 2. The new sensor must output a slightly different voltage for it to affect the fueling that much. I looked at a couple different maps that needs some tweaking and need some feedback.
First, MAT based timing retard. What are you guys using? This was set to 180 F so I had to bring it to a more realistic region. This is what I have now, but I really need some warm temps to see what kind of ambient temperatures do to the intake charge temps. I think my timing and fueling is conservative but this is a nice feature to have for hot days.
For the overboost I have sparkcut setup at 130kpa with 8 kpa hystereses, long enough to back off the throttle thinking something is wrong. I may try a MBC and bump this up to 140kpa to see what that is like, maybe i'll log it. I really wonder if a MBC would do much for my engine, it already has great response. Something I read:
"The idea of cutting fuel to an engine sets alarm bells ringing in engine builders, as they all know of the potential disaster of a high revving race engine running lean. Running in a lean combustion mode will elevate in-cylinder temperatures very rapidly, the denser the air/fuel charge, the more heat the lean burn can generate. Therefore it is vital that a fuel cut system will not cause a lean burn.
The simplest way of preventing a lean burn is to remove more than 50% of the fuel from the pulsed delivery. A mixture will only ignite if the air/fuel ratio is within a tightly defined window, look at the efforts being put into making lean burn engines fire on very low air/fuel ratios (1:20 or more). Removing more than 50% of the fuel will cause an air fuel ratio of over 1:25 and will result in a complete miss-fire, with the unburned fuel passing out through the exhaust valve. Even if a high air/fuel ratio did manage to ignite, the energy available from the amount of petrol injected wouldn't be enough to elevate temperatures significantly. Of course the ideal system will remove 100% of the pulsed fuel delivery, allowing the cylinder to take a gulp of fresh air, and the in-cylinder temperature would remain virtually unaffected.
Prolonged fuel cut on one particular cylinder would cause scavenging of the petrol lining the inlet tracts, and when the next full fuel pulse arrived, it would be partially reduced in quantity by the re-wetting of these tracts. Therefore it is often important to manage a rotation of the cylinder cutting to prevent this situation from occurring.
Spark cut
Cutting the spark to an engine will stop any chances of a weak mixture occurring, but it carries it's own potential problems due to a large quantity of unburned fuel travelling through the cylinder and out of the exhaust. This petrol can remove some of the oil lining the inside of the cylinder, and pass it thorough the exhaust, again this only becomes a problem if the fuel to one particular cylinder is cut for an extended time. The best way to overcome this is to rotate the order in which the cylinders are cut.
The unburned fuel in the exhaust will have a catastrophic affect if there is a catalytic converter in the exhaust, as it will try to convert the unburned fuel to harmless elements, effectively burning the mixture. This causes the catalytic converter to heat up very rapidly, reaching temperatures in excess of 1000°C, and possibly melting down completely."
I've got spark cut to avoid a lean condition and no catalytic converter. Lastly I logged a few runs to see what was happening. Everything looks good, except for everything being overly conservative for fueling and spark at 6 psi. I do get some boost creep but it isn't too bad. This probably should be the case for a large engine running low boost. Take a look at my log. I wanted to see boost response so this is a pull from 2000 rpm to 4000 rpm in 5th gear up a slight incline. RPM Is orange on the bottom graph, the red line on the top graph is AFR.

You can see the pedal is at the floor and boost starts building instantly. By 16 seconds you can see the wastegate start to open at about 6 psi(yellow line top graph). This is at 2600 rpm. Manifold temps rise from about 60 to 70 F. AFR's are at about 12.0. Timing tapers down from about 18 to about 13 degrees. I had been getting detonation at about 22 degrees of advance or so. Once 130 kpa is seen, boost cut kicks in and that is where I ended the run at 4000 rpm. 4000 rpm with a 3.64 diff and 0.81 final drive is somewhere in the triple digits.
Anyway, one run saved here for future reference. Give me some comments on this 'dyno' style run and let me know your thoughts. The car is fast and running good so I'd like to keep it that way. Maybe i'll weigh it on the scales at my work tomorrow.Last edited by downforce22; 01-19-2017, 06:31 AM.Leave a comment:
-
I would connect a multimeter and measure amp inline with the battery + and + lead to the car, then take out one fuse at a time then youll see which fuse is causing the drain.Leave a comment:
-
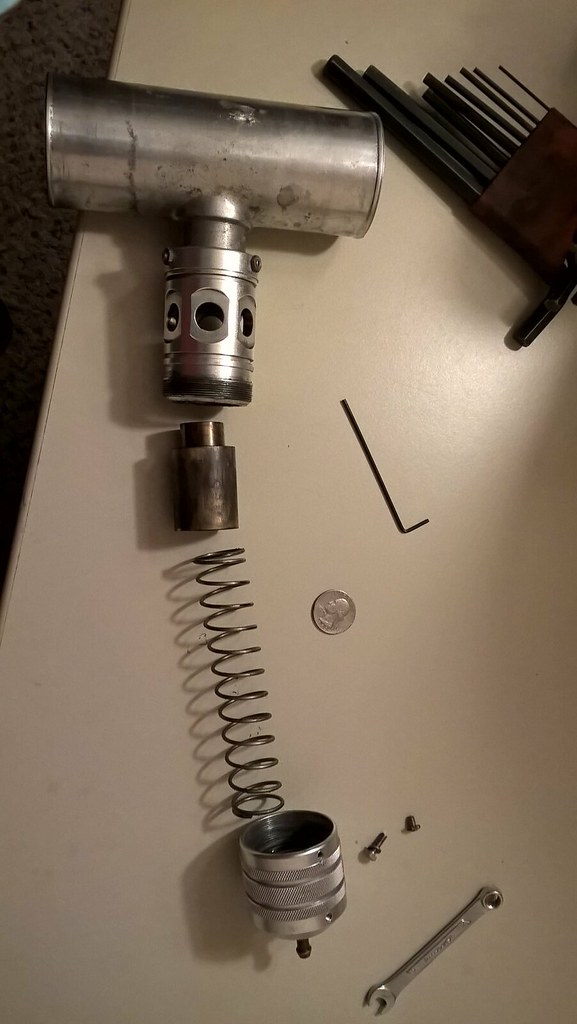
I didn't like the fact that my blow off valve would flutter almost every time I let off the gas. I opened up the turbo xs blow off valve, lithium greased the piston and added 2 quarters to it to stiffen it a bit. I had put in 4 put it seemed too stiff, so I left only 2 in there. It is such a simple device with the vacuum line helping keep it closed under boost and open while under vacuum. I like this old school bov, only a few website still sell it, most all carry the Type H 'RFL' now.
I didn't take any pictures but I decided to remove the 10 psi spring combo in my wastegate and opted to install just the 6 psi spring. I figured if for some reason my boost signal like got disconnected it would be better to err on the side of caution and let the wastegate open earlier. I may run a MBC to get back to 10 psi once I get the timing verified under hot ambient temperatures.
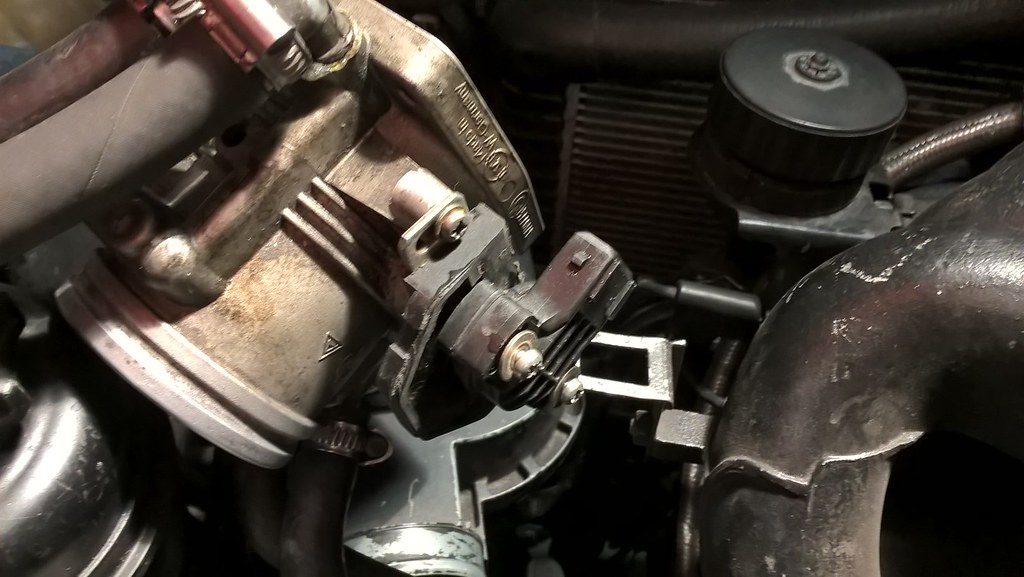
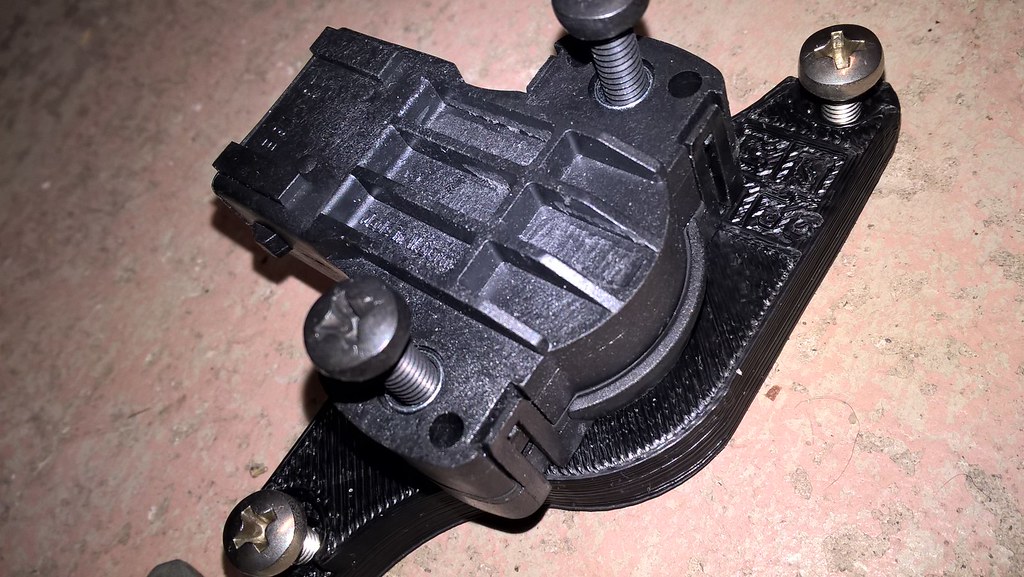
One other issue I was having was from the TPS. It seemed to have poor response below 10% throttle. Since it was a used tps from the junkyard, I assumed it was bad and ordered a replacement as well as the Squared Motorsport adapter bracket for $15. It was great, I received multiple stickers and screws to mount it. (https://squaredmotorwerks.com/products/m50-tps-adapter)
After taking off my throttle body, I realized in my haste to get the car running my original TPS bracket adapter was not holding the TPS solid and allowed it to rotate. I never tapped the plastic and tightened it down solid. Must have forgot after seeing the MS2 was getting a TPS signal. It could rotate sideways a bit due to the screws not being tightened. It would do that before the sensor would open and read a signal, even if the throttle was open a bit. Now I have a solid TPS signal that actually correlates with how much i press my foot down.
Old TPS/ Bracket (made from m20 TPS)
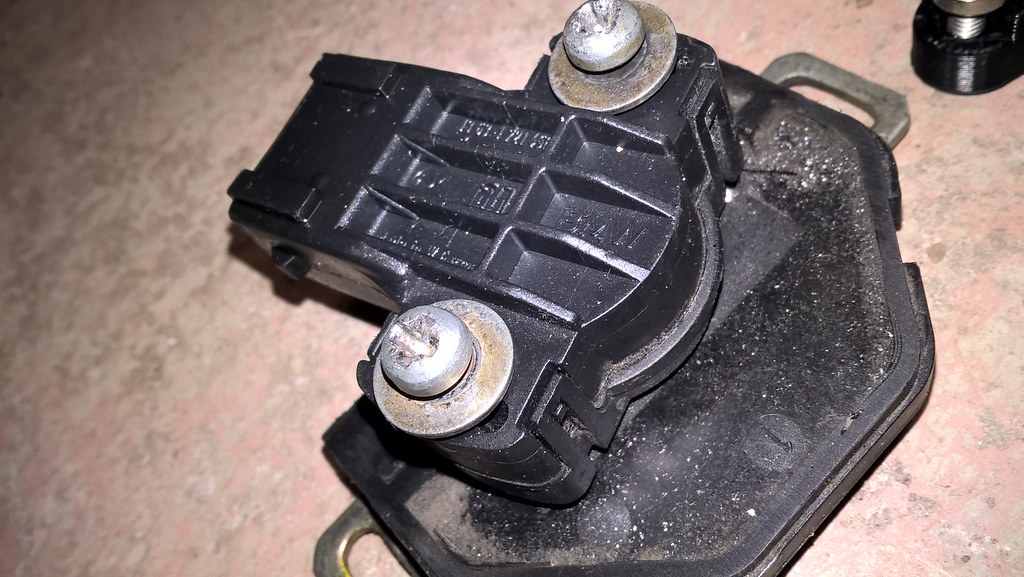
New
I posted my timing and fuel maps in the thread over in the alternative tuning section of the forum but here they are for record keeping purposes. Currently running at 6 psi. Only tested to about 60 F ambient
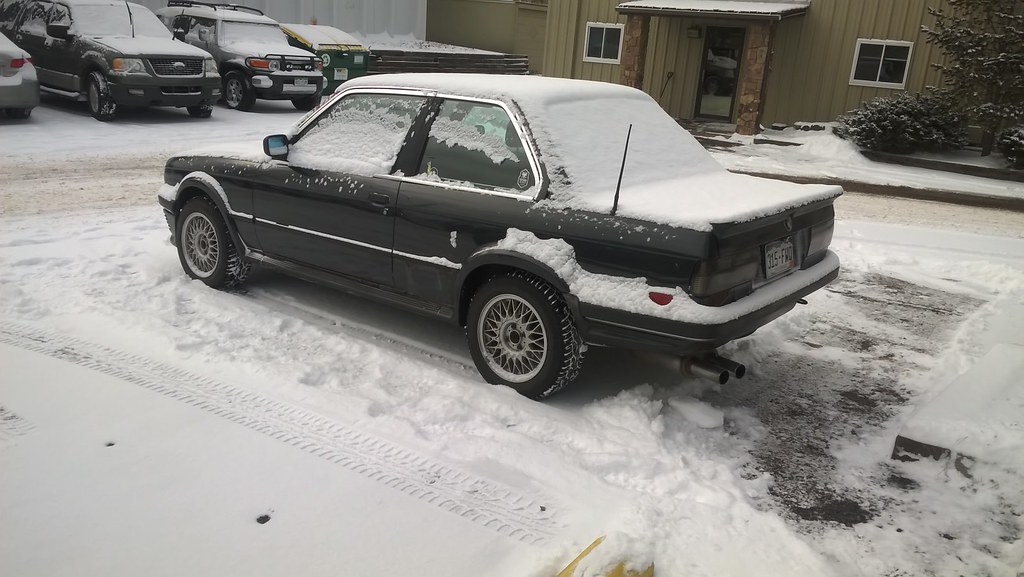
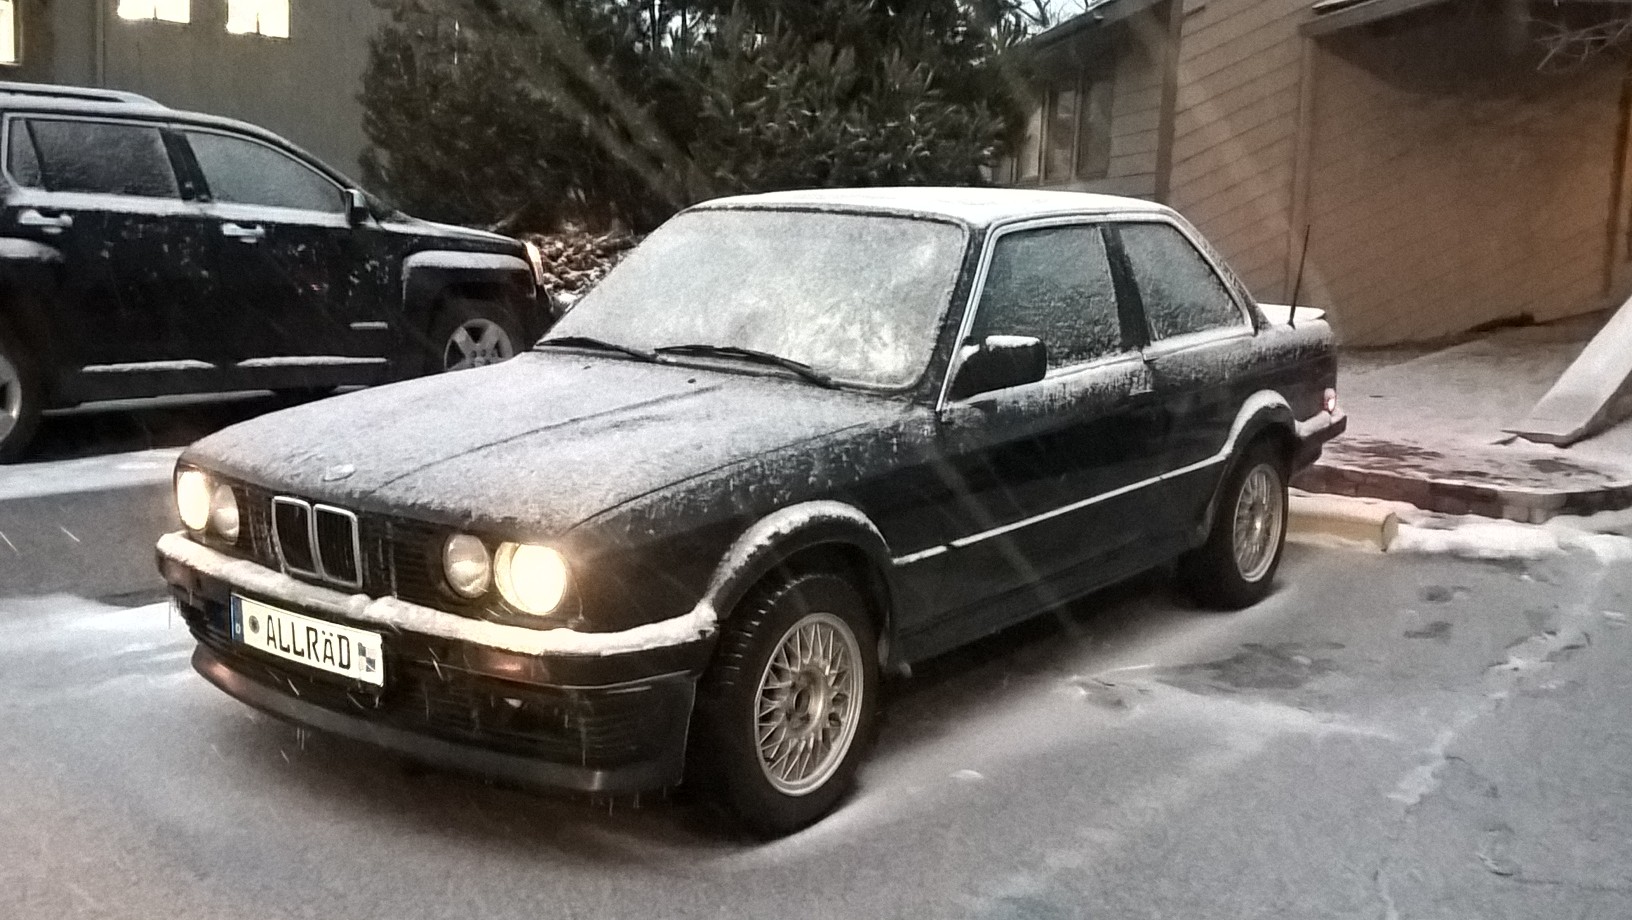
I still need to make a cold air intake for warmer weather, but with the snow we got this week I currently have a cold air intake. There was snow on the turbo air filter and elbow into the turbo. I may have to create some sort of 'water' barrier to protect the turbo inlet from rainy and super snowy days. Haven't had more than a few inches of snow lately, but no problems for the car yet. I will say, the stock iX has enough power in poor conditions that the turbo can just add to the danger. Need to be careful not to spool up on ice.
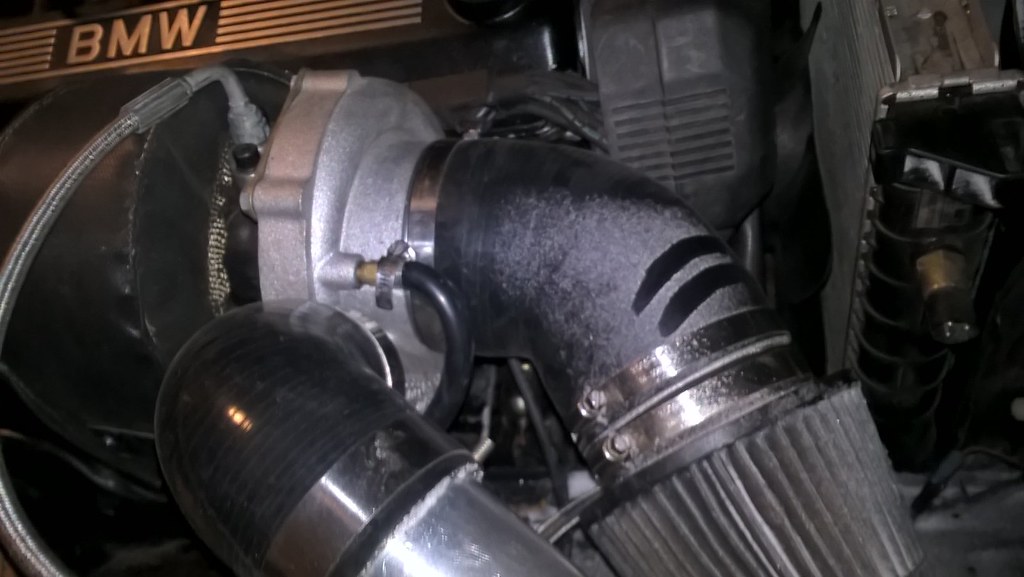
Check out that snow on the air filter and intake elbow! I seem to have some sort of battery drain because the car wouldn't start for me twice now. Any tips to tracing a battery drain? I may start with a multimeter at the fusebox.
Leave a comment:
-
It has always worked. I'm running the whodwho unit, so it literally is plug and play. I ran a vacuum line from the intake manifold, went with a variable tps (should have used the e34 auto tps instead of cutting wires) and jumping a wire for the tachometer from the glovebox that's it. Everything else is as stock and I thought the OBC gets its signal from the gauge cluster? If your cluster works I would think the OBC would work.
I didn't realize it didn't work for others. If it usually doesn't work, maybe the fact that my car is an early car with early cluster allows it to work. The early cluster has the coding plug on the back, not the front.
I just remembered that I switched from the original ecu to Motronic 1.3 ecu and engine harness. My car originally ran motronic 1.0 (M20b25, 35 pin, 073 ECU, 9.7:1 CR, No cat) with the VR, crank position sensor in the trans bellhousing. I switched to M1.3 for multiple reasons including removable fuel injector wiring harness, 55 pin ecu for megasquirt, oxygen sensor input, later style water pump and later radiator for expansion tank relocation to the driver side.Last edited by downforce22; 12-21-2016, 02:32 PM.Leave a comment:
-
-
From my experience you want your over run fuel cut to come back around 1200 RPM. the heavier the flywheel the later (lower) RPM you can go. The ECU needs a short amount of time to "catch" the engine and bring it back down to idle. Too low and you get what you experienced, and too high the car doesnt get the benefit of fuel cut. Drive any fuel injected car and go to 2000 RPMs and let off the throttle and most will start re-adding fuel around that RPM because you'll feel the car jerk a tiny bit.Leave a comment:
-
Those pictures make it look like a pretty nice car nowadays! Now to get those check control LED's to turn off ;)
Let me bring you my MBC this weekend. You can play with it while I'm not using it and see if it makes a difference before buying your own or going Electronic.
The 'issues' are described in the feedback and are related to hose size and lack of a mounting bracket. Functionally it has great reviews:
https://www.amazon.com/Dawes-Devices.../dp/B00IBMN8YO
This one was an interesting comment I hadn't read before:Great product and most reliable way to control boost that I have found - can also be used with an EBC to deliver more mid-range torque too, while maintaining super quick and stable baseline boost level.
If you don't want to switch between low and high boost, you could use it with a mini ball valve in the engine bay to switch between low boost (wastegate spring) and high boost (mbc) settings without losing the locked position and boost level setting of the mbc.Leave a comment:
-
Yeah I don't want to push it while the temps are cooler now and then find out the higher boost level detonates over the summer.
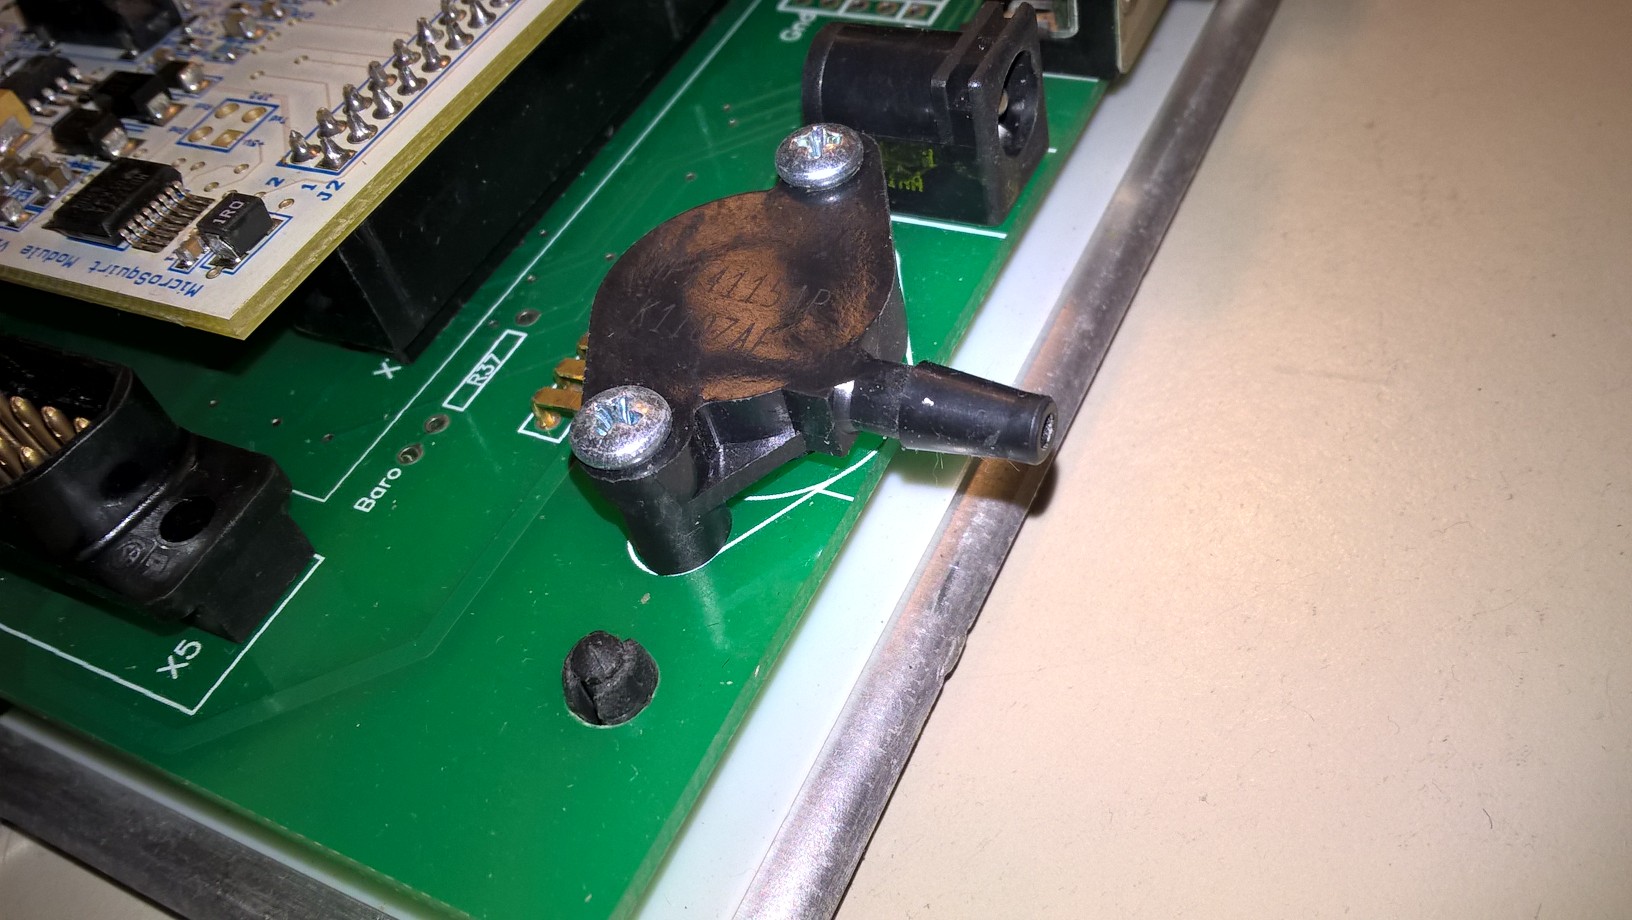
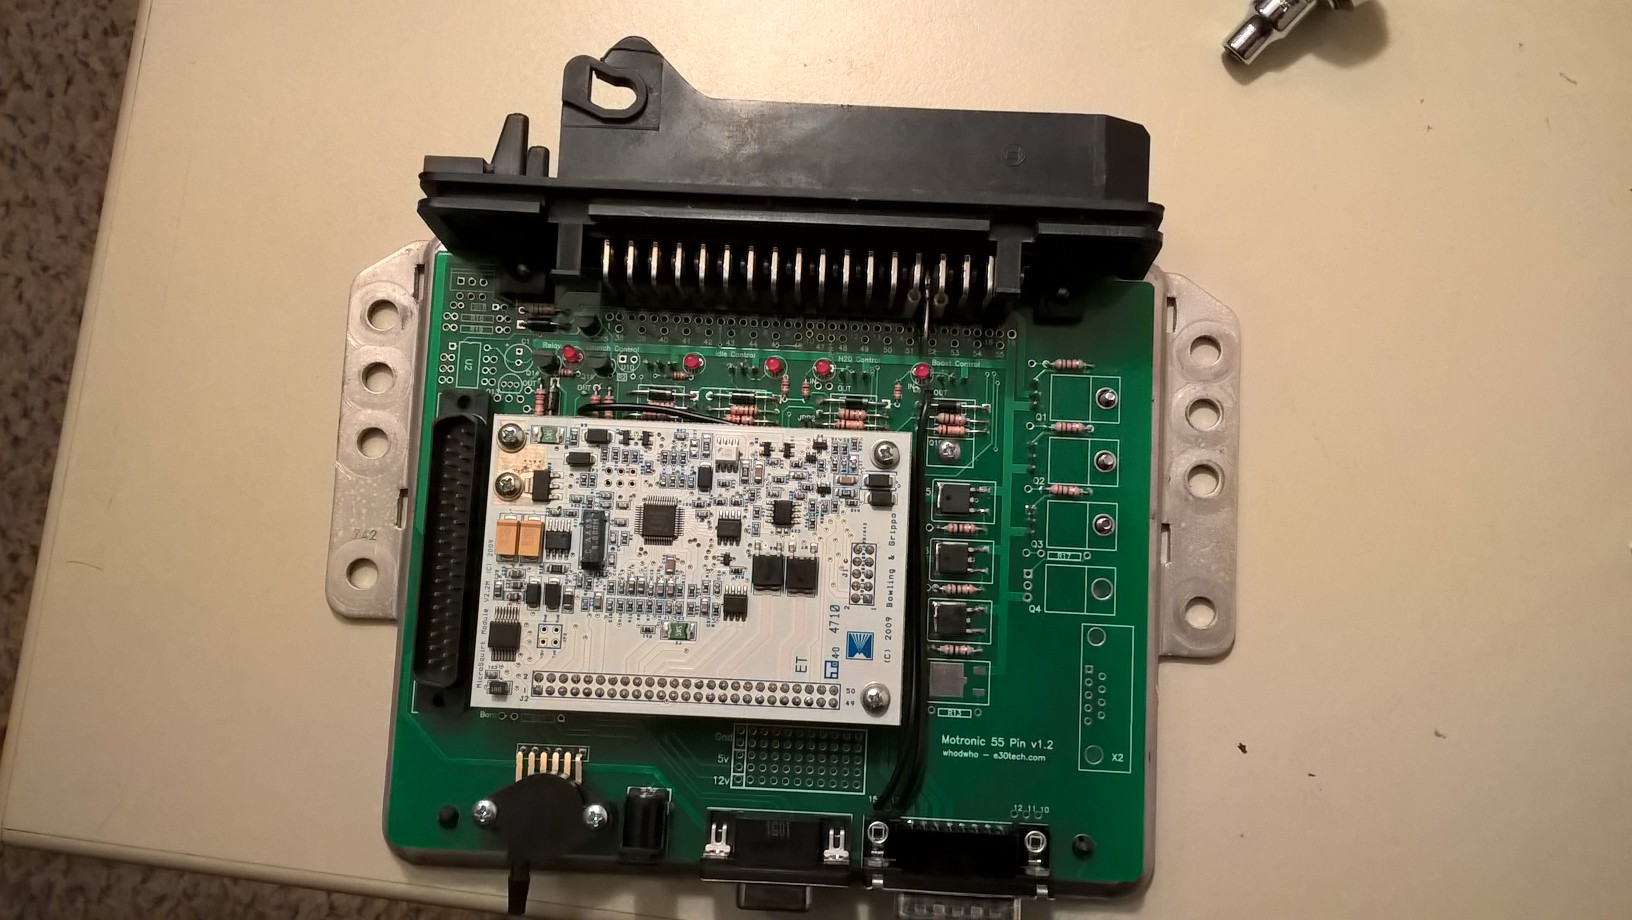
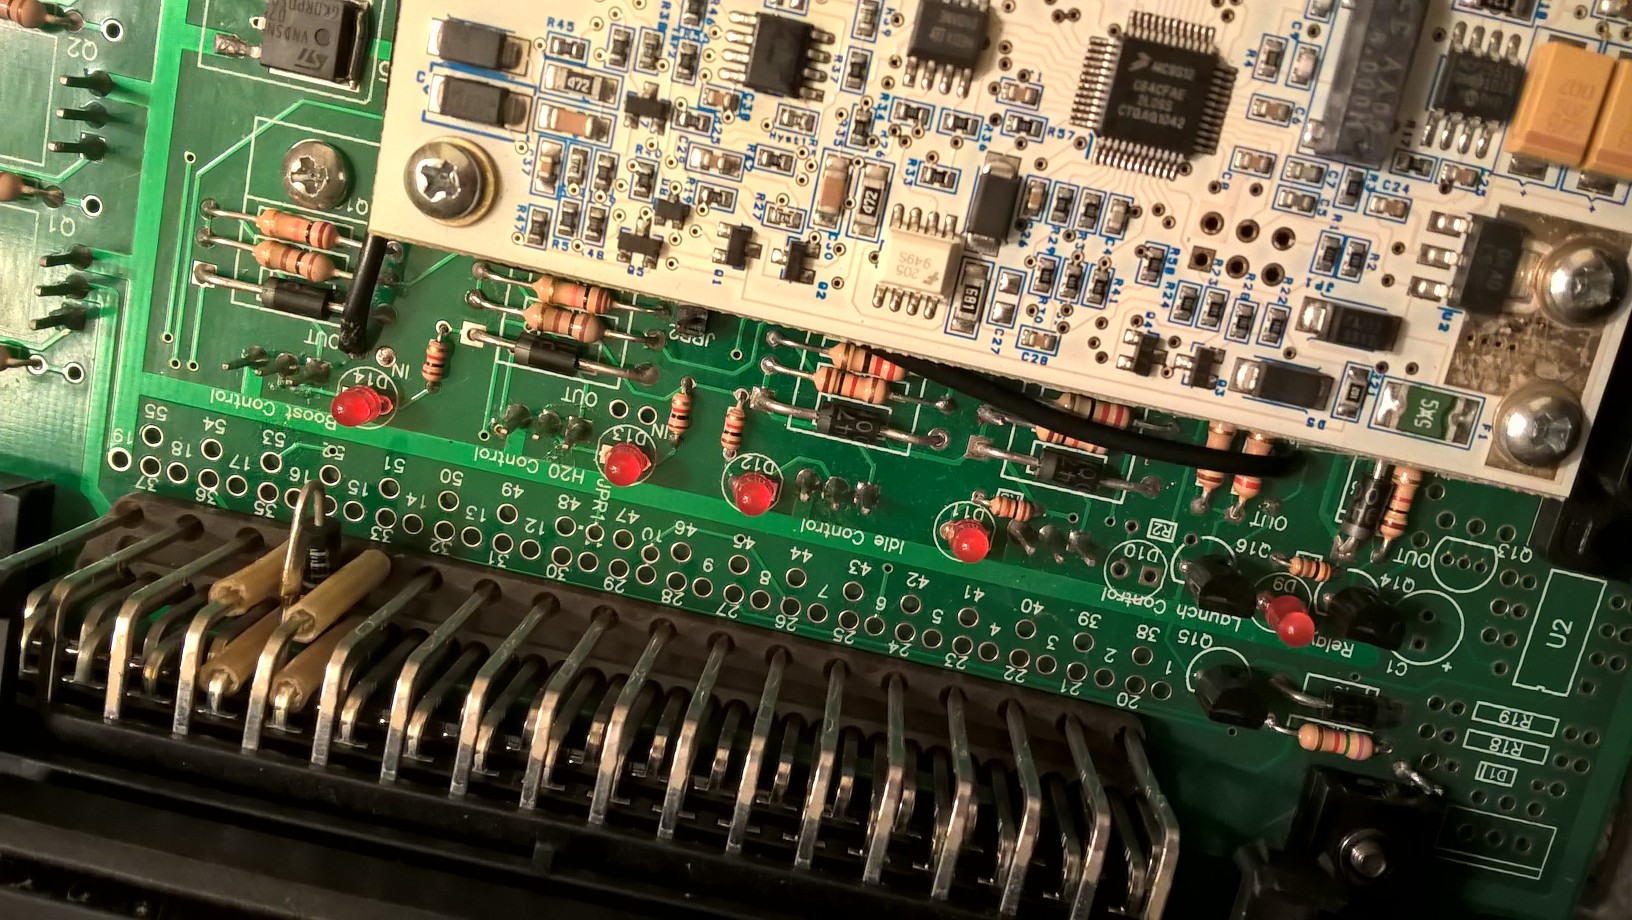
I took the MS unit out of the car and took the case off to see what MAP sensor I have. It turns out I do have the 4115 sensor good to 115 kpa (it actually reads to 120kpa). It also turns out I have an early whodwho unit with the Stim 37 pin connector. Keith's newer units don't have this.

Keith said he could replace the sensor with a 4250 (250 kpa sensor) or add a MapDaddy if I wanted. I was thinking about it and i'm not sure that the MapDaddy is really that useful/necessary. The only question I have about the MapDaddy is whether you can implement a timing advance/retard based on barometric correction? If not, you are only adjusting fuel values, right? And with EGO control enabled to ~10%, that would compensate for most of the changes in pressure or temperature (assuming 3% less oxygen per 1000 ft of elevation).
That would allow for +/- 3400 ft of elevation change without affecting the fueling. An engine restart would retake the initial MAP reading and reset the fueling based on the new initial MAP reading. So what is the point of the baro correction if it doesn't adjust timing? It shouldn't matter much with the 10% ego control unless i'm driving up pikes peak, am I missing something?
Either way, I found a 7 bar MAP sensor that would work while hunting for my options, but I don't see the need for. For reference it is the MPX5700AP vs the MPX4250. I think I'm gonna go with the 4250 and skip the baro correction. I was considering adding a knock sensor though while I'm in there. I need to figure out where the sensor could mount and if I could use something like the charcoal cannister connector wiring to send the signal to the ECU.
Once I got the unit back in the car I messed with the Overrun Fuel cut. I realized the idle stall would happen right after fuel cut was enabled to so I increased the 'Return Fuel' Parameter from 850 to about 1050 RPM and that has fixed the stall I would occasionally see at idle. I also need to get my cold start finalized so I bumped up my target rpm closer to 900 while below 100 F and increased fueling on the WUE setting in that same region. The engine would jump to life but then kind of putter down to 600 rpm so I think it just needs some more fuel until it warms up. I will keep messing with it. In the mean time I went boosting up to Denver this weekend in the frigid temps we have been having. I've put 1000 km on the car since getting it fixed and my last tank of gas came out at 22 mpg which isn't bad for winter blend and some boost. Here are a couple of pictures with the snow tires on and a picture of the OBC air temp sensor. Temp sensor was reading -24 F which is -11 C and my laptop was reading about 13 F Intake Air Temp in those conditions.
I want to add a manual boost controller(still trying to find a good unit that isn't $100 for a ball/spring check valve), build an airbox around the air intake before the summer, and possibly add a catch can but I'm not sure whether I should reroute the catch can to the air intake of the turbo because it could reduce the effectiveness of my intercooler.
The grocery getter :devil:
Winter mode
Thats all for now, stay tuned.Leave a comment:
-
Good exercise on this one.
It appears your turbo is matched pretty well and the altitude does at least help the pressure ratio increase to hit that efficiency island at lower boost pressures.
Being above 70% efficient is good regardless, so although there are gains to be had I would be real careful with tuning your car (9.5:1 CR?) to those levels without a knock sensing unit.
Keeping an eye on intake temperatures will help you to understand if you need to be more concerned with turbo sizing or simply intercooling efficiency (probably something I can improve with my setup).
Maybe it is worth talking to somebody like Lars with a turbo S50/S52 (10.5-11:1 compression ratio engine) and find out what boost levels those guys run here at altitude, along with what octane fuel. Also did he dyno tune it or street tune it? I'd feel more comfortable with a dyno friend when upping the ante on intake charge pressures.
If you look at boost levels in terms of kPa, I don't think ~12psi at altitude (170kPa) is really that crazy. But the guys at sea level usually seem to have access to 93 octane fuel (or E85) to give that margin of safety at 12+psi boost levels.Leave a comment:
-
I messed with the tune a little and found the stalling when coming to a stop disappeared when the Over-Run Fuel cut was disabled. It seems to not be bringing fuel back soon enough when I put the clutch in. I will have to mess with those settings to see if I can find a happy medium. I still need to pull the megasquirt unit apart and see what MAP Sensor I have installed. The sensor only reads 5.5 psi now but I am running 8 psi of boost so it is going off the AFR and fuel setting that I have at 5.5 psi.
To top it off, I was comparing the 5862 to garrett turbos to see if I could compare the turbo compressor map of a know Garrett to the PTE 5862 turbo I have. I found the GTX3576R has almost the exact same compressor wheel as mine. The main difference would be the Garrett is running a dual ball bearing instead of journal bearing and also has water cooling. The Garrett has the upgraded wheel and my 5862 has the upgraded billet wheel. So obviously we are just looking at the compressor side for now, but I use the BorgWarner MatchBot to calculate these values and plotted several combinations on the GTX3576 compressor map. This is particularly useful to me because I live at 6,500 feet but regularly go to 5000 feet in Denver, and can get to over 11,000 feet on the various mountain passes in the area (let alone pikes peak at 14,000 feet). I plotted the different scenarios and used a base of 8 psi at 70 F. The MatchBot allowed me to incorporate 6 different points on the map with different rpm, VE, boost, and pressure drops. To make it simple, I kept the values the same besides the altitude and one scenario where I upped the boost.
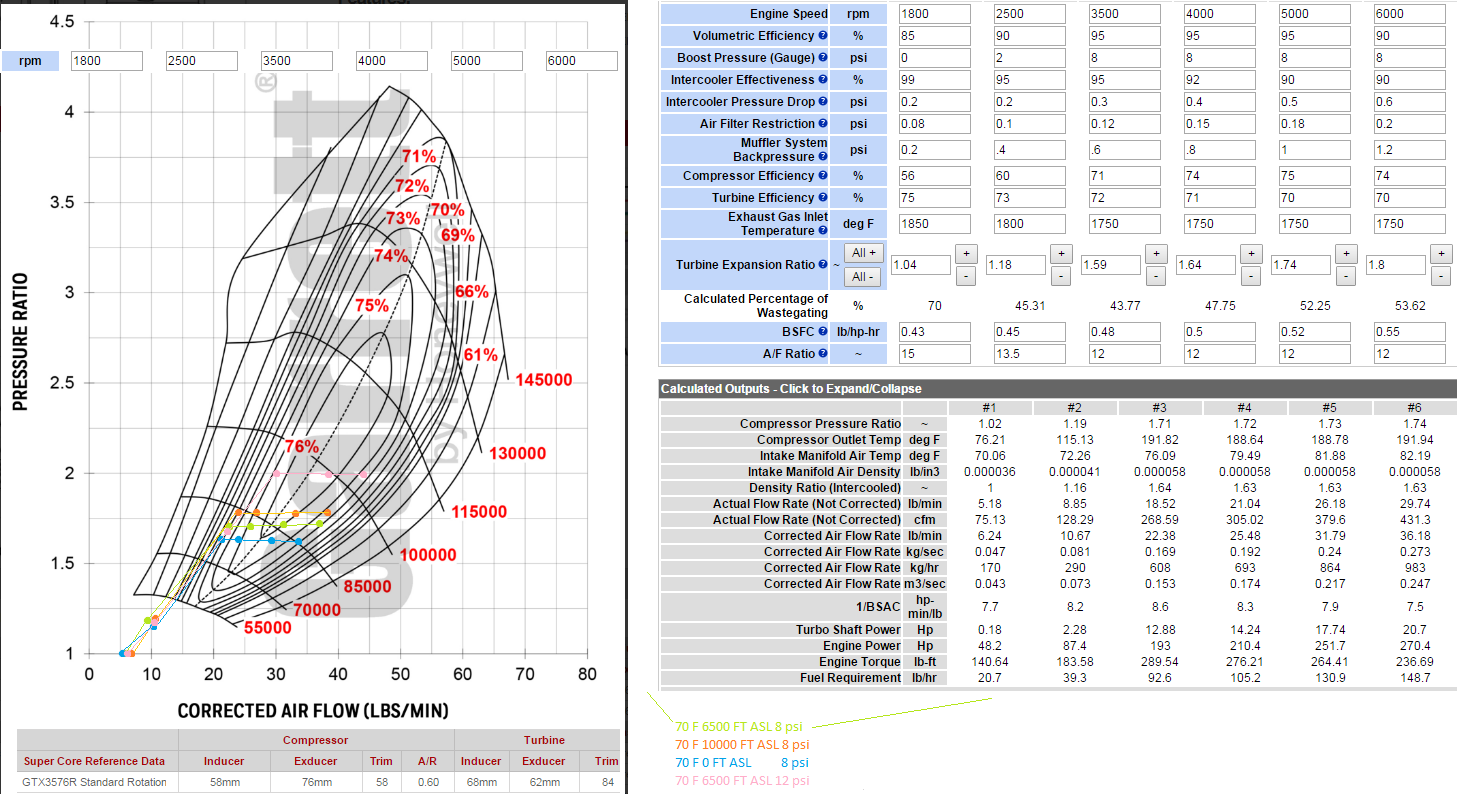
The compressor map shows me what kind of efficiency I would be at for these four scenarios. The blue line represents sea level. The green line is my current elevation in Colorado Springs. The orange line represents me going over Vail Pass at 10,000 feet. The pink line is if I were to up the boost to 12 psi here in Colorado Springs.
I put these 4 scenarios in to see what would happen as I drive to different elevations. Currently, the green line shows I hit peak turbo efficiency between 3500 and 4000 rpm. This seems accurate to what it's like in the car. I attached the MatchBot values here to see what kind of power levels I would be at during daily driving. Note, I plotted corrected airflow, which should be related to the temperature and altitude. As I travel to Vail Pass at 10,000 feet, the air density goes down and my pressure ratio increases, moving me up the map. The turbo has to move more air and therefore spin faster to keep up, moving the plot up and right. This is a good thing in this case because it moves me to a wider cross section of the peak efficiency island. If I were to drive down to sea level (the blue line), I may make more horsepower, but the 5862 doesn't have to work as hard so it moves the line down and left. Air density goes up, pressure ratio goes down. Now I am no longer in the highest efficiency! For this turbo to be ideal for this engine at sea level, I would need to pump up the boost to hit the max efficiency.
Now, one final scenario is going to 12 psi at my current elevation (pink line). With the same air density as the green line, I pump more boost into the engine and now my pressure ratio increases to 2 and I am in the 75% or better efficiency zone all the way from 4000 rpm to 6000 rpm. Notice I am taking advantage of the widest portion of the most efficient island at 76% instead of breezing through it like the 8 psi green line. I can expect to be between the orange line and blue line for all running conditions wherever I drive the car which is pretty good. The turbo is a good match for the engine (3.1L at 70 F). So about the pink line, and raising boost to 12 psi... Doing this makes logical sense to increase the boost to 12 psi.. its just optimizing the engine. :giggle: potstir
 Last edited by downforce22; 12-07-2016, 02:33 PM.
Leave a comment:
-
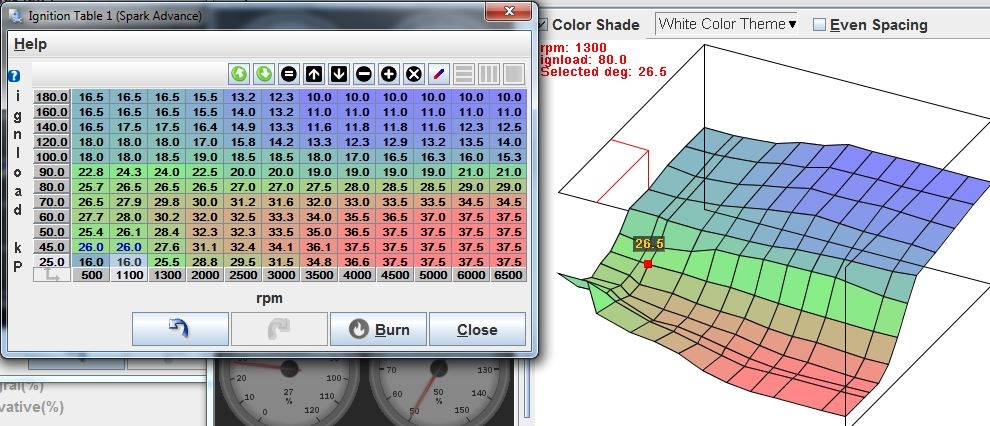
Good point on the timing in 100-180kpa region, much more aggressive than I have ran yet.
This is super retarded timing in that region when I was running on low octane. I have since bumped it up in that range but haven't been able to test/tune my car recently.
Mine is 8:1 M30B34 though so probably quite different.
 Last edited by tschultz; 11-30-2016, 07:34 PM.
Leave a comment:
-
Thanks for the feedback. I am running 91 right now.
After looking at some timing maps from other turbo cars, I noticed they all drop about 3-5 degrees of timing once boost comes in above 100 kpa. I did the same, just starting at about 80 kpa due to my altitude. Instantly the engine response dropped a bit and i had to retune the fueling values. But sometimes I would hear a bit of a rattling as boost built that I thought was loose change or something.
That's gone and I now know is the sound of detonation. Another description I read was the sound of gravel hitting the firewall. That's not quite what I would call it, but still a good idea of what to listen for. I dropped the 80 kpa zone to about 25 degrees and it steadily drops on my map to about 16 degrees at 200 kpa (eventhough my map sensor only goes to 120 kpa at the moment). I read through KAMotor's turbo thread and he popped his headgasket at 17 psi and had timing at 19.5 degrees instead of 16 (with water meth injection) on a precision 6262. That gives me a rough guideline for my map that at 200 kpa I should be around 15 degrees. Withmy new settings, the car is a bit slower, but there is no detonation as boost builds up to 8 psi and it is much smoother through the rev range.
The tune needs a few other issues sorted that I can't figure out.
-I set up fuel cut which seems to be working great. However, if I want to rev the engine while idling, the engine will go into fuel cut as engine vacuum drops below 20 kpa, above 1500 rpm, tps below 1% and triggers fuel cut on the decel. Is there a way to allow this to not go into fuel cut? Maybe the solution is just to turn off fuel cut. Minor detail, sure, but if someone wants to hear the sound, it is annoying to have it cutting in. Maybe I need to adjust the delay time.
-I got the CLIdle set up good and the car will go into closed loop idle rather quickly like it should, but when coming toa stop and clutch in, sometimes the car will stall. I have bumped up the spark advance at 500 rpm and adjusted the idle stepper values to the appropriate values. This helped, Maybe I need to check that it is not related to the fuelcut not supplying fuel fast enough.
-Target idle RPM - Going along with the CLIdle values, the target rpm is always close to my target. After startup, the car idles at like 500 rpm and then gets up to like 700 after maybe 20 seconds. It shoots up high due to the cranking idle pw settings I have but instantly drops lower. It would be nice to have it idling at 900 rpm until it warms up.
-Some times when coming to a stop, the idle is closer to the target 750 rpm, but other times it is at like 650 rpm. Any ideas how I can get this closer to what I set in in the target rpm curve?Leave a comment:


Leave a comment: