Weiß Beater: a budget iX build

Collapse
X
 
  • Time
  • Show
Clear All
new posts

  • unloadedak
    replied
    Originally posted by rzerob
    Wow. Very impressive. I love all the new hardware.
    thank you sir. new hardware is one of my weaknesses... i have to make stuff cleaner and better, no matter the car.


    i got the front end all buttoned up, eye-balled the toe, and went for a test drive. wow. the front end feels new. i now realize just how loose/worn out the rear of the car is grabbed some daylight/close up pics of oil cooler delete for those interested in doing it to their iX. i couldn't find any info about it clearing the motor arm/headers. it looks like it'll be messy changing the filter but nothing a can of brake clean won't fix. you can also see the leaky corner of the head gasket :|


    got some more exterior pics. my lip broke in half on a snow pile. the other half tore off while working on the front end. i think i'm gonna try to straighten it, put the lower center trim piece back in and paint the brake ducts black; leave it lip-less.


    taking it to buddy at dealer for an alignment tomorrow. it's an 80mi round trip; if it survives that. the spotlight will shift over to the M3 for it's rear subframe reinforcement extravaganza. in the meantime i'll disassemble and clean up the spare iX rear subframe and trailing arms for that job later in ~May.

    Leave a comment:


  • rzerob
    replied
    Wow. Very impressive. I love all the new hardware.

    Leave a comment:


  • unloadedak
    replied
    Originally posted by Northern
    If this car is a beater, my ix is definitely a parts car.
    hahhhaha I am known to go a bit overboard on projects at times...

    I'm keeping track of all costs and this car is only at $3560 without all those spare parts I got off CL. All of that was $800. Putting me at $4360 total.


    I'm going to post some of my spare front end stuff up for sale here soon to recover some costs of the build. Will do the same with rear end parts as well when I refresh it.

    Leave a comment:


  • Northern
    replied
    If this car is a beater, my ix is definitely a parts car.

    Leave a comment:


  • unloadedak
    replied
    Originally posted by Kershaw
    That's some great progress. I hope the rtv holds since it's not split fully.

    Did you have to clearance anything for the x5 guibo?

    I'm hoping it'll last too. The trash bags/duct tape lasted for the ~600 miles I drove on them. Probably had another couple months in them. The ends were just starting to fray. All the RTV has to do is last long enough to do the subframe reinforcement and maybe vanos/cooling system/rod bearing refresh on the E46M. Once that car is track prepped, I'll spend more money on this car.


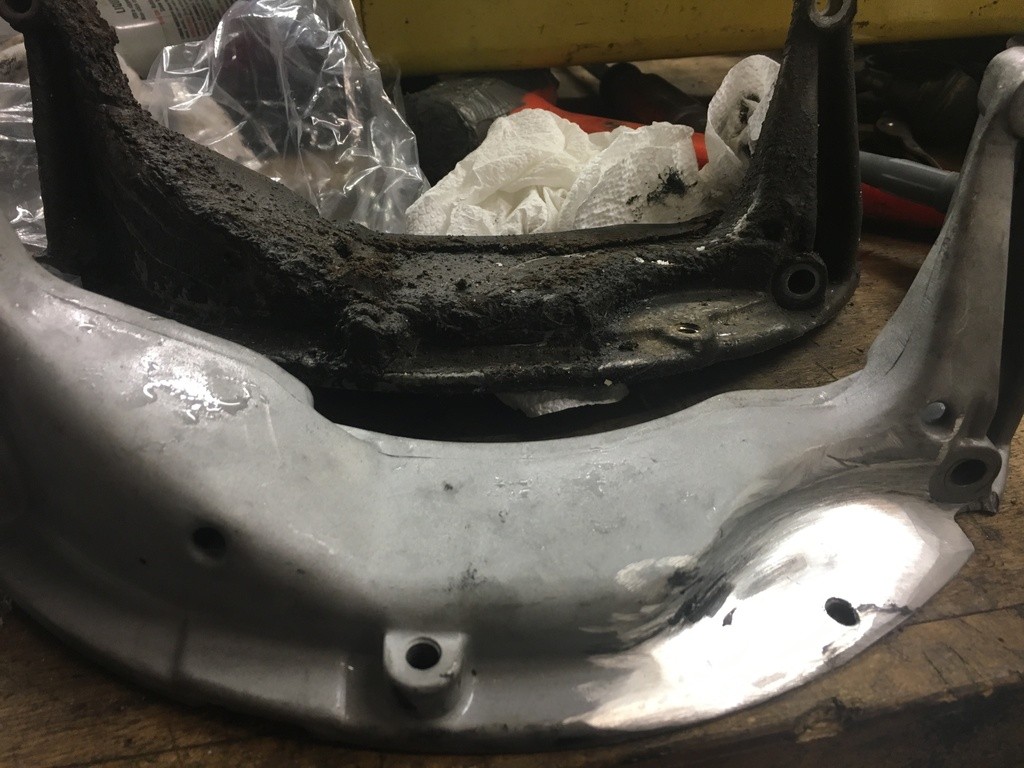
    As far as the X5 setup. I sorta followed the how to here. I found an X5 flange on ebay for $20. I bought hardware from belmetric.com instead of the over priced OE bits, I did get M10x45 instead of 42, hence the washers. I did get three extra 45mm ones, thinking of trimming 3mm off the tip. I also decided to grind down the bell housing cover instead of the bolt heads, that just doesn't sound smart to me. Pic below shows a disgusting stock one and the modified one. 4" angle grinder with a grinding disc and then some 36/60 grit paper to clean it up. Super simple except for the fact it covered my garage with a fine aluminum dust.

    Leave a comment:


  • Kershaw
    replied
    That's some great progress. I hope the rtv holds since it's not split fully.

    Did you have to clearance anything for the x5 guibo?

    Leave a comment:


  • unloadedak
    replied
    The front end is pretty much done being rebuilt. I have yet to test drive/align it but it’s all pretty much there and installed. I replaced almost everything, including hardware. I won’t bore you too much with text.


    First day, tear down. Started on a Friday afternoon with plans of calling it a night when the oil pan was on the ground; twas a success.


    During the week, sandblasted, cleaned up, painted, assembled, rtv’d, etc. I am borrowing ironfreaks blaster and I can’t stop using it; everything is getting blasted and painted.


    This weekend, assembled everything. X5 guibo mod, permatex oil pan rtv reseal, oil pressure switch replace, all orings&seals for front diff, lemforder ball joints, fag wheel bearings, tie rods, bilstein hd, oe strut top hats, sway bushings&links, motor mounts.
    I also did the 325e ‘oil cooler delete’; I know this is kinda fuhraze but, it was right up front and I thoroughly enjoy bashing shit with this car, last thing I need is to lose all my oil.
    I also cleaned up the wheel wells and put a coat of 3M under coat on them.


    -Front axles are known good take offs (driver side was a snafu; was purchased as being in good condition, hoping rtv lasts).

    -Steering guibo needs to be replaced, I used an air hammer to push out the OE studs, so I can swap the guibo out later without removing the entire front subframe/rack. I can just unbolt and slide it out.

    -Front brake calipers will be rebuilt when I do the rear subframe; would rather bleed the brake system once. They may be ugly right now, but they work.

    -A couple of power steering lines are leaking; these will be replaced when I pull the head to replace the head gasket.


    To do this spring;
    • Send my trash bagged front axles in for rebuilds by axles unlimited
    • Get head gasket job parts situated; contemplating about a mild cam
    • Refresh/assemble my spare rear subframe and trailing arms
    • Install rear assembly and rebuild front calipers
    • Go over surface rust areas with wire wheel and white spray paint or undercoat
    • 5 speed swap if I can find a manual transfer case and pedals/etc; already have G260

    Leave a comment:


  • unloadedak
    replied
    thanks guys! i am really enjoying this car. way more than i ever thought i would enjoy an automatic e30.

    sheep came in today. installed them really quick, i think a better install would come if i pulled the seats out; oh well they work and are awesome :)


    Leave a comment:


  • Panici
    replied
    Looking good! Subbed.

    Leave a comment:


  • rzerob
    replied
    Awesome.

    Leave a comment:


  • Kershaw
    replied
    Nice, dude.

    Leave a comment:


  • ThatOneEuroE30
    replied
    I told you it would be. Its just a winter beater project not a summer fun car project haha.

    Leave a comment:


  • unloadedak
    replied
    It’s been a while since I’ve updated this. I’ve since received all of the parts and have begun to prep them for the front end to be rebuilt. The dampers are starting to make some nasty sounds but I continue to drive this car every day. The M3 hasn’t moved in about 2 weeks and I miss it lol.

    We’ve had a few snow storms. Most recent and most severe caused my rear defrost to explode the rear window; it happened twice to the PO so I’m assuming faulty wiring/switch, haven’t checked the ETMs yet, I put a spare rear glass in that has a bad defrost so it’s not even hooked up now.

    I super cleaned the garage in preparation for all of the parts that Kingston brought up for me. I also bought some OE black sheep skin seat covers that I have yet to install. I grabbed ironfreaks blasting cabinet from his storage unit and started to blast all the front end and other misc parts to be refreshed and installed soon; I some how managed to destroy the outer race of a wheel bearing too (FCPeuro ftw, free replacement).

    Anyways, the car has been treating me awesome. It starts on the coldest of mornings and I demolish all snow banks with it. Hopefully get the struts, subframe, rack, oil pan, front diff/driveshaft pulled out and get some parts installed this weekend, list is looking something like;
    • Motor mounts
    • Oil pan sealant
    • Level sensor orings, oil pressure switch
    • Oil cooler delete from an eta (i don’t want the oil cooler to get smashed by a snow bank lol)
    • Front diff seals/orings
    • Good condition axles (will send in the garbage bag/duct tape ones for rebuilds this summer)
    • Control arms w/ new ball joints & OE lcabs
    • Strut tubes w/ new wheel bearings, bilstein hds, and OE top hats.
    • Sway links, bushings, brackets
    • Thick front guibo and X5 mod for front driveshaft
    • Blast/clean/paint most parts that are removed


    It’s still got a oil leak from the PF head gasket area, that will be taken care of in the Spring. I also have the spare subframe and trailing arms to refresh and install along with bilstein hd rear shocks.
    Anyways, here are a bunch of pics in somewhat chronological order.


    more to come once the front end refresh job is finished...
    this car is becoming a project, lol.

    Leave a comment:


  • unloadedak
    replied
    That's an awesome jig; I'll make something like that for the axles I'll be getting in a couple weeks.


    I also worked out a bit more to the deal with the iX parts in Kansas. He is going to include a bunch more iX parts now too;
    • rear subframe, trailing arms, axles, diff, bilstein hds
    • 2 front driveshafts
    • map light mirror
    • side skirts
    • brand new inner and outer tie rods, steering rack boots, front inner cv boots, ac belt, front & rear sway links, and engine mount
    • air filter box with afm
    • oil pick up tube
    • +other misc things


    I took the car on a ~100mi road trip last weekend; it worked perfectly. Couple days later one/both of the front axles had about 10 seconds of terrible vibration ~45mph, slowed down to a red light, took off with zero vibration; I think they are on their way out so I parked the iX until our next snow and back to dd the M3. I did put a yakima rack and lame plate frame on the iX though! ;)


    Leave a comment:


  • Kershaw
    replied
    Yep. I made this on my fifth cv joint job. I had been fiddling for an hour, remembering all the nightmares of previous jobs, I said to myself, "I have a full woodworking shop around me. I know I can do better than just trying to clamp this stupid axle to the bench." After 30 minutes I had the jig. 15 minutes later the axle was fully put back together.

    I have struggled with a frozen cv clip for 6 hours before. It was my second cv joint job. The first axle took an hour. The second... What a frustrating experience and it was getting late in the day by this point. I didn't realize that I couldn't just keep wacking the joint off. It'll pinch the circlip and it won't move freely. Now if I don't get it, I always check to see if the circlip moves freely. If it doesn't, it gets a tap on the end to move back and free the circlip so it can rotate and expand properly.

    It's a very tedious job, but after doing 8+ axles I'm getting fairly competent with it.

    Leave a comment:

Working...