

You are close and thanks for the reply - almost forgot I posted this.
This car continues to suprise with randomness. Apparently the car was converted to a non-airbag column during the big repair. No biggie but check out the steering linkage - it does not look like anything I have seen on any of my prior E30's.....maybe a Euro part? Google shows me a Euro steering linkage that looks longer so I'm not sure and I don't have a pic from my '86.
The good news is that simply loosening the upper linkage bolt and sliding it up the shaft allows the the Z3 rack to fit with no mods to the linkage or firewall - just subframe spacers and good to go. I'm never this lucky but I'll take it.
Next up is the iX booster coversion.
MJ
-
I recently did a Z3 rack swap, but I have a pre-airbag car... my only guess is something's going on with the angle of the column joints.Leave a comment:
-
Hope everyone has had a good holiday so far. I have been trying to work in little projects in between family events.
These pictures show some of the areas that were repaired on the front end as a result of the wreck. They did a nice job of seam sealing the areas but it seems that no primer was used and surface rust is now showing. This and a few other repaired areas will need addressed by going down to bare metal and starting over. Not difficult but time consuming and no time like the present since everything is apart.


Was cleaning up a bunch of misc parts and found that the car had a short shifter installed at some point. I believe that it is an Autosolutions kit from the early 90's. These were very popular and replaced the lower portion of the lever with a custom piece with bronze bushings and a custom linkage to clear the guibo. This explains why the shifting felt really nice...
Also got the Z3 rack cleaned up and ready for install.

Last edited by mjweimer; 12-04-2021, 02:18 PM.Leave a comment:
-
Very interesting, thanks for sharing that info. Here is a pic of what I'm talking about.

The green circle area on the bottom pipe is a slip fit into the green circled area on the Y-fitting on the larger pipe. As you can see the inner pipe diameter is much smaller without the outer layer and gains some valuable space for the control arm lollipop.
Unfortunately I will need to further modify the pipe to fully clear the lollipop and of course weld up the slip fit area once modified....don't currently have the capability to weld stainless.
MJLeave a comment:
-
-
I will be running the compressor from the 24v and mixing/matching up the lines to fit. I kept the Z3 compressor and lines so it should be a matter of using those end fittings on the E30 hoses but that is TBD. I won't know for sure until it is all mounted in the car.
The subframe notch is not needed if you modify both downpipes to fit. I wanted to try something different and only wanted to modify the outermost downpipe (cyl 4-6) to fit around the control arm lollipop. It seemed easier that way but now I'm not sure....
Seems it is common knowledge that the OBD2 downpipes are a larger diameter than OBD1. This is due to the pipes using double-walled construction with the outer layer acting as a heat shield.
Yesterday I decided to remove the outer layer of stainless heatshielding from the cyl 4-6 downpipe and found out that the inner pipe is loose fit into the rear Y-connector. (Z3's are 2 into 1 systems) It seems the outer material secures the pipe in place and keeps the system "air" tight. Very strange. I had not heard of this prior and it adds a bit of a challenge to the pipe modifications for clearance at the CA. I know....worthless without pics. I will post some up in the next couple of days.
MJLeave a comment:
-
Looking great! I completely forgot to notch my subframe before I reinforced and powdercoated it haha. I'll cross that bridge later.
What are you doing for AC lines? Are you running the 24v compressor?Leave a comment:
-
-
I think that whole job came out great. I love the notch and the reinforcement. When I did my swap, we heated and hammered hahaLeave a comment:
-
It was 60 deg today which is warm for Southern IN this time of year....perfect day to clean up the engine bay.
Before:

After:

Not a huge difference but noticeable. I used "LA's Totally Awesome" which is a damn good degreaser that you can get for $1/ 32oz bottle at the Dollar Tree. Works really well, doesn't smell bad like Gunk and is cheap.
All of this cleaning has revealed more opportunities to clean up some light rust where body panels have been replaced. The lower radiator support was replaced and the spot welded areas are rusting some under the seam sealer...it will be a decent job to fix.Last edited by mjweimer; 12-04-2021, 02:15 PM.Leave a comment:
-
I wish I did this to my subframe. It's so trivial but would help immensely.Leave a comment:
-
Got the used spare front subframe blasted in preparation for welding in reinforcements and got to work.
My plan is to use the stock M52 exhaust manifolds as well as the stock Z3 2.8 downpipes/center section (which is a 2 into 1 merge prior to the converter).
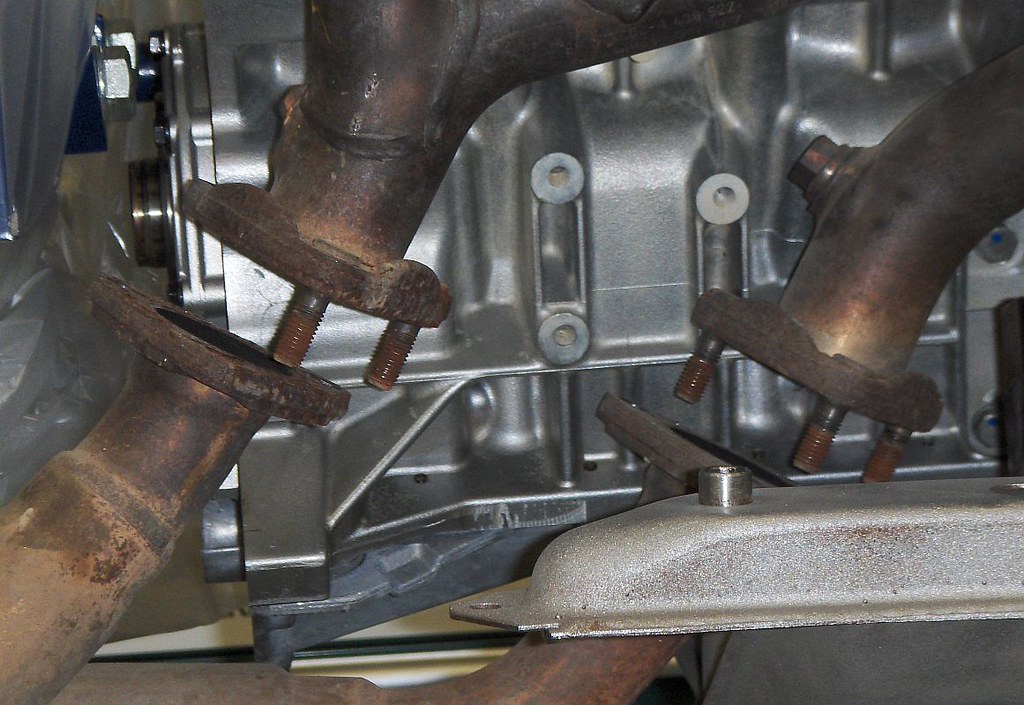
Most folks mod the front bank downpipe to go around the subframe but I decided to go a different route and modify the subframe. Since the engine is on a stand I mocked up the exhaust to the engine.
Here is a shot of how far away the flanges are from mating up with no mods.
I took several measurements and notched the subframe for clearance.

Obviously the notch needed to be filled...so took some 14ga sheet and bent it up on the "beater bag". This was my first time using a bag to form sheet metal and it was pretty interesting - you can do a lot with simple tools.

Also made a plate to reinforce the the area below the notch as well as front swaybar tab reinforcement plates.
Welded up the swaybar and engine mount reinforcements


Then the notch filler and extra reinforcement.

I am a fairly inexperienced welder and had a few minor problems but overall it turned out pretty good. Need to get it out to powdercoat after the holidays and then this piece of the build will be done.
Last edited by mjweimer; 12-04-2021, 02:01 PM.Leave a comment:
-

Leave a comment: