-
What about getting Mtech cloth but instead of the M colors in the pattern use like an orange color that will match the exterior. That would be sweet and different.
Leave a comment:
-
Hey, thanks very much. I dont know how many of these kind of restorations I will do after this one, so i need to make it count :)
Your X5 looks nice, I had saddle brown in my old 335 and really liked it. I went boring on current F31 and got black again... its OK but you know... its just black...
I have a fat stack of leather samples on my desk... and I cant get past some browns and some blues. not all... some look terrible.
But there's a couple I can just see them working. Not all leather mind you, I really like the thought of some course, loose woven fabric too... I have this brown Natuzzi couch in this brown, coarse weave fabric... i would like to recover the couch so I can use the fabric in my seat & door inserts... hey that's not as silly as it sounds!
besides colour there is also pattern, leather feel, natural vs stamped grain, poly coated/semi aniline / aniline leather... so many choices.
It may not suit the period of the car... but this theme of aniline dyed 'Spanish' leather in a deep brown with cloth inserts... i really dig it. Recall the 'buffalo leather' in the older high-end BMW how it would get a distressed look but you could bring it back... i like that.
i don't really like the poly-coated leather like Dakota, because it doesn't really feel like leather. Upside is low maintenance and stability.
this will take a while :)Leave a comment:
-
Im kinda liking the brown, the besides black with orange threads the only thing I can think of that would go with your orange car is maybe a cool white with orange seat, but that would be a bitch to keep clean.
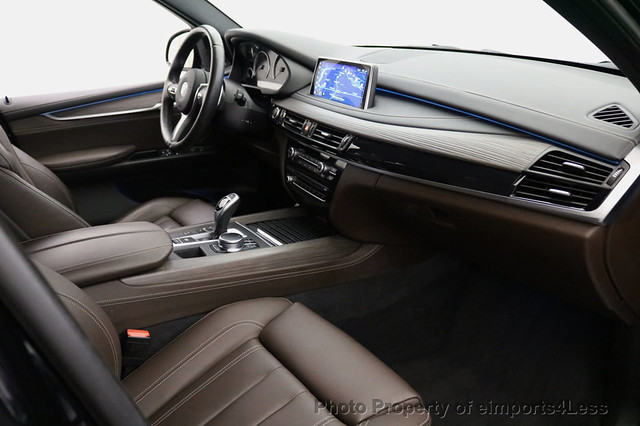
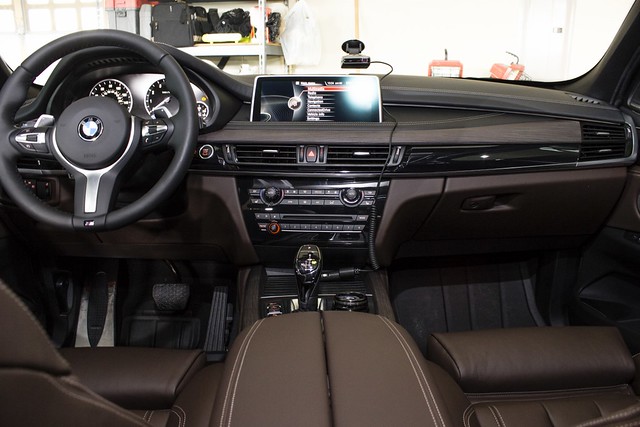
We have mocha brown in our X5 and its pretty nice not just being black.
Leave a comment:
-
It seems your attention to detail does not stop at E30 projects! The vanities look amazing - the inlay detail in the drawers is over the top.
I love the fact that you are sharing all the macro details of your build and including pictures with the description. It may not help my project (because its a beater) but it is fun to see and will help others who plan to restore their car to a high level.
The brown interior is a good choice with the orange and the interior rendering looks fantastic...the woven inserts really set it off.
MJLeave a comment:
-
Hi!
Update is a good idea, i have been a bit busy with other things. Quite smashed at work and I am building a new house where I am making much of the interior fit out... So, I have been kind of chasing my tail building cabinetry after hours to match builders’ timelines.
Like bathroom vanities… I want nice stuff and I have the tools and some of the skill to make nice stuff… so rather than accept metal blum drawers in a white melamine carcass… we have Russian birch ply carcass, mitre joins with Dominos, drawer bottoms made from up to 13 pieces of separate timber and doors that have a 4mm veneer of blackheart sassafrass over 18mm birch ply that I personally cut from a slab of tree, trimmed, book matched and made a veneer press… I think they look nice ��

two

Some of the finer detail


Custom made hardware, of course. And my makers mark

ANYWAY, this is not woodworkers.com (is that a site?)….. so that’s another story.
Not a great deal has been happening.
I did get two clear days over Christmas period where I pulled the whole chassis harness out of the 318is donor car, stripped off all of the original tesa tape, straightened and de-gunked (with brake cleaner and isopropyl alcohol) each individual wire before re-wrapping with new Certoplast 514 cloth tape. I also took the time to recrimp and reinsulate some of the crimps that are hidden in the harness. All this hidden stuff that no-one will ever see, but I know it’s done right and the car will be good for the next 30 years.
Then began to reroute it back into the new shell and that’s kind of half way done.
I have also run the battery cable into the boot.
Must admit I didn’t take too many pics of this because I was time limited and had a GET IT DONE mindset, so social media took a back seat to productivity.

This is the kind of gunk that the original tape has devolved to. I cant stand to handle it, because your hands just get covered in sticky black shit. So, the only way to fix it is to clean it all up and re-do it.
So, you get to a position like this, where everything is sparkly clean to be re-wrapped

This is factory insulation for a crimp

I don’t need to go overboard, but I think we can improve these with some simple adhesive lined shrink wrap

So, just lots of small stuff like this has been going on. Stuff no-one will ever see unless they trawl through this thread.
Another example, the wire harnesses for the dome lights in the roof. Pull them out, strip them down, clean them up and this time I have run them in some loose tubing (actually heatshrink too large for the cable diameter) to give them some abrasion protection in the B pillar.

We have rear mounted battery… this cable grommet is a real bitch to pull through. Much swear. Very curse. wow


Yes, I will be chasing that threaded ground.
We have a fuse box!

Also been experimenting with Evo3 vs normal M3 bumper seals. Evo shown but I think regular M3 wins because its much more discrete. It fits with a little trimming.


These are just loosely pushed in to check fitment… so don’t worry.
Last couple things
I reassembled the bonnet hinge. Painter took this apart COMPLETELY. It’s like 5 different parts that have been quite meticulously painted.
Put it back together with some ARP 12 pt stainless hardware.. I like the look, I’ve done it in most places on the car where the bolt would have been painted factory.


I hope you can begin to appreciate the level to which this car has been painted. I’m effectively showing macro zoom pictures of stuff that doesn’t even matter to most people…. Bonnet hinges and the smallest nook and cranny that will never be visible.
Stuck my old dash in to check fit and fouling spots for sound deadener

I have finished sound deadening the roof. It has a 3 layer treatment. 3mm butyl / alloy deadener (dynamat extreme) across the whole roof and then a 12mm matrix of open/closed cell foam that is a heat barrier. I have longitudinal gaps in it so that the head lining rods can be installed and the cloth wont foul on the deadener.
I purchased 3 linear yards of Alcantara in colour 6422 anthracite and this is currently with the trimmer to make the headlining, wrap the A and B pillars and the sun visors. Should be ready soon… then I can put glass in.

Looking like a car??
Lastly, I have been working with an industrial designer to refresh the interior of the E30.
At the moment we’re just working through colours and textures. So, we have a photoshop file with many layers that allows us to tweak the colour / texture of various surfaces. It super cool. Big props to him.
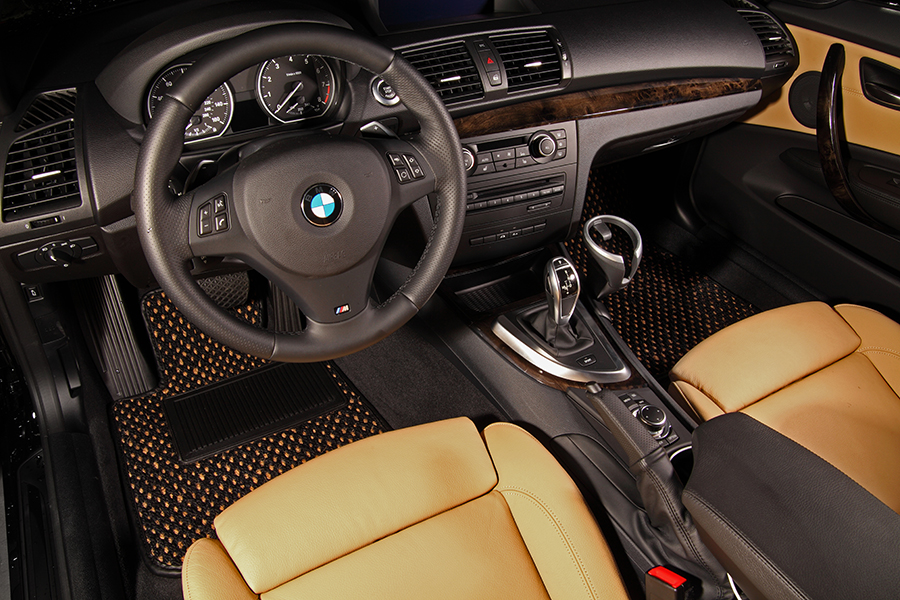
I have this idea that I need a brown interior.

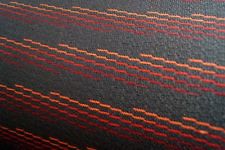
Something with woven leather inserts. Spinneybeck will do it but you need to order 5 yards minimum… probably quite $$
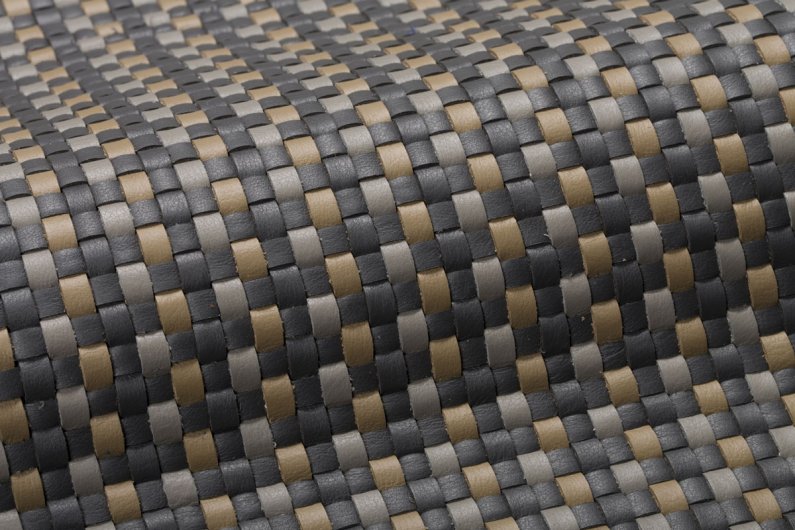
I could go on for hours about WHY brown..but lets be brief… Black is boring. Grey is not right. Red uhhh. I think its either a dark brown or actually dark blue.. I’ve a few blue prototypes that look pretty good.
I really like cocomats - https://www.cocomats.com/bmwgallery/ I will definitely have these on the floor. Probably black / brown(orange)
It’s a simple thing, but I like the aesthetic
I THINK I have a lead on a new black RHD carpet set too. Scoured realoem and cross referenced EVERY carpet part number (there’s quite a few over the years) and plugged them into my favorite online vendor site to see which came up with a price (most said NLA). ONE came up with a price… so I bought it and they’ve charged me. They don’t normally charge unless they can supply… so I may have landed a new black carpet set… which would be great!
best
burkeyLeave a comment:
-
What are you doing for the body harness? I have to find a new one because my vehicle's previous owner is an asshat.Leave a comment:
-
5 series bumper grommet to place in between the front bumper and front balance.Leave a comment:
-
Well I haven’t finished yet, but I ordered seven boxes of the buytl/alloy stuff. Each box 1.8 sq metre. 15 sq m of the 6mm and 12 of the .12mm.
I don’t believe I will use it allLeave a comment:
-
How much of each type of sound Deadener did you use in total? Seems super clean and OEM+.Leave a comment:


Leave a comment: