-
-
As previously mentioned, the PO somewhat welded in 'vert strut tower gussets, but only to the degree that they could be removed by hand. As such, the strut towers only needed a lick with Scotchbrite discs and a skim of filler to level the surface. I masked as tight to the seam sealer edges as I could and cleaned all surfaces with acetone to remove any Cosmoline, before scuffing, primer, paint and clear.


With that done, I could start throwing some bits back in the engine bay. The ABS unit and all brake lines were cleaned, including the brake line separators.

All the firewall insulation hardware was washed...

...battery cable & grommet cleaned and fed through the firewall, along with the insulation pieces. Almost anything plastic or rubber, no matter how small, gets a wipe with 303 Aerospace Protectant to dress it up before installation.


With the firewall dressed, the loom & therefore fusebox could go back in. But first it need some attention. I stripped all the old insulation, section by section, addressing any damaged wires or connectors using a couple of spare looms I've now accumulated! Repairs were achieved using crimp connectors with heatshrink, water proof jackets, usually topped with another round of heatshrink, marine grade for anything the ventures outside the shell. Everything was re-wrapped with 3M Friction tape. Few examples below...


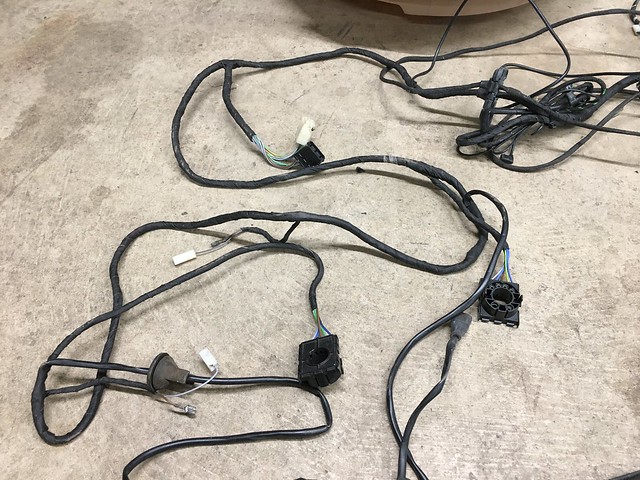


And the resultant carnage!


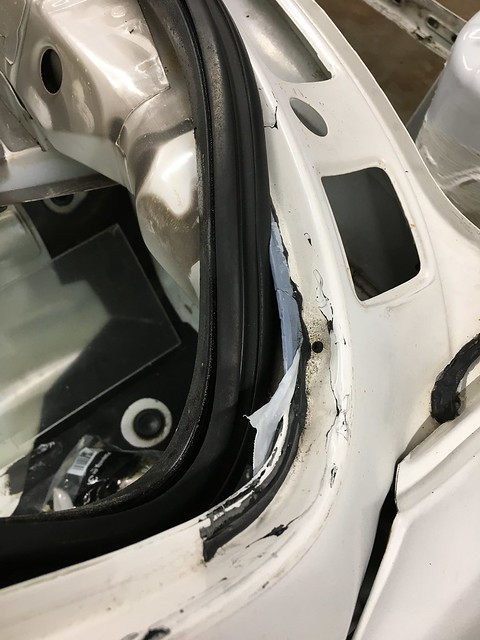
To aid installation, the cracked windshield came out...

...to reveal mint lower frame corners! Phew!!!
I laid a board in the 'bay to support the loom at a nice working height for feeding through the firewall.

A few moments laterrrr...

The loom was quickly laid out in place and clipped down. All clips washed and dressed, naturally! The overhead check panel loom had been chopped at the pillar, so the replacement loom was run up there, clipped in place, and the headliner re-secured with contact adhesive. The sunroof power harness was repaired at the same time, using the electric window harness from a spare loom. It uses the same gauge and colour (green/blue) wire, with the same connector to mate with the C302 accessory socket.


Comment
-
After all that wiring, I needed to get down to some dirty mechanical stuff.
Scrubbed up the gearbox. It'll get some seals and such at some point, but just needed it clean so I can store it neatly in the meantime.


Cleaned and dressed the radiator and condensor assemblies


You may remember the exhaust on the red parts car had been cut at the cat, after one of the collector nuts had been half ground off, and then welded back to the stud... After grinding that guy off and snapping the last stud rather easily, I was left with 4 sheared studs.

Out came the Dremel to knock off the spot welds so the studs could be knocked out. I'm assuming I'll be able to find replacements somewhere?

I'll probably get this blasted & coated eventually. Again, just wanted it neatening up for storage. Out of interest, can anyone tell me what the 4 bolts in the runners are therefore? I know they don't get used on an M42, but I've never seen any reference to why they're there in the first place? Jigging for assembly welding?

Pretty close to up to date now. Probably cover it off in one more post. There are plenty of older photos of cleaning stuff up, but I'll probably compile those with the final restoration of those parts at a later date.
Thanks for following alongComment
-
Great set of updates and it looks like you are making serious forward progress. Good move on scrapping that old chassis.
Are you still planning to keep this a stock build or perhaps a few (+) modifications where is makes sense?
MJComment
-
Thanks MJ
She’ll be mostly stock, preserving maximum funds for restoration of original equipment as opposed to mods. The costs tend to snowball whenever I think about modifications!
I’ll be fitting a Z3 rack & shifter, which should enhance the driving experience a little. ZHP knob and a non-airbag wheel for the interior. Then a nice little audio ‘upgrade’ as the entire stereo system inc wiring is MIA, so I’ll just build from scratch.
Otherwise, restoring and refreshing with as many new parts as possible. Already drawn up a shopping list for the chassis refresh, so looking forward to getting it back to a roller in the New Year.
Oh, I guess I should add that the body loom is from a 325i, so should be a few more features than the original base 318i came with. Going to see how many of the overhead check panel features I can get functional. Only head scratcher right now is the oil level as the M42 doesn’t appear to have provision for a sensor 🤔Last edited by Matt@EDC; 12-01-2020, 07:00 AM.Comment
-
That's really cleaning up nicely. Solid work!Comment
-
Hey Matt, does this system work with a oil pressure measuring unit? I got this aluminium oil filter lid from Ebay to get a pressure and temperature sensor installed on my M42.
So maybe this could help if you're planning to make this thing functional?
I can't seem to find the original Ebay advertisement where i bought it from tough...
Good luck!
Belgian E30 Driver
/// 1990 - E30 - 318i Cabriolet Brilliantrot
/// 1988 - E30 - 320i Touring Diamantschwarz (Sold)
/// 1990 - E30 - 318IS Coupé Lazurblau
Check out my Rare BMW Music Edition Cassettes TopicComment
-
Sweet looking thing, Pieter!
Unfortunately, it would have to be a level sensor that goes in the bottom of the oil pan, I believe. There doesn’t appear to be any provision in the bottom of the M42 pan and, unsurprisingly, nowhere sells a sensor. Although, I guess once you lose oil pressure, you’d know the level is low!
The solution is most likely going to be to just ensure the light in the check panel doesn’t illuminate under normal driving conditions.Comment
-
Belgian E30 Driver
/// 1990 - E30 - 318i Cabriolet Brilliantrot
/// 1988 - E30 - 320i Touring Diamantschwarz (Sold)
/// 1990 - E30 - 318IS Coupé Lazurblau
Check out my Rare BMW Music Edition Cassettes TopicComment
-
Behold!!! Updates!!!
Sorry it's been a while. The master bathroom has been undergoing a 'bareshell rebuild', most of which I've been handling myself; tear out, wiring, plumbing, insulation... Just waiting on the guy who is installing the shower and doing the tiling to start in May, so got a bit of time to catch up on what I have been doing on the E30 and hopefully make some big strides forward!
First of all, we went back to a shell on jackstands... again. The complete subframe assemblies went back to the seller as there were a number of new bits on them and I only bought the shell really.

While the shell is in remarkable condition, there is the almost inescapable bit of rot in the rear battery tray. After poking and pulling and scrubbing, the extent was a small hole and a bit of rust along the front seam.


I ground all the corrosion away from the seams and cut back the inner fender until clean metal was discover. Inbetween the inner and outer fender was pumped full of seam sealer at the factory, so I carved this away also until I found the extent of any surface rust.

Every surface was wire wheeled back to bare metal with the Dremel, treated with Loctite Rust Dissolver (including all seams), and wiped down with IPA. I then produced a template in CAD and followed up with a rather sweet patch panel at the first attempt! Even surprised myself, given the complex shape.

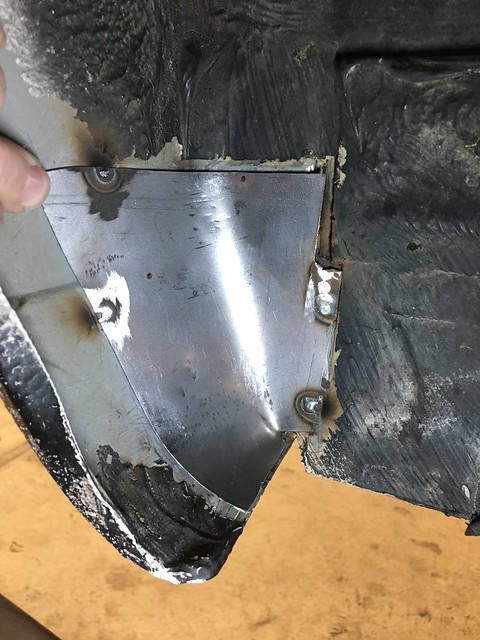
As you can see, the patch wouldn't take a tack for love nor money. Couldn't get a good ground due to this area being 74 overlapping layers of sheet metal with 14 gallons of seam sealer in between it all. So I cleaned it all up again and switched to Plan B; Eastwood panel adhesive.

Get everything super clean with IPA, warm the area up with the heat gun and then lightly clamp in place. The bond relies on having a nice even 'filling' between each piece of panel. The top end 3M panel adhesives have little polymer micro-balls in to prevent total squeeze-out of the adhesive.

Flipped a long clamp into a spreader. Can never have too many clamps around the shop!

I turned set the thermostat in the shop at 70F (outdoor temps in the 30's) and left it a day or two. Then I came back and gave it another IPA wipe down, a coat of 3M rust converter primer and a few coats of Rustoleum Professional rubberised undercoat.

The battery tray got all the surface rust ground out, Rust Dissolver, rust converter primer and paint.


Very happy with the results and that this is the extent of the rust repairs!Comment
-
Did a bit more interior work next. Cleaned up the firewall area and ordered a brand new insulation pad through BMW, which was shipped from Germany.


I went round checking and servicing all the doors. Tested all the power windows and greased the cables. I think all but one of the power lock actuators was jammed and had to be swapped out. The drivers door lock was acting goofy and wouldn't lock so I ordered a kit and rebuilt it. Well worth it, super smooth action now.
While I was in the doors I added some additional sound deadening with a strip of butyl rope stuffed in between the side impact bar and the door skin, plus about 30-50% coverage using damping mat. Door skins are pretty solid sounding now.


The trunk also got some deadener in the spare wheel tub, rear quarters and rear panel. Basically just did a knock test everywhere and deadened enough to kill any 'oil canning'. I've got a few ideas buzzing around my head for the trunk lid so not addressed that yet, but it will be thoroughly deadened when the time comes!

I'm ditching all the factory audio as the looms are either AWOL or trashed, so I removed the light module from the amp/tuner/whatever it is and found it bolts right up in place and looks super neat! Very pleasing.

Then the trunk carpets. Oh them carpets... You may remember the red car had one of the trunk vents installed backwards and seemingly vacuumed half a desert into the car.

Process was vacuum, dry brush, vacuum, Shout carpet cleaner and an upholstery brush, wipe with towel and clean water, then another brush & vacuum when dry.


Came up remarkably well from where they started. I gave the battery cover a resto and dropped everything in the trunk. Mainly as it's the best place to store them, but also it was very satisfying to see an 'upholstered' trunk for the first time!


I've just picked up a rear panel carpet and will probably end up making one for the rear bench as they're generally all trashed in parts cars, from what I gather.Comment
-
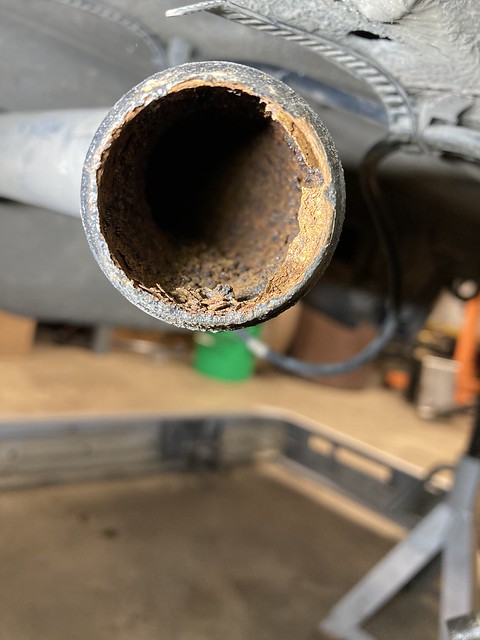
The fuel tank is the latest little project I completed and should get us pretty well up to date.
Peering inside the old tank was pretty grim...

...so out that came. Floor pan and chassis is SUPER clean.

The tank was stripped of it's hardware and lines, which were all washed and installed onto a new tank.


The pump assembly from the old tank was junk though somehow the level sensor was just fine. Go figure. The secondary level sensor on the drivers side... not so much.

However, at $400 to replace, I was gonna have a damn good go at saving it! I made up that little stand out of a wire coat hanger and sprayed it with carb cleaner every couple of hours until the goop stopped running off under gravity. Then it went in Berryman's Chem-Dip for an hour at a time, scrubbing and cleaning in between. Took a fair few dunks to get it cleaned up.

However, there was still dark matter oozing from the bottom and I couldn't hear the float moving inside, so knew it was jacked internally. Cracked her open to reveal more misery...

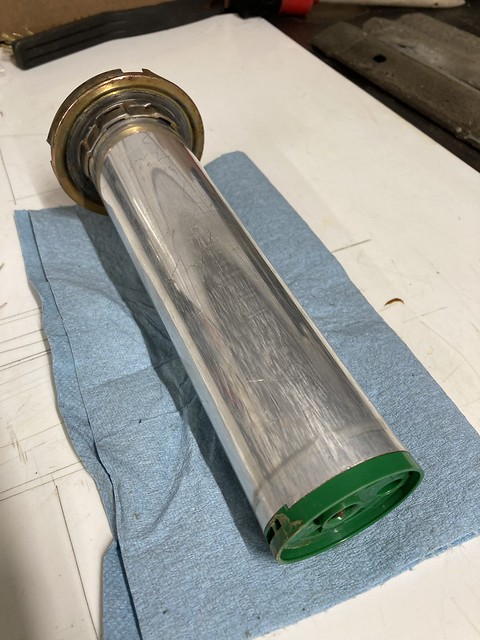
All the rust and junk was carefully picked, scrapped and brushed away, being super careful not to 'pluck' those resistor wires in the process! Eventually, once cleaned up and the shaft polished, the float slid freely under its own weight and the resistance across the terminals checked out with a DMM. Score! I polished up the flange with the Dremel before reassembly.

Took quite a lot of cocking around with brake clean, wire and compressed air to clean out the passages in the base (green plastic cap) before she was done and ready to go back in the tank. Result.
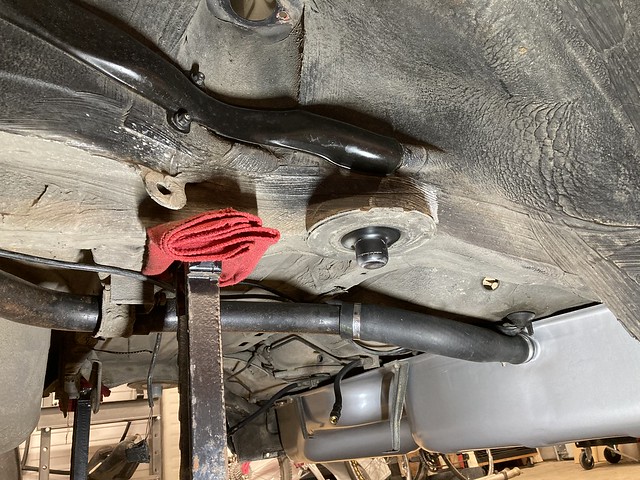
New tank was installed with assistance of the custom tank jack.

AWDBOB hooked me up with a super clean and tested OEM fuel pump assembly. This and the level sensors were installed with new o-ring seals and all new fuel hose.

Was happy to put a lid on that job.

But wait, there's more....
The fuel filler neck was rusted up inside. AWDBOB to the rescue again with a tidy replacement.
Behind the shield, the vent hoses were in decent shape, but stuffed full of trapped dirt, so that all got a clean out.


Washed and installed the shield and fitted a new OEM flexible filler neck section.
Then just washed and reinstalled the the splash shield over the filler neck and EVAP tank. Lovely.

Over on the other side of the tank, a Mahle fuel filter and all new hoses were fitted.

Phew! And I think that's about where we're at. I have the IHKS blown to bits on the workbench right now, so that'll be the next restoration project to report. And hopefully sometime this week I'll be taking the subframes, trailing arms and other chassis parts to the powdercoaters. So it'll be a race between completing the interior and getting it back into a roller after that!
Thanks for reading and hope I have more to report soonComment


Comment