Announcement

Collapse
No announcement yet.

'91 325i Alpine Sedan (2.7 Stroker ground-up rebuild)

Collapse
X
 
  • Filter
  • Time
  • Show
Clear All
new posts

    #76
    mjweimer Thanks for the info, as always! I’m definitely wanting to run floor mats. Good to hear there’s an OEM option! I thought the CocoMats looked good but daaaang... $$$ I was also told E90 mats might fit?

    And yes, very satisfying and rewarding work. Bringing as many of these old parts back to a condition where they can be enjoyed and appreciated for many more years to come is quite fulfilling. I’m anti-waste anyway, but as an engineer I think about how much effort was put into designing and making things in the first place and if it takes just a bit of patience & effort to make it live on, I’m all in! Just goes to show how long a car can last with care.
    Last edited by Matt@EDC; 05-17-2021, 06:11 AM.

    Comment


      #77
      I don't know about the E90 floor mat fitment but they might work, amazing how similar some of these mats are to each other. Yeah, CocoMats are really neat but are quite spendy...on the flip side, they wear like iron so the money is not wasted.


      100% on re-using what you can on car projects. I like the challenge of carefully taking things apart, repairing and putting back into service. Takes some extra time but you learn so much in the process and don't create extra waste.

      Comment


        #78
        cocomats are a flex tho, definitely a good look.

        Comment


          #79
          Today I was able to get the front hubs restored, ready to go on the front struts when they go in. These are SKF units which appear to have a slight different bearing cage arrangement to the FAG units Jordan fantastically refinished in his project. It took me a couple of attempts to figure out how to best assemble the first unit and then the second was a breeze, so thought I’d cover my findings in detail and maybe copy to a how-to in the tech section later.

          So, a pair of 30yo front hubs. About what you’d expect.


          I first pulled out the outboard inner race. May take a little fidgeting to get the balls to spread enough (stop giggling at the back...) for the race to release. Then with a narrow flat blade screwdriver, pop the balls up out of the cage. They won’t fall out yet, but remember this position as it will be important for reassembly.


          Then use the screwdriver to flick the balls (quiet...) inwards, repeating until they’ve all dropped into the middle.


          The bearing cage will come out this side but it’s a bit of a squeeze. Be firm but careful.


          For the inboard bearings, the inner track can be worked out, but I found it easiest to just push the inner track and bearing cage out from the inside, which will pop the seal out and the whole lot comes out as one. Just apply firm, even pressure with your thumbs.


          You should left with a dirty pile of bits like this. Believe this grease is original as it’s brown. Note the outer cage is a crown-like design. The FAG unit appears to have 2 of these profiles back to back in a single piece. The SKF has a separate inboard cage with radial holes to house the balls.


          Each piece was wiped clean of grease before a final wipe of brake clean to remove remaining residue. Go easy with brake clean on the plastics, if at all. The hubs inner tracks were wiped out with brake clean before taking a degreaser bath, scrubbing the old copper slip grease and dirt off the outside with a brass wire brush. I then took a steel wire wheel to the outsides to rid it of all the rust. Wipe with brake clean to... clean, and then WD40 to protect. Kept the nice forged finish.


          Now for reassembly in reverse order. After packing the inboard side with grease and refitting the seal, I could not get the inner track to go in for love nor money. This was frustrating and made for a bit of a mess! Here’s what I finally did, which was much cleaner on the second hub!

          Assemble the balls into the cage and the seal onto the inner race. Pack some grease onto the inner race, drop the bearing on and pack a bit more grease over the balls. Add a layer of grease in the outer race of the hub and the drop the whole bearing, race and seal in as one.


          You need to pull the inner race back up a little to manipulate the seal enough to pop back into its groove.


          Then push the race back down, wipe its bum and your done. Just check from the inside that the bearing is fully greased.


          Now for outboard side. Grease the outer race then pop the cage back in again carefully and add a bit more grease to the grooves of the cage. Now drop a ball bearing in and push it outward and downward into the cage. It’ll pop in once, but don’t snap it right down into the cage. Try it with the first ball; you’ll feel one pop, then a more positive snap when it goes fully home. You just want the first little pop. This the same position it was when we first popped it up with the screwdriver on disassembly. ( Sorry for all the ‘pops’, it’s a British thing I guess...)


          Splooge a bit more grease around the bearings. Now the inner race will pass through the balls (it won’t if they’re fully seated) and pushing down on the flange will snap the falls home into the cage.


          Wipe all your greasy fingerprints off and admire the finished article. Before and after shown for comparison.


          Regarding grease, I’m using Redline CV-2 as I wanted some for the CV joints anyway. Something like Lucas Xtra Heavy Duty (green) would be a fine over the counter, cheaper option. I got CV-2 through O’Reillys, if you’re so inclined.

          Very pleased with how these came out. The cleaned up well. I’ve bagged them until the struts go together and are hung on the car.
          Last edited by Matt@EDC; 05-21-2021, 07:45 PM.

          Comment


            #80
            While in the mood for cleaning, I dealt with these crusty little buggers. They are the shields that go behind the front hubs.


            After a degreaser bath and a scrub, the got soaked in white vinegar to loosen up the rust a bit. The insides wiped clean with some brake clean. The outsides got the wire wheel treatment and came clean.


            I’ve hit the outsides with some satin black before they go on the strut housings.

            Then, the big stepping stone...


            The carpet is in and suddenly it feels like a car and not a metal shell full of wires! It looks great, smells fresh and means I can start putting the interior back together.

            The stoke is high tonight

            Comment


              #81
              With the carpet in, we can work towards installing some of the chunky interior pieces.

              The dash in the red car was shot and went in the bin a looong time ago. I picked this one up from Zionsville Autosport which had one crack that started in the passenger side dash but was quickly remedied by them. They believed it was too good to go to waste and I agree.

              It got a bit dirty in storage and it’s unlikely to have ever had a deep clean, which is a must for this project.


              The whole dash was disassembled...


              ...so every vent and duct could get a thorough clean. Aiming to eliminate those old car aromas through the vehicle!


              I keep a couple of dryer vent brushes in my cleaning arsenal for just such a task.


              The dash itself got sprayed down with APC and worked over with a soft brush, then wiped down with a clean microfibre and water until no more dirt comes off on the towel


              Once thoroughly clean and dry, we just need to work on the finish


              Everything was treated with 303 Aerospace before reassembly. The dash sucked it up pretty quick at first, but after 3 or 4 applications, a beautiful even finish was achieved. Lovely.


              The center consoles were out of the red parts car and absolutely hideous, but in great condition under all the filth.


              But nothing we can’t handle. The received the same treatment as the dash and look fantastic for it.


              In the next update, the IHKS goes in, and maybe the dash!?

              Comment


                #82
                Sooooo.... the IHKS went in....


                ...and then this morning, so did the dash! Eventually... took a few tries but remembered AWDBOB saying the upper column cowl has to go in first. Wish I’d remembered these wise words before the first couple of attempts! It’s then real tight to get over the cowl. I pulled the two bolts on the side of the column then loosened the one below until the column lowered enough for the cowl piece to slide in after the dash was in place 👌 Without the cowl in place, the dash goes in easy peasy, from passenger side towards driver side at a slight upward angle. Not having the windshield in helps a lot too 😆


                Really happy with that as I can get rocking on the interior now! The dash loom is out of the red 318i which did not have fog lights. Fine by me as I’m not to bothered about fogs. The ones on the E39 never get used and are just expensive rock catchers otherwise. I fitted the blanking plate in the light switch panel.


                With going airbag delete, I think I found a spot for the dinky little Pioneer GM-D1004 amp I’m using. Spent most of this evening trial fitting and head scratching before commuting to a solution. Aiming for something clean and hidden, but can be easily accessed for service or removal. More on that as it develops...


                I also finished up the last of the sound deadening in the rear seat and parcel shelf, as they may be able to go in as soon as I have speaker wires run back there.

                Panels got another clean and wipe down with IPA


                General rule is more than 25% coverage and you’re into diminishing returns. I went for neatness and used aluminum foil to make templates of the panel pressings. Conforms and holds its shape much like the deadening mat.


                The pressings are symmetrical so I only had to make templates once before tracing on to the deadener. I left space to cut them about 1/8” oversized as I’d traced the bottom of the pressings and wanted to fill up the sides a bit too.


                The piece over the ski hatch just covers the spot welded seam to tie it to the back rear. I just covered the large, thin, flat part of the parcel shelf as it rung like crazy. The rest of the shelf is very contoured and had not much to be gained.


                Very happy with the result. Looks neat and made a huge difference to this area.

                Comment


                  #83
                  Damn, haven't been on the site in a bit and am just now catching up on all of my sub's. Really nice work in the last few weeks, things are looking awesome!
                  '86 325e Zinnoberrot /// '02 325ci Schwarz II /// '18 M4 Azurite Black Metallic ///

                  Albie325 Build Thread | Albie325 COTM Jan 2021

                  Comment


                    #84
                    Albie325 Thanks! I’m trying to keep the ball rolling while finishing up our master bath right. So I get out to the workshop for an hour a couple nights a week, mostly just to get the last of the dash wiring routed as it’s tedious and boring. But I shall be rewarded with assembling shiny mechanical things soon enough!!!

                    I recently picked up a ‘2.7i’ drivetrain pull out to strip for parts. (I have enough that I should be able to sell the still-timed short block if anyone’s looking for a low comp base for a turbo build). Anyway, need to start pulling that apart to clean and possibly powdercoat parts ready for reassembly onto my fresh block and head.

                    Last edited by Matt@EDC; 06-22-2021, 07:52 AM.

                    Comment


                      #85
                      This is an awesome build, and great inspiration!

                      My project is going the resto-mod route, there's a ton of reference material here - love your attention to detail. Subscribed. :)

                      Comment


                        #86
                        M20 is no joke. Fun thread. My ‘89 will be ripping soon, just got the heater core today.
                        My son has the 1987 325e, 2 door, 5speed
                        I daily the 1989 325i, 4 door, 5speed

                        Comment


                          #87
                          Many exciting things have occurred!!! But first, more wiring.

                          Earlier I teased the potential spot for the diddly Pioneer amp for the stereo system. I have many photos of the boring and tedious process of bundling and terminating the harnesses (rather than just cutting everything 3 inches long) but we'll jump straight to the finished install.

                          Power is drawn from the 30A power antenna and cigarette lighter circuit, both of which have been deleted. The fuse will be replaced (and labelled) with a 15A, as recommended for the amp, and I took the connector from a spare antenna harness so the amp plugs straight into terminal Z of the C302 accessory socket. A terminal block is affixed to the amp for easily accessible, color-coded speaker connections.


                          Standalone speaker wires were fed through the door connectors, rather than splicing into the body or door harness. Relatively challenging, but the right way to do it, and made much 'easier' with the correct application of chubby zip tie, tape and silicon spray.


                          A spare (and already chopped) stereo harness was used to make up a loom for the Pioneer headunit that is going in. The remote wires were terminated with spade connectors for a no-tools solution behind the headunit.


                          Last thing to do before throwing some speakers in the back was to clean up the parcel shelf. Picked up a sweet beige item from AWDBOB, complete with a set of standard grilles for stealth installation of the Pioneer co-axials. A dry brush and vac had it looking resplendent.


                          The rear seat and shelf area will all come together shortly when I get the bench seats cleaned up.

                          Comment


                            #88
                            If you stayed awake though that lot then, then behold your reward. Shinies...


                            I laid out all the new, restored and powdercoated front suspension parts, ensuring everything was in order and ready to go. Let's start with the new Bilstein B8's into the powdercoated strut tubes. Per the instructions, the struts got a manual squish through their travel to lube the seals before assembly. No cooling oil required in the strut tubes for Bilsteins, but I did give the struts a wipe with ATF for some corrosion protection while installed, plus a bit of copper grease on the threads of the collar nut. I wasn't willing to settle for a pipe wrench or chisel to tighten the nut, but finally found a use for the 1-5/8" Craftsman wrench I randomly acquired a couple years back.


                            Wrap your tool to avoid irritating scratching


                            Everything but the strut tubes here is new. Bilstein B8's, H&R Sports, OEM spring isolators & spring cup, and Sachs top mount to... top it all off.


                            Powdercoated brake shields and rebuilt hubs installed with new hub nuts (to be torqued and staked on the ground).


                            E36 'solid' control arm bushes went in the fridge overnight before being pressed into pre-heated lollipop brackets.


                            After assembly, I warmed the rubber bushings gently, added a little silicon spray to the bushings and Lemforder control arms and pushed them on fairly easier by hand. This also makes them much easier to remove if you install them back to front. Apparently...


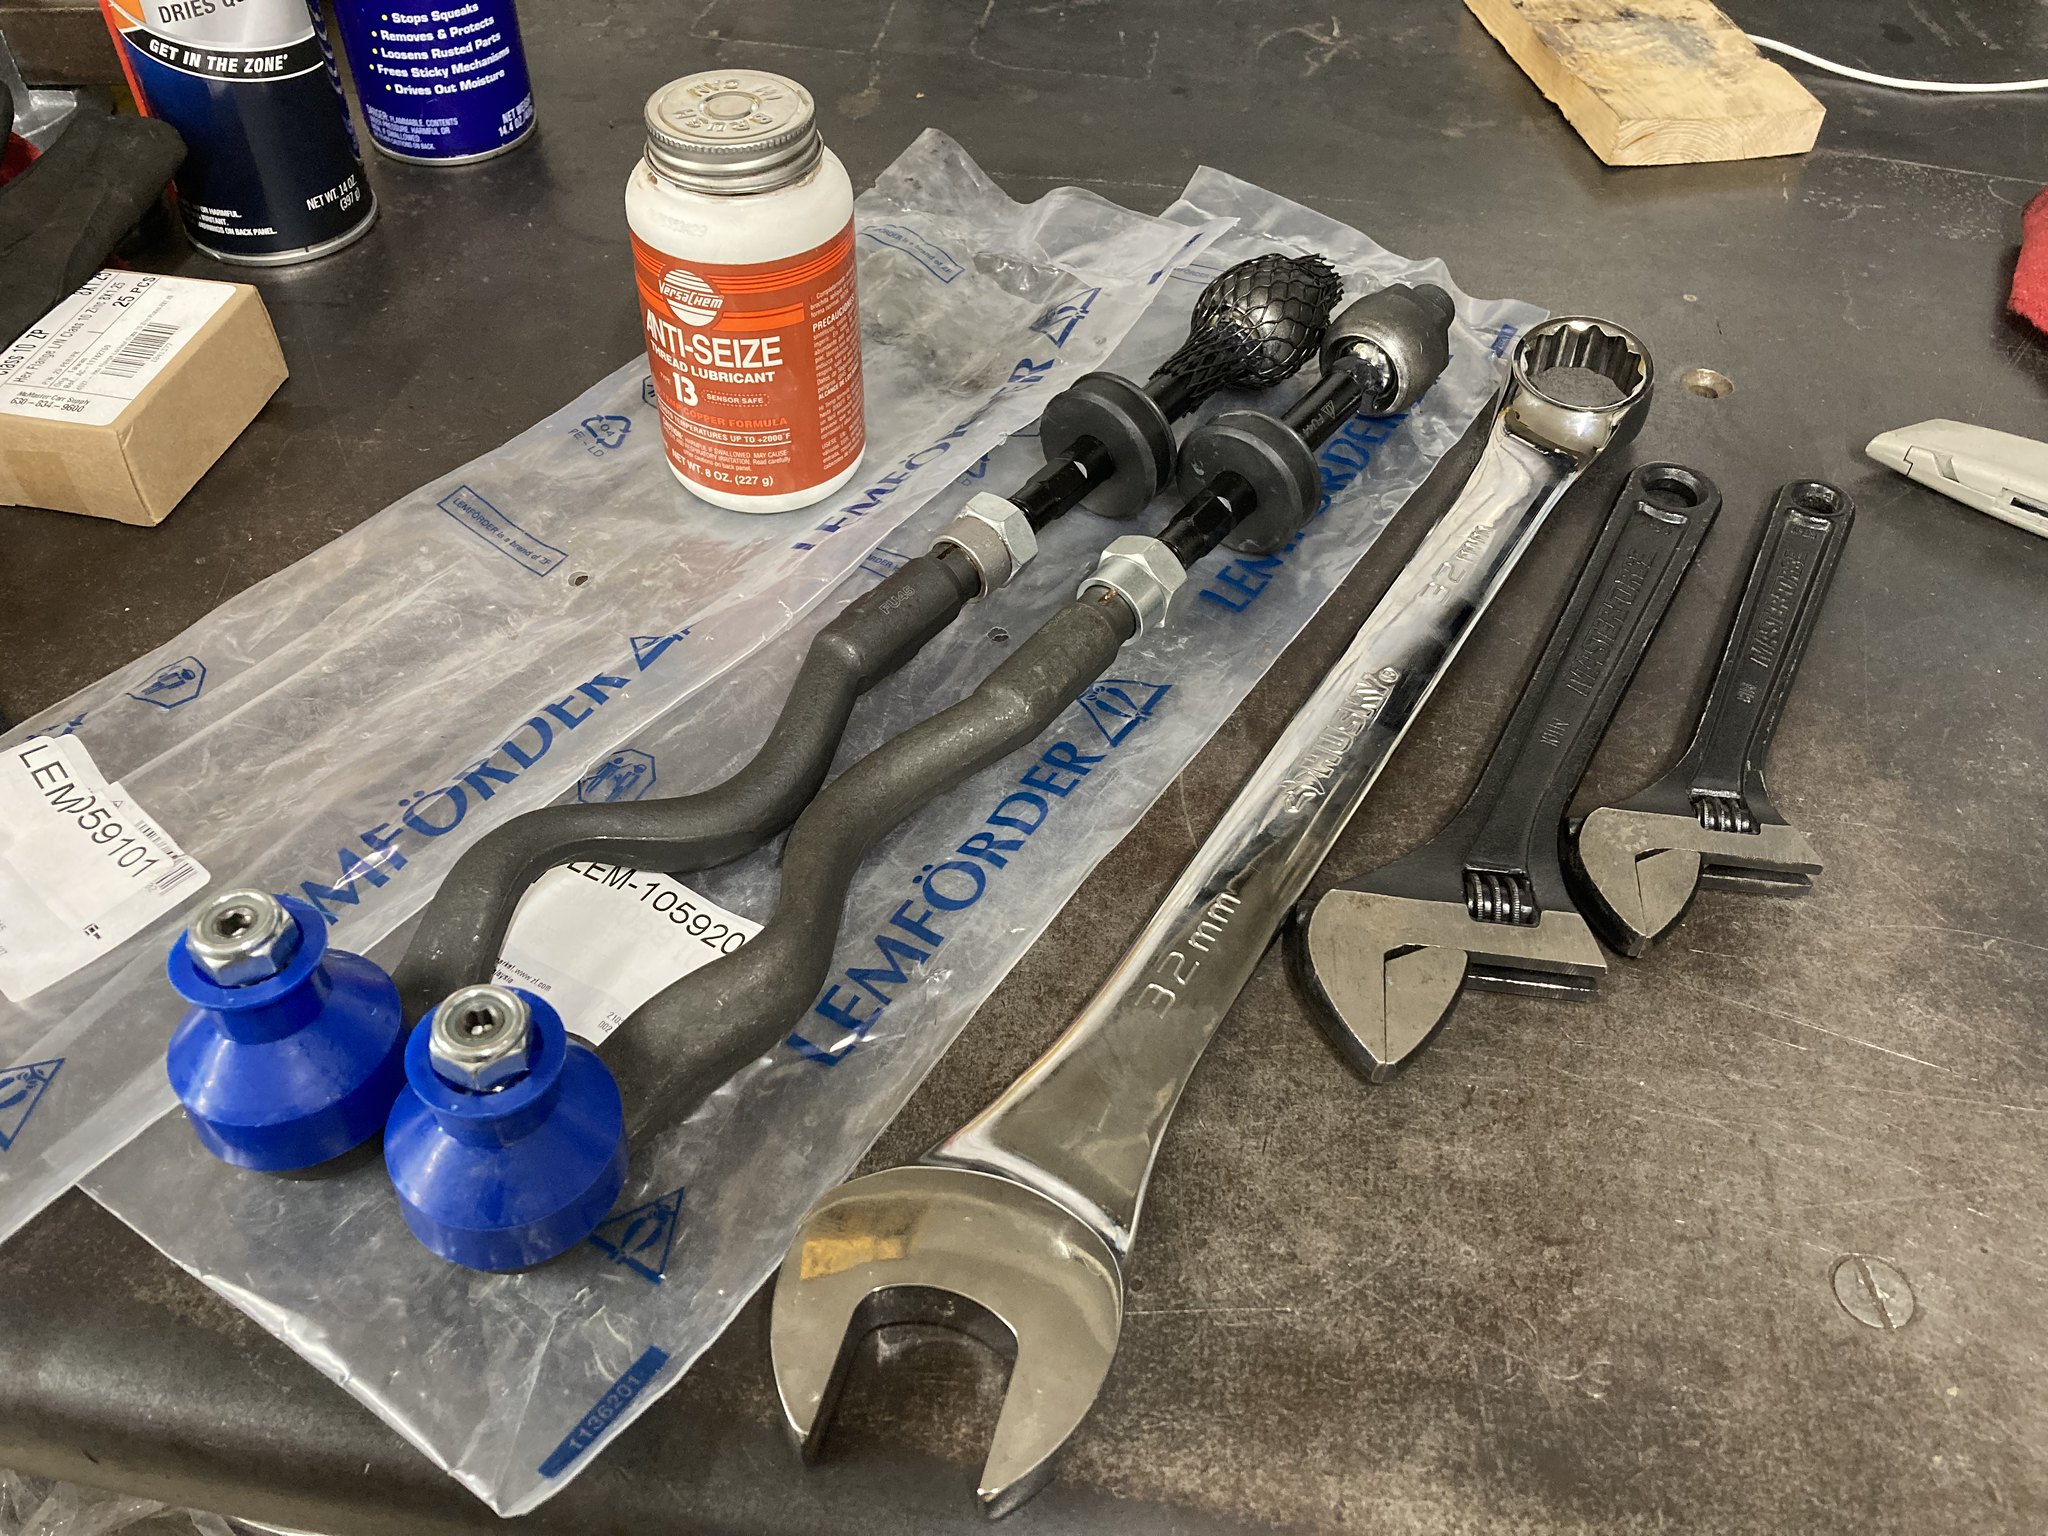
                            I went with E36-platform tierod assemblies as I prefer the collar nut design, as opposed to the pinch bolts. I pulled the inners and outers apart, greased the threads and reassembled before installing on the car. Always love an opportunity to bust out the 32mm hero spanner!


                            Got all the new swaybar bits together. Cleaned up the bolts and bought new distorted thread, zinc plated nuts.


                            I was warned installation of the sway bar bushings can be a bitch, and I can see why. I wiped the bushing, bracket and bar with silicon spray, then used the weight of the shell to compress the bush, leaving both hands free to twiddle the nut and bolt together. I'm waiting to torque these once the weight of the car is on the wheels, setting the bar at static position within the bush.


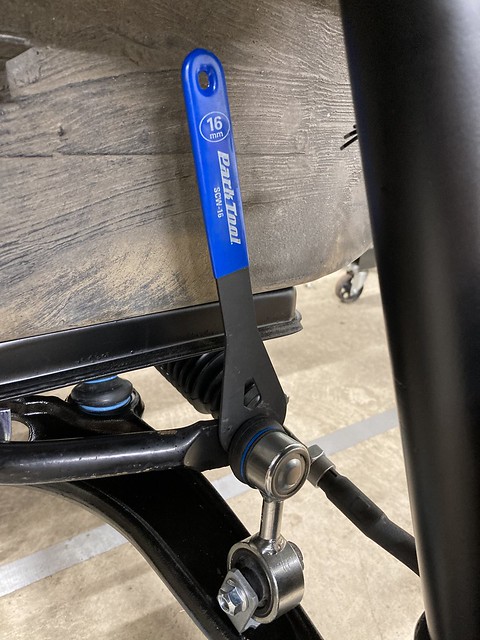
                            Bicycle wheel hub 'cone wrenches' are a great tool to have around for BMW sway bar links. Use this same one on my E39.


                            I also used an adjustable hammer wrench to keep the swaybar link bracket aligned while the nut was torqued. The bolt thought the bushing itself will be tightened at static ride height.


                            Et fin.


                            I'm currently refurbishing the axles before completing the same process in the rear. I'm keen to get it into a roller so I can move it around as I have some shop adjustments and additions to make before getting into the engine build.

                            Got a few weekends of working in a row this month, and the bathroom is still dragging on, but hopefully the next update will be another interesting one. Thanks for everyone that's been following and encouraging. We're getting there!
                            Last edited by Matt@EDC; 08-19-2021, 02:53 PM.

                            Comment


                              #89
                              Axles underway. I’m doing one at a time in case I needed a reference upon reassembly. I can see how it can be a fairly messy job, but I’m blessed with a nice size workbench with vice, which made life significantly easier. I cleared my work area and got a box of gloves, roll of shop towel and cans of brake clean ready to hand! Tidiness and preparedness go a long way.

                              The rebuild candidates are GKN originals from a late model iS. About what you’d expect after living under a car for 30yrs. The shell was rusty as hell, so she’d had a hard life. Came off the car pretty easy though.


                              Disassembly is straightforward and inherently messy. Again, being organized and prepared helps to contain the carnage.


                              The outboard end cannot be disassembled, so I scooped out as much old grease as possible, then stood the shaft on end and filled the CV housing with mineral spirits. Left it to stand while I worked on cleaning up the inboard parts, going back to stir the shaft occasionally and giving it a prod with a pipe cleaner brush, finally ‘rinsing’ it out with brake cleaner. This did a pretty good job but there was still some old grease visible so I repeated the process and it ended up pretty spiffy.


                              The outboard end was completely disassembled.


                              The majority of the old grease was wiped off with paper towel before a final clean up with brake cleaner.


                              Before reassembly I knocked all the crustiness off the outboard CV housing with a wire wheel and brush (stuffed the opening with a rag to stop crap ingress), gave it a coat of Mar-Hyde rust converter and then finished in satin black.


                              As mentioned earlier, a bench vice made this much cleaner and easier than it could have been. I bagged the outboard CV housing and secured it with a rubber band around the boot lip, but barely got a fingerprint on it. Grease (I’m using Redline Cv-2) can easily be packed in by the finger full, manipulating the shaft occasionally (who’s laughing?) to ensure all voids are filled. I thought I had a pic of the finished article, but no…. It was very tidy, you’ll have to take my word for it!


                              Also, with a swipe of silicon spray in the neck at each end of the (Vaico) boot, it was an absolute cake walk to install.


                              The inboard CV was assembled and neatly packed with grease. I also piled a bit on the weir in the boot (after installing on the shaft) and added some to the splines. The boot carrier was sealed to the CV outer using Permatex Aviation Form-A-Gasket. Boot kits are GKN Loebro but again, I chucked the grease packs in the cupboard and used CV-2.


                              Added a bit more grease to the outboard CV before knocking the cap on. Wasn’t happy with the small boot clamps in either kit so I’ll source and fit some better options.


                              Very happy with the outcome. Fun project with clean results. Just need to ‘copy paste to the other side’ and then the rear end can start going together.
                              Last edited by Matt@EDC; 08-29-2021, 07:35 PM.

                              Comment


                                #90
                                Everyone on R3V is, in some way, an expert at manipulating the shaft
                                Simon
                                Current Cars:
                                -1999 996.1 911 4/98 3.8L 6-Speed, 21st Century Beetle

                                Make R3V Great Again -2020

                                Comment

                                Working...
                                X