Announcement

Collapse
No announcement yet.

'91 325i Alpine Sedan (2.7 Stroker ground-up rebuild)

Collapse
X
 
  • Filter
  • Time
  • Show
Clear All
new posts

    Wow- this is looking fantastic! I'm picking up my first 4dr e30 this weekend, so it's good to see this amount of effort and detail going into a sedan project. Powdercoated parts are looking great as well.

    What are you doing for front seats?

    Also how's the mountain biking in Indiana? I ride a lot myself down here in the Charlotte area and have a roof rack and tray waiting on my 4dr car so I can use it to tote my bike around instead of my W212 e63 / Sea Sucker rack setup.
    - '88 m54 coupe

    <3

    Comment


      Originally posted by Jb325is View Post
      Wow- this is looking fantastic! I'm picking up my first 4dr e30 this weekend, so it's good to see this amount of effort and detail going into a sedan project. Powdercoated parts are looking great as well.

      What are you doing for front seats?

      Also how's the mountain biking in Indiana? I ride a lot myself down here in the Charlotte area and have a roof rack and tray waiting on my 4dr car so I can use it to tote my bike around instead of my W212 e63 / Sea Sucker rack setup.
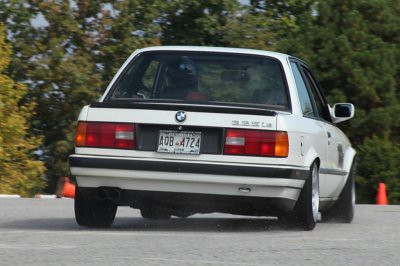
      Thanks Jb325is, much appreciated! I find all the restoration work very satisfying and pretty much every single piece of the car will get touched before it's all back together.

      I have a really clean pair of matching comfort seats which will go in to begin with. I don't need to spend big bucks on seats right now, but will likely end up fitting a set of sport seats before eventual sale.

      We have a few cool little trails around Indy. 7-10 mile loops. No big hills unless you venture down to Brown County or Hoosier National Forest, but enough to keep us entertained! I know guys who have ridden down in NC, Mooresville area. Said it was really decent, you lucky devil! My daily is a '19 Frontier with tow bar rack which is currently sorely missed as it's in the bodyshop after someone reversed into the side of it! Looking forward to its return next week as I'm currently stuffing the bike in the back of our winter beater Accord coupe.

      Comment


        To keep the work flowing, I tidied up the rusty old iron headers.


        They were pretty heavy with carbon deposits, so I washed the outsides, then filled them up with foaming oven cleaner. They scrubbed up pretty good and then were outgassed and blasted. The blasted cast iron looked really nice but I'd started with glass bead which left a really white finish. Switching the cabinet back over to coal slag rendered a much nicer finish.


        As great as the look here, they were always going to oxidise again pretty quickly. So I went with VHT matt black, pre-heating, baking and curing in stages as directed.


        I have new studs to go in them at assembly time too.

        Comment


          Another item that received a rattle can restoration on the donor engine was the trigger wheel/vibration damper.


          This was all masked and blasted to protect the rubber elements, then primed & shot with satin black. I didn't opt for powdercoat due to the rubber element and the required curing temps for the powder. The metal prep should provide a good durable painted finish.

          Last edited by Matt@EDC; 01-15-2023, 03:56 PM.

          Comment


            And to be honest, this is pretty much how it's been going! Disassemble, clean, restore and store. But I know that eventually, I'll be able to layout a ton of clean, shiny parts on my workbench and build the engine and ancillaries without getting my fingers dirty! Much like the suspension, that part is then over in a flash. But as above, I enjoy the process and results of the restoration work, so it's not so bad. Nice to see it all laid out in pictures above, as opposed to sporadically spread out all around the 700 or so pics in my phone album dedicated to this project!

            Hope to have more 'complete' mini projects to report soon. Got trailer axles to rebuild which will clear the hubs off my worbench, and serviced the mountain bike shock and forks today, so don't need to save work space for those. Then a bit of organisation & hardware ordering and we should be good!

            Comment


              Many gaskets and small parts received from FCP Euro. I compiled the shopping list from RealOEM and am now going through and kitting up all the new, restored and reused parts by subassembly to ensure I have everything. Or more likely, determine what I’m missing now, rather than half way through the build!


              First stage down, Engine Block, only 3 parts missing… doh! Haha, to be fair, I knew there were things I couldn’t determine or remember if I needed from the laptop screen. Pulling all the cleaned and restored stuff and matching up with gaskets and fasteners is about the only way to do it.

              Comment


                Finally got through it all!


                Everything is kitted up in small boxes or large ziplock bags. I now have a couple more pieces to order, plus some orings and bolts to order.

                On the subject of bolts, I did bag and label bolts as I removed them and found a quite a few that don’t match the lengths specified by RealOEM. Anyone care to comment on the accuracy of RealOEM for such info? I just assume whoever worked on the donor motor just threw in any old bolt that fit! I’ll be ordering replacements to RealOEM spec

                Comment


                  Well, the engine build has begun! It has been a while in starting due to many other things, but I'm happy to report that one of them was the little 'mini' (haha, mini seems daft after all the effort!) projects I spoke of in an earlier post.

                  These projects consisted of things like alternators, P/S pumps and throttle bodies. I could just go and buy remanufactured items off the shelf, but where's the fun in that? I enjoy completing as much of the project myself. In an effort to support this and future builds, I decided to do my own zinc plating. A kind local business owner offered me a Caswell CopyCad kit and I built a permanent setup in my workshop. I've seen it done in Tupperware (even cut down milk jugs...) but wanted something safe and futureproof, rather than something I have to setup everytime I want to do a few pieces. Aside from waiting about 2hrs for a couple of the solutions to reach operating temp, this is always ready to go.

                  Behold, Science!!!


                  So, about that alternator... ugly, ain't she


                  It was quickly broken down into its component parts


                  The casings were washed & blasted...


                  ...and went away for vapor blasting with my other cast parts.


                  And so the plating adventure began. While I've bought a bunch of new hardware, I'm refinishing the odd, large, or expensive/unavailable stuff.


                  First we blast (pulleys joined the party)...


                  ...and then polish on the wire wheel (tensioner bits entered the chat, washers waiting their turn)


                  The parts hang out in a hot Caswell degreaser for 5 mins or so, rinse, quick 2-3sec dunk in a 5% muriatic acid pickle, rinse, and then hooked up to power in the zinc plating bath. Time and amperage are dictated by the surface area of the part, something I'm still learning on larger, more complex parts, but these guys all came out great!


                  Then its a quick rinse, another pickle & rinse to etch the plating and into the yellow chromate for that beautiful gooooold finish


                  The bolts and big shaft washers & nut made great test pieces for this new process in the shop and I'm stoked with how they turned out! I powdercoated the alternator pulley plates semi gloss black for a nice contrast.


                  With the process proven on some smaller parts, I did the alternator fan along with some larger plate-type pieces for other parts of the engine & ancilliaries.


                  I managed to rig up some perfectly sized masking cups to allow me to blast the stator ring before taping off for paint


                  Then all that remained was to reassemble with new bearings and regulator. While an exercise in patience, I do love laying out all the shiny new parts and just bolting it all together without getting dirty hands. Most satisfying


                  A couple of before & afters to close

                  Comment


                    So, about that power steering pump... ugly, ain't she


                    Explodified


                    The housings were carefully cleaned inside & out. I didn't want to dry or vapor blast these to avoid media ingress


                    I powdercoated the P/S pulley alongside the other ancillary pulleys earlier


                    All the hardware was ultrasonically cleaned. The washers are all being replaced and I will order a full compliment of toothed adjuster nuts.


                    The adjuster bolt thread was a bit ratty where it has been wrneched around in the slot in the bracket for 30 years. This bit of thread will never be used, but I chased it with a die all the same so it's nice and neat


                    Betterer


                    Given the hollow banjo bolts, I stripped all plating and rust in neat muriatic, rather than blasting.


                    All polished up. I'm only plating the flange of the shaft (teehee) and not touching the bearing & seal journal


                    All the shiny


                    Another one of those 'layout all the beautifully clean restored parts' moments. This is like heaven. Haha. Rennbay Porsche ZF 944 P/S pump rebuild kit for all the seals.


                    Incase anyone's interested in how the rotor works... I gave all the vanes a soaking in ATF before shutting the lid so they are nicely lubed for first spin up


                    And there it is, a shining engine jewel. And to think there's even more goooold bracketry to hang it off the block (seen in the last post with other plate-type... plating)


                    And those before & afters for good measure


                    Super stoked on both these pieces. Not only as they'll set the engine off a treat (hopefully the rest of the bay can keep up!) but I'm expanding the number of processes in the shop and the level to which I can refinish stuff, or even scratchbuild in the future. More on that engine soon... bear with me!

                    Comment


                      What a satisfying read-through! Fantastic work, I'll be following this keenly!

                      Comment


                        Man this is so sweet.
                        Simon
                        Current Cars:
                        -1966 Lotus Elan
                        -1986 Mercedes Benz 2.3-16
                        -2006 Volkswagen Jetta TDI

                        Make R3V Great Again -2020

                        Comment


                          Love the zinc work!
                          OBD1 S52 E36 Compact
                          84 318i M10 Zender

                          Comment


                            Alrighty, some good things happened, and some not good things happened…

                            I started twirling wrenches on the engine! Which is good…

                            Cylinder head was refinished by Head Solutions, IN, including new valve guides & seals, and the addition of an Ireland Engineering 272 cam and HD rockers. Valve cover powdercoated by yours truly


                            Laid out the tools to fit all new studs


                            Installed everything with a light dab of anti-seize, tightened down by feel and measure all exposed heights to ensure they are about equal (not that it matters as none of the cast bosses are the same thickness…)


                            Pro-tip: on the exhaust side, don’t put the 3 long studs in first or you’ll smash your knuckles on them every turn of the wrench


                            Pushed the polished pulley on (try saying that after a couple of beers) and threw on the valve cover. Because you would


                            Comment


                              More goodness...

                              Made a start on the block by installing the pump, which was stripped and ultrasonically cleaned by Head Solutions as part of the bottom end build.


                              Put my gorgeous old Dake No.1 press to use on the (vapor blasted) lower front timing cover installing new seals. The cover was fitted with Elring gasket and a thin coat of Reinzosil both sides.


                              Laid out the REM polished intermediate shaft, pump gear & pulley and associated parts for assembly.


                              But why doesn't the bolt go in?


                              There's a ceramic polishing stone stuck down in the hole!


                              After a I minor panic because it wouldn't wiggle free (and I wedged it in harder trying...), I went at it with the automatic, sprung loaded centre punch which made short work of crunching it up. Phew!


                              Beautiful GEBA water pump next, with powdercoated pulley. New INA tensioner with new spring, zinc plated pin & pivot bolt, and a few new bolts and wave washers.


                              Starting to look mighty fine...


                              I won a valve-to-piston clearance measuring kit in a white elephant game over Christmas. How did they know?!


                              Clearances came out at approx 3 googley eyes so we are good to rock & roll. I had initially bought two 2.05mm Elring gaskits (incase I buggered one taking the cylinder head on & off) but ended up needing a 1.75mm. I had grabbed a standard thickness FelPro just for test purposes while it was about $4 on RockAuto, but I won't be running that so had to wait for more Elrings to arrive. Looks good stacked up though.


                              The 1.75mm Elring gaskets arrived this week. I ordered the last one on Amazon to cover my bases, and a cylinder head kit off FCP Euro. I'd already ordered all the gaskets as singles so I can send back any of those I don't need.


                              So I'll get the head torqued down for good tomorrow afternoon, torque all the pulley bolts, and then start throwing pretty parts at it when I have the odd free moment outside the next big distraction...

                              Comment


                                *Big sigh* So, the next big distraction...

                                Back in 2017 we decided we needed a sedan for when family visits (I had a reg cab truck, the wife an Accord coupe) and I looked around for something cheap that needed some work but was relatively simple and inexpensive to fix. A non-running, 1998 BMW 528i with 220k and precisely zero working parts is none of those things. Except cheap. I gave the guy $950 and limped the thing 2 blocks home on a failing alternator and just about coasted it into the apartment car park before it died.

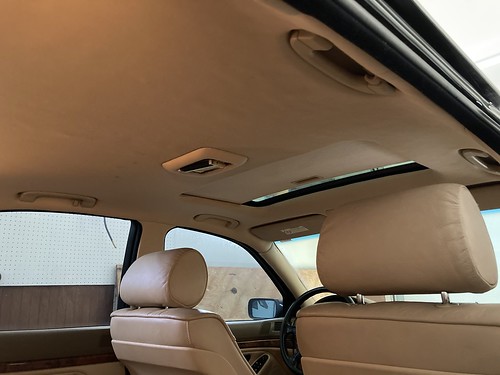
                                Over 5 years, she got ALL the love. Full chassis overhaul with all new Lemforder & Sachs parts, she rode factory fresh. Every single mechanical issue was fixed. And then the headgasket threw in the towel at 245k. No cooling system failure, the gasket just perished between cylinders 3 & 4. So the engine was torn down to the rotating assembly, cylinder head refreshed, new timing guides & tensioner, evry gasket & hose has been replaced. Replaced all the window regulators, replaced the sunroof cassette, reupholstered headliner & pillars... It was like driving one fresh off the showroom and it was magnificent. And drive it we did, with the wife daily driving it all the way up to 270k without a worry.


                                When something you've put so much effort into is destroyed by a red light runner not paying attention, it sucks pretty hard.


                                Luckily the old Bavarian barge took it like a champ and my wife was able to walk away with only minor bruises. She saw the other driver coming, and was able to punch it when she realised they weren't stopping and mostly cleared the intersection. The other car blew a red on a 55mph road and went into the left rear of the E39 without even dabbing the brakes. Wifey did a full 270 on the spot, the trunk has been pushed out the other side of the car, but the rear window aperture and door jams are all square, all airbags deployed correctly.

                                The car was immediately and unceremoniously dumped outside my workshop to save it from loitering in a salvage yard. I popped it up on stands and assessed the damage.


                                The shell is obviously toast. The impact was pretty severe as it's Pringled the rear wheel, bent the shock and either pulled the balljoints out of the control arm or torn the tabs off the upright itself. It also burst the spherical balljoint out of the upright and the integral link. I imagine the subframe is buggered too.


                                I was more shocked to find the front right corner damage. I can only surmise that the weight of the car was forced upon this corner as it spun, as there was no external impact to this corner. Similarly, the balljoint was torn from the tie rod and one of the control arms snapped, punching a big gouge in the rim


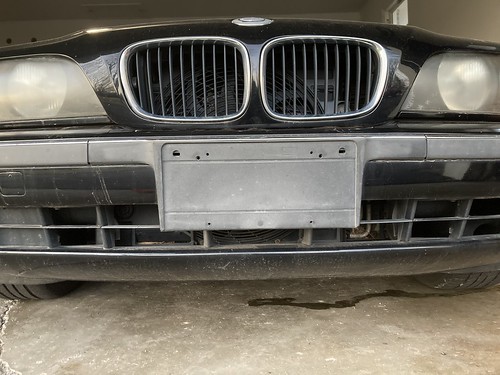
                                The crash was back in Oct '22 and it took a few weeks of banging my head against a wall to get any sort of money out of the insurance company. Since then, I've looked at a number of E39s and they've all been hilariously overpriced for the condition and nothing close to being worthy of rebuilding to a similar standard. However... last week I called the guys who do all my tires & alignments (and a most excellent job they do too) as I knew they had a very mint E39 I was sure they wouldn't part with, but they did have one of their 3rd rung shop cars they said I was free to take a look at. Well, it's not pretty and everything leaks and the windows don't work and it makes some rather unnerving vibrations from the right rear. But it's a pretty tidy shell without the normal rot (that I can see...) and the price was more than acceptable. So, time to do it all over again!


                                It belonged to a customer who was tired of fixing it and so they acquired it, did the minimum to keep it moving along as a spare car and runaround for the shop. Said they put tires on it and those are dated 2012 so it's had a life as a shop car, as the interior shows...


                                It does have the beautiful anthracite wood trim which is a bonus


                                Most importantly, it's an 03/97 build car which means it has the same single VANOS, cable operated throttle M52B28 as our old car. Just quite a bit grubbier...


                                So first job is to yank that out to make way for the rebuilt engine from the old car. This one can be rebuilt for an E30 of some sort at a later date. Then I'll set to work doing a full chassis refresh again. It's so worth the money in these E39's, they ride like nothing else on a cruise. I stuck with stock ride height, non-Sport OEM Sachs dampers and 225/60R15 Cooper tires. Puts every modern rental I get on work trips to shame.

                                I've been pretty down over the whole situation since the accident, but now feel reinvigorated with a decent shell in my hands. I'll try to keep chipping away at the E30 but will be going full steam ahead on the E39 to get it back into daily rotation for about May when they stop salting the roads in Indiana. I'll reference progress in this thread, but probably log the rebuild as it's own project too, in case anyone is interested. Can't wait to drive a fresh one again!

                                For now, it's just doing E39 things to my garage floor...

                                Last edited by Matt@EDC; 02-17-2023, 08:04 PM.

                                Comment

                                Working...
                                X