Announcement

Collapse
No announcement yet.

The MR E30 Project Thread - E36 M3 Edition

Collapse
X
 
  • Filter
  • Time
  • Show
Clear All
new posts

    The MR E30 Project Thread - E36 M3 Edition

    Welcome back to another MR E30 build thread. The time has finally come to partake in another car-based adventure. Though this time it will be the documentation of an E36 M3, not a 1991 318is like before. To make up for that fact I promise to work diligently to keep this one interesting.

    This car, this build, this experience, this journey is to memorialize the life of my father, an avid car guy, who unfortunately did not have the time or finances to pursue his hobby before his sudden passing earlier this year. What is so cool about this car in relationship to this adventure, is that for the couple of years that my father and I lived near each other in San Diego, CA, this is the exact year, body style, and colors that I previously owned and that we would cruise around in together every chance we got. Road trips up to Julian from the I-15 were frequent, and we always had a blast in the car. It is incredibly fitting that I was able to find another 1997 Estoril on Dove M3 Coupe to restore.

    Unfortunately, he is gone, but I am here, with this car, and this inner desire that requires attention. So, let us begin.

    What do we have here?
    - 1997 M3
    - Estoril on Dove
    - ~220,000 miles (the car came with no battery, so assuming this mileage for now until I verify it.
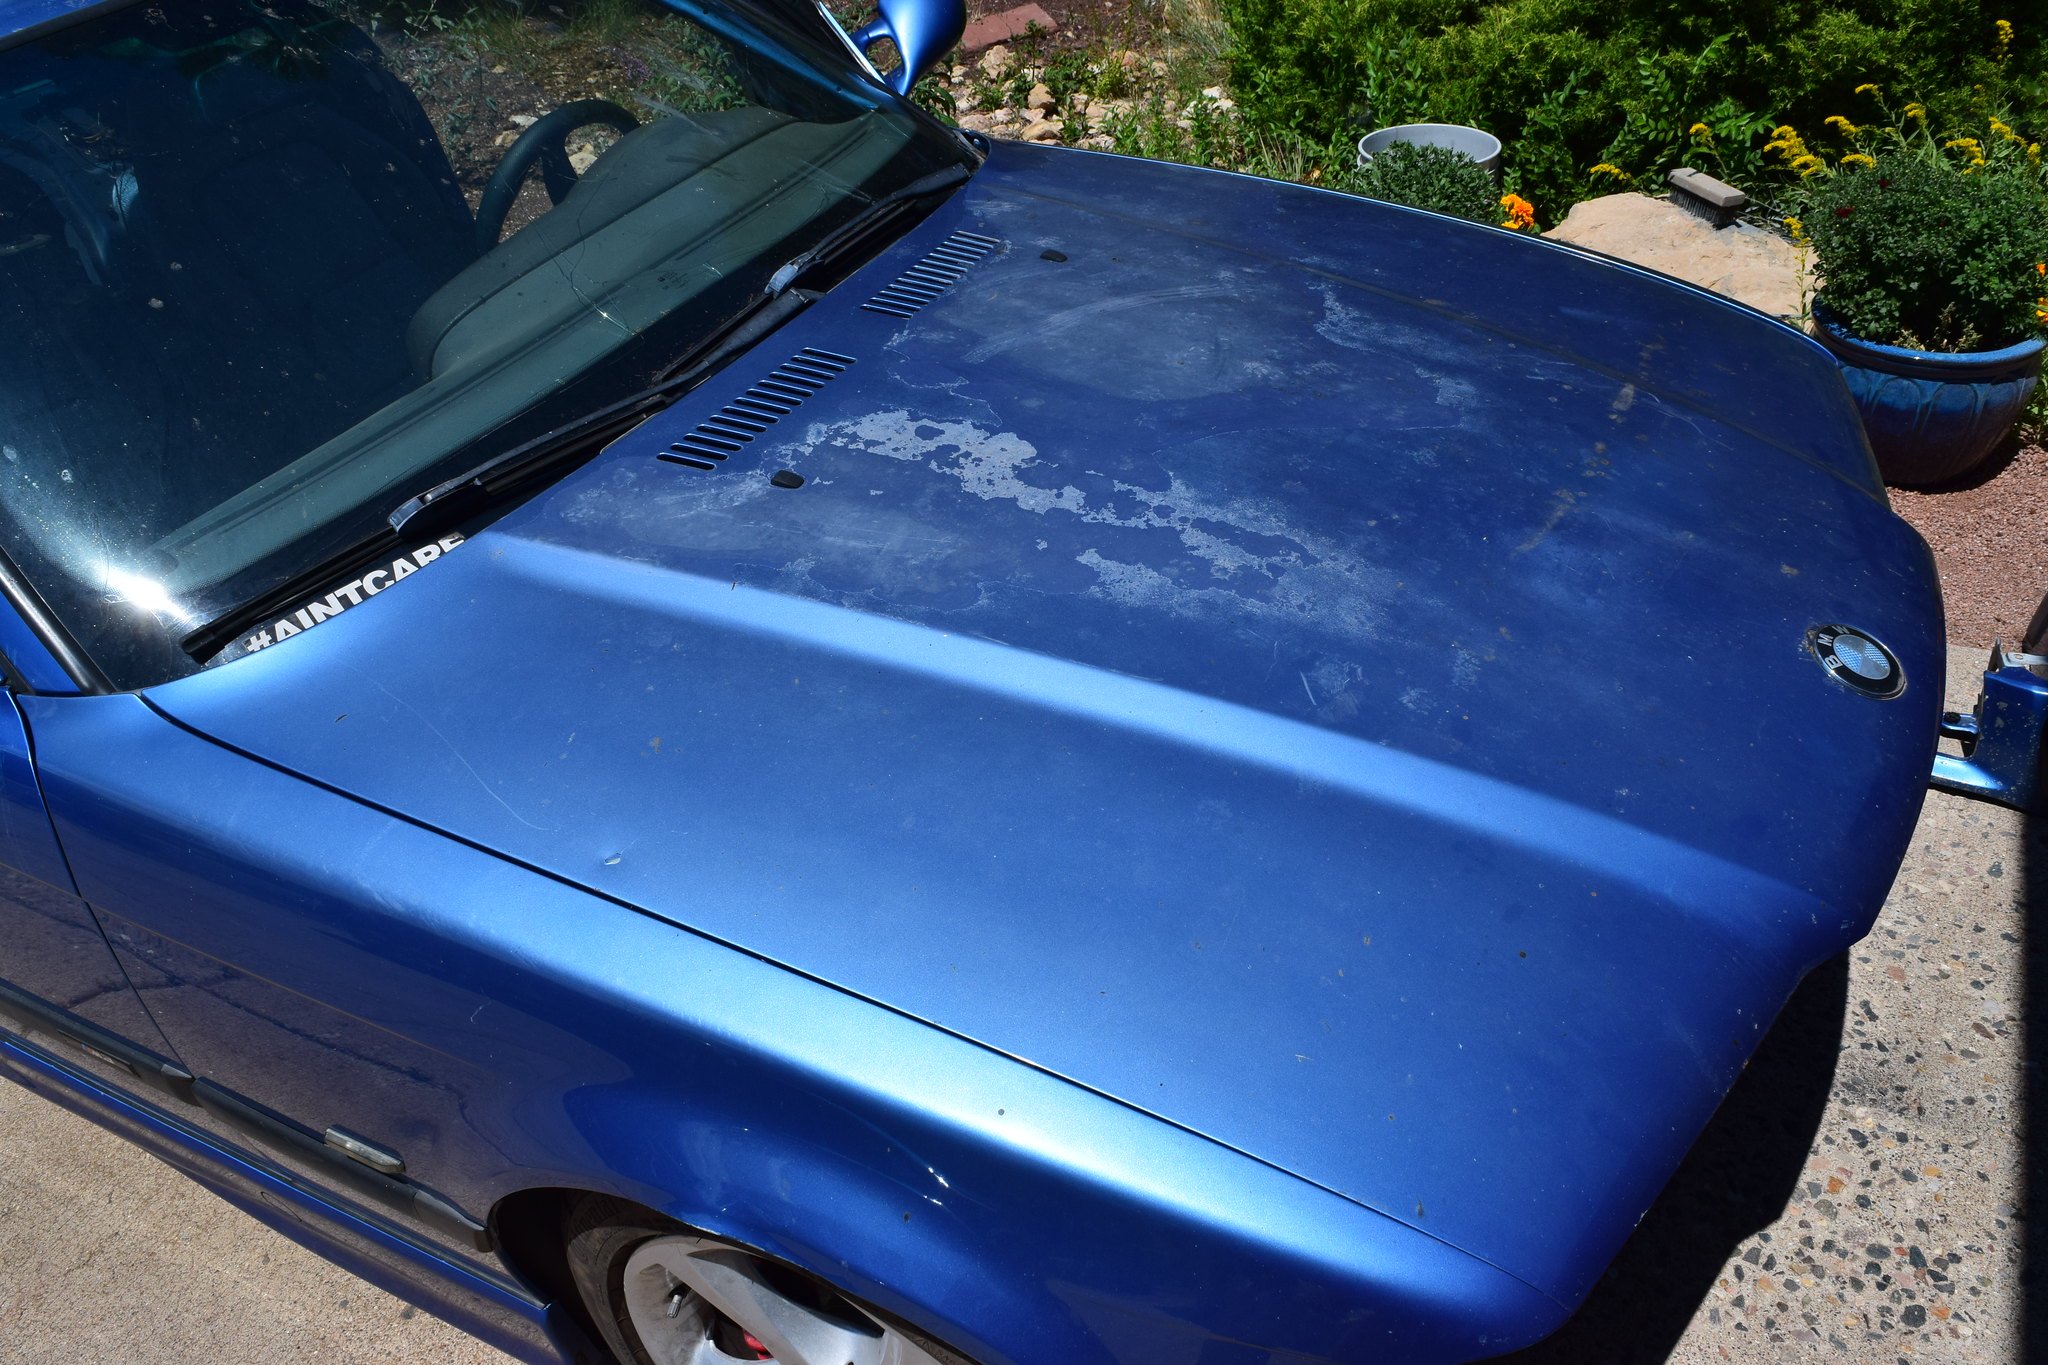
    - I am the seventh owner. The first two owners owned it until 2011, and it traded hands frequently until it ended up with me. This car has been registered in Maricopa County (Phx, AZ) since the day it was purchased. I will be the first person to register it in another county (Coconino County, still in AZ). So, what does that mean? While it is severely sun damaged, it has zero traces of rust. Which is a huge win for me.
    - European Delivery by the first owner.
    - Service records from day one. Huge folder full of hundreds of pieces of paper, painting a very detailed picture of the cars history. It even includes all but one set of title transfers, so I know the exact date that it was sold. It even has old Autotrader ads printed in it!
    - Original Owner’s Manual and associated paraphernalia.
    - Very straight body with all original panels.
    - Limited modifications apart from drilled brakes, front coilovers, and aftermarket steering wheel
    - A very recently (past few years) neglected machine. It is interesting to see such intensity in documentation, and high dollars spent on maintaining it back when it was newer (through 2013 basically) and then a serious lack of care until today. The guy I bought it from bought it from someone else to take the S54 out of it, and then let it wither away in his backyard. I won’t ever understand this.

    So, what is the idea here? What am I going to do with this thing?

    To be honest, at the time I am typing this, I don’t really know. All I do know is that I really, really want to enjoy the journey, not the destination, with this thing. My last build was very rushed, as the car was my DD, so little attention could be paid to making things oh so right. They just had to get done. But I am grown now, and don’t face that constraint, so I am going to focus on doing things the right way. The attention to details that I have not previously valued will be at the top of the list.

    I am not sure of the order of events at this time. I’m going to start by organizing and cleaning things up for now. I just know that I want to save this thing from wasting away. And I want to use this project and its rough state as an excuse to get creative with some things.

    Other than that, I am thinking OEM+, with a turboed V8 for the time being. Though I do want to retain the ability to go back to a more OEM setup if the inner need ever arises, so I won’t be making any extreme changes to the structure of the car without serious thought beforehand.

    Now, with that out of the way, let’s get to the good stuff. The pictures and the story!

    It all started with the posting of a WTB ad on a local Facebook E36 page. Immediately after posting I was surprised to find someone with something very close to what I desired. I thought about it for a while and then made plans to grab the trailer and pick it up from Phoenix, roughly three hours away.

    Spent a couple days with my brother while I was down there. The car was loaded onto the trailer at 9:30 PM on Monday, July 27th, 2020. Three guys and a couple of come-alongs got the job done without any fanfare. Though the car did not come with a steering rack, so keeping the wheels straight as it was being loaded was fun.

    With it loaded I bid Ryan and Brenden ado, and left.

    A couple of days later I headed back up the long and steep hill to the much more pleasant mountain town where I live. 130.6 miles at 13.3 mpg went off without a hitch, the first time pulling a load this heavy and at these speeds with my new truck.

    M3 Trailered Home by Michael Rickerd, on Flickr

    I was warned by the seller that he has a spider infestation in his backyard, so I took the opportunity to pressure wash off the underside while the car was raised on the trailer. Lots of spider webs down there.

    Pressure Washing Underside by Michael Rickerd, on Flickr

    Pressure Washing Underside by Michael Rickerd, on Flickr

    A couple of buddies came over during lunch and we pushed the car up into the driveway, its resting place for the time being. Damn Covid has closed all of the gyms in AZ, so my garage is currently a gym until this crap gets resolved.

    After that, it was time to go through all of the paperwork. I found the original window sticker amongst the paperwork, which is super cool to me. Recent receipts (4 years ago) show some decent money spent on hard to do tasks, like the front wheel bearings. Older paperwork shows a doctor who did a ton of driving in the first few years he owned the car. Like 70,000 miles in three and a half years. Always serviced at the dealer, until the second owner had it serviced at Bo’s Motorwerks in Phoenix.

    I set up an Excel sheet of all of the maintenance history, documenting dates, mileage, and price, as well as all of the ownership, emissions, and registration history that was available (almost all of it). The second owner even had a vanity plate in the guise of ‘TIMMAAH’ mounted to the car during his ownership. I of course will be continuing with my own nomenclature, MR E36, a plate that has been on every E36 M3 that I have owned.
    Last edited by MR E30 325is; 07-31-2020, 11:57 AM.
    My previous build (currently E30-less)
    http://www.r3vlimited.com/board/showthread.php?t=170390

    A 2016 Toyota Tacoma TRD 4x4 Offroad in Inferno is my newest obsession

    #2
    Organizing the paperwork took a legitimate amount of time, but after it was done it was time to start looking over what I had purchased.

    The following photos document what I have in front of me. Viewer beware, it ain’t pretty.

    The car came with the front end disassembled, which was done to facilitate the removal of the S54 from its grasp.

    1 - Disassembled Front End by Michael Rickerd, on Flickr

    The front end is extremely pitted and will require a full strip and repaint before being remounted.

    2 - Pitted Front Clip by Michael Rickerd, on Flickr

    The years of the direct, hot, Phoenix sun did a serious number on every flat painted surface of the car. Most rubber/plastic bits did not fare any better.

    3 - Sun Damaged Hood by Michael Rickerd, on Flickr

    The windshield has seen better days. According to the receipts, this cracked mess is the cars ninth windshield. That seems like way too many to me.

    4 - Cracked Windshield by Michael Rickerd, on Flickr

    The engine bay is basically all but empty

    5 - Mostly Empty Engine Bay by Michael Rickerd, on Flickr

    The car is scratched all over, and even the underside of the hood wasn’t spared.

    6 - Scratched Hood Underside by Michael Rickerd, on Flickr

    Some hot gold tape on the firewall, with a driveshaft and shifter beyond.

    7 - Gold Firewall by Michael Rickerd, on Flickr

    Arbitrary sticker shot. Notice the absolutely destroyed rubber and plastic.

    8 - Windshield Sticker by Michael Rickerd, on Flickr

    The roof is no better

    9 - Sun Damaged Roof by Michael Rickerd, on Flickr

    The shadowline is toast

    10 - Cracking Shadowline by Michael Rickerd, on Flickr

    The car came with 1 Series wheels all around. Drilled rotors and red brake calipers are on all four corners as well.

    11 - 1 Series Wheel Rear by Michael Rickerd, on Flickr

    Some of the fender lips are banged up, but other than that the body is very true.

    12 - 1 Series Wheel Front by Michael Rickerd, on Flickr

    The rear end is mostly unscathed

    13 - Rear End by Michael Rickerd, on Flickr

    Somebody snagged the toolkit, something I will want to replace.

    14 - Missing Toolkit by Michael Rickerd, on Flickr
    Trunk full of parts and no battery. I still need to sort through all of this to figure out exactly what I have.
    15 - Trunk of Parts by Michael Rickerd, on Flickr

    The rear shock towers are in great shape

    16 - Clean Shock Towers by Michael Rickerd, on Flickr

    No rear interior and more failed weatherstripping

    17 - Failed Trunk Weatherstripping by Michael Rickerd, on Flickr

    The driver’s front area is the most scratched place. I think that is where the previous owner had one end of the front bumper resting.

    18 - Scratched Drivers Front by Michael Rickerd, on Flickr

    No front door cards, though I have a creative solution brewing for that.

    19 - No Door Cards by Michael Rickerd, on Flickr

    The car has powered vaders, which I have never had before. They are both in rough shape, so I am thinking of recovering the frames with black leather instead.

    20 - Powered Dove Vaders by Michael Rickerd, on Flickr

    No throttle pedal in this thing.

    21 - No Throttle Pedal by Michael Rickerd, on Flickr

    Disassembled interior, and what looks like some sound deadening material placed randomly. This is an upgrade that I will be doing before long.

    22 - Disassembled Center Console by Michael Rickerd, on Flickr

    One of the previous owners wanted to drift missile this sucker, so he pulled the ratcheting piece out of the e-brake, so that’s what that piece of wood is about.

    23 - Passenger Interior by Michael Rickerd, on Flickr

    And last but not least, to my absolute amazement, the headliner is in impeccable shape! Pardon the crappy photo.

    24 - Clean Headliner by Michael Rickerd, on Flickr

    Next I am going to gather up all of the loose nuts and bolts and clips, pull everything out of the interior, organize that, and then wash the exterior (not sure why, but it’s getting done) and do a preliminary cleaning on the interior carpet before it gets removed.

    ‘til next time.
    Last edited by MR E30 325is; 07-31-2020, 11:57 AM.
    My previous build (currently E30-less)
    http://www.r3vlimited.com/board/showthread.php?t=170390

    A 2016 Toyota Tacoma TRD 4x4 Offroad in Inferno is my newest obsession

    Comment


      #3
      Sorry to hear about your father, this will be an awesome tribute.

      I really enjoyed the 318is build you had, gave me some confidence back in the day to continue the driveway wrenching and press on with future goals.

      I’m excited to see where this goes! There is something to be said about having a rough example that you don’t feel bad about trying stuff with.

      Comment


        #4
        Thanks zwill! Glad to hear my old build thread had some value to someone other than myself.
        My previous build (currently E30-less)
        http://www.r3vlimited.com/board/showthread.php?t=170390

        A 2016 Toyota Tacoma TRD 4x4 Offroad in Inferno is my newest obsession

        Comment


          #5
          Im glad this will be tied to memories of those fun cruises with your Dad, mine has never been a car guy and the few times Ive tried to get him involved with my projects he has shown little interest.

          This is going to be quite the project and the thoughts of a TurboV8 powering it... well ... glad to see us R3V folks building projects even if they arent E30s.
          Simon
          Current Cars:
          -1999 996.1 911 4/98 3.8L 6-Speed, 21st Century Beetle

          Make R3V Great Again -2020

          Comment


            #6
            I look forward to this build. It was before my time here on R3V, but since joining in late 2015 I've read through your 318is build thread and enjoyed it.

            Comment


              #7
              Wow, this is going to be quite the project, but estoril over dove is hard to ignore.

              Comment


                #8
                That is a massive project lol. Should be fun to watch this one. Maybe S65 + turbo? I'd love to add an E36 M3 to the stable some day, I've wanted one since HS.

                I would suggest that you change the text to standard font and size though, whatever you have there is smaller and harder to read.

                Comment


                  #9
                  Originally posted by 2mAn View Post
                  Im glad this will be tied to memories of those fun cruises with your Dad, mine has never been a car guy and the few times Ive tried to get him involved with my projects he has shown little interest.

                  This is going to be quite the project and the thoughts of a TurboV8 powering it... well ... glad to see us R3V folks building projects even if they arent E30s.
                  Thanks Simon. Thankfully I had his positive influence with automobiles from a young age, as we were always fixing his cars, or else I may have never had this attraction.

                  I agree. I am buckled up.
                  My previous build (currently E30-less)
                  http://www.r3vlimited.com/board/showthread.php?t=170390

                  A 2016 Toyota Tacoma TRD 4x4 Offroad in Inferno is my newest obsession

                  Comment


                    #10
                    Originally posted by mike.bmw View Post
                    I look forward to this build. It was before my time here on R3V, but since joining in late 2015 I've read through your 318is build thread and enjoyed it.
                    Awesome!
                    My previous build (currently E30-less)
                    http://www.r3vlimited.com/board/showthread.php?t=170390

                    A 2016 Toyota Tacoma TRD 4x4 Offroad in Inferno is my newest obsession

                    Comment


                      #11
                      Originally posted by roguetoaster View Post
                      Wow, this is going to be quite the project, but estoril over dove is hard to ignore.
                      I feel in a bit over my head at the moment, but like someone once said, "How do you devour a whale? Bite by bite." or some shit like that.

                      Estoril love.
                      My previous build (currently E30-less)
                      http://www.r3vlimited.com/board/showthread.php?t=170390

                      A 2016 Toyota Tacoma TRD 4x4 Offroad in Inferno is my newest obsession

                      Comment


                        #12
                        Originally posted by rturbo 930 View Post
                        That is a massive project lol. Should be fun to watch this one. Maybe S65 + turbo? I'd love to add an E36 M3 to the stable some day, I've wanted one since HS.

                        I would suggest that you change the text to standard font and size though, whatever you have there is smaller and harder to read.
                        The engine choice is not locked down yet. Plenty of research to do. But I want mo powa baby.

                        I won't be letting this one go. This chassis is just too engaging to live without.

                        Thanks for noting that. Just fixed it.
                        My previous build (currently E30-less)
                        http://www.r3vlimited.com/board/showthread.php?t=170390

                        A 2016 Toyota Tacoma TRD 4x4 Offroad in Inferno is my newest obsession

                        Comment


                          #13
                          Could "easily" swap in a M62B44 in there and when you get bored, turbo that baby
                          Simon
                          Current Cars:
                          -1999 996.1 911 4/98 3.8L 6-Speed, 21st Century Beetle

                          Make R3V Great Again -2020

                          Comment


                            #14
                            The day with the car started early for me, 6 AM to be a bit more precise, as I was excited to spend the day getting to know the car a bit better.

                            I started by gathering all of the small nuts, bolts, and screws that were strewn about the car. It’s clear that I am missing a lot of them, so RealOEM will be my new best friend, as I will be replacing every missing fastener with the appropriate replacement.

                            I then pulled out every loose piece that was in the trunk and backseat area. After a preliminary look, I think I have most all of the interior pieces (minus door cards and back seat, which I admit is a lot of the interior), though some of the more fragile pieces have damage that is too great for them to be reinstalled.

                            The entire interior was vacuumed out. Even though the carpet is coming out, this made it more pleasurable to work in the car for the rest of the morning.

                            01 - Vacuuming Interior by Michael Rickerd, on Flickr

                            I came inside to have some breakfast and did some research on recoloring the interior plastic pieces from Dove to Black. It seems like SEM has a decent, albeit expensive, system and I will pursue that idea. The car came with some extra interior pieces that I will experiment on to see if the color change meets my standards. There are (4) distributors in my town, one close by, so I’ll get on that soon.

                            I want to attempt to recondition and reuse any parts that I can, since the exterior is all original I think it is valuable to attempt to keep as many interior pieces the same as I can as well. Though I will be replacing physically damaged pieces.

                            After that was done it was time to get on removing the dash.

                            Started with the center console and discovered some creative mounting ideas from one of the PO’s. I’m going to ditch the arm rest center console in favor of the non-arm rest style, so I won’t be reinstalling this piece like this.

                            02 - Creative Mounting Solution by Michael Rickerd, on Flickr

                            The rest of the interior came apart in similar to E30 fashion, with the little plastic 10mm nut and Philips head screws we all are aware of. The car did have a plethora of extra wiring, all of it spliced together poorly. I’ll be cutting out any non-factory additions and then soldering and heat shrinking the wiring back together.

                            03 - Excess Wiring Removed by Michael Rickerd, on Flickr

                            Taking my time, I had the dash out in 2 hours. All bolts and screws were retightened back into the holes that they live in after a piece was removed. This strategy has been very effective for me in the past, so I am carrying it forward with this one. Any that couldn’t do that went into well labeled bags and got stashed on a shelf for later.

                            I took extra time to organize and move things around as I went about removing the dash. Before I would simply tear stuff apart and leave it strewn about the interior. But not this time! This time I worked diligently, piece by piece. I am really enjoying this way of working, though I do realize it is very near the beginning of the project, but I will keep it up.

                            I’m going to run by Harbor Freight to grab an ultrasonic cleaner, as well as a bunch of other stuff, so I can get all the hardware nice and clean.

                            Dash removal was easy in the end.

                            04 - Dash Removed - Far by Michael Rickerd, on Flickr

                            05 - Dash Removed - Close by Michael Rickerd, on Flickr

                            Now it’s time to remove the heater core and get this carpet out of here. The carpet has a massive hole in it in the drivers footwell, so it’s going to need to be replaced. The interior will be covered in Dynamat for that extra quiet ride, after it is satisfactorily cleaned that is.

                            The metal structure behind the dash has to go.

                            06 - Heater Box Removal by Michael Rickerd, on Flickr

                            These are very clean, with factory like hardware so they came out with ease.

                            Next, I stepped (literally) into the engine bay to remove the wipers, cowl cover and AC and heater hosing. Not having an engine in the way was the way to go and reinforced to me that I need to work through this thing step by step, no rushing it.

                            I was surprised, and a bit disheartened, when I stumbled across this incredibly ghetto hole through the firewall. I’ll need to resolve this before moving on much further. This is too poorly done for me.

                            07 - Ghetto Hole by Michael Rickerd, on Flickr

                            That aside, I kept pulling bolts and nuts and labeling them to be cleaned later.

                            My wife brought out a smoothie for me to enjoy as it was a hot for here 94 degrees today.

                            08 - Refreshing Smoothie by Michael Rickerd, on Flickr

                            At one point it looked like it was going to rain, so I loaded up the truck and took a bunch of parts to my storage shed to be retrieved and spruced up/fixed/replaced when the time comes. These powered Vaders are wayyyyyy too heavy to go back in the car, so I think the chore of moving them once solidified my path towards an aftermarket seat of sorts. I don’t need powered seats, so I don’t see the point of having all that weight just sitting there, never being used. Even if I still wanted Vaders I would find manual ones to install over these. For now, they are stored away.

                            09 - Truck Full of Parts by Michael Rickerd, on Flickr

                            I found a sped-up YouTube video of a gentlemen removing a heater core from an E36 and used that to get the heater box out of the M3. The video didn’t stress some important facets of the removal that needed to be done, but in the end, it came out without anything breaking.

                            The steering column had to be dropped, so to facilitate any future modifications or needs, I am going to slice the two bolts that have no heads on them, which separate the steering column from the metal structure that holds it up. As you cannot get to the metal structure with the dash in place.

                            10 - Heater Box Removed - Far by Michael Rickerd, on Flickr

                            11 - Heater Box Removed - Close by Michael Rickerd, on Flickr

                            And now I am typing this out, as the day with the car is done. The carpet is ready to be removed and will be pulled tomorrow. I need to find a black carpet to purchase to replace this one, as it is too damaged to be reused.

                            I also thought I would do my best to track how much time I spend working on this thing, if for no reason other than to have that information on hand. The time includes actual labor, project specific research, and writing up this build thread. Maybe it will also help someone understand the magnitude of a project of this type. Or maybe it will be a waste of time. Who knows.

                            ‘til tomorrow.

                            Approximate Hours Invested in Project Since Purchase: 26
                            My previous build (currently E30-less)
                            http://www.r3vlimited.com/board/showthread.php?t=170390

                            A 2016 Toyota Tacoma TRD 4x4 Offroad in Inferno is my newest obsession

                            Comment


                              #15
                              Originally posted by MR E30 325is View Post

                              All bolts and screws were retightened back into the holes that they live in after a piece was removed. This strategy has been very effective for me in the past, so I am carrying it forward with this one. Any that couldn’t do that went into well labeled bags and got stashed on a shelf for later.
                              I did this while tearing down the MR2 also and it’s great. Only have about a dozen bolts, half of which I just installed after attaching the motor and trans together.
                              Simon
                              Current Cars:
                              -1999 996.1 911 4/98 3.8L 6-Speed, 21st Century Beetle

                              Make R3V Great Again -2020

                              Comment

                              Working...
                              X