-
Simon
Current Cars:
-1966 Lotus Elan
-1986 German Car
-2006 Volkswagen Jetta TDI

Make R3V Great Again -2020 -
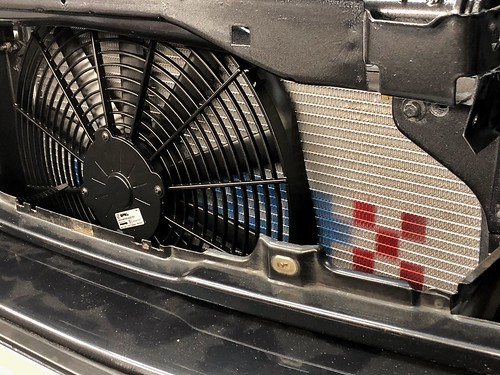
Threw on the front fenders / valance / bumper and working on buttoning up the cooling system:
using Koyorad radiator / Spal push fan


Comment
-
Great job on rust work!!!
I love Toyo Proxy tires.
I’m using RA1 on my e30’s.Projects Hartge,Alpina & AC Schnitzer Builds.http://www.r3vlimited.com/board/showthread.php?t=280601
http://www.r3vlimited.com/board/showthread.php?t=227993
http://www.r3vlimited.com/board/showthread.php?t=289362
 DSC04926 by Raul Salinas, on Flickr
 DSC03413 by Raul Salinas, on Flickr
Comment
-
did you use the stock wires that has the connector behind the driver taillight to get power to the spal fan? If so did you twist the low and high speed cable together and installed them both on the plus side of the fan connector and the ground on the minus side or did you just connect the ground and high speed?
funny we are pretty much at the same state in our swaps and we both have a Blake Minson harness
Comment
-
This is from an 89 325is with AC. The small 3 prong plug was hooked up to the front electric stock fan. Here is how it was told to me to set this spal pusher fan up. In order to get power to the fan you use the black/blue wire (high speed) from this plug and connect it to the spal fan for (+) and the brown wire fro ground (-). On the radiator you install an 82 degree switch and use the wires from the stock plug that was in the radiator. Again there are 3 wires but you twist the black and black/brown together and put on a spade connector and then the green/black on the other spade connection.
 Sent from my SM-G960U using Tapatalk
Comment
-
This is coming along great ! what are you missing to "finish" it ??
keep the updates coming !Comment
-
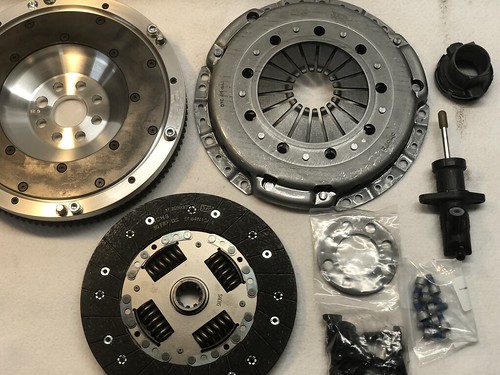
So I have run into an issue where the slave explodes when I go to bleed the lines and the shaft shoots like a missile inside the transmission. The first time I blamed a semi suspicious slave cylinder. Then it did it again with a brand new FTE unit.
I have pulled the transmission twice now and am beginning to doubt the combination of parts. Problem is I am using a no label no markings, unknown manufacture aluminum LWF. Paired with a OEM clutch and pressure plate for e36 m3. The pivot fork had an unusual divot which I think it unrelated, and the clutch fork pivoting point seemed OK but may be worn also.
I can not be here again. So ordered up a JB LWF / e34 m5 clutch / e36 m3 pressure plate, brand new pivoting fork, front and rear bearings as well as a new steel clutch fork pivot / FTE slave (again.)
With these pieces, I know that the mating between the transmission and motor components are absolutely correct and then I should not have any issues once the final turns are made.
-- --
In other news, I finished the cooling system and ran the motor with the previous mentioned set up. Motor runs and overall the project seems all very close to some inevitable ending.

Comment
-
So a big part of my issues were apparently worn out parts (particularly the fork pivit which was causing the fork angle to be way off and so making the fork sag when the slave was installed) and the other issue was this unknown brand e36 single mass LWF (now known to be an early model Fidanza).
I now have all new parts and should have everything mated this weekend when I have a moment.


Comment
-
Looks good!
I wonder what the difference between the early fidanza smf and the newer ones are. I just picked up a fidanza smf for my car.Comment
-
Somehow I missed this thread....what a great read. That rust repair must have been tedious but it all turned out fantastic. Seems like it is coming all together really well at this point and working through all the little issues that crop up during a proper swap. Look forward to some more shots of the car in it completed state.Comment


Comment