

Keep up the good work. It'll pay off at the end
-
-
Nice to see another E30 in Ontario on r3v! :up:
Mine is the same paint colour, Lachssilber Metallic or salmon silver. Great idea to get custom spray paint - I looked into ordering it online, but ended up just getting touch up paint from the dealer since I didn't know you could get BMW colour matched spray paint locally. May I ask where you got it from?
I like your idea of hanging up a big to-do list. I started keeping track of my car-related to-do list tasks on a white board, but whenever I erase one completed task it seems like I have 2 or 3 more to add in its place so the list never shrinks. :-?
Have you had any trouble driving it around in Ontario without the front plate? I think it looks way better without it, but don't know how much you would get hassled over it.
The houndstooth interior looks great! I've been looking for cloth sports seats locally and they're hard to come by, so you definitely lucked out with them coming with the car. It looks like you've put tons of work into this car and it's really coming along. Keep up the good work! :)
Comment
-
--------------------------
--------------------------
Not much in terms of updates on the E30 since my last post.
- I did find a local source for a Febi differential bushing, but I have to wait until Monday to get it, because of the Canada Day long weekend.
- I picked up the brackets my friend Kevin made for my iS airdam, along with a welding helmet and gloves.
- I had my first practice session this afternoon with my new MIG welder. I used up the entire "sample" spool of wire.
I am going to need to buy a better welding helmet, I'm pretty sure the one I was using is for stick welding, and isn't dark enough for MIG. I have a headache now after that bit of welding.
Something with an Auto-dim feature would also be essential for all the tack welding I'll need to do on the E30's sheet metal.
I don't think I did too badly, considering this is my first time ever welding.
I also didn't have a smooth surface to prop my hands and drag along while welding. I have the feeling it would help a lot.
Angle iron on the right is the first one I worked on. I started by "pulling" and ended up liking the "pushing" technique better.
 Last edited by Panici; 02-22-2018, 03:56 PM.
'87 BMW E30 325is Turbo
'98 BMW E36 328iComment
-
Thanks, that's good to know! I'm still waiting for the touch up paint to arrive at the dealer, so I'm not sure how much you get or how far it will get me with all the touching up required on my car.
That would be a lot of fun! I met a couple of guys from the Ontario E30s Facebook group at Tedfest in Mississauga last weekend who asked me to join the group, but I'm not on Facebook and the group didn't come up in a search. I'll send you a PM to get more info about the group - thanks!
Comment
-
Unfortunately, I've been busy with other things, and the E30 hasn't had much progress.
I'm going to make a push to have some major work done by the 13th of July, which will be one month exactly since I started the rear end refresh.
------------------------
I installed the FEBI rear differential bushing, using my table vice. I had to finish it up with a big sledgehammer, and the last blow put the bushing about 1mm deeper then I would have liked. It's still fine, just not perfect.
Interestingly enough, the bushing I removed was solid (without the void spaces) of the new/standard bushing, similar to the (now very expensive) Z3 bushing. I wonder if it was previously changed (doubtful), or another hidden feature of the one-year model '87 325is.
I used a paper gasket and a thin bead of black RTV (between the diff and paper gasket) to re-install the cover.

I picked up my driveshaft from getting a u-joint replaced. The shop is the same place I had my flywheel resurfaced and lightened.
Not sure I'm happy with the tack welding of the new joint, as I believe they are supposed to be steaked into position. The shop said this is how they've always done them without issue.
The price was right as well. I paid ~$120cdn, which was great compared to the next closest quote I got for $250, and about an hour further away.

I also bought a new welding helmet.
Although having images of women riding bombs isn't exactly PC these days, I much prefer looking at it to skulls, flames, or greasy figures that the other welding helmets featured.
The auto-dimming, and adjustable darkness are both nice features, and will come in handy with all the bodywork and tack-welding the E30 needs.

--------------
Today's progress (July 7th/16)
Practiced my welding some more on the 1/8" angle iron. I also found a better surface/table to weld upon.
I think I need some more metal of various thicknesses to practice on before I feel comfortable welding on my rear subframe.
Played with the wire speed, as well as hand speed. I also attempted (for the first time) two welds using a pattern rather then a straight bead. I can see why this is used with thicker metal, it gets a lot more heat into the surface and allows greater penetration.
I also attempted a stress test on one of my joints. The surrounding metal bent before the weld, showing the weld is stronger then the other metal. This is what you want!
I had to stop welding after a short while though, as it's 36c (97f) today with humidex. Quite hot to be welding in pants and long sleeves.


--
I've closed the overhead garage door and opened the man door to the house. Here's hoping the central air can keep up and make the garage temperature bearable, so I can get some more work done this afternoon.
EDIT:
It worked, garage stayed cool and I got some work done.
- Pressed in two of the new Lemförder TA bushings with a c-clamp.
- Installed the driver's side new wheel bearing (+new c-clip).
- Bolted up the reconditioned brake dust shield, after cleaning the threads of POR15 with a tap.
Almost feels like I'm working with new parts!
Tomorrow I aim to at least get the passenger side this far as well.


-------------------
July 8th/16
Super hot today. Hit 39c (102f) with humidex. My trick to keep the garage cool (as I did yesterday) didn't work quite so well.
I did get the passenger side trailing arm to the same state as the driver's side though. Bushings, bearing, and brake dust shields. Also threw on the new thinner spring pad.
Also, I found my missing FEBI rear differential bushing.
It was in the freezer! I completely forgot I put it in there. Now I'll have to sell it.
 Last edited by Panici; 02-22-2018, 03:55 PM.
'87 BMW E30 325is Turbo
'98 BMW E36 328iComment
-
Got a little more work done here and there over the past few days.
- Investigated the rusty spots under the car where the subframe normally sits. (Details here)
- Gave them a coat of Eastwood rust encapsulator for now. Will be redoing the body spots with POR15 when I do the diff and subframe.
- Painted the rear wheel wells with Eastwood rust encapsulator.
- Painted the driveshaft with Eastwood rust encapsulator.
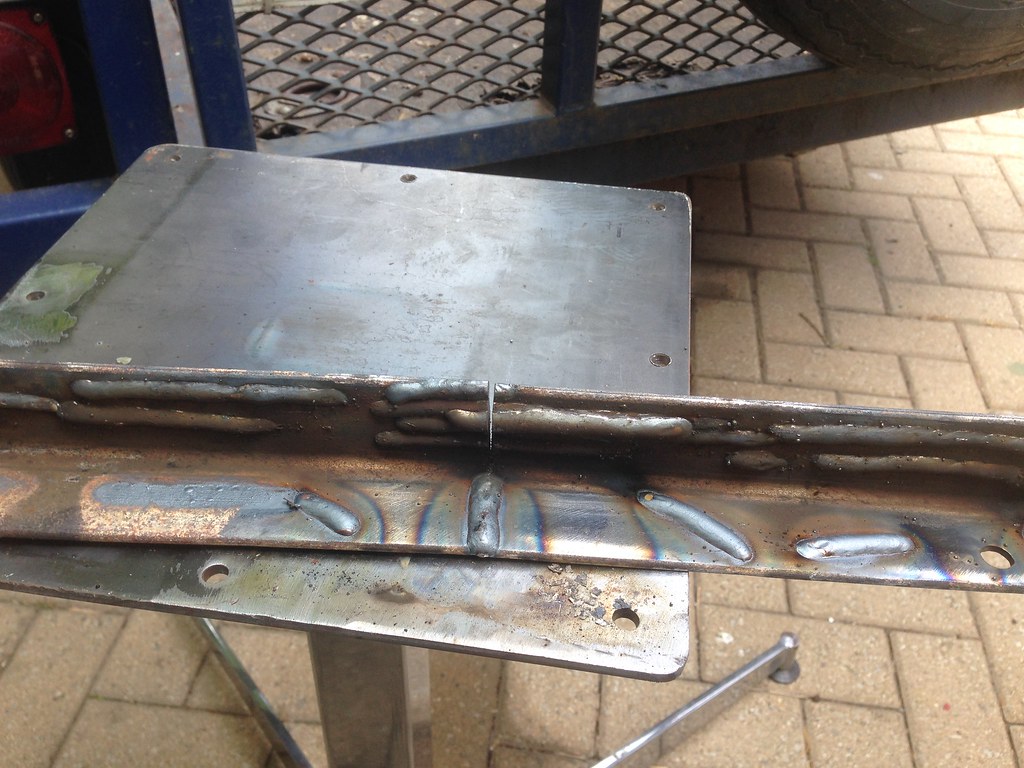
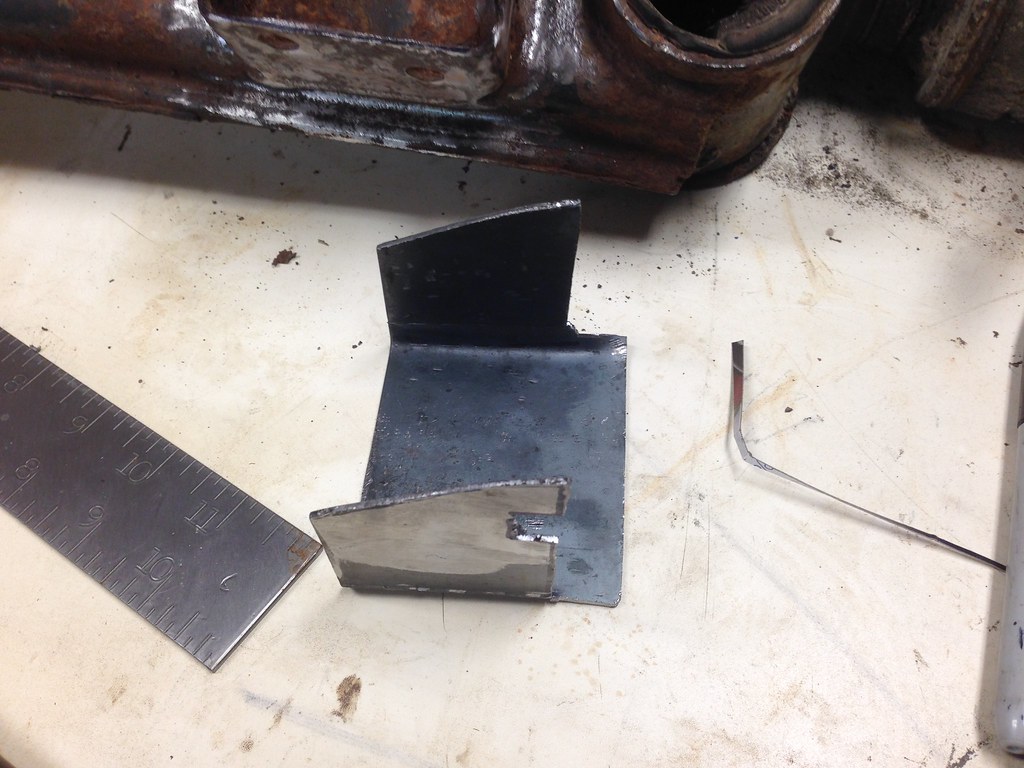
- Made up a reinforcement plate for one side of the subframe beam.
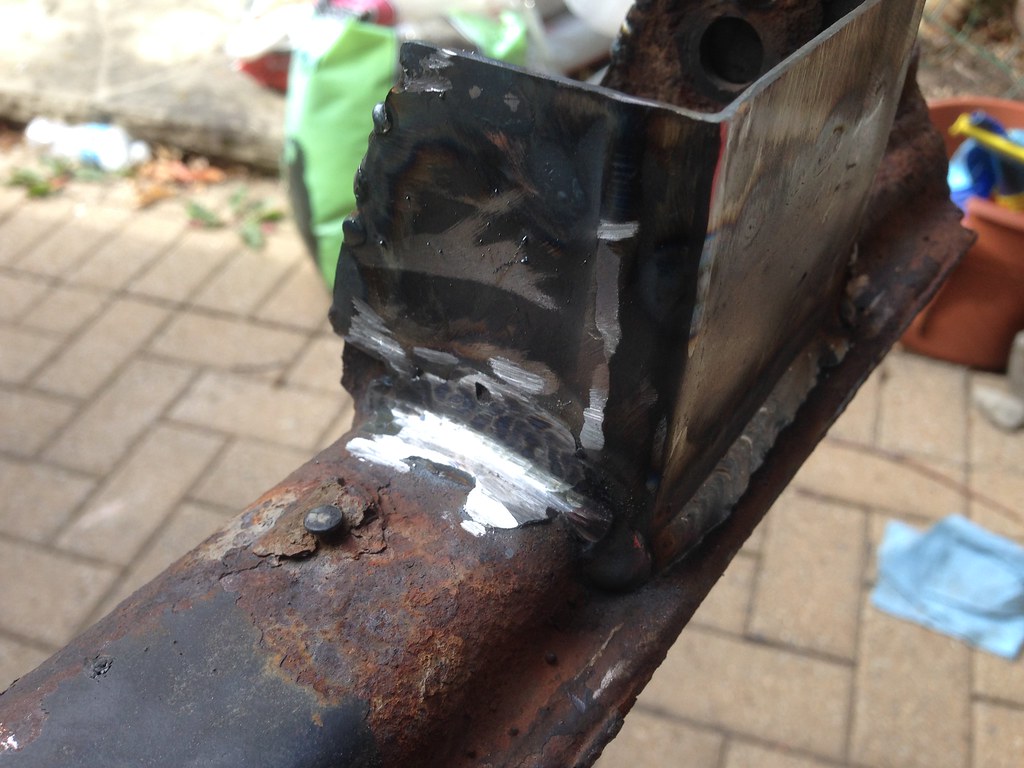
- Welded reinforcement plate in place. Details below.
I started by laying a good bead on the backside of the bracket (centered in the pictures). It has great penetration and is strong.
I can promise you that on the left (pictured) side, the first bead was done with the welder set to 1/8" settings, and had good penetration. It actually blew through the 1/16" in one tiny spot when my travel speed dropped.
I then switched to 1/16" welder settings to successfully fix that blowthrough, and to do all the welding on the inside of the bracket.
On the right (pictured) side, my initial bead at 1/8" settings had some penetration, but it definitely wasn't great. I believe the subframe metal wasn't clean enough, as I wasn't able to get in there really well to get the steel to a mirror finish.
Then for some reason, it all went to pots. My only excuse is the weather, as it's blistering hot today and I was wearing long pants and a long sleeve shirt. I was not thinking clearly.
I stacked a bunch of terrible and cold welds over the left and right sides with little to no penetration and the welder still set to 1/16" settings. Again, no idea why I did this.
If I can fit some grinding tools in there, I'll get rid of that terrible stacked cold welding at the sides, and see if I need to do any further welding to make sure it's all strong. I'm thinking a grinding or cutting disk (used gingerly) on an angle grinder with the safety shield removed might fit.
I may need to also trim down the new piece, as it's too tall. Not quite sure why I left so much extra on top?
On the other bracket, I'll be sure to clean the "hot rolled" scale off the inside of the bracket before I bend it (which I neglected to do this time). That should help a little when tack welding to the existing thin metal on the inside. I'll also do a much more thorough job of cleaning the trailing arm metal before I weld.
I obviously also need to drill through holes for the trailing arm mounts.


 Last edited by Panici; 02-22-2018, 04:02 PM.
'87 BMW E30 325is Turbo
'98 BMW E36 328iComment
- Investigated the rusty spots under the car where the subframe normally sits. (Details here)
-
Another hot day today. It actually got up to 42c / 108f today with humidex.
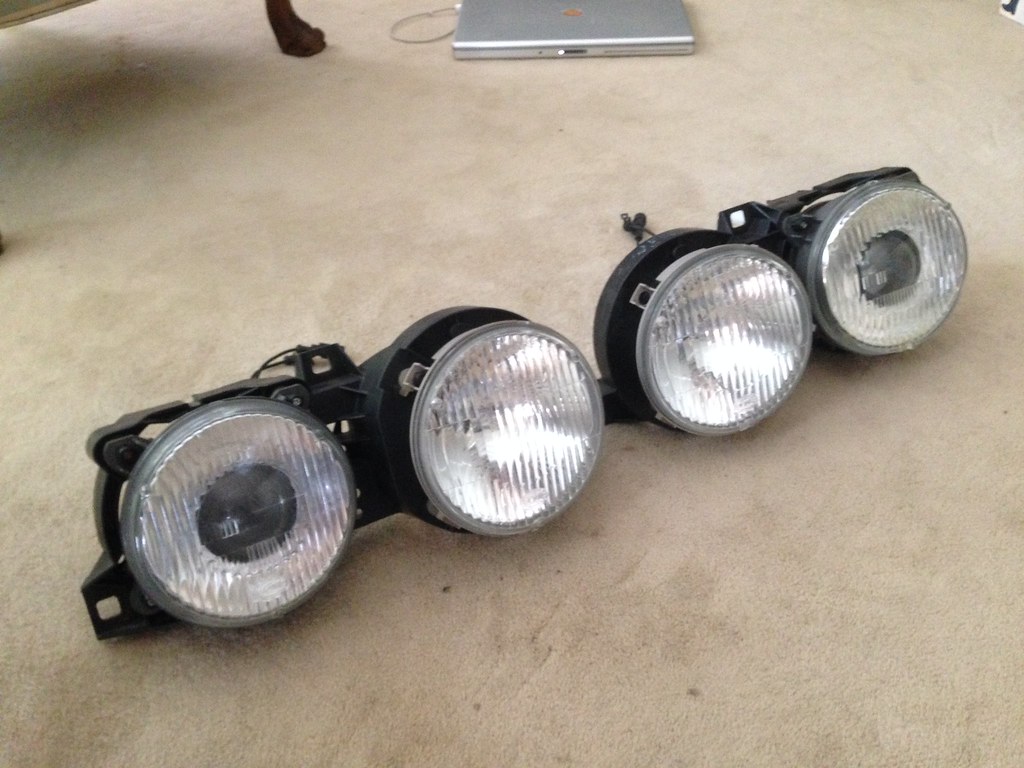
I decided to stay inside and rebuild my Hella ellipsoids instead of trying to work in the heat.
Since I first got them, I completely disassembled, cleaned and removed the silicone mess the previous owner used in place of a new adjuster.
I replaced all of the Ellipsoid adjusters and reconditioned the highbeam adjusters.
The HIDs are estimated to be 5000k or 6000k. They were thrown in for free with the lenses. I am using a set of 50w ballasts I had sitting around.
I had originally planned to run Halogen bulbs, but I can't argue with a free set of HID bulbs!
EDIT: I tested the HIDs for a few minutes, and the backside of the Ellipsoid units got quite hot. I also started to smell a slight plastic burning smell. Possibly the bulbs are 35w units and don't like the 50w ballasts.
It's also possible that the 50w HIDs just create too much heat for the Hella halogen projector housings.
I've ordered a 9006 35w 4300k kit from eBay for $30. If I manage to install the lights before these come, I'll just use standard 9006 halogen bulbs.
These will be a MASSIVE upgrade from my stock sealed beams!
Pictures of cutoff to come when car is back on the road.


Last edited by Panici; 02-22-2018, 04:06 PM.
'87 BMW E30 325is Turbo
'98 BMW E36 328iComment
-
This subframe refresh just keeps dragging on. I went away for a week so I lost some more time there. I did get a bunch done today even though it was hot.
I'm hoping to get the first coat of POR15 on the subframe and diff tomorrow.
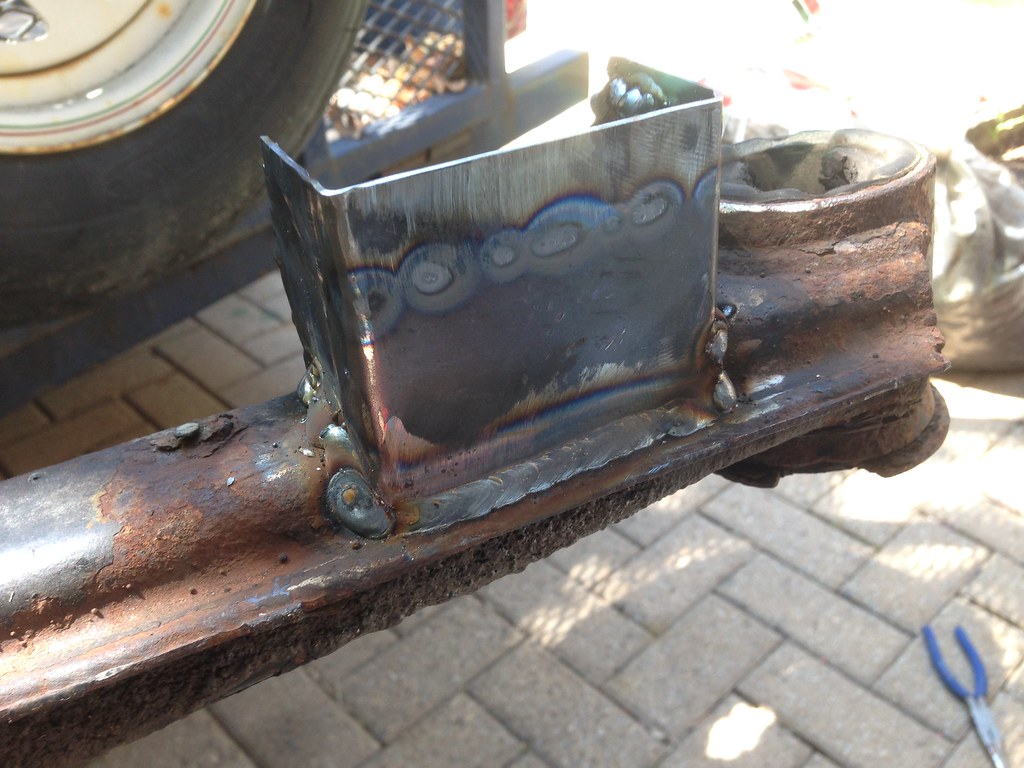
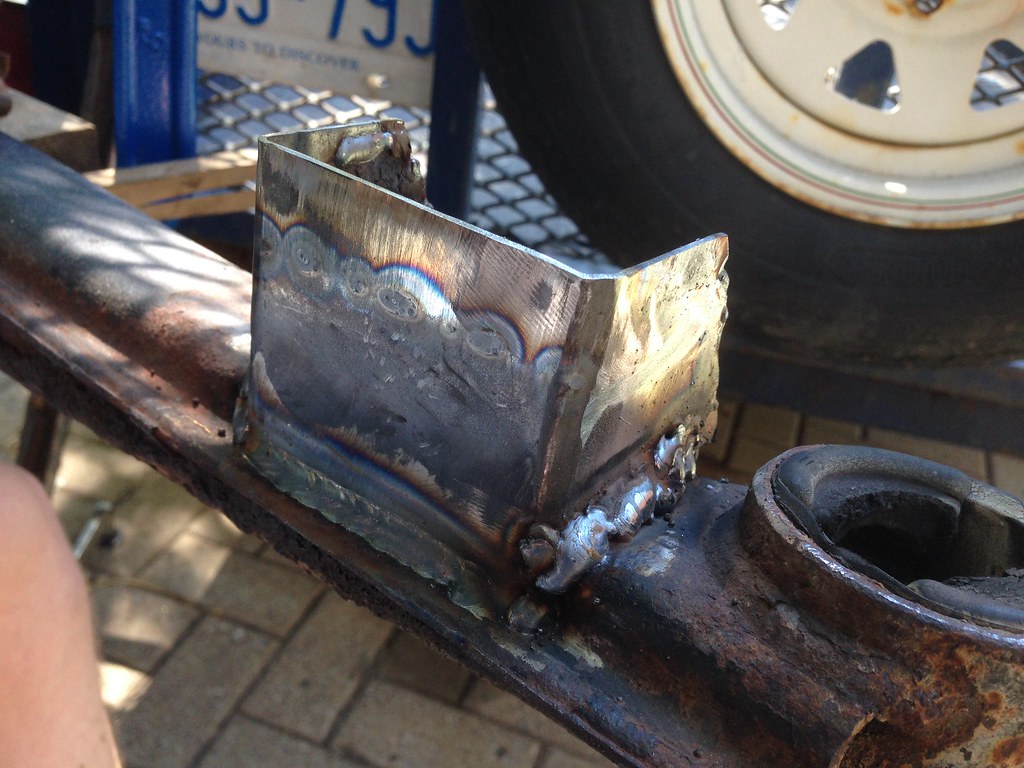
Progress since last update:- Ground down and re-welded first rear subframe reinforcement bracket.
- Trimmed excess height from first bracket
- Fabbed and welded second bracket, with more precision this time.
- Again, welds aren't great, but it's stronger then before I started. I'm still very much a MIG n00b
- Removed subframe bushings with my wheel bearing kit. Smoked (burned out) my smaller impact gun in the process
- Drilled through holes for trailing arm mounting point reinforcements
- Removed rust scale from subframe beam
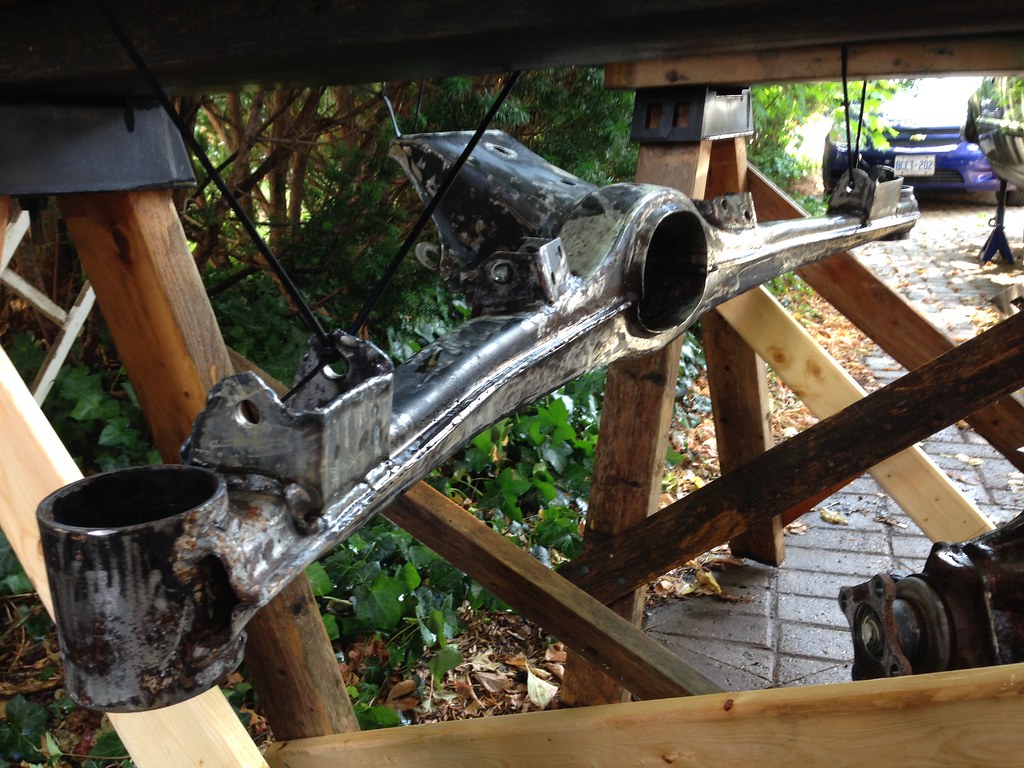
- Suspended subframe and diff from sawhorses
- Prepped for POR15 with degreaser and metal etching


 Last edited by Panici; 02-23-2018, 08:14 AM.
'87 BMW E30 325is Turbo
'98 BMW E36 328iComment
-
Got some more solid work done today.
- Two coats of POR15 on the subframe and diff
- Touched up "cardboard" spots on trailing arms with POR15
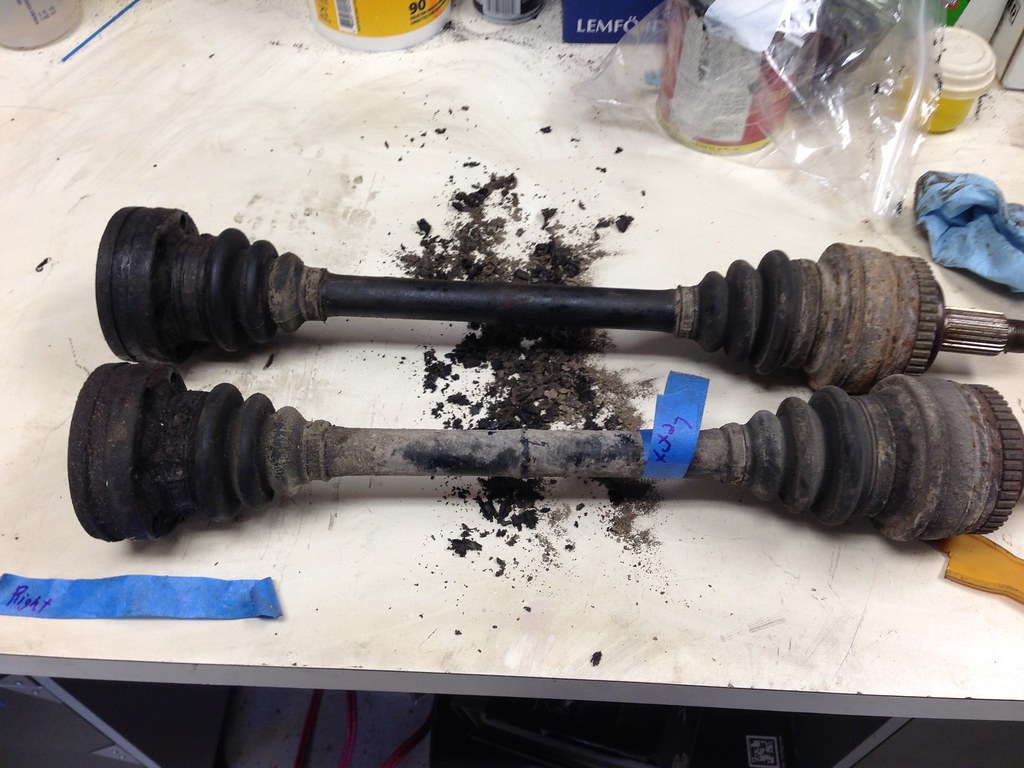
- Cleaned all the undercoating off the halfshafts, scrubbed with engine degreaser
- Cleaned all undercoating off the pinch seam/bolt subframe plates, scrubbed with engine degreaser
- Degreased random brake line clips, halfshaft diff side bolts
Next on the list is some paint for the halfshafts and pinch seam assemblies, followed by pressing in the rear hubs. In three days (or so) the subframe and diff should be completely cured and ready for re-assembly.
I'm going to hit the small spots (where the zipties sat) with POR15 before the finished assembly is installed in the car.
First coat of POR15 (in the morning)


Visual example of how much undercoat was on these halfshafts. One is scraped here, one is not.
After degreasing

Second coat of POR15 (six hours later)

 Last edited by Panici; 02-23-2018, 08:18 AM.
'87 BMW E30 325is Turbo
'98 BMW E36 328iComment
-
Believe it or not, I damaged a muscle in my side while painting that subframe and differential. I liken the painting process between those sawhorses to playing "twister", and I did that for three hours in one day.
I couldn't do much of anything for the better part of a week, without my side spasming.
But I'm better now, and back at it.
Today's progress:- Installed new fuel filler hose.
- Old one was split around the clamp.
- Sometimes you could smell gas, and the hose leaked when the tank was full.
- Topcoated the (previously addressed) chassis spots with a high-build fleet paint
- Pressed in both new Lemfoerder subframe bushings
- Bought and then proceeded to bend an 8" C-clamp in the process.
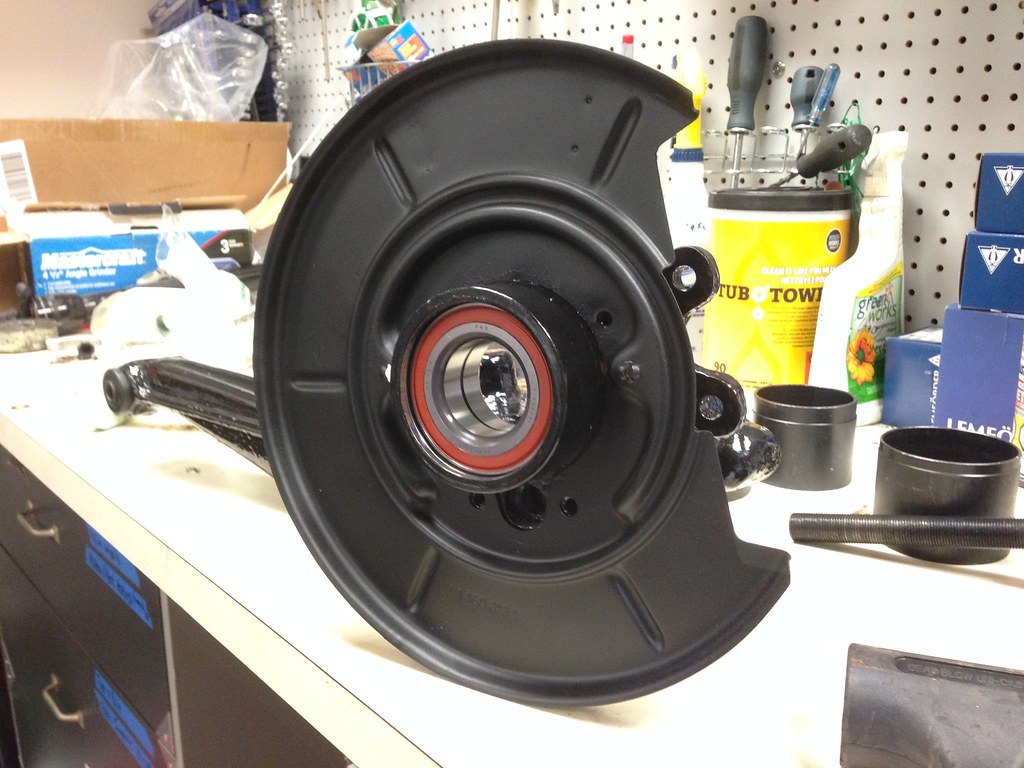
- Pressed in rear hubs into new wheel bearings
- Touched up subframe and diff POR15 in a couple spots (two coats)
- Painted the driver's side pinch bolt assembly.


 Last edited by Panici; 02-23-2018, 08:21 AM.
'87 BMW E30 325is Turbo
'98 BMW E36 328iComment
- Installed new fuel filler hose.
-
More updates. I'm making a final push to finish before the end of the month!
Sorry about the decreasing quality of photos. I think my cellphone camera is on it's way out. I'm going to try to take some SLR photos of my finished subframe assembly before I get it back into the car.
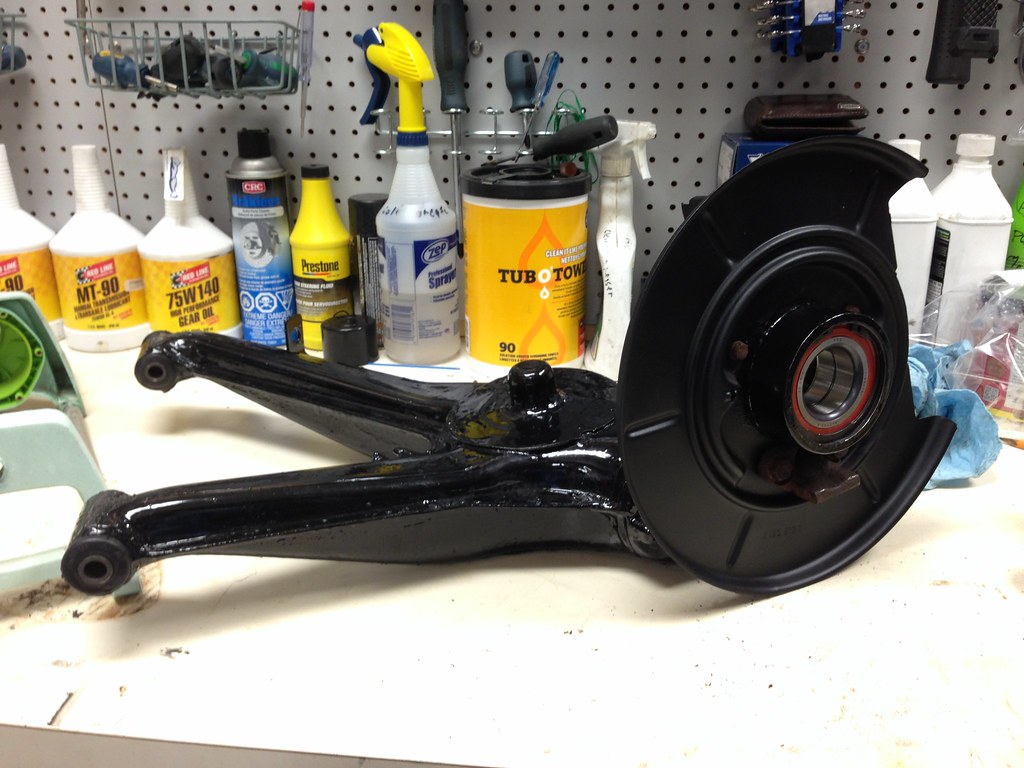
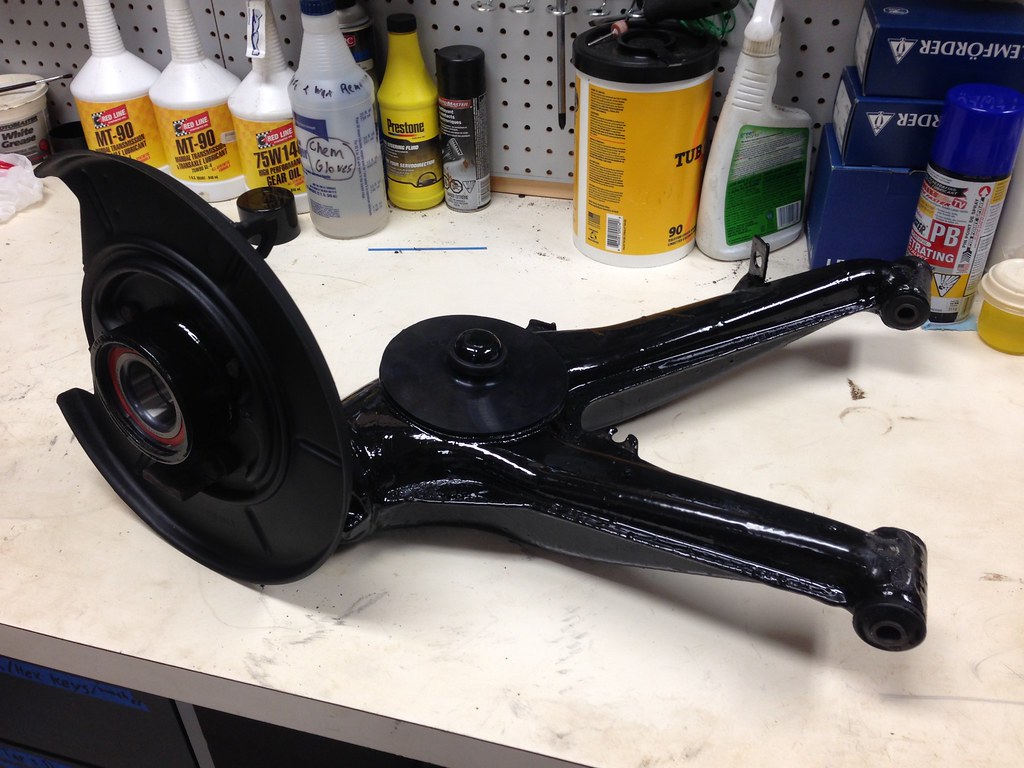
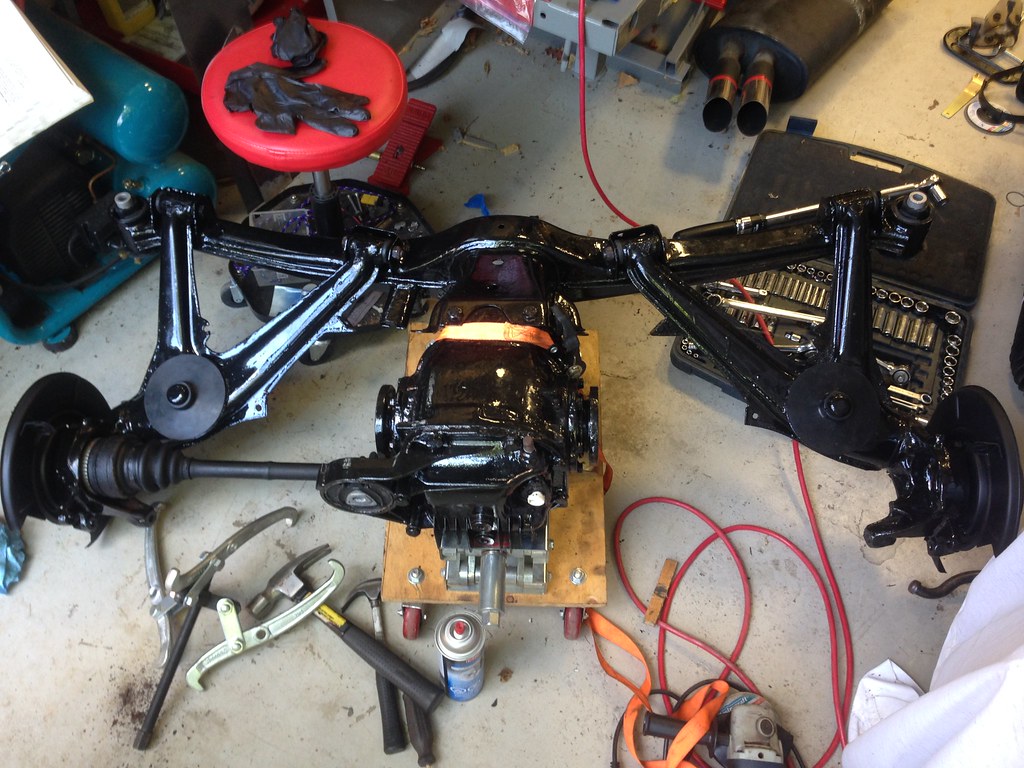
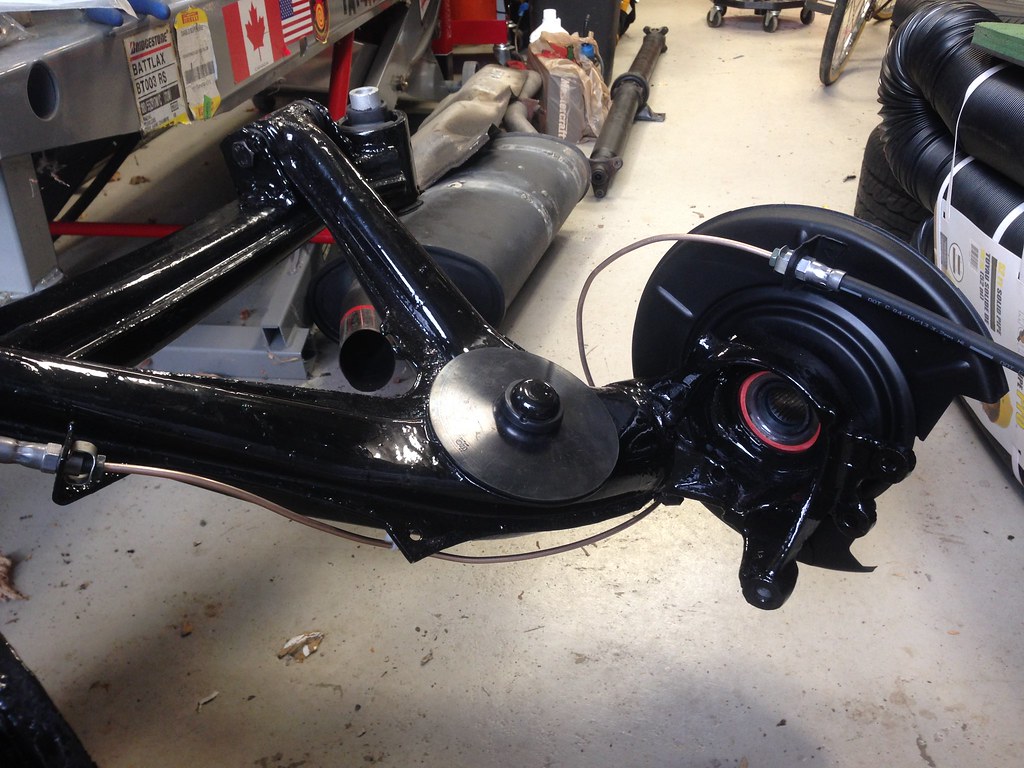
- Mated the rear diff to subframe beam.
- Mated trailing arms to subframe beam. Used longer Class 11.9 bolts for the the reinforced (thicker) brackets.
- Cleaned, masked, and painted my rebuilt set of four calipers.
- Attempted to install the passenger side rear axle.
- Had to order an install tool which should be here early this week.
- Bent and flared the first of four copper hardlines for the subframe.
- Need to shorten (and re-flare) the upper loop so it doesn't stick out so much.
- Removed the rear swaybar. Cleaned, sanded and painted. Installed with new bushings and endlinks


 Last edited by Panici; 02-23-2018, 08:27 AM.
'87 BMW E30 325is Turbo
'98 BMW E36 328iComment
-
That copper line I made yesterday looked sloppy. Today I shortened it and re-flared, so it tucks nicely behind the brake dust shield.

-
I also used the new axle install tool I bought to install both axles. Works great since my splines aren't 100%.


-
Bent and flared another brakeline as well.
Waiting on some more brake line clips (34341163565) that I had to order from the dealership in a pack of 10. :|
I'm going to attempt to use zipties in place of some of the plastic clips which broke (34301161567 & 34321158467), some of which are NLA.
 Last edited by Panici; 02-23-2018, 08:30 AM.
'87 BMW E30 325is Turbo
'98 BMW E36 328iComment
-
I'm looking forward to seeing your car in person someday soon, hopefully before the snow arrives.
Excellent work so far! ;)
Comment
-
Dang pretty good progress.Comment
-
Those little pullers are amazing when you need to install a halfshaft. Looks like you are doing awesome work on this car!Comment
ave")


 -
-
Comment