
Update 10/5/2015
Sorry guys, due to a busy work schedule with travel and life schedule I haven't had much time lately to work on these gauges. I don't expect it to always be this busy, so I am looking forward to start making them again, however I don't really see any immediate opportunities to start in the near future :(. Work usually gets busier until after the new year when it lets up a bit.
__________________________________________________ ______________
Update 4/15/2015
Current batch sold out! Thanks for the orders guys!
__________________________________________________ ______________
Econoboost v3
What's new?
New for Version 3 (June 2013)
Also keeps all of the functionality of version 2
New for Version 2 (July 2011)
One issue that I found with the original design was that all gauges had a different level of frictional damping. This meant that while some gauges were very responsive and quick, others were slow and inaccurate. While the original design worked very well with some gauges, it meant I had to be selective with the gauges I modified or I had to swap the motors around.
With the new design, a motor driver was incorporated between the controller and the gauge, allowing it to be controlled with more power. The voltage now sent to the gauge has been doubled from the old design putting it closer to what the e30 cluster uses to control it.
"Peak and Hold" - With the new design, I was also able to add in a new feature that would constantly monitor the boost pressure and record the max boost since the car started. A wire has been added to the module which can be hooked up to a switch that when pressed will recall the max boost on the gauge.
Here is a video of "Peak and Hold" in action:
What is it?
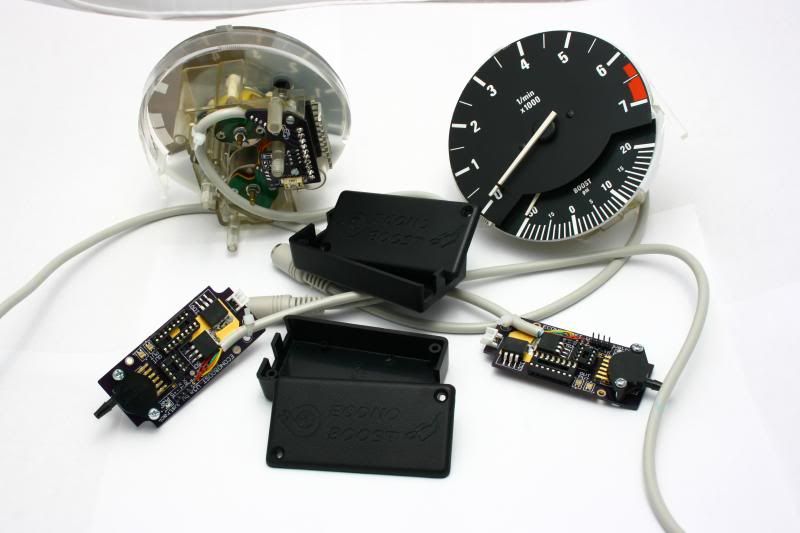
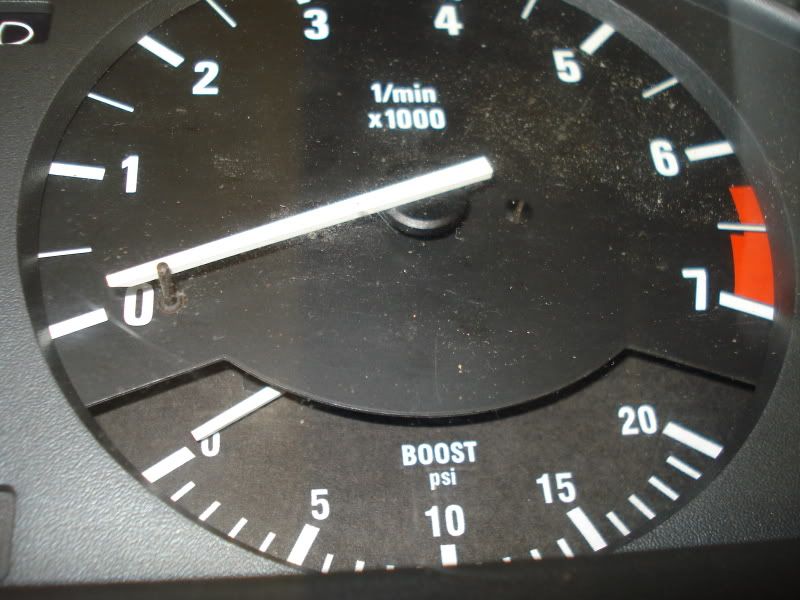
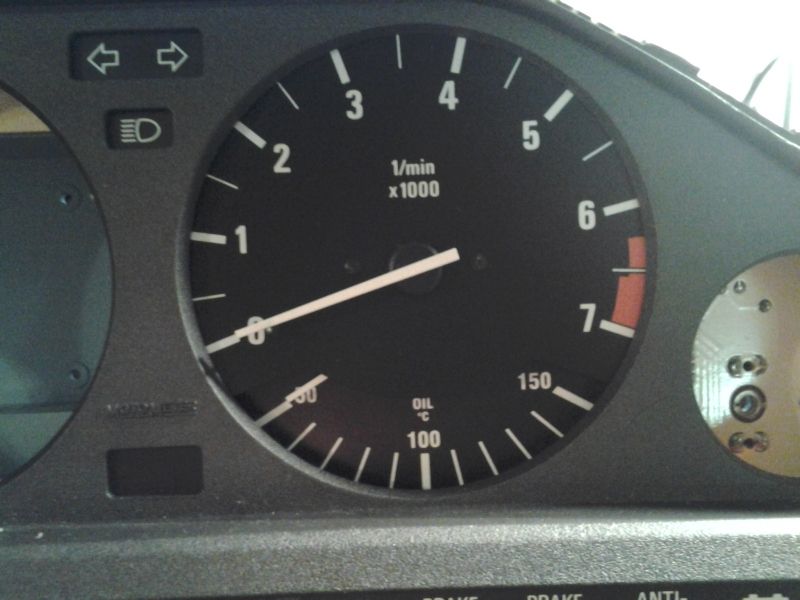
The Econoboost module along with a modified econometer gauge, will turn a useless gauge that swings back and forth as your foot goes on and off the throttle (plus if you turbo'd your car, I doubt you would call yourself a hypermiler, if it even still works with your ECU) in to an OEM looking, very conveniently placed boost gauge. It gives a stock look with no messy gauges, and it lets you watch boost, RPM and speed at the same time.
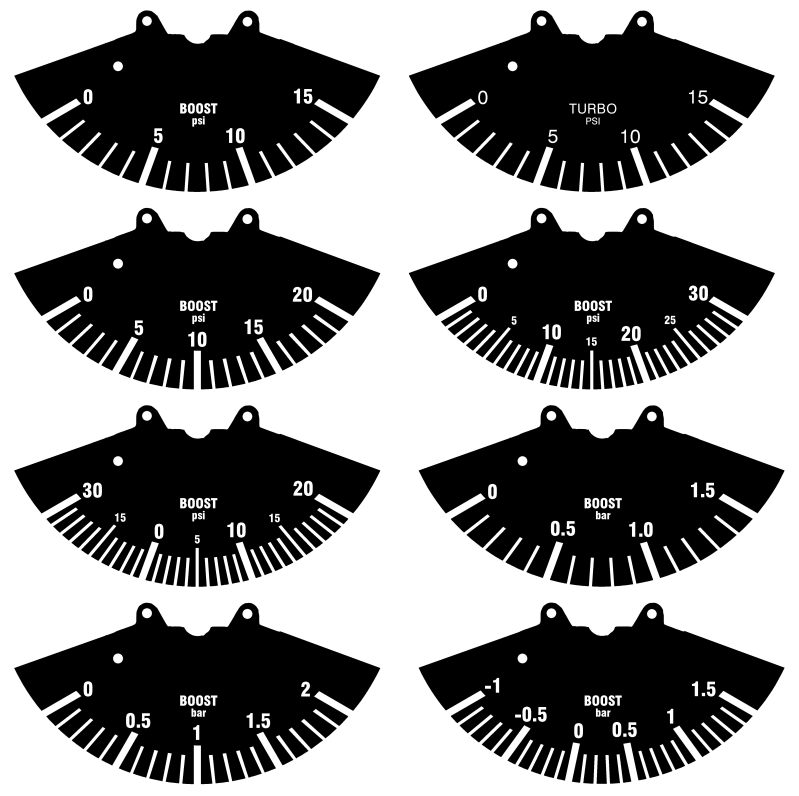
Currently the pressure ranges are available in the following, feel free to pick one or let me know if you'd like something different:
I set out from the beginning to try to create a quality design that would be robust and reliable, from having the PCBs professionally made to using a pressure transducer from the same family as the one used in megasquirt.
How its Made
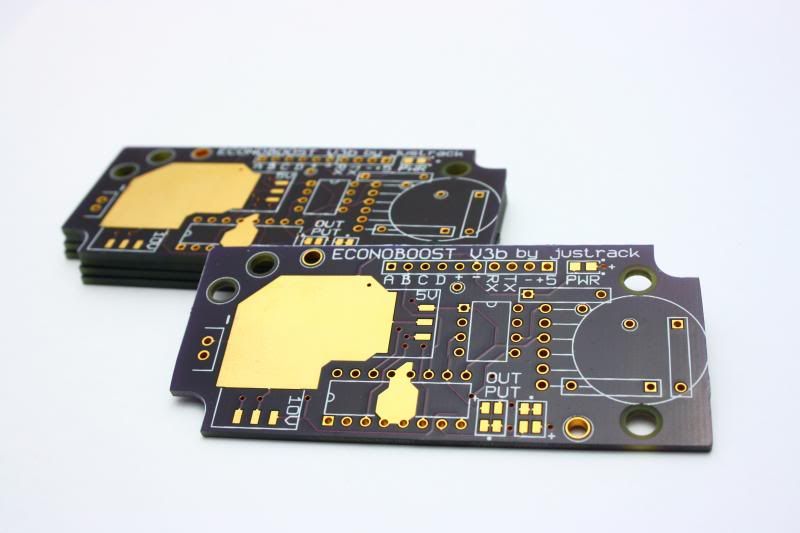
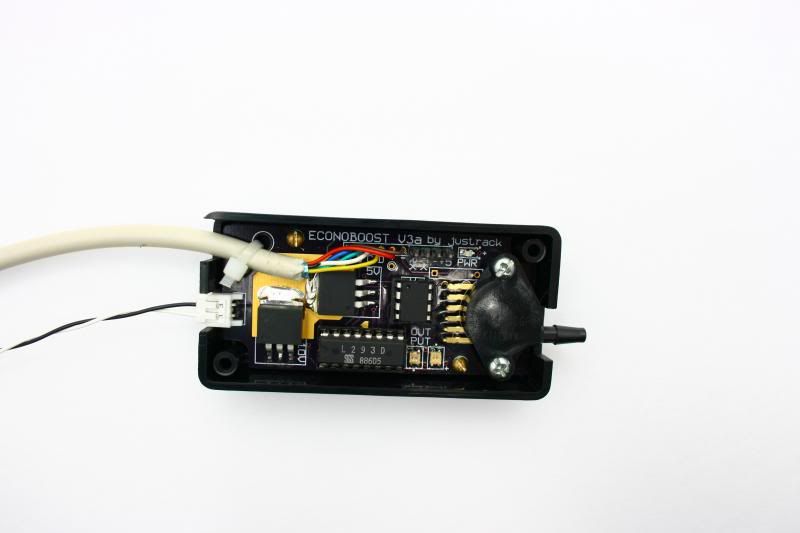
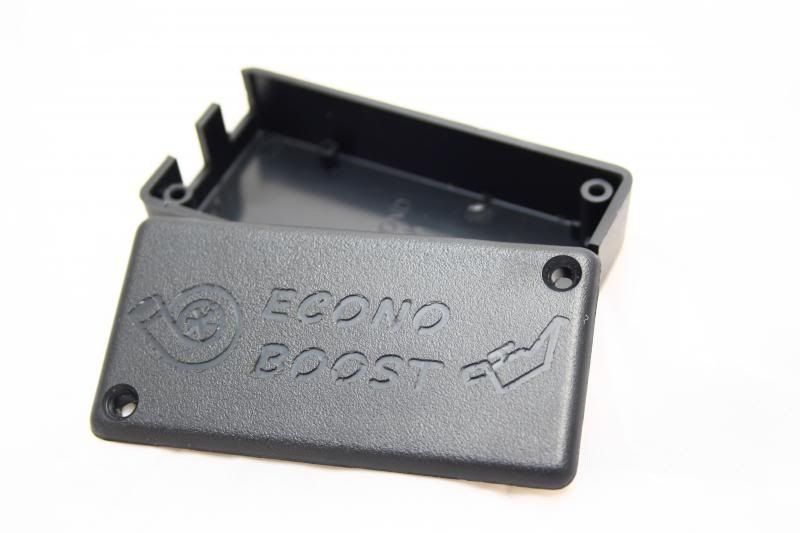
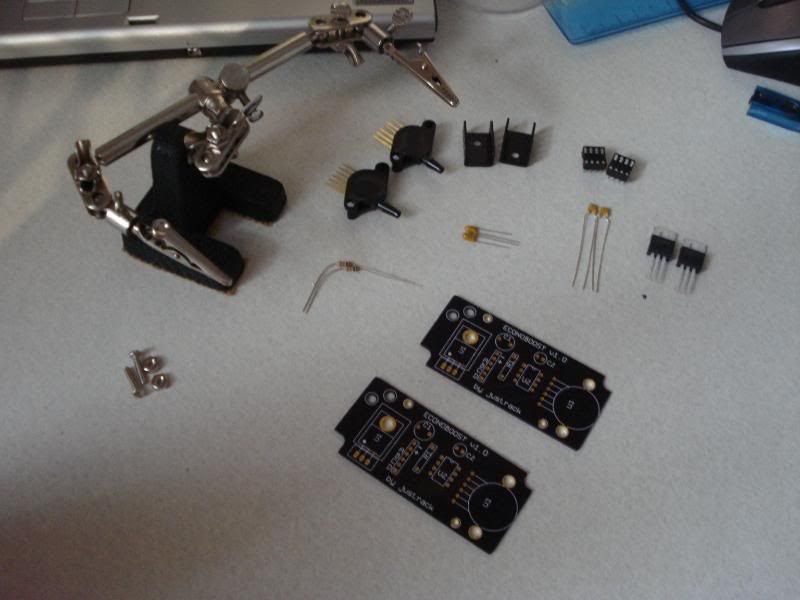
The PCB boards are high quality 2-Layer professionally made in the USA with solder mask and silkscreen. I think they came out great.
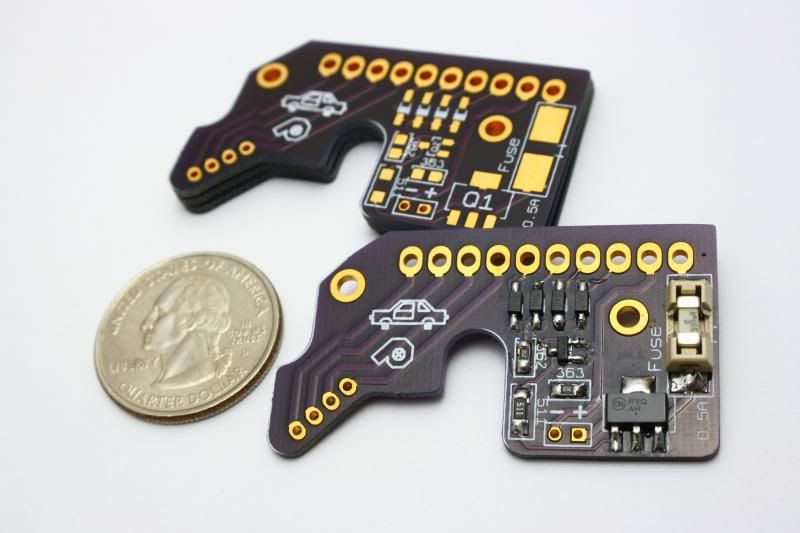
New board that will allow power to be supplied by cluster:
The boards fit perfectly in a case that will be notched on one side for the vacuum/boost hose and on the other for the wires
Here's a video showing the case being engraved and notched by a CNC router:
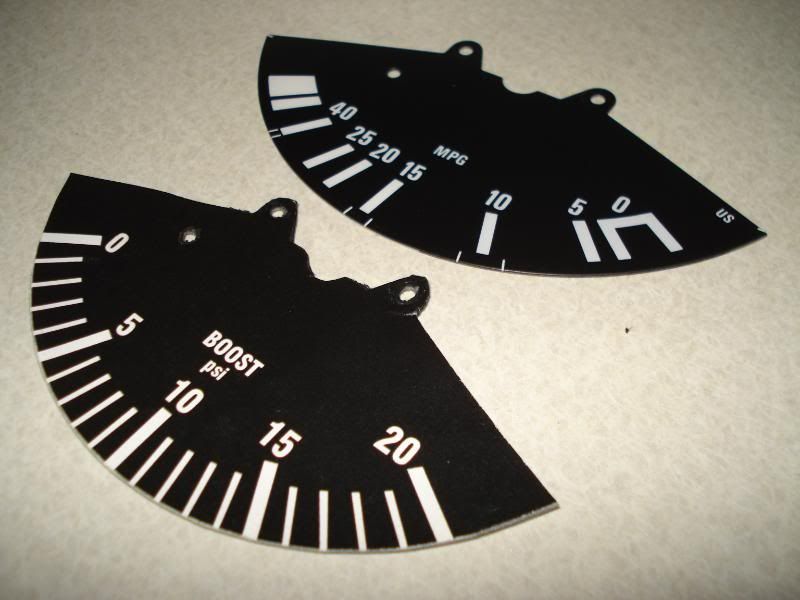
To replace the stock MPG gauge card, a layered design was used to match the original thickness and also create the correct and even lighting effects at night. This is not exactly trivial since the cluster is lit entirely by two bulbs, so it took a few iterations to get the gauge to light evenly at night.
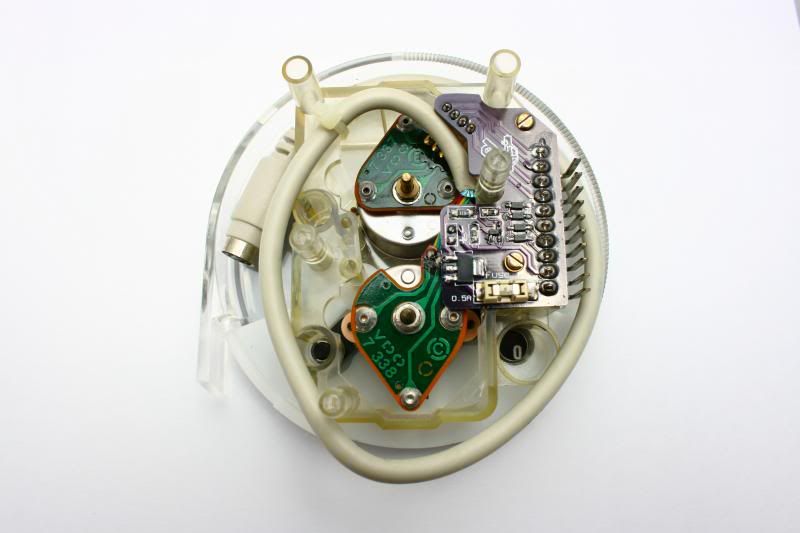
A wire harness will be installed on the gauge that will connect to the harness coming from the Econoboost module and allow the gauge to now be controlled by the module instead of the cluster.
How its Calibrated
Each and every module is individual calibrated and test for particular gauge (though they shouldn't vary much between gauges, but after 20 years who knows if all gauges are the same still).
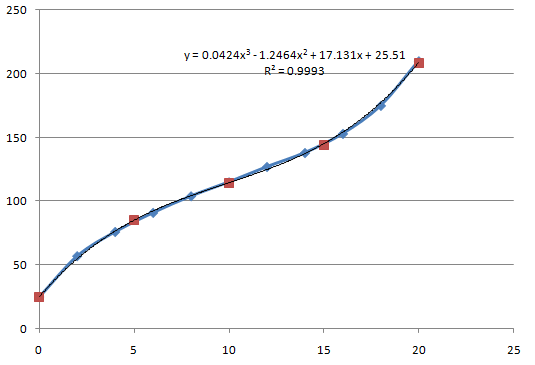
Calibration is achieved using a pressure source, a calibration gauge and some tubing to connect all of it. Multiple points of data are taken which include the calibration gauge's reading, the input to the micro-controller, the output to the gauge, the reading on the gauge. From this data, a calibration curve/table can be built and it is then programmed in to the micro-controller to accurately read the boost pressure and display it on the gauge.
For now, I'm going to say that the accuracy of the gauge should be plus or minus the width of the needle (actual value depends on the scale you pick). I'll try to get it closer, most of the times it is, but at the worst case the real value should be with in plus or minus a needle width away from the needle's position.
What is it Compatible With?
BMW e30 cluster designs can be broken into two periods: Pre-1986 and Post-1986. The Post-1986 cluster design was standardized between the manufacturers and allows greater compatibility of tachs between different clusters. Currently the Econoboost module is only designed to control Post-1986 gauges. Another slightly different module that will work with Pre-1986 gauges may be developed in the future if there is interest.
I also assume that most people will want/have 7k tachs, which is what I will keep on hand. Let me know if this is otherwise.
Post-1986 clusters had the coding plug on the front of the cluster (under a trim piece) where as pre-1986 clusters had the coding plug on the back and plugged in to the tach. Also an easier way to tell is by the number of red SI lights, 3=pre-1986, 1=post-1986
So the coding plug should look like this on the front of the cluster (numbers don't matter):
And you tach should look like this once removed (minus the cable):
If there are large circuit boards with more components on the back of the gauge, then you have a pre-1986 tachometer/econometer.
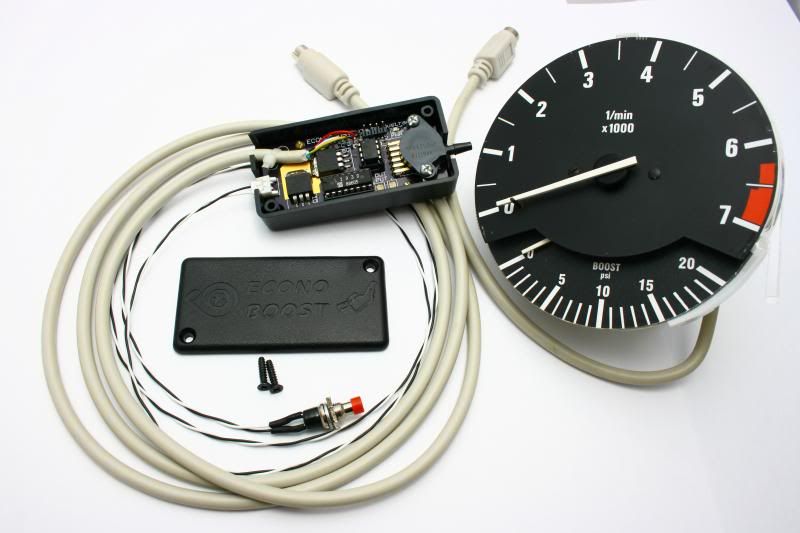
What's Included
Every order will include:
How to Order
Okay, so since I will be modifying/calibrating the gauges and installing the gauge plates , there are a few ways to go about this:
International shipping may be a bit more depending on actual shipping costs.
WARNING: Some e30's won't charge the battery if the cluster is not in the car. So if you remove the cluster to get the tach out, I recommend plugging the cluster back into the car if you plan on driving it. I believe this only applies to earlier e30's, but I don't know for sure what year they changed it.
Also, if you have any extra tachs (post-1986) that you are willing to get rid of for a reasonable price, let me know :)
Please: If you send me anything, put a note in with it saying who you are (email address you used with paypal and your username). THANKS!
Also, please keep in mind that I am doing this in addition to college courses (graduated!) my full-time job, so while I want to provide quick service, there is a lot that goes in to each gauge and depending on how many other orders I'm currently working on, it may take a little bit longer than expected. With that said I really don't want any to take longer than a week, so I'll make that my goal.
How to Install
Once you receive the module and modified gauge, you will need to remove your cluster to install it. Here are some decent instructions for that: http://www.rickk.net/i/drive/bmw-e30...ument-cluster/
Open the cluster by removing the screws that have a hexagonal shape AND a Philips slot. The tachometer is held in place by three screws on the back of the cluster, remove them and the tach should pull out.
On the back of my cluster there was a tab that I broke off which left plenty of room for the new connector attached to the modified gauge to pass through out of the cluster. If your cluster does not have this, you will have to drill, cut or find some other way to get the connector out of the cluster so the module can be connected to it.
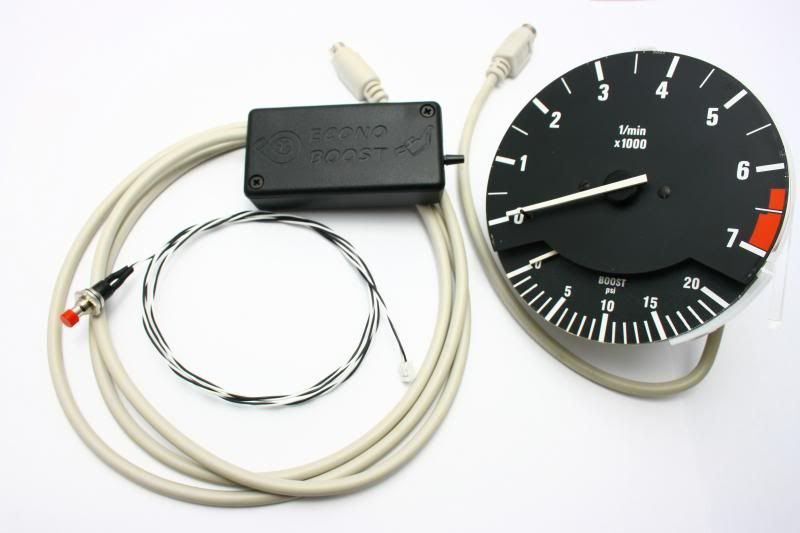
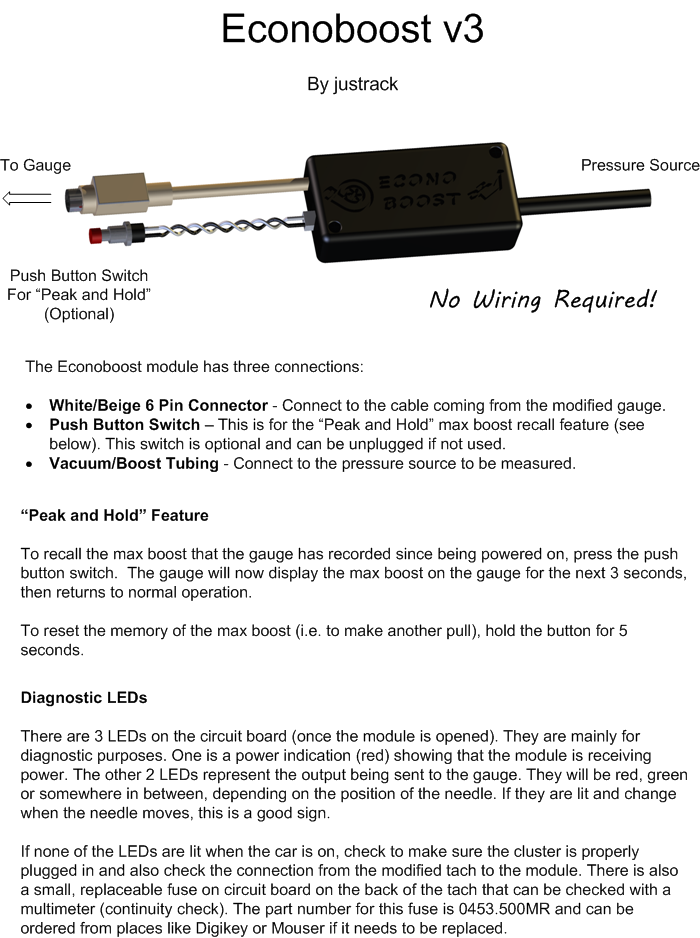
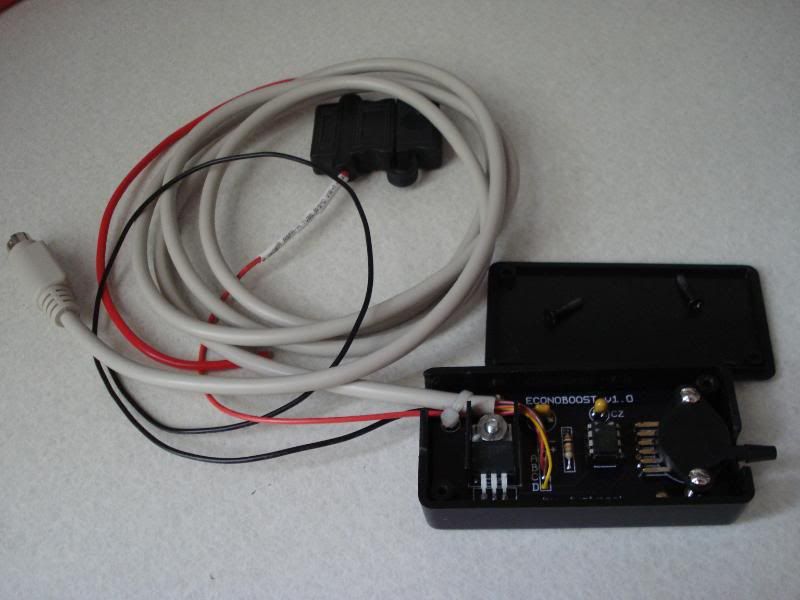
The Econoboost module has a thick white/beige (6 conductor) cable that connects the module to the modified gauge.
If you choose to use the included switch for "Peak and Hold" max boost recall install it where you like, and simply plug it in to the module.
Since power is now taken through the cluster, no extra wiring is needed.
Just hook up some vacuum/boost tubing to the other side of the module and you should be good to go!
Photos & Videos
Included Instructions:
(From Version 1)
Video of Calibration of Gauge:
Videos of Gauge in use:
http://www.youtube.com/watch?v=l_o6qxoT688
(sorry for the shaky camera)
Sorry guys, due to a busy work schedule with travel and life schedule I haven't had much time lately to work on these gauges. I don't expect it to always be this busy, so I am looking forward to start making them again, however I don't really see any immediate opportunities to start in the near future :(. Work usually gets busier until after the new year when it lets up a bit.
__________________________________________________ ______________
Update 4/15/2015
Current batch sold out! Thanks for the orders guys!
__________________________________________________ ______________
Econoboost v3
What's new?
New for Version 3 (June 2013)
- No Wiring Required - With the addition of another circuit board that replaces the stock one on the tach, power is pulled straight from the cluster. Also the max boost recall switch is provided with wiring and a connector that plugs straight in to the econoboost module.
- Internal Improvements - New, more capable microprocessor along with a different control method for the gauge, which should give more consistent, responsive results.
Also keeps all of the functionality of version 2
New for Version 2 (July 2011)
One issue that I found with the original design was that all gauges had a different level of frictional damping. This meant that while some gauges were very responsive and quick, others were slow and inaccurate. While the original design worked very well with some gauges, it meant I had to be selective with the gauges I modified or I had to swap the motors around.
With the new design, a motor driver was incorporated between the controller and the gauge, allowing it to be controlled with more power. The voltage now sent to the gauge has been doubled from the old design putting it closer to what the e30 cluster uses to control it.
"Peak and Hold" - With the new design, I was also able to add in a new feature that would constantly monitor the boost pressure and record the max boost since the car started. A wire has been added to the module which can be hooked up to a switch that when pressed will recall the max boost on the gauge.
Here is a video of "Peak and Hold" in action:
What is it?
The Econoboost module along with a modified econometer gauge, will turn a useless gauge that swings back and forth as your foot goes on and off the throttle (plus if you turbo'd your car, I doubt you would call yourself a hypermiler, if it even still works with your ECU) in to an OEM looking, very conveniently placed boost gauge. It gives a stock look with no messy gauges, and it lets you watch boost, RPM and speed at the same time.
Currently the pressure ranges are available in the following, feel free to pick one or let me know if you'd like something different:
- 0-20psi
- 0-30psi
- 0-40psi
- Vac-20psi
- Vac-30psi
- 0-1.5 bar
- 0-2 bar
- Vac-1.5 bar
- Vac-2 bar
- Also Oil Pressure or Temp
I set out from the beginning to try to create a quality design that would be robust and reliable, from having the PCBs professionally made to using a pressure transducer from the same family as the one used in megasquirt.
How its Made
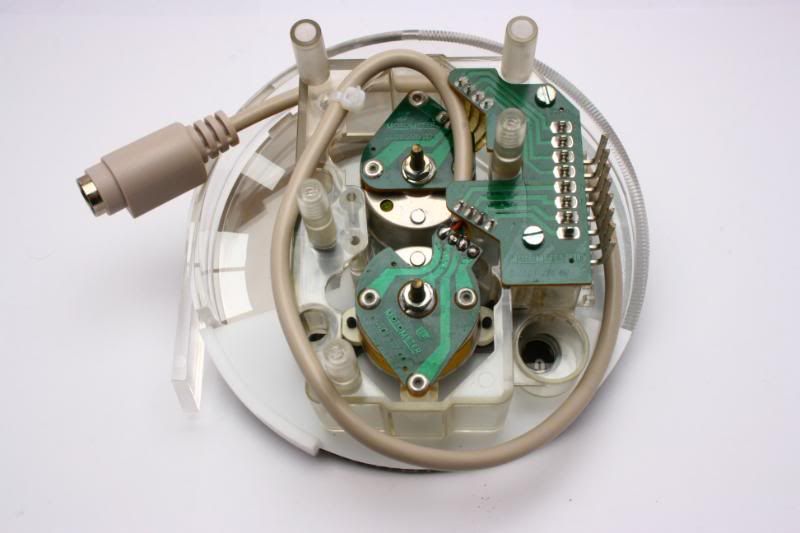
The PCB boards are high quality 2-Layer professionally made in the USA with solder mask and silkscreen. I think they came out great.
New board that will allow power to be supplied by cluster:
The boards fit perfectly in a case that will be notched on one side for the vacuum/boost hose and on the other for the wires
Here's a video showing the case being engraved and notched by a CNC router:
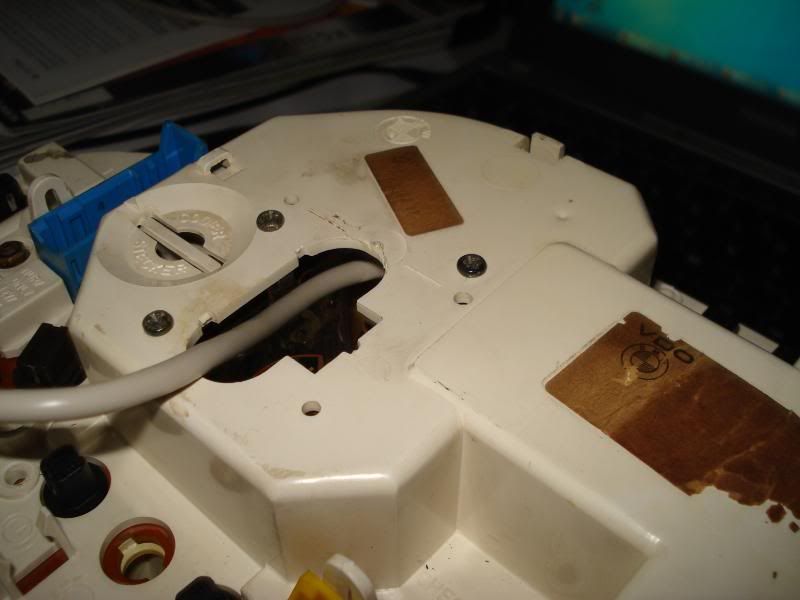
To replace the stock MPG gauge card, a layered design was used to match the original thickness and also create the correct and even lighting effects at night. This is not exactly trivial since the cluster is lit entirely by two bulbs, so it took a few iterations to get the gauge to light evenly at night.
A wire harness will be installed on the gauge that will connect to the harness coming from the Econoboost module and allow the gauge to now be controlled by the module instead of the cluster.
How its Calibrated
Each and every module is individual calibrated and test for particular gauge (though they shouldn't vary much between gauges, but after 20 years who knows if all gauges are the same still).
Calibration is achieved using a pressure source, a calibration gauge and some tubing to connect all of it. Multiple points of data are taken which include the calibration gauge's reading, the input to the micro-controller, the output to the gauge, the reading on the gauge. From this data, a calibration curve/table can be built and it is then programmed in to the micro-controller to accurately read the boost pressure and display it on the gauge.
For now, I'm going to say that the accuracy of the gauge should be plus or minus the width of the needle (actual value depends on the scale you pick). I'll try to get it closer, most of the times it is, but at the worst case the real value should be with in plus or minus a needle width away from the needle's position.
What is it Compatible With?
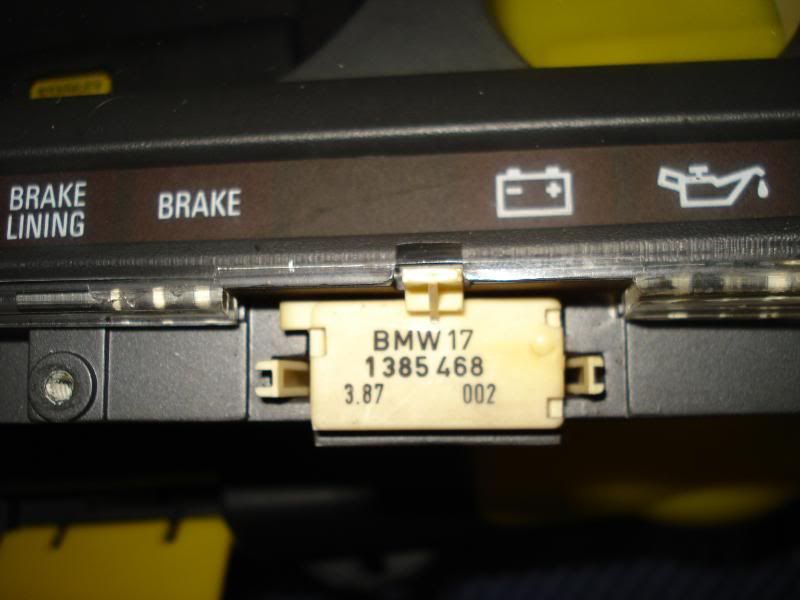
BMW e30 cluster designs can be broken into two periods: Pre-1986 and Post-1986. The Post-1986 cluster design was standardized between the manufacturers and allows greater compatibility of tachs between different clusters. Currently the Econoboost module is only designed to control Post-1986 gauges. Another slightly different module that will work with Pre-1986 gauges may be developed in the future if there is interest.
I also assume that most people will want/have 7k tachs, which is what I will keep on hand. Let me know if this is otherwise.
Post-1986 clusters had the coding plug on the front of the cluster (under a trim piece) where as pre-1986 clusters had the coding plug on the back and plugged in to the tach. Also an easier way to tell is by the number of red SI lights, 3=pre-1986, 1=post-1986
So the coding plug should look like this on the front of the cluster (numbers don't matter):
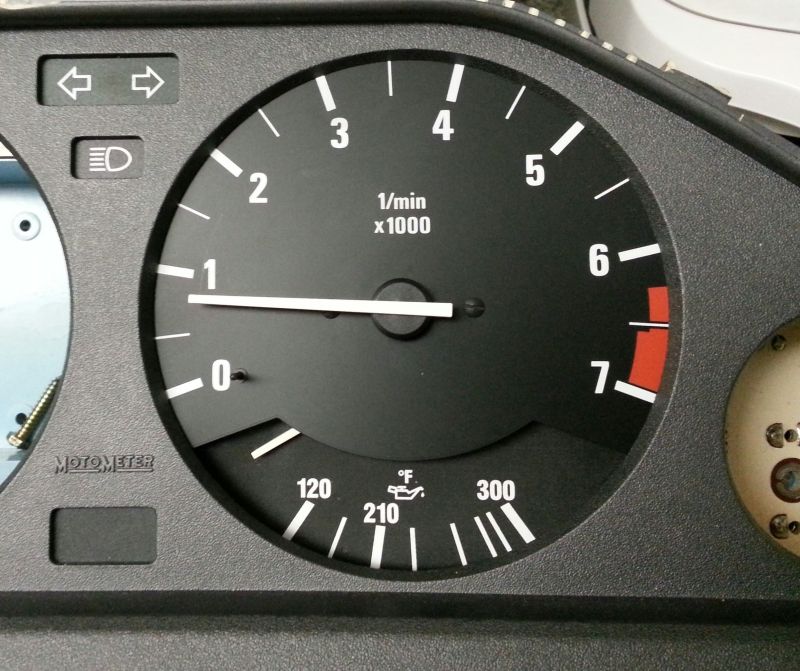
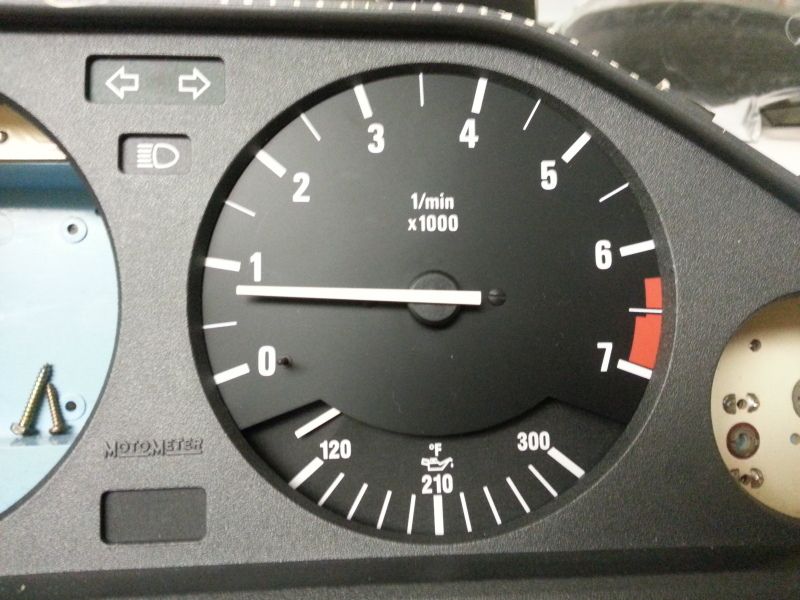
And you tach should look like this once removed (minus the cable):
If there are large circuit boards with more components on the back of the gauge, then you have a pre-1986 tachometer/econometer.
What's Included
Every order will include:
- Econoboost module
- Switch to use with "Peak and Hold" max boost recall
- Modification of Econometer, including new gauge plate
- Individual calibration and testing of your Econoboost module to your econometer (now boost) gauge
How to Order
Okay, so since I will be modifying/calibrating the gauges and installing the gauge plates , there are a few ways to go about this:
- You take your tach/econometer out (or have one laying around) and ship it to me, I modify it and send it back with an Econoboost module. I will try to make this turn around time as quick as possible, but with shipping both ways it may take up two 2 weeks. PRICE: $125 Shipped
- I understand that some won't like being without a tach for that long (I know I wouldn't), so I will try to keep some on hand and as long as they are both post-1986 gauges, they should be compatible. I'll modify the one I have on hand and send it to you along with an Econoboost module. When you receive it, you swap it out with your original tach/econometer and send me back the original. The feasibility of this option will depend on how many tachs I have on hand at any given time (check with first, if you want). Also there will be a core charge which will be completely refunded when I receive your original gauge. Must be post-1986 cluster PRICE: $125 Shipped +$25 Core (will be refunded)
- You want me to just send you a modified gauge and module and don't intend on sending me anything back. This is fine, just let me know so I can keep my stock of gauges up. Must be post-1986 cluster PRICE: $150 Shipped
International shipping may be a bit more depending on actual shipping costs.
WARNING: Some e30's won't charge the battery if the cluster is not in the car. So if you remove the cluster to get the tach out, I recommend plugging the cluster back into the car if you plan on driving it. I believe this only applies to earlier e30's, but I don't know for sure what year they changed it.
Also, if you have any extra tachs (post-1986) that you are willing to get rid of for a reasonable price, let me know :)
Please: If you send me anything, put a note in with it saying who you are (email address you used with paypal and your username). THANKS!
Also, please keep in mind that I am doing this in addition to college courses (graduated!) my full-time job, so while I want to provide quick service, there is a lot that goes in to each gauge and depending on how many other orders I'm currently working on, it may take a little bit longer than expected. With that said I really don't want any to take longer than a week, so I'll make that my goal.
How to Install
Once you receive the module and modified gauge, you will need to remove your cluster to install it. Here are some decent instructions for that: http://www.rickk.net/i/drive/bmw-e30...ument-cluster/
Open the cluster by removing the screws that have a hexagonal shape AND a Philips slot. The tachometer is held in place by three screws on the back of the cluster, remove them and the tach should pull out.
On the back of my cluster there was a tab that I broke off which left plenty of room for the new connector attached to the modified gauge to pass through out of the cluster. If your cluster does not have this, you will have to drill, cut or find some other way to get the connector out of the cluster so the module can be connected to it.
The Econoboost module has a thick white/beige (6 conductor) cable that connects the module to the modified gauge.
If you choose to use the included switch for "Peak and Hold" max boost recall install it where you like, and simply plug it in to the module.
Since power is now taken through the cluster, no extra wiring is needed.
Just hook up some vacuum/boost tubing to the other side of the module and you should be good to go!
Photos & Videos
Included Instructions:
(From Version 1)
Video of Calibration of Gauge:

Videos of Gauge in use:
http://www.youtube.com/watch?v=l_o6qxoT688
(sorry for the shaky camera)


Comment