

I just finished doing the driver's side strut tube and coilover assembly. I took some pictures of the process and i'm going to outline what needs to be done from start to finish. Unfortunately, to do this yourself, you'll need some pricey tools (cut-off saw, welder, grinders, sawzall, etc).
First, we need to remove the spring perch. I used a sawzall with bi-metal blades to accomplish this. I would also suggest using this method as it was VERY easy:

You'll also want to grind down what's left of the spring perch. I used a dremel with a sanding drum attachment. I think there are better ways to do this since it took a while. It might have just been the shitty sanding drums I was using:

This is the point of no return:

Ever wanted to know what your strut tube looks like on the inside? Didn't think so...:

Prepping the strut tube for welding:

I removed 1" of metal from the tube in order to make use of the shocks which are 4" shorter. I decided to go with 1" because its easier to remove more later than try to put it back. In order to secure the shock properly in the tube, i'll need to add in a 3" spacer (shock is 4" shorter, so I remove 1" from strut tube and use a spacer to take up the rest of the length difference):

I prepped both pieces for welding and used a magnetic jig to align the 2 pieces of tube. I then made a few tack welds, removed the jig, and welded all the way around:

This is after I welded. I wish the picture wasn't so blurry, but you get the idea. You can see the adjustable sleeve support (new perch) on the bottom of the picture. I wish there was a little more to it (its just a piece of pipe), but I guess it gets the job done:

Regardless of how much material you remove from the strut tube, you must always ensure that the top of the adjustable sleeve is flush with the top of the tube. This gives you a reference point of where to weld the support ring (new perch). In order to fit the support ring in the right place, I had to grind my weld down and "press" the ring over the weld. I initially thought there was a much better way to do this, but having the support ring "pressed" onto the weld area functioned as a jig so I could make my tack welds. Its just time consuming to grind the weld down:

This is after I welded the ring on with the adjustable sleeve in place. It just sits on top of the ring:

Here is the spacer I made. Its 1/8" thick tubing cut to approximately 3":

I slid the spacer and shock into the tube. I then bolted it all down with a stock holding nut:

Unfortunately, the stock holding nut is too large for the 60MM ID springs. I had to grind it down in order to use it. I'm gonna look into getting a smaller nut since its still very close:

This is the "finished" assembled product:

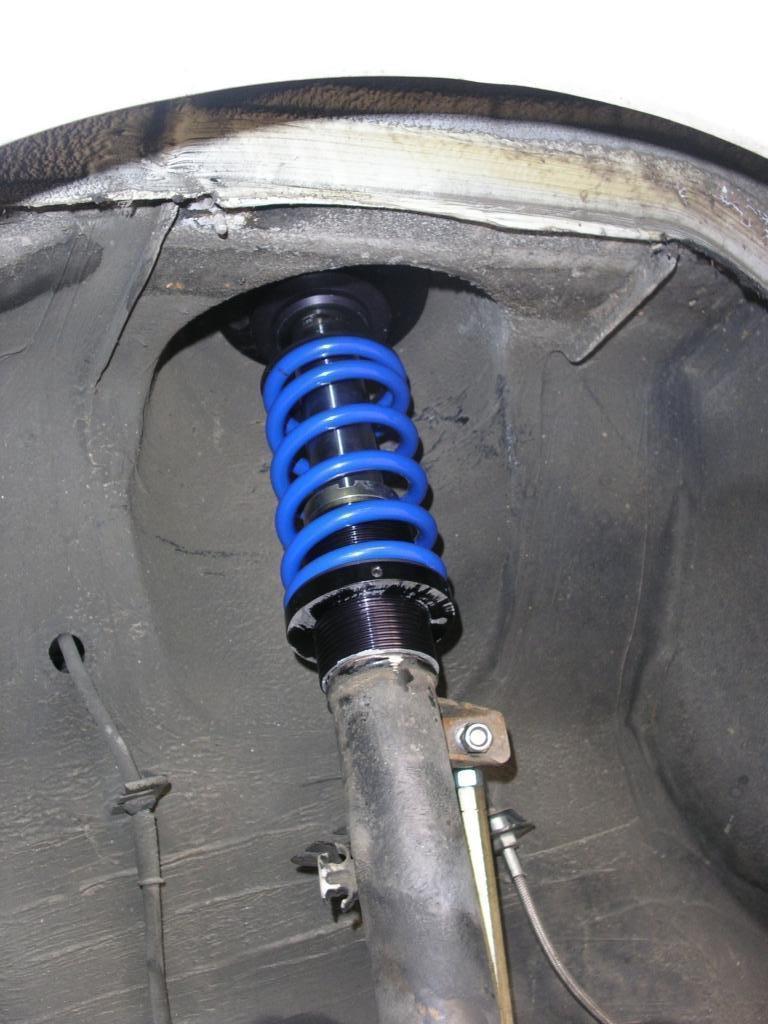
This is with the assembly semi-mounted to the car:

I put the assembly in a vise and mounted a wheel to get an idea of what the clearance would be like. The example is of a stock 195/65/14 wheel and tire. The wheels/tires I will be using are 16x8 20MM offset and 245/45/16. I'm expecting to do LOTS of fender rolling and a 10mm spacer:

First, we need to remove the spring perch. I used a sawzall with bi-metal blades to accomplish this. I would also suggest using this method as it was VERY easy:
You'll also want to grind down what's left of the spring perch. I used a dremel with a sanding drum attachment. I think there are better ways to do this since it took a while. It might have just been the shitty sanding drums I was using:
This is the point of no return:
Ever wanted to know what your strut tube looks like on the inside? Didn't think so...:
Prepping the strut tube for welding:
I removed 1" of metal from the tube in order to make use of the shocks which are 4" shorter. I decided to go with 1" because its easier to remove more later than try to put it back. In order to secure the shock properly in the tube, i'll need to add in a 3" spacer (shock is 4" shorter, so I remove 1" from strut tube and use a spacer to take up the rest of the length difference):
I prepped both pieces for welding and used a magnetic jig to align the 2 pieces of tube. I then made a few tack welds, removed the jig, and welded all the way around:
This is after I welded. I wish the picture wasn't so blurry, but you get the idea. You can see the adjustable sleeve support (new perch) on the bottom of the picture. I wish there was a little more to it (its just a piece of pipe), but I guess it gets the job done:
Regardless of how much material you remove from the strut tube, you must always ensure that the top of the adjustable sleeve is flush with the top of the tube. This gives you a reference point of where to weld the support ring (new perch). In order to fit the support ring in the right place, I had to grind my weld down and "press" the ring over the weld. I initially thought there was a much better way to do this, but having the support ring "pressed" onto the weld area functioned as a jig so I could make my tack welds. Its just time consuming to grind the weld down:
This is after I welded the ring on with the adjustable sleeve in place. It just sits on top of the ring:
Here is the spacer I made. Its 1/8" thick tubing cut to approximately 3":
I slid the spacer and shock into the tube. I then bolted it all down with a stock holding nut:
Unfortunately, the stock holding nut is too large for the 60MM ID springs. I had to grind it down in order to use it. I'm gonna look into getting a smaller nut since its still very close:
This is the "finished" assembled product:
This is with the assembly semi-mounted to the car:
I put the assembly in a vise and mounted a wheel to get an idea of what the clearance would be like. The example is of a stock 195/65/14 wheel and tire. The wheels/tires I will be using are 16x8 20MM offset and 245/45/16. I'm expecting to do LOTS of fender rolling and a 10mm spacer:


Comment