
I'm using a #7 cup with gas lense, 2.4mm multi mix tungsten (I'm still careful with the dust, just not thoriated) and limited filler usage (I try to fuse where I can as I'm not purging) but 2.4mm 308L filler.
If you've got a good local supplier that is handy, the one close to me just recently closed. I just order it all online now.
I'm the same, slowly accumulated tools where I can. Still on the hunt for a quality used horizontal bandsaw, it takes me a solid 20 - 30 minutes to get any pipe cut with the angle grinder good/flat enough to weld.
-
ah yes thanks for the tips. I have seen the ETSFab, I should look into that. I've watched quite a few of his videos on the youtubes. seems quite knowledgeable.
What size cup, electrode and filler were you using for the 1.6mm stainless tube?
I just briefly browsed ECS and they have a great selection of stuff! I might get a few bits to practise.
I have accumulated my welding tools over a few years and finally got it all up and running this year. Ive done a few jobs but have been looking for the next challenge. I have found the local welding supply shop reasonably priced for good consumables (Aitken welding supplies - Brisbane) and the guys behind the counter are quite happy to help out a noob like me. I think they have an online store too. I am yet to play with stainless steel though, by all accounts its quite nice to weld.
I did get some mild steel filler rod from bunnings at some stage and the stuff from Aitken was significantly better. Flowed much nicer. Aitekn was actually cheaper per kg but i had to buy in bulk (~5kg vs 1kg pack). Probably the biggest change for me was buying good tungsten electrodes (thoriated - be careful of the grinding dust) and good filler. Made a huge difference.
Leave a comment:
-
I would recommend using them (ECS Exhaust), so far everything I've received looks to be reasonably high quality. They also ship pretty quick as well.
I have also purchased some items from Bend Brothers (they have a TIG practice kit which was handy), I'd use them as well but they didn't stock mufflers/cats so I just went with ECS.
All my welding consumables are eBay specials, once I get better at the process I'll get some nicer gear.
For all the exhaust consumables for a dual 2" you'd be looking at around $800aud. I did have some quotes to get this done at a shop and I was looking at around $2k-$3k. I'm probably pretty close to that figure when you factor in the welding machine, welding consumables and other various tools.
One other thing I would recommend is to look into the TIG course ETSFab offer, I purchased it and I think it is a valuable resource. Any time I make a mistake I usually refer back to this course for pointers and tips on how to improve.Leave a comment:
-
Very nice job. I've recently been teaching myself to TIG weld as well and have been looking at doing something very similar (just on my m20) as an teaching excercise if nothing else.
Im in Ausi to, I was going to ask where you got your materials from but then i saw the stickers above "ECS engines" ill have to check them out.Leave a comment:
-
More work completed on the exhaust, incredibly time consuming and difficult to do on jack stands.

I got really excited seeing the two pipes running together, really started to look like an actual exhaust at this point.

Decided to mostly weld the headers up at this point, I figured if there was some warping the rest of the exhaust could be moved around a bit. I also thought I'd compare them to what I used to have, a rather big upgrade I'd say.

I got to the cats and decided to work on welding these sections up now I'm happy with the fitment. I did plan on having the mufflers straight after the cats with a h-pipe between (copying the stock E36 exhaust layout) but the ones I got are too large. Going to use them as the rear mufflers instead.

Once again comparing to my old hodge podge exhaust, safe to say it looks like a big upgrade.
Still plenty to do, I have to figure out a hanger solution from the gearbox and just finish the exhaust. I also need to order smaller mufflers for the centre section. I stopped a bit early on the weekend as I ran out of gas, decided to get the larger bottle, compared to mig you absolutely chew gas with a tig.Leave a comment:
-
I've had a little bit of time during the week after work to continue mocking the headers up, only get about an hour where I can use cutting tools before it gets too late.


Probably a bit hard to see on the images posted but my intention is to have the flanges before or shortly after the transmission, allowing me to take the trans off without pulling headers.
Hopefully I'll get a fair bit more finished on the weekend, most of what I need to complete the rest of the exhaust arrived today.
 Last edited by jsta1109; 06-10-2021, 04:36 PM.
Leave a comment:
-
Didn't get as much finished as I planned to on the weekend but I managed to have a go at TIG welding. I purchased some 3" 304 offcuts from a local supplier. I plan on making a dual 2" system all the way.
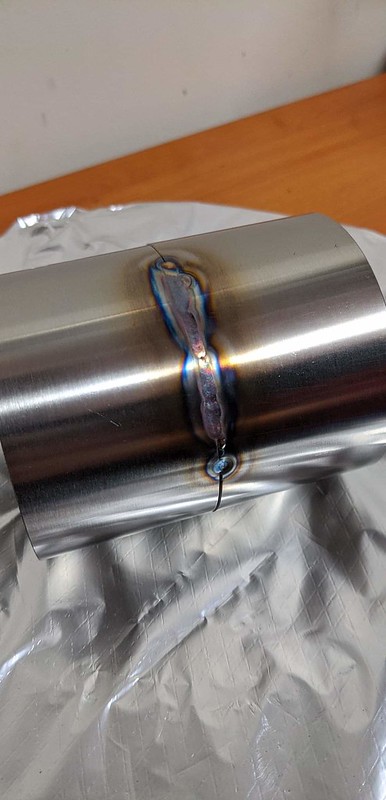
First ever TIG welds, spent a bit of time dialling and trying new settings / pulse.

The second test piece with what I think were pretty good settings.

At this point I felt confident enough to start making the headers back, I mostly welded this piece because it was just too fun. With the rest of the system I will probably wait until it is all tacked together before welding a section as one. I did have some trouble where the fit up wasn't exactly right, I could see the arc wandering a bit. I did sharpen the tungsten with a flap disc as I don't have a bench grinder. Still got a long way to go but I'm confident I'll be able to make an exhaust.Leave a comment:
-
As far as I can tell it is holding up rather well. I do frequently check for cracking but it all seems fine.
I would have about 50k km's all up on the subframe, several track and motorkhana/auto-x days, hopping curbs and beating on the car pretty hard.
I purchased it from a business/person on Facebook operating as Footwork in Vic. I was told the wall thickness on the tubing is 3mm, which matches the plate and attachment points for the steering rack. I also had an engineer assess it, in summary he said it is overkill. The only thing he wasn't 100% with were the sway bar mounts but I haven't had any issues. I think he was mostly okay with it as the original subframe is retained and reinforced where the engine mounts. Seeing the prices of E34 sumps now I have no regrets going this route.Leave a comment:
-
Hows that front subframe holding up?
How many KM do you have on it.
What kind of tubing did you use?Leave a comment:
-
Good to hear, I really only went with the S2.93 because it popped up cheap relative to what a normal LSD would be here. My original plan was to swap the centre section out into a spare 3.25 that I have, but I then found out the carriers have different offsets for the ring gear. I lucked out though because it is one of those rare 4 clutch 1.5way 40/25 diffs. I had a quick drive of it with the Getrag 240 and despite the gearing being way too long the lockup was really solid. Absolutely looking forward to driving it with the ZF though.
I used my previous E36 325i driveshaft as reference, it was flipped compared to a standard E30 driveshaft. Driveshaft is straight in the tunnel.Leave a comment:
-
Congrats on the first start!
I just switched from a 3.73 to a 2.93 and it made a huge difference. Car can actually go on the highway now without revving in the 4000s, and first gear is no longer useless.
When you say flipped, what do you mean? Is the CSB is installed so it mounts to the chassis the same way as stock?
Someone a long time ago started saying to "flip" the CSB because the Ujoint is on the opposite side of the CSB on the E36 driveshaft as the E30 driveshaft.
When you install it, it goes on the opposite direction to how you would install it on an e30 driveshaft because the centre section of the driveshaft is backwards.
The only thing that matters is that the late e30 CSB mounting is offset to one side, which corrects for the tunnel being offset to the other side. If the CSB is backwards with respect to the chassis, you end up with a kinked driveline like in this picture:

Leave a comment:
-
Sorry in advance for the lack of photos this time around. After fitting the pedal box I then switched out the brake booster, I went from a Clio booster to a Mk1 Golf booster. The clevis length matches a standard E30 booster and no need for a spacer for the master cylinder. I think it has made the brake pedal feel more positive but I won't really know until I drive the car.
I also fit the ZF, it wasn't as hard as I thought it would be, everything went together really quite easily even with limited space on jack stands. I also threw the driveshaft in with flipped E30 CSB.
Turned my attention to the engine bay, fit the new starter motor and addressed the wiring. The only additional thing I needed to wire under the manifold was the coolant temp sensor.
I decided to relocate the fuel filter to the rear, normally it sits up front with the charcoal canister for the European/Aus 318is. I did this because I am running the E30 charcoal canister, I can't see any reason not to and I ditched it previously and ended up with some fumes entering the cabin. Currently the fuel filter is just zip tied in place in the rear just so I could get the car running. Before I drive the car I will need a more secure bracket.
At this point I had most of what I needed together in order to start the engine, I had previously flashed MS41.2 onto my ECU with an M52 tune to suit, I quickly grabbed a stock S52 tune and removed ews and flashed it on.
I cycled the key a few times, tried to start it initially and it didn't seem like I had fuel/spark. Quickly realised I hadn't connected the 3rd relay over by the positive for the coils. I just quickly looped this around another connector and tried again and it fired to life. This was genuinely the second attempt, which is probably why I was a bit shocked...
I was damn excited, that quickly died down when I set the fire alarms off. The engine sounds reasonably healthy (albeit, only ran for a few seconds) given it was a sight unseen mystery engine from eBay. I don't think I'm totally clear yet but it is a good sign.
Leave a comment:
-
not a fun solution to change out, but still a very easy solution for adjusting brake pedal height to suit various brake booster setups.,Leave a comment:
-


Leave a comment: