
I think it's just so awesome to see old 2002's getting rusty parts replaced with new metal.
-
-
Thanks guys!
Never say never, I didn't think I'd be doing this two years ago either. Just take the opportunities that come to you and run with them.
You and me both!Comment
-
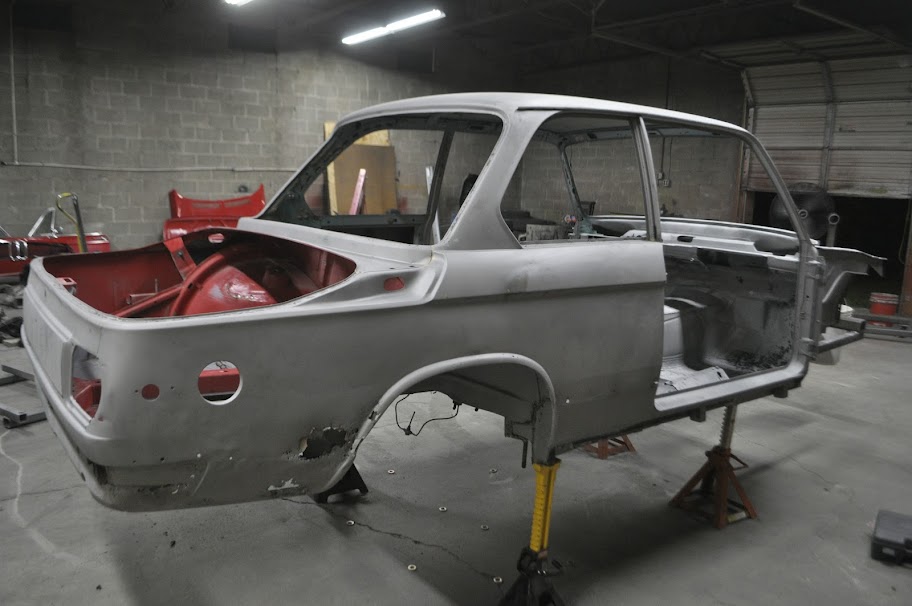
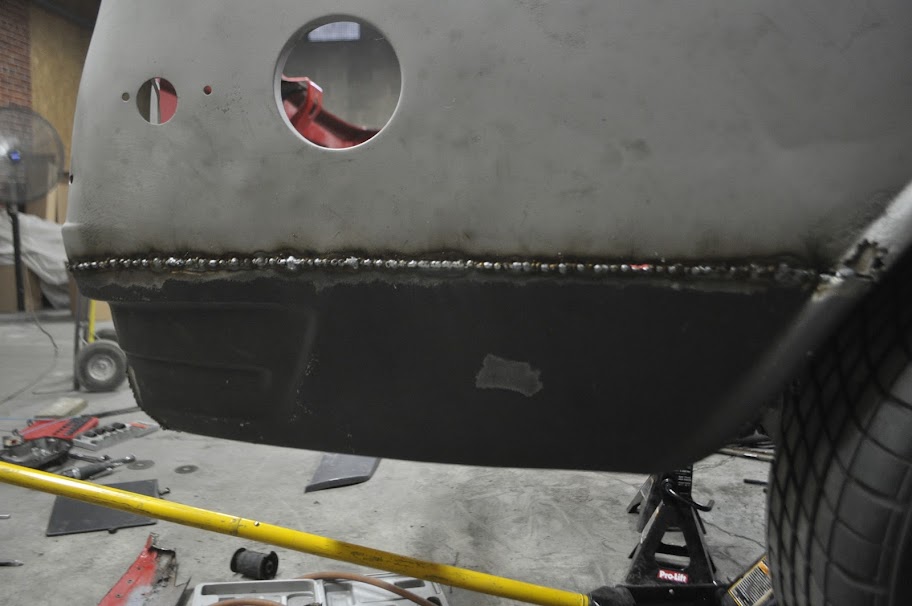
More progress from the night. First up was to start work on the trunk repairs. The rear mount for the rotisserie was being supported by the old shock mounts, which are part of the trunk floor, so I had to set her back down on jack stands before I could get to it.
One on the ground I removed the stock bumper retainers. There was a lot of crap and gunk holding them in so I had to persuade them with a few blows of my mallet.

With the bumper retainers out of the way I could start cutting out the old, rusted trunk floor. First were the side braces, which are only found on the late model 2002's (square tail). I won't be adding them back in, but only because I plan to run two diagonal sections of tubing down from the shock towers to the rear corners.

Next under the knife was the passenger side floor, which used to be the mount for the gas tank. Also missing from the picture is the center divider, which looked solid from the top but was completely rusted out on the bottom.

Then the old spair tire well was cut out. I haven't decided if I'm going to replace it with another tire well or just not have a spare in the car. It really depends if I end up centering the fuel cell in the trunk, which would let me move it a bit further inboard, or leave it more off to the side like the stock location.

With the rear trunk floor gone, I started trimming for the e30 rear subframe mock-up. I plan to frame out the trunk with 2"x2" 1/8" wall tubing, with the front most crossbar being in line with the ear mounts of the diff. Because of this I need to get the subframe position figured out before I can finish the trunk and mount the fuel cell.

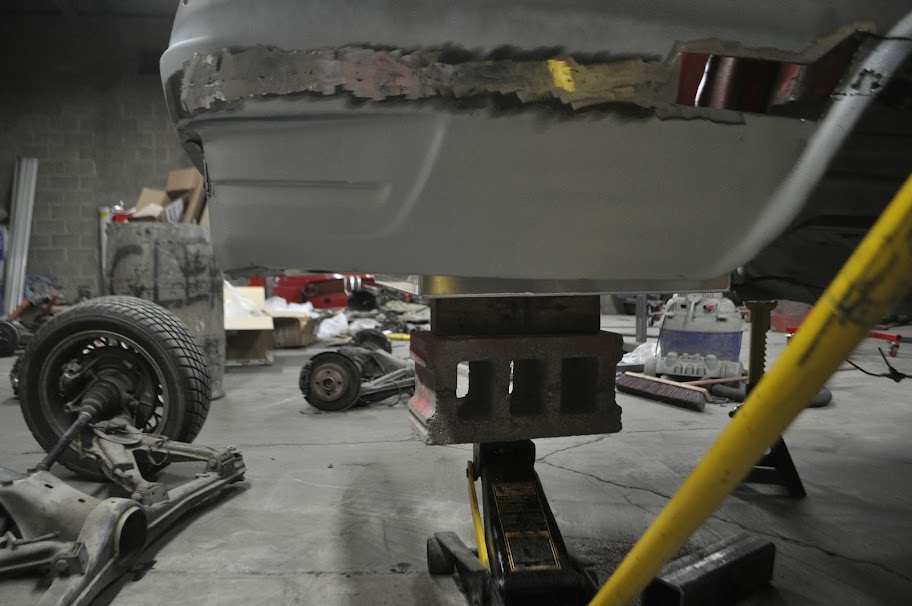
View from underneath:

Lifting the rear subframe into position:

Hub positioned in the wheel well:

Wheel mounted:

View of the subframe from the front, looking through the engine bay. And yes, the differential input shaft is off-center with respect to the center of the subframe. From this view the centerline is based on the opening in the subframe, which appears dead-nuts on.

Yay extra track width!! It's to bad my wheels don't fit the fenders anymore.....

The band aid in place:

Muuuch better, that being said I will be getting wider wheels/tires. Shooting for at least 15x8 and 225's, but would prefer 245 if I can find the right sidewall.

As far as permanently mounting the subframe, I have two options. One is to modify the e30 subframe to use the stock '02 mounting points. This has the benefit of utilizing the body reinforcements that are already there. I also wouldn't have to fabricate any forward mounts, only the differential ears. The other option is to keep the e30 subframe stock and move the mounting points on the body. This would be nice because it would allow me to bolt up any e30 subframe, if the original one were to get rusty or bent. The downside is I would need to engineer new mounting points and ensure that they are heavily reinforced.
After getting the e30 subframe up there, right now I'm leaning towards the second option. The e30 bushings are roughly 2 inches wider and 1 inch forward of the '02 counterparts. This puts the outer trailing arm mounts right up against the stock subframe mounts on the body. I'm also not convinced that my stock mounting locations are in very good condition. While making new mounting points will be a challenge, it will give me a chance to tie them into the cage structure as well as the unibody. This should give enough integrity to withstand any power levels I throw at it.Comment
-

I just read this from front to back, amazing!5.0L of race car:
'90 Bronzit 325i 5 spd coupe
'10 Subaru STi SE 17x10 w275s (SCCA SM)
5.0L of red DD goodness:
'89 Brillitant rot 325ix coupe (auto)
'13 Subaru Legacy (6mt)Comment
-
More progress from this morning. Since I was starting to mock up the e30 rear subframe, I figured I should mount the diff I'm actually planning on using as well as the e36 dual eared diff cover. First up was to inspect my 3.25lsd. It's a rebuilt unit from BMW, denoted by the 'SE' tagged on the side of it. Getting the cover off, it's probably the cleanest diff I've ever gotten my hands on. All the gears are immaculate and not even any discoloration from old oil. I was thinking of replacing the seals before putting it on the road, but now I doubt I'll need to.
The ring gear, lsd pumpkin and speed sensor:
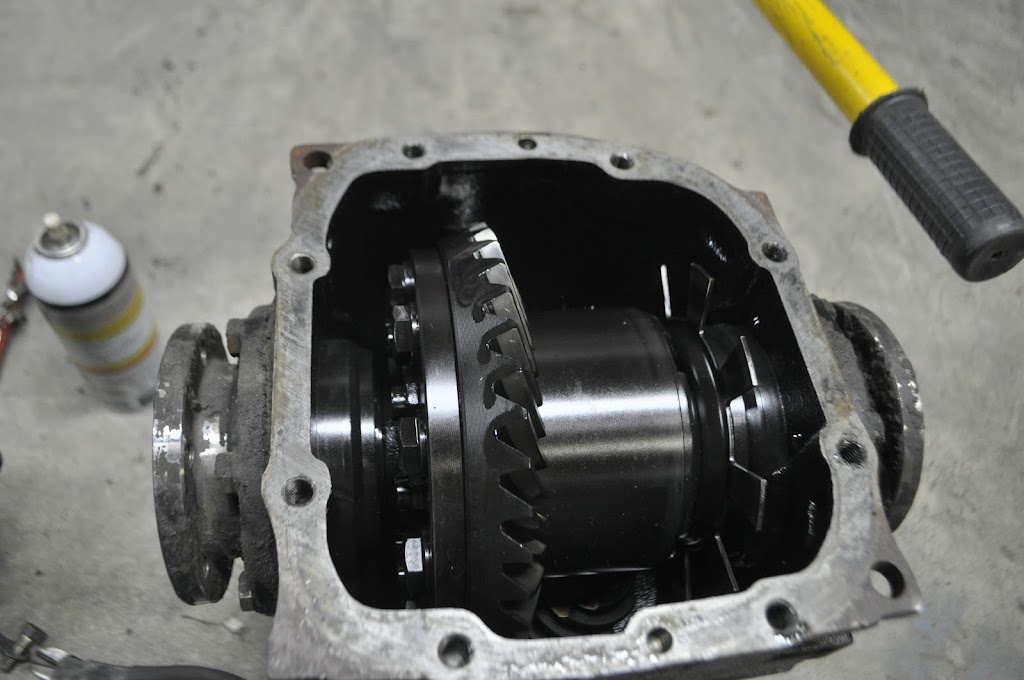
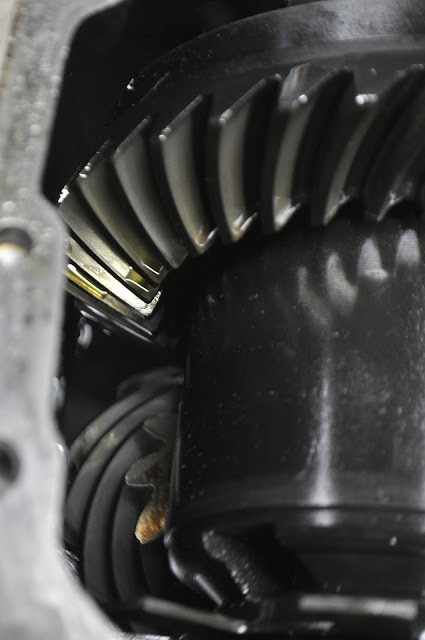
Ring and Pinion:
Next up was to install the e36 diff cover onto the 3.25 lsd. The main issue with this setup is the e30 reluctor ring is larger than the e36 counter part (or at least closer to the diff cover). This causes it to hit the cover and sensor. First you need to relieve the inside of the cover a bit to clear the ring.

With the cover clearanced, next up was making a spacer to move the speed sensor 0.300" out. This would let it get the proper reading from the ring while not interfering with it. So I took some measurements and made a quick sketch:

And of course I was out of 1.5" 6061 round stock, and I wasn't about to turn down my 4" 2024 round stock for a little sensor spacer. Luckily I did have some 1.5" square stock, so I cut off a section to turn down.

Facing the saw cut edge:
The diff cover side finished:

Inner diameter bored and lining up the cutoff tool:
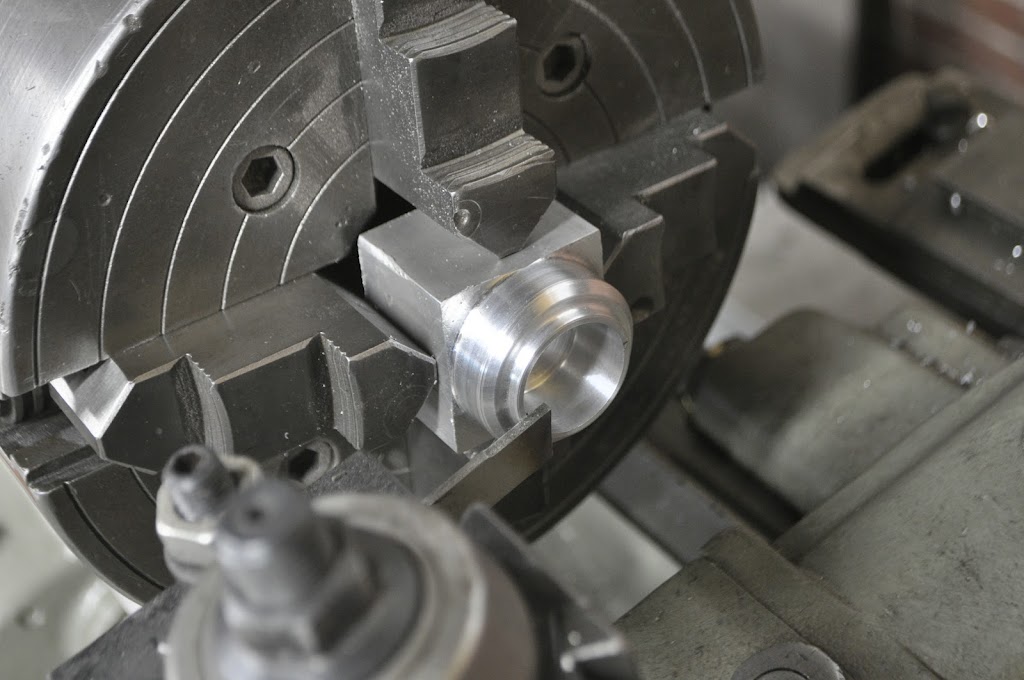
This is how everything lines up. I may need to get a slightly larger o-ring for the spacer-diff cover seal, but overall it fits together pretty snug:

Installed view from the outside. As it sits right now it just bolts down with the stock metal bracket, which bends now that it's spaced up off the cover. I'm going to order some 0.5" round stock 6061 to make two addition small spacers to help support that connection:
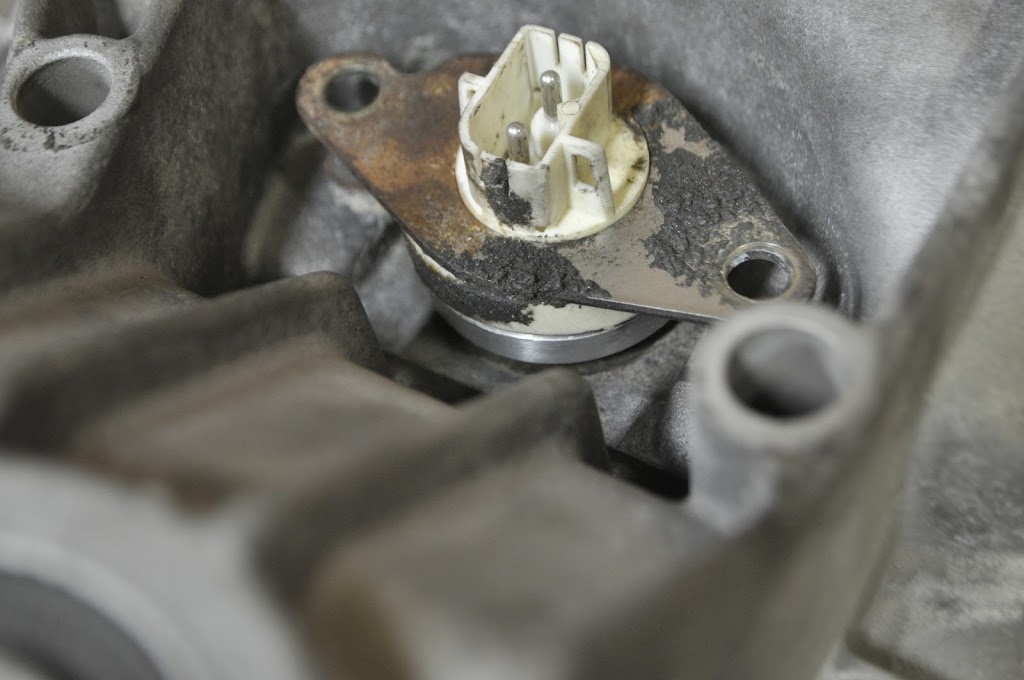
Inside view with everything installed. You can see the extra clearance that the sensor has now:

Diff cover and sensor bolted up to the 3.25lsd:
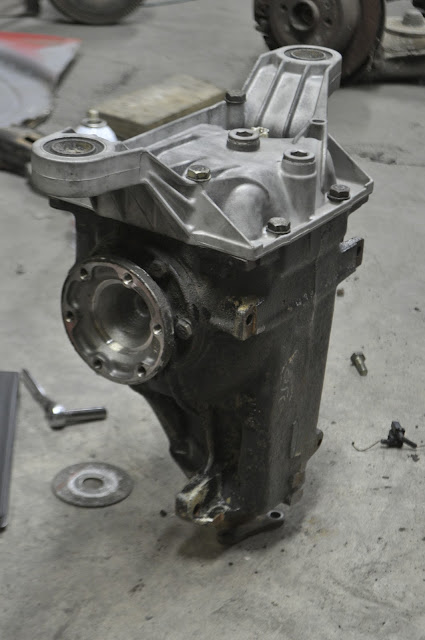
3.25lsd bolted up to the subframe:

And finally the subframe back under the car, ready for mount fabrication:

Thanks for looking!Comment
-
-
Unreal build, seriously!
I think R3V would dig a quick autobiography from you. You clearly have everyone's attention with your auto restoration skills.
Being an ME, I can't believe the work you were able to accomplish on this vehicle while still working the curriculum. When I was in school, the most involved thing I did was an E30 M3 5-lug swap on my '90 325is and help a few friends with motor/transmission swaps. What you've done here is simply beautiful.
How does your girlfriend take all this "car time"? lolEstoril E36 M3/4/5 | Toledo E53 X5 3.0 | LeMans E90 335D M-Sport

Comment
-
Damn...sigpic
Justin Angelli
1985 325e GazellenbiegeComment
-
holy hell! Me want moarEuro M3'87 NogaroSilver/Euro E34 M5 '93/Porsche 993 TT 97' Euro/Porsche 993 Carrera 95' Euro/Skyline R33 GT-R
Comment
-
Thanks! And me either lol.
Thanks so much for the compliments. Really there's not much to say about me personally, I'm just a guy that's passionate about his car. Most of this stuff I have never done before, it's all pretty much learning as I go. That being said I did graduate this past winter, so I'm no longer trying to handle the two at once (thankfully).
I'm also lucky to have a very understanding g/f. Right now she's at Stanford working on her PHD (started last fall), and since I graduated and finished up a project for my current employer last month I've started to look for work out there as well. Hopefully I can finish this before it comes time to move!
Haha, one of the best gif's I've seen so far. Thanks guys!Comment
-
Progress report from the last few days. While waiting on some parts to come in for the rear subframe mounting, I decided to tackle the rear quarter panels. First was to mark off the area that my patch panels would cover:

Then after cutting out the rot I tacked the new panel in place. They aren't perfect as far as overall shape, but since the only option BMW has in the entire rear side panels (for $1k a piece) I can make these work.

Bunch-O-Tack Welds:
Welds ground down, then a small upper section of rust cut out. It extended out past where my patch panel would fit, so I'll have to make up some small patches on my own.

I also took the time to put some paint on the tubing bender. It's by no means a great paint job, but it keeps it from rusting and who doesn't like Hot Rod Red? I also ordered the 1" die set (3" radius) which should come in a week or so. That will let me fab up some smaller reinforcements, like in the front grill area and a strut brace I've been thinking up.

Next up is just some of the parts that have come in this week. First was a set of Tii struts. For those that don't know, the Tii struts have larger wheel bearings compared to the standard '02 pieces, and so they are more durable and desirable. This is especially true when running larger wheels with higher offsets. These will be turned into coilovers either by myself or a suspension supplier depending the route I go.

Lastly is my NEW fuel cell. Basically the more I thought about the one I originally bought, the more I realized the A1000 pump is really overkill for my setup. I also wasn't thrilled with having to run the 5/8" and 1/2" feed and return lines to the front, since I can't handle hard line that size I would have to either bring in a hydraulic shop to bend it for me or use braided hose. The new fuel cell has the '340 Stealth' pump, which is still rated for 5-600 FI horsepower. However, it only needs 3/8" feed and return lines, which I can bend and flare with my own tools. It is also a quiter, more street friendly pump that doesn't need a controller like is recommended with the A1000. The other change with this fuel cell is the 20 gallon capacity up from 15. Considering I want to drive this car, and taking into account the mileage I'm expecting from the turbo M20, the added capacity will be welcome.

Toying around with possible mounting positions in the trunk. Front and Centered:

Leaves decent room for the center exit exhaust to be run:

While minimally hanging below the sheet metal:
Thanks for looking.Comment
-
Comment
-
heck yes-FREEDOM- is cruisin at 80, windows down and listening to the perfect song-thinking "this is it"
-The Beauty in the Tragedy-
MECHANIC SMASH!!- (you all know you do it)
Got Drop?? ;-)
Originally posted by JinormusJComment


Comment