-
Leave a comment:
-
I'm using 44mm throttle bodies, which are on the large side for my motor. 52mm throttles are way too big for an M20.
For the vacuum lines I'm going to make a manifold with some barbs and mount it below the throttle bodies. All of the vacuum lines will be somewhat hidden on my set-up since I have the throttles upside down.Leave a comment:
-
What MM are you running on the id for the bike throttles and also how did you do the vac line. Ive started this kind of build last year when I was in the shop but never completed it. I hacked the i intake since bigger and got 52mm Triumph TB. Figuring out how to di the vac lines and extend cleanly. Any info?Attached FilesLeave a comment:
-
-
Our engine setup is quite similar TBH. I also am looking forward to seeing your gains, as I am currently in the block boring, engine balancing process as of now.
Different setup but more or less same displacement,compression, headers and cams. ;)
Also have 2 sets of Itbs at home, but from different bike and different size than yours..
Great work on engine and setup, as I said before looking forward to your progress, not only in engine but in all your proyect!
GL man!Leave a comment:
-
-
sweet ass build man. i plan on integrating ITB's when i fo my m20 turbo build starting this winter. kudos to you!Leave a comment:
-
This is insanely cool. I wish I had the machining and welding tools on hand to try something like this.Leave a comment:
-
I took a few minutes yesterday to tack together the main part of the throttle assembly so I could test fit it on the motor with injectors, fuel rail and injector harness. Everything appears to be clear...


Leave a comment:
-
I realize that I haven’t updated this in a while, but that’s only because there’s been nothing up update on unfortunately. Fortunately however, I am hoping to machine a couple of the bits I need to mock up my throttle linkage after work this evening.
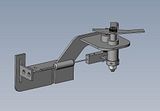
I figured that in the meantime I might post some pictures of what I’m planning on building. My idea is to use the linkage off of the stock throttle body in hopes that the pedal travel and throttle progression will remain the same in addition to retaining cruise control functionality. My plan is to use the holes in the valve cover to mount a piece of angle iron and to that piece of angle iron I’m going to weld some laser cut pieces of 3/16” steel.
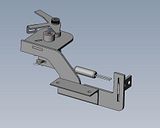
The one side of the bracket is slotted and has a tab with two holes where the two throttle cables adjusters will mount. The slot is so I can set the height of the tab, once it’s set I’ll fill the slot with weld and trim any excess off the top. Then you can see the cable joiner to combine the two cables into one. I’m going to weld a shoulder bolt to the actuating linkage from the throttle body and attach my cable actuating lever to that.
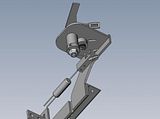
Those with a keen eye will see that it’s not actuating through the axis that the stock throttle plate does, but the other axis of the linkage. The reason for this is that the throttle plate axis needs to rotate through 90 degrees in order to get full pedal travel and having the actuating lever attached to that axis adds complications to the motion of the actuating lever and clevis. Due to the geometry of the throttle linkage, the other axis only rotates about 45 degrees through full pedal travel which should be sufficient in order to get enough cable travel to fully open the bike throttle bodies.
Here you can see the actuating lever which is a lasercut piece welded to a collar clamp. The collar clamp is to help fine tune the cable positions when setting up the throttle bodies. Once everything is set, I’ll likely drill through the collar clamp and shoulder bolt and insert a spring pin to lock the orientation. That way I won’t have to worry about the collar clamp vibrating loose and slipping. The actuating lever has a few holes in it for the clevis for fine tuning the amount of cable travel.
p.s. I'm using thumbnail pictures to try and stretch out my bandwith for longer that it's been lasting the last couple months :mrgreen:Leave a comment:
-
Yeah I know, I need to find a place to host my pictures that has unlimited bandwidth, two months in a row now my photobucket bandwidth has been eaten up in only a couple weeks
You can still look at the pictures by going directly to the album here http://s575.photobucket.com/user/Ste...?sort=3&page=1
I'll need to make some custom curved stacks in order to fit anything longer than the short stacks that came with the throttles because there isn't much room to come straight out.Leave a comment:


Leave a comment: