If this is your first visit, be sure to
check out the FAQ by clicking the
link above. You may have to register
before you can post: click the register link above to proceed. To start viewing messages,
select the forum that you want to visit from the selection below.
any details on the header? which one is it? I've been on the fence about sourcing one.
My old Style 5 Thread / My Swap
1991 318IS :bow: 2.5L S14 Swap/BC Coilover suspension/Some new (old) wheels/
IS Skirt-Lip/RG Splitter/M-Technic I Spoiler/Dogleg/3.46 Diff/Euro H4 headlights etc.
1998 528I (Sold) // 2003 540I ///M Sport
So its been a while since I have updated. The weekends have been going towards the small stuff, things I didnt realize would be so time consuming but needed to happen to get the car on the road.
I started here:
I finally took the many pages of wiring resources that I have saved over the last couple months and went to town with some wire strippers and butt splices, (remember, this is temporary wiring and will be properly trimmed and soldered once the car is running and the wiring all checks out). As mentioned before, Im using the C101 connector. I have the E30 M3 engine harness, an E34 m20 525i male C101, and then of course the factory 2002 body harness. First step was to write out a detailed diagram of the colors of the wires between both sides of the C101 (E30 M3 vs the E34 525). Ive already trimmed out the unneeded wires from the C101, and added the oil temp pin back in. After some trimming and splicing I was left with this ugly bundle:
Mated up the other needed wires with their respective homes: alternator, starter, etc. and like that this dreaded wiring job was complete, at least I hope. Included in the job was running the new wiring to the E30 electric fuel pump and the fuel level sender.
While on the subject of the fuel pump, I used a break in the weather to remove the fuel tank and pretty it up. After much sanding and a couple wire brushes I was left with this:
A couple dents, but overall a solid tank, clean inside and out now. Shot some rattle can primer and some paint next.
I Installed the tank on some 5/16inch rubber weather stripping in the trunk and dropped the final product in (thanks for the tip on the weather stripping mlytle!) Isolates the tank a bit, mainly adds a nice seal to the elements in the trunk since whatever factory gasket is long gone under the fuel tank.
I had been looking for a donor 2002 to come up on either craigslist or pick-n-pull. My wish was granted a couple weeks ago in the San Jose junkyard --> 1976 Chamonix 2002. I grabbed the high pressure metal fuel line from the car, along with some other bits that might come in handy later on. As mentioned previously, the now fuel injected S14 2002 requires a hard fuel line that can hold up to the high pressure of the electric E30 fuel pump. With the factory non Tii 2002s having only 1 metal hard line (used as the return line from the factory), I didnt want to rely on 40 year old plastic for a fuel line, even if it was to be used as the low pressure return line as some swappers do. So out came the old plastic lines along the passenger side of the car and up went the additional hard line. I didnt get a picture, but it runs right next to the existing hardline.
With the fuel and spark now there for the engine, I turned to the other necessary element of the engine swap, the need to breathe a little oxygen. Enter the Aardvark Racing K&N intake system and AFM mount. I think I got a bit dremel happy many months ago when I removed some metal for the future intake system, Ill build an intake box and isolator eventually to seal off the dead space.
Next to the intake kit is the IE aluminum radiator and the now wired Spal 13" pusher fan:
And next door to those is a 19 row Setrab oil cooler with AN fittings and new lines. I cut away a section behind the oil cooler to allow air to flow through it easier, similar to the cut around the K&N intake, but smaller. Eventually these cuts will be cleaned up better when the car get stripped down for paint at some time in the distant future.
Many hours went into fitting coolant and vacuum lines since many need to be hybrids or trimmed a bit. I have both an E30 M3 and a 2002 thermostat, but I think the 2002 unit fits better since i have the late model 2002 with the large bumper mounts by the frame rails.
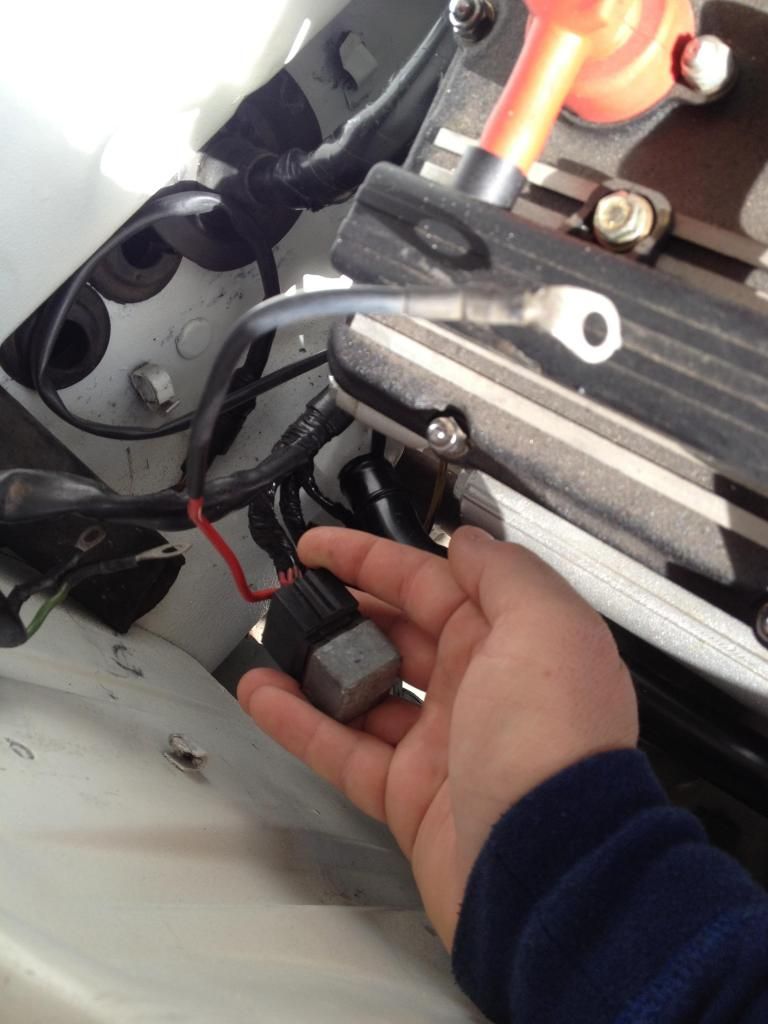
Having completed all of that, Im left with a couple unknowns, maybe you S14 guys can chime in. Where do these wires/ connectors go exactly?? I have an idea, but I want to quadruple check, mainly as 3 of the wires (the red ones) were cut at some point in the past.
Done for the weekend. First start video will follow this post very soon.
I need to touch up some paint on the car also. I stripped off the badly cracked areas where the respray didnt hold up too well. Since the front shuttle makes a convenient tool holder I decided to wait to paint it until the hard wrenching ceased.
Nothing exciting, but progress is progress at this point. :)
any details on the header? which one is it? I've been on the fence about sourcing one.
Thanks!! 2.5 S14... one day.
Ill dig up some details. Its the Euro header used on the 215hp version of the S14, the one without the catalytic converter and a few other changes. I had a cool website bookmarked that described the exact measurements of the many S14 headers offered but the link is now broken
Whats nice about it for the M2 is the added length of the header. The longer down piping gives the needed clearance for the track rod that translates up and down as the wheels turn. Most S14 swap guys need to dent the US header a bit to allow this clearance as the wheels turn.
Christmas came early! I received my 2002 illumination set up from MoBrighta a couple days ago and just opened it up today. Im very pleased with the work Andrew did to make the 2002 more visible when on the road in traffic.
All the reflective backings for the lights were refurbished and recoated to reflect maximum light. Installed were dual filament HO bulbs and added lamps for more braking light output. Also, he ordered me a Hella LED 3rd brake light and made up a harness to install it (thats still en route). Euro turn signals and rear license plate lamps got the same treatment, HO bulbs in the turns, dinanm3atl LED festoons in the plate lamps. Andy also sourced me the Hella Euro Super flat-faced headlamps with city lights and provided the bulbs and protective covering. Very happy with the final products and the customer service and organization of the operation. Thanks again MoBrighta! Ill install these once I have the 2002 in front of me and get some real pictures of the work up.
I finally took the many pages of wiring resources that I have saved over the last couple months and went to town with some wire strippers and butt splices, (remember, this is temporary wiring and will be properly trimmed and soldered once the car is running and the wiring all checks out). As mentioned before, Im using the C101 connector. I have the E30 M3 engine harness, an E34 m20 525i male C101, and then of course the factory 2002 body harness. First step was to write out a detailed diagram of the colors of the wires between both sides of the C101 (E30 M3 vs the E34 525). Ive already trimmed out the unneeded wires from the C101, and added the oil temp pin back in. After some trimming and splicing I was left with this ugly bundle:
There was a decent discussion on this in my build thread. There are people out there who would argue with your claim that soldering is the "proper" way.
Electrical tape over splices is also frowned upon. Just want to see this done right :) Loving the progress.
I had a feeling that picture would generate some criticism. I ordered a BMW connector a few weeks back that I was going to pin. The soldering and shrink wrapping just would keep the harness looking cleaner and easier to hide than the additional plug. I guess I need to check your thread out and look over this discussion in your thread for some new inspiration. For the 5 minutes that the testing will take to verify all systems are a go I doing see any catastrophic events occurring.
What do I know though? I'm just a peckerwood who lives out in the hills with too many BMWs.
Ill dig up some details. Its the Euro header used on the 215hp version of the S14, the one without the catalytic converter and a few other changes. I had a cool website bookmarked that described the exact measurements of the many S14 headers offered but the link is now broken
Whats nice about it for the M2 is the added length of the header. The longer down piping gives the needed clearance for the track rod that translates up and down as the wheels turn. Most S14 swap guys need to dent the US header a bit to allow this clearance as the wheels turn.
nice, nice.
Just a heads up for the intake elbow: It looks like the original and that's a good thing. The "new" one that I bought from BMW like last year isn't stiff like my old one. What can happen in the heat is it can collapse a bit under hard throttle and can cause some air restriction. I took it off and put the old one on; it's old lookin' but a little better. Unsure of the QC from part to part, so it may not apply if you do decide to get a new one. My 2c.
My old Style 5 Thread / My Swap
1991 318IS :bow: 2.5L S14 Swap/BC Coilover suspension/Some new (old) wheels/
IS Skirt-Lip/RG Splitter/M-Technic I Spoiler/Dogleg/3.46 Diff/Euro H4 headlights etc.
1998 528I (Sold) // 2003 540I ///M Sport
Just a heads up for the intake elbow: It looks like the original and that's a good thing. The "new" one that I bought from BMW like last year isn't stiff like my old one. What can happen in the heat is it can collapse a bit under hard throttle and can cause some air restriction. I took it off and put the old one on; it's old lookin' but a little better. Unsure of the QC from part to part, so it may not apply if you do decide to get a new one. My 2c.
Hah, it looks old and beat for sure! It's actually brand new. It came in this weird coating that I've only rubbed off of the inside. If I rub the outside there is brand new shiny rubber underneath. Not sure what the gross powdery coating was? It looked like NOS. I was going to grab a silicone elbow but I was worried about clearance since I have almost none between the intake boot and master cylinder. The silicone was a few mm's thicker in places from what I read.
This Xmas break was one of my last chances to put some work into the 2002. Since I'm a recent graduate, I had been using December to look for and secure a permanent position. On the 29th I was offered full time work between two dental offices giving me a total of 6 days/ week of work :D . With that in mind, and knowing the car is 2 hours away from my home in the Bay Area I worked around the clock over the break to finish up the last jobs before my opportunities to do so in the future become limited.
There were a few things that I needed to finalize on the engine. First, the coolant plumbing. Finding the hoses that will mate up between the S14, the 2002 components, e21 components, and the aftermarket bits. A few of the S14 hoses worked great, the hoses between the water pump and 2002 thermostat and the coolant crossover pipe to the upper radiator were a different story. I started my hunt at AutoZone in the back staring up at the wall of random hoses. After 30 minutes I found 3 that had the bends in the proper diameter that would work out. Look closely and you can see the Gates P/N's.
I copied Marshall's M2 build and used standard 16mm hose to connect the heater core line to the coolant tube under the plenum. The factory 2002 heater core inlet tube works fine as is to connect to the back of the head.
The biggest obstacles are routing the tubing in the tight space left between the radiator and the front of the engine keeping it safely traveling up and around the main crank pulley. Finding a hose with some tighter 90* bends followed by a straight section makes it much easier. Also, on my late model 2002 I found it much easier to use the 2002 thermostat versus the e30 M3 equivalent. The slimmer 2002 housing doesn't rub on the passenger bumper shock mount and has the proper angels to mate up to their respective fittings. One thing I did do to the 2002 thermostat was I sectioned away the 45* bend on the lower tube (the fitting that will mate up with the lower radiator). By sectioning this bend off, you end up with a straight section on the bottom of the thermostat housing, leaving you with a 3 inch straight shot gap to make the connection.
The vacuum system was about the same as the coolant system. I utilized almost all OEM S14 hoses aside from modifying two OEM hoses to integrate to the 2002. First was the hose between the plenum and the oil separator, it had to be cut in half and added to a copper fitting with a bend in it to clear the oil filter hosing/ oil cooler lines and still mate up. The other was the line from the valve cover also to the oil cooler. It was 4 inches short due to the oil separator being shifted over to make room for the 2002 driver side engine mount. I added a T fitting here and a 1 way valve to give vacuum to the booster and ran the other side of the T back to the oil separator.
Next up, finishing the oil system. I needed to incorporate the VDO senders for oil temp and oil pressure to my VDO gauges. I left the new OEM factory oil pressure sender for now as I planned on wiring in an idiot light to work off of it. Where the E30 M3 S14 once had a factory oil temp sender, I threaded in an M12 X 1.5 to 3/8 standard fitting. I then could build up a little apparatus to house both VDO senders, and position them where they can be accessed and where they are still out of direct view. In the pic below the oil temp sender isn't installed, the oil pressure sender sits at 45* at the very end of the apparatus about 3 inches from the oil filter housing.
Scope creep again. Even though I had the factory headlamps and turn signals installed, the allure to install the new Euro turns and Hella Super Euro headlamps was too great. MoBrighta sent along lens covers to go over the headlamps and keep them crack resistant. Installing these was breeze, just used some H20 and OH- mixed 3:1 and a heat gun. The covering was thick, and I am very pleased how it turned out as they're completely invisible.
P/N for the headlamps:
I started first by installing the head lamp bulbs and the city light bulbs.
Next up, made a station for the laminate application.
One done, can you tell which one?
And both assemblies complete. I resprayed the bucket rings and cleaned up the buckets. Bulbs in, protective covers on both the bulb socket and the glass.
Installed:
I also spent a night or two improving upon previous projects. For instance, in the throttle cable assembly there was added resistance when depressing the gas pedal. Most of this is from the spring that resists the depression of the gas pedal and returns it back towards the driver, however some was from the way the brackets are designed (if following the Aardvark swap guide). Here is my solution:
Its hard to see whats going on if youve never made these brackets. What happens is when the driver depresses the gas pedal, an arm on the other side of the fire wall moves throughout space in the same plane as the arc the gas pedal travels through as you push it down to accelerate. A bracket is created to attach to the end of this arm and this bracket acts as the anchor point for the throttle cable. Directly above this arm/ bracket assembly, another fabricated bracket mounts firmly to the pedal box assembly to be the connection point for the throttle cable outer sheath (picture any standard throttle cable design with the outer sheath and the inner steel cable). The problem is seen in the tension that can develop as the arm/ bracket pull the throttle cable. Since this arm must swing in an arc to pull the cable, it moves in two planes and causes a sort of pinch point to occur. Ideally, the throttle arm would move in one direction directly away from the bracket that retains the outer sheath of the cable to reduce all tension in the system. To mimic this I made the following modifications to the original bracket design.
Here are the brackets as they were before modification. The gold nut is attaching the throttle arm to the first bracket mentioned above^. You'll notice the second bracket above these, it has the ~135* bend in it.
My solution was to add a pivot point where the throttle arm and the first bracket meet so that the throttle cable is always being pulled directly away from the mount that secures the outer throttle cable to the pedal box. This greatly reduced the tension that was in the system before the mod. The blue arrow represents the direction of travel of the throttle arm as the gas pedal is depressed.
Here is a better shot of the final product. Basically, I used a few brass NPT fittings to make this. The brass fittings pass through the slightly enlarged hole in the original bracket design plan. On either end of the fitting system are male threads that allow end caps to tighten down and hold everything together. I grabbed the end caps and drilled holes through them the same diameter as the center hollow fitting. Nylon bushing form ACE were pushed into either end and an M5 bolt traveled through these bushings and connects back up with the throttle arm. A nylon lock nut holds it all together and allows rotation to occur still as the nut isn't locked down 100%. I set the drag just so that rotation can occur, but so that there is no slop being produced.
And finally, that moment when you realize you're ready to add fluids and turn the key. Enter tacky IG pic.


 [/URL
[/URL


Comment