If this is your first visit, be sure to
check out the FAQ by clicking the
link above. You may have to register
before you can post: click the register link above to proceed. To start viewing messages,
select the forum that you want to visit from the selection below.
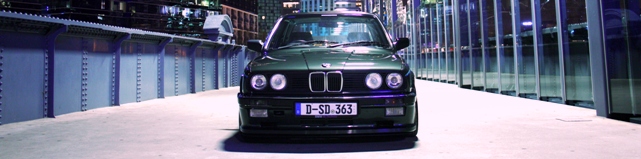
Here are a few shots of the last couple of projects
Installing poly CAB's
Old subframe bushings removed and replaced with Strongflex poly urethane
(sorry the picture is on an angle)
This method didn't require complete removal of the subframe, and was much easier than all the stories I've heard about burning out old bushings.
Process itself was quite simple, just had to make a "U" shaped jig to push on as the bearing puller did its work. We found the idea on one of the forums and simplified it a bit.
Car is riding so much better now with the new bushings.
Had one last opportunity to take the car to the nurburgring before winter so couldn't miss that!
Car was really great fun to drive, But have some wrinkles to iron out. New tires will be a high priority for early next year. Probably Toyo R888.
Also had some spare time to refresh the parcel shelf which was so faded it was a completely different colour.
I'd been wanting to remove the replica mtechII front and replace the beaten up OEM valence with an is lip. So I picked up one in reasonable condition, straightened i out and painted it.
New clips installed:
Lip plastidipped and installed with some end splitters I made.
Installed:
Next I wanted to replace the smashed glass in my foglights since new ones are super expensive and you can get replacement lenses for cheap from Latvia of all places haha (ebay)
Before:
About 30Euros later:
FYI: I had to trim the rubber seal around the lights (thin them by about 1/2) to get them to fit into the openings for the valence. I couldn't find any information about this online but it had to be done. The fit snug and perfect now.
I bought a new centre intake moulding for the valence, and have just finished painting the brake ducts to install. Pics to come.
YellowStuff pads:
New tires :D
TOYO R888 finally! 225/45/16
Unfortunately I have some rubbing problems on the rear inner wheel arch?? i will point out later.. :(
Front Konis, stut tops, and e36 Tie rods in.. Oh my god. TIE ROD ENDS FROM HELL. Literally took days to break the ball joints. I actually ordered a tie rod splitter and broke it!! It took a lot of heat and hammering to finally separate them, hence replacing the lot.. What a shit job..
Man you've done nothing but solid upgrades on this thing, really loving everything you've changed! How do you like the M52? I'm considering it for my E30 eventually.
pretty fan of your build!
By the way,could you do me a favor? I am looking for those skirts in ebay.de but there is no way I will find them hah
could you send a link please?
greetings from southern france!
“Speed has never killed anyone, suddenly becoming stationary… that’s what gets you.”
― Jeremy Clarkson Euro 318is M50 build thread
Man you've done nothing but solid upgrades on this thing, really loving everything you've changed! How do you like the M52? I'm considering it for my E30 eventually.
Thanks mate!
Honestly I was never a fan of m5x's in e30 simply because i thought they were to modern (look, sound and feel), but after driving this one for a year, I have to say it is heaps of fun. 200hp quite achievable with not much cost or difficulty, a great upgrade to the car.
Originally posted by Aguedae30
pretty fan of your build!
By the way,could you do me a favor? I am looking for those skirts in ebay.de but there is no way I will find them hah
could you send a link please?
greetings from southern france!
Cheers! Are you talking about the "is" side skirts? For used parts I always search on "ebay kleinanzeigan". its like German trading post, much better than ebay.de for used stuff. I got lucky and found this set close to me then bought new mounting clips online.
Or do you mean the front splitters? I made those haha
So I had some terrible grinding feeling from the front wheels and decided it was time to do the front wheel bearings (rears have already been done)
Was actually quite an easy job and makes a huge improvement! I also installed new discs, painted callipers and EBC yellow stuff pads.
The discs are from a Works Mini Cooper so I had to open up the centre bore a couple mm and drill a new set screw. They Now fit perfectly and are much more solid than the previous set up!
I used to have the slightest wobble with hard braking when they get real hot. The are perfect now!
Somebody had repainted the hood in the past, and left it with terrible orange peel, so I decided to have a go at wet sanding it and buffing it. I started cutting and polishing the rest of the car as well.
It's come up a 100 times better but still need to go over the car a couple more times with some finishing polish to get rid of all the swirls.
Bringing back some of the terribly faded paint.
As part of my "oem plus" look I'm going for, I wanted to put the original badging back on the car. I actually had a "318" badge from another car I owned in Australia so I ordered a new "is" badge from BMW. So the badge comes from both sides of the world.
I've been having trouble with my AUX fan, so I've rewired the entire thing stand alone, and bought a nice new SPAL 16" Curved blade Pusher.
The old fan was absolutely stuffed. could barely spin it by hand and sounded awful. Completely fucked haha
Made some nice little brackets
One bracket was too short so had to improvise with what I had lying around in the garage haha


Comment