

Machined branding on painted turbo housings is my fetish
-
-
Update on my e30:
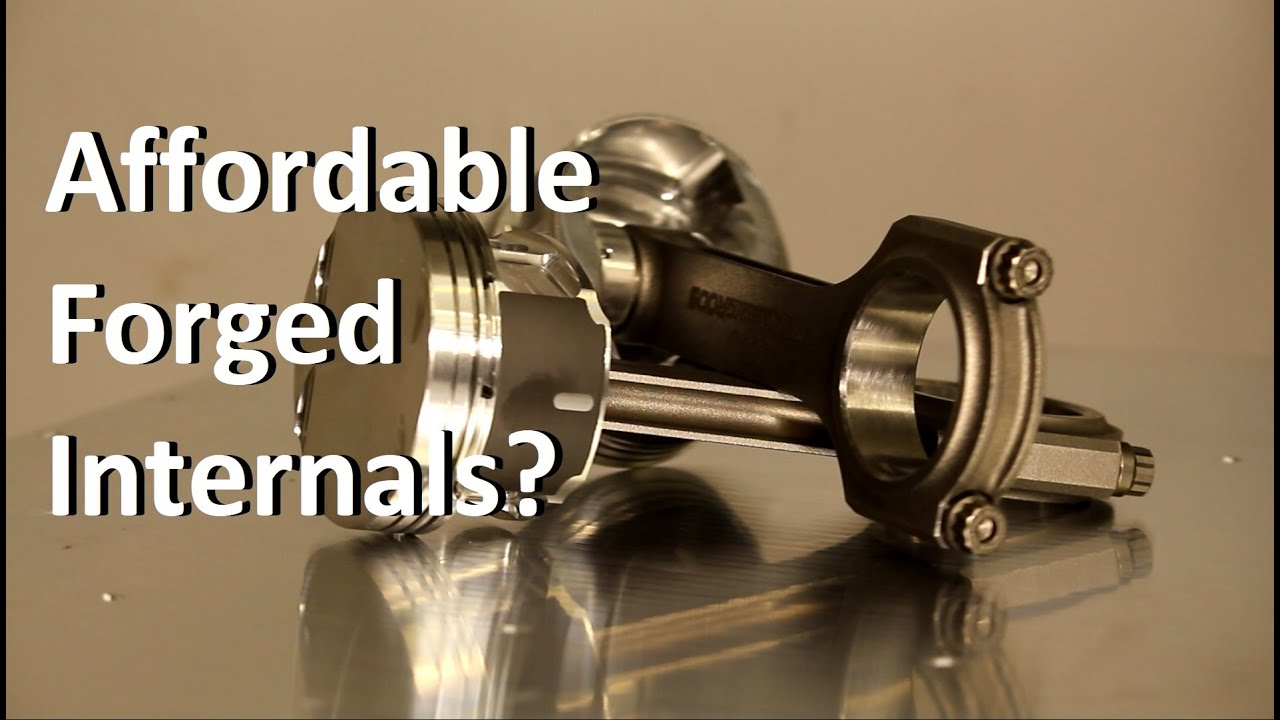
Got myself new forged pistons from amp44:

Main reason being that those are about half of the price of know brand ones. But after having those in hand, there doesn't seem to be any problems those being so cheap. And as you can see from the label, these are m54b30 pistons, because the manufacturer didn't have other m5x pistons available at the time of purchase. But if someone is interested, they should have m52b28 pistons soon and m50b25 ones bit later.
And no I'm not going to upgrade to b30 crank, so I got those maxspeeding rods in 140mm size. Luckily those fit nicely to the pistons:

This will give me better stroke to rod length ratio and less stress on cylinder walls than with 135mm connecting rod. And compression ratio will be about 12:1. Can sound high for turbo engine but, with only e85, it shouldn't be problem. But the pistons comes higher than normally, so I will probably need to make the valve reliefs bigger and that will reduce the compression ratio closer to 11:1
And you might have noticed that those are oversize pistons. So I dug up my spare block that had corroded cylinder walls. And took that to machine shop to be bored to oversize and decked. Well that didn't go well...

But some time later, it's fixed and pistons fit the bore:


Time to take the stuff to our garage, and start cleaning the block. After few hours it's looking much better:

Crank fitted with new bearings, clearances checked and new girdle installed:

If someone needs, I have the cad files for alu and iron block girdles here: https://drive.google.com/open?id=0B2...DBnREFraHRDZ28
And the pistons comes pretty much level with the block surface as I calculated:

Time to measure valve clearances:


And not good:

So next up I need to make the valve reliefs deeper. In the meantime, here's video of those forged internals:
Comment
-
I think your estimate for the added hp per sticker is off. Those stickers are too small for 10hp each they look closer to 5hp each sized stickers. I may be wrong but if you are short 40hp you will know why.How to remove, install or convert to pop out windows
http://www.r3vlimited.com/board/showthread.php?t=297611
Could be better, could be worse.Comment
-
Maybe some update here. I did weight the amp44 pistons. All were within 0.1 grams. Which seems to even better than the expensive brand name pistons come from factory.

The old head was warped and skimmed down many times. It also had few leaky valves, so I left that as spare head. The one I used to measure valve clearance is much better condition, so I will use that one. Problem being that it doesn't have anything in it. Just bare head. So I will take all the stuff from other cracked head. To do that I made this valve spring tool.

You can see how it works on this video: https://www.instagram.com/p/B7yToQrF..._web_copy_link
Few minutes with that and head is torn apart:

I will take the new head and the old valves to machine shop to be matched. Before that I cleaned and lightly polished the valves:


At the machine shop they said that they can do radius cut valve job and move the surface outwards for better flow. So that's what they did:

Radius cut valve seats:

There is huge steps in the intake runners, so I need to take care of those. After some grinding, those look much better:

I also "machined" the needed valve pockets for the pistons. Doesn't look pretty, but should work.

Here's video of all that: https://www.youtube.com/watch?v=ahFexbJJav0Comment
-
Head assembled with new valve seals:


This is always nice to see after assembling the head. But I checked everything 5 times and all was there. So I guess I did put all the parts I had to same box, so these are really spares

Then started the bottom end assembly. These are the specs I got from piston manufacturer:
This is recommendation for our turbo pistons:
Turbo/Supercharged up to 1bar
Piston wall clearance 0.05-0.06mm
TOP Ring end gap 0.5mm
Second ring end gap 0.4mm
Oil ring end gap 0.5mm
Turbo/Supercharged over 1bar:
Piston wall clearance 0.06-0.07mm
TOP Ring end gap 0.6mm
Second ring end gap 0.6mm
Oil ring end gap 0.5mm
This is what I got straight from the box:

Top ones were tight 0.6mm and lower ones loose 0.5mm Even close to 0.55mm. Only one was different. I though that those were close enough and only grind that one to 0.55mm and assembled to pistons:

Bottom end assembled and waiting for missing chain guides:

Video of that: https://www.youtube.com/watch?v=DXXFromhP6MComment
-
For the exhaust manifold I added the EGT sensors and removed old wastegate port. Also new coat of ceramic coating. I wanted to have black color, but it was not available so I did go with titanium color:

I'm using this EGT box that is 100% my own design:

It has support for 8 invidual EGT sensors, CAN-bus and serial connection for speeduino. All opensource and things that you need to build one are available here: https://github.com/pazi88/8Ch-EGT
Testing the EGT box with ms3:

All assembled. Don't like the color of the ceramic coating at all. Looks like something from construction machine. But well the turbo is out of those things, so I guess it's ok

New AN-12 oil return:

All lifted to the car:

First revision of the new wastegate location didn't work so here's the latest one:

Video of all that: https://www.youtube.com/watch?v=ZRbmov9SiaAComment
-
Finished wastegate mounting:

Engine bay 90% done:

New downpipe. 3,5" instead of old 3"

The wastegate outlet looks like this:

Some thermotec for the engine bay:

And after million small things it's ready. Time for bath:

Short test drive after that and engine felt super lazy. I had to do some changes to VVT settings because I altered the intake cam timing from old setup. And those different VVT settings caused the ignition timing to be retarted. Only noticed that after day of debugging and checking timing with timing light. No idea how closed loop VVT settings could alter ignition timing, but it did. I did write bug report about that to megasquirt forum, but so far I got zero responses to that. Well I noticed that it all works well if I use 0 as minimum VVT angle. So after doing that the engine pulls nicely and time to drive 100km back to home:

Worked well but it went quite lean when giving more throttle (AFR was 15ish instead of 13). Which means that there lot more air going inside engine with new turbo setup and after the head work. Which seems really promising.
After driving the only problem I noticed was that I forgot to clean the oil inside intercooler after engine damage and now it puked everything out from the dump valve:

After 200km of driving, I did swap the oil and checked the oil filter. All good:

Video of all that: https://www.youtube.com/watch?v=T6XWuOoZFhs
I have now driven the engine for about 1500km. It works really well and it's really snappy on throttle with that high CR (almost 12:1). Still running really low 0.4bar boost because the wastegate spring for the old setup is way too loose for this. Waiting for stiffer one to raise boost.Comment
-
Summer is over and e30 is back at garage. I didn't took much photos during summer, so this is all I got.

The new engine worked great, but I was so busy that I never got it dyno tuned. Only problems I had that the engine was leaking like a sieve and I battled whole summer with those oli leaks. And there is still a major one that needs to be dealt during winter. I took the car on track once, but I had problems due the oil leaks:
BMW e30 m52 turbon kesä?huoltoa. S04E08 Pikku fiksejä ja ratapäivä - YouTube
But there is one upgrade that I'm probaply going to do during the winter and it's this:

During last summer I was all the time sweating like a pig when driving the e30, so I got annoyed about that. A/C on e30 has unicorn status here in Finland so parts here are impossible to get. So I bought that A/C blower unit from the states. Engine bay stuff I have been planning to use from e36 and there is lots of e36 A/C parts. New and used available here. So no problem in that regards. Because the engine is m52, the e36 m5x A/C compressor will fit great etc. But I'm bit worried about the A/C plumbing and hoses. The evaporator fittings look totally different compared to e36 ones, so is there good links or knowledge here about how to deal with that.Comment
-
Mess around with realoem. It might help with your AC problem. https://www.realoem.com/bmw/enUS/sho...diagId=64_0529How to remove, install or convert to pop out windows
http://www.r3vlimited.com/board/showthread.php?t=297611
Could be better, could be worse.Comment
-
When are you gonna update us with the s58 intake manifold swap? LolComment

Comment