If this is your first visit, be sure to
check out the FAQ by clicking the
link above. You may have to register
before you can post: click the register link above to proceed. To start viewing messages,
select the forum that you want to visit from the selection below.
Big Al's Revenge: an OEM+, MTech1 325e restoration
Solid work man! Really looking forward to seeing this thing done.
Oh boy, don't scare the kiddos... haha. Moving along though, getting there little by little!
So over the last couple weeks I knocked out a couple small projects, made some big progress, and made an oops.
First, the small projects:
I unwrapped that spare harness I mentioned a few posts ago to inspect the wires and to get rid of all the old loose tape:
And rewrapped in new Tessa tape:
Waiting on the associated parts to come in, then will work on and write up the install...
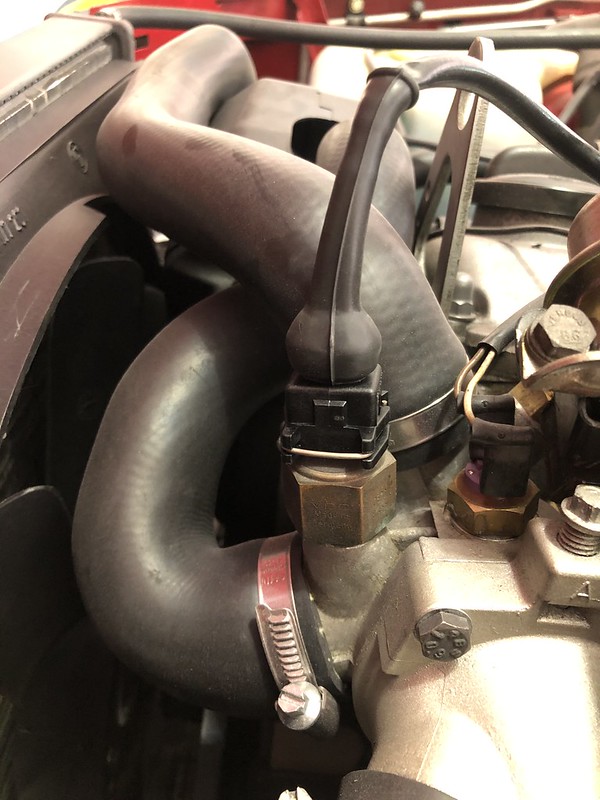
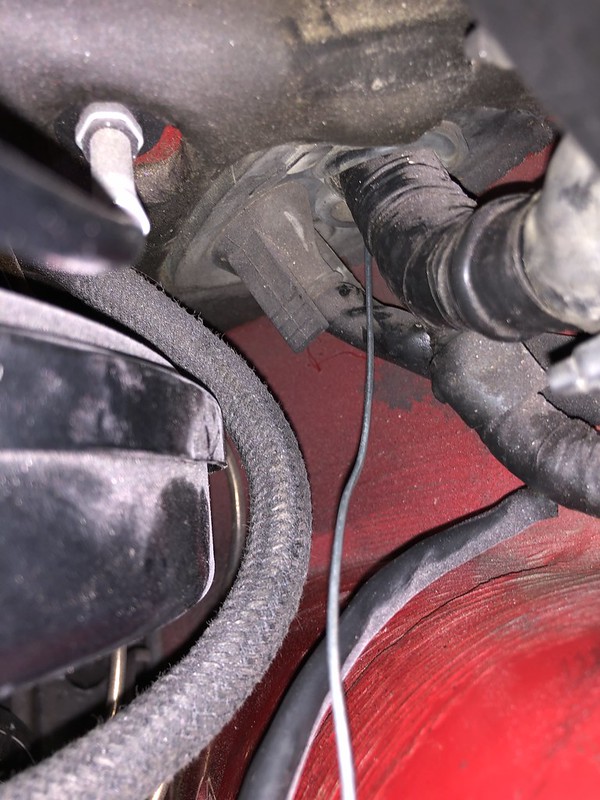
Also, one of my coolant temp connectors has been broken since I've had the car. The metal clip broke off and it was always just held on by friction, always bothered me that it could come off while driving:
You can buy a replacement 2-pin connector (which I had), but I misplaced the part. While trying to get the garage organized I found it in one of my parts boxes and decided to just knock it out before I lost it again.
The label was kindof interesting:
Regular hooman: NO. Hooman with hat and big wrench: YES.
I consider myself more of a hat/wrench kinda guy anyway
Mo betta:
Next I removed the windshield wiper linkage and motor, otherwise the little nubs that the wiper blades attach to would have been in the way for paint/prep. I also wanted to replace some of the rubber grommets on the linkage that were starting to crumble. Reading through the few writeups I found, some people say it slides out no problem, others say that it won't fit through the HVAC panel in the engine bay with the IHKA still in the car. Mine fell into the latter category:
No matter how much I squeezed, pushed, wiggled, there just isn't enough room to get the whole thing out intact without breaking something, or bending the metal cowl under the windshield. I was not about to pull the dash and remove the IHKS again (EVER). I ended up removing the wiper motor from the linkage while still in the cowl, which allowed me the room needed to get the whole thing out. I'm going to take the motor and linkage apart and replace all the wear components, when I do that I'll included the removal, refurb, and re-install just to keep everything in the same place.
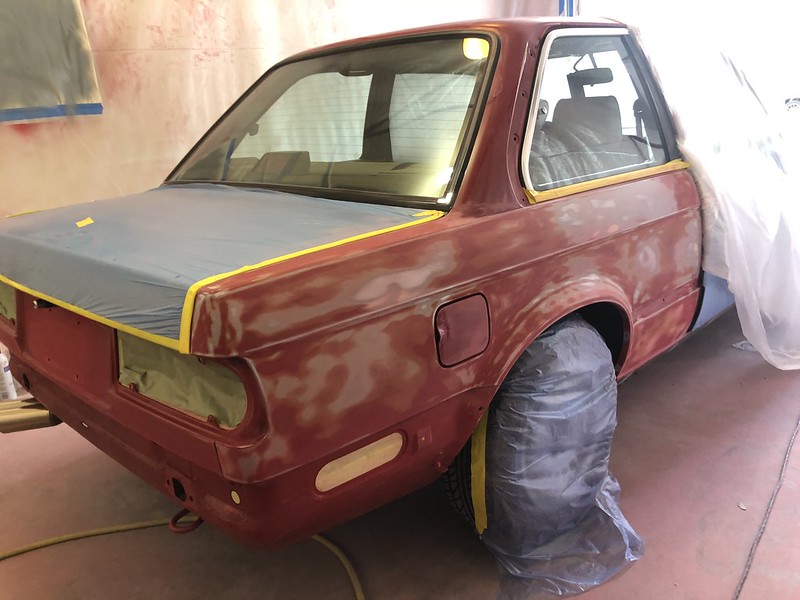
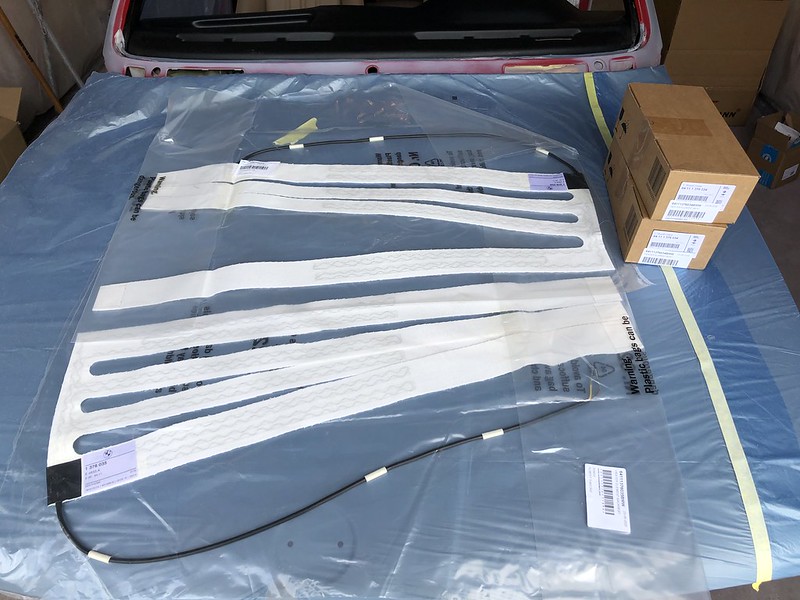
Then I went about getting the unibody of the car sanded and primered. It's one thing to prep a panel here and a panel there, it was another to tackle essentially the majority of the car at once. Plus I knew I'd have to remove all the glass...
Started by just masking the interior and blocking the car flat with the glass still installed to keep as much dust out of the interior as possible:
As big a surface area as I was dealing with, this actually went pretty quickly as there wasn't really any body work I needed to do. The above only took me roughly 2-3 hours.
Then I got to work removing the glass so that I could finish sanding the edges and inspect the metal under the windshield seals. I feel an oops coming on...
I was pushing with my palms from the inside and trying the help the gasket off of the glass with a non-marring pry tool from the outside just to get the seal broken. I just about had it when...
POP:
I knew that was gonna happen dammit. Oh well, the glass was the original glass and full of rock chips and I was really not looking forward to buffing it all out with cerium oxide. Safelight has me quoted at about $280 for new glass installed with a coupon code.
Luckily I got the hang of it and the rear glass came out no problem:
And best of all, there was no rust hiding under the seals:
Original butyl tape still intact:
Masked everything off to keep the dust out:
Got the doors off, this was actually surprisingly easy. Took about 5 mins per door:
After sanding all the edges that had been covered by the rubber seals and scuffing the jambs, I decided to remove all the rocker panel chip guard:
I was going to leave it, but due to its texture it was really difficult to sand and I worried that I'd have some paint adhesion issues if it wasn't sanded well enough. At least I can see how the car looks painted with smooth rockers, and I can always add chip guard after paint, then paint it black the way it came from the factory later if I don't like it. Doesn't really matter as the MTech skirts cover it anyway.
The next day I did a more proper masking job and got to work on primer. I wanted to keep primer out of all the jambs as the paint was in excellent shape and I didn't need to be wasting time sanding primer out of there. I'll be sealing the jambs along with the rest of the car anyway so that the basecoat will look consistent throughout.
The masking alone took me a few hours, not looking forward to having to do it again for base/clear:
The primer went on rather quickly once that was done:
Epoxy over exposed metal/filler:
Then filler/primer:
Was so excited to have such a big part of the car done that I ripped all the masking off to admire my work before I sprayed guide coat on, oh well:
Very happy to have that part done, it was a daunting task that I had been nervous about for whatever reason. Now I feel like getting the unibody in sealer/base/clear is a little more attainable.
The last few bits I'll need to get sanded and in primer are the metal euro valance, the side mirrors, and the trim pieces that go behind the vent windows. Should be able to knock those out in a day, then will be getting ready to get this baby looking ravishing in red!
'86 325e Zinnoberrot /// '02 325ci Schwarz II /// '18 M4 Azurite Black Metallic///
Careful with the plastic, the previous coats can flake off really easy.
You mean the plastic mirrors? Mine were just the unpainted black plastic ones, no paint on them. I should just need to scuff, prime, and paint. I'll make sure to hit them with some adhesion promoter to make sure the paint stays just in case
'86 325e Zinnoberrot /// '02 325ci Schwarz II /// '18 M4 Azurite Black Metallic///
You mean the plastic mirrors? Mine were just the unpainted black plastic ones, no paint on them. I should just need to scuff, prime, and paint. I'll make sure to hit them with some adhesion promoter to make sure the paint stays just in case
No, the plastic sheets you're using to block off the interior of the car and other parts. The paint protecting stuff.
Ahhh gotcha. Yah will have to be careful not to get too close with the gun, will definitely swap the current plastic out for fresh stuff after finish sanding
'86 325e Zinnoberrot /// '02 325ci Schwarz II /// '18 M4 Azurite Black Metallic///
I'm anxiously awaiting the post showing off the epic/amazing paint. :)
Originally posted by 2mAn
x2
Ha! Your timing is impeccable, was just getting some photos organized last night to try and update the thread today.
So the reason for my hiatus is I started a locums job in Charlotte and have been commuting back and forth to Raleigh in my E46 each week, it's about a two hour drive. My already limited garage time was unexpectedly interrupted when two weeks into my new gig, this happened halfway home on the highway:
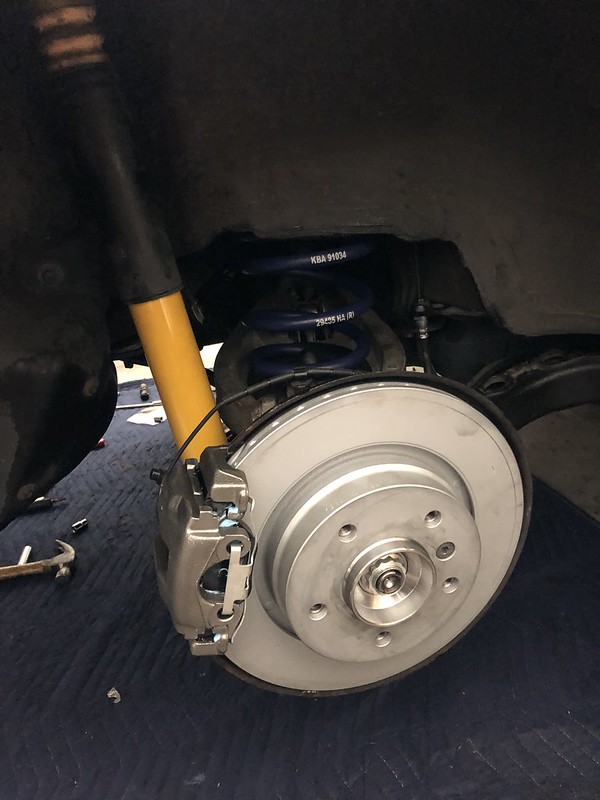
WTF? Was having some steering wheel juddering at speed and found one of my front control arm ball joints to be loose upon inspection. Was planning to replace it that weekend, but this was my driver REAR tire that blew. I swapped in a spare and limped it an hour back home and got under the car. My rear control arm bushings were toast and my alignment was off as a result. So of course I decided to do a complete undercairrage overhaul "while I was in there" just so I didn't have anything else to worry about:
Cleaned, and repainted to rear subframe:
And installed all new subframe and differential bushings, a huge bitch in the 95 degree heat we've had:
Upgraded to H&R sport springs and Billstein B8 shocks/struts since I've loved them in the E30:
And upgraded to the stiffer ZHP front control arms:
Altogether: the car got:
New shock/struts/springs
Strut tower and rear shock reinforcement plates
New shock and strut mount bushings
New swaybar end links and bushings, front and rear
Upgraded ZHP front control arms and bushings
All new subframe, differential, trailing arm, and rear control arm bushings
New FAG rear wheel bearings (had already done the fronts a couple years ago)
New rear hubs
Rebuilt and repainted the rear axles
New soft brake lines, new calipers, pads, and rotors
New tires
Alignment
Various other bits I found needed replacing
I didn't take a ton of pics of the process as it's not E30 related and was struggling to get it all done ASAP in the balls hot heat, but this unexpected "project" took pretty much a month to get done, delaying my true paint project.
So, back to the regularly scheduled program...
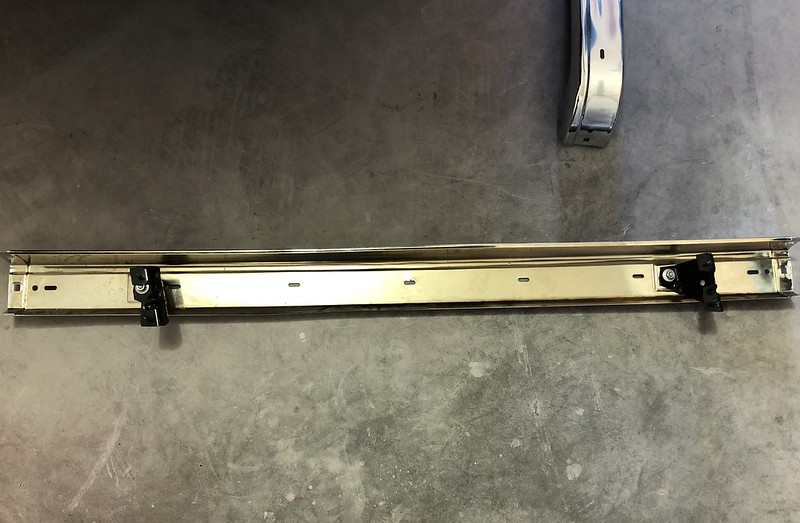
After getting the body in primer, I got everything blocked out in 320 grit. I then got to work test-fitting the rear euro bumper and Mtech rear apron as there were a few last holes that needed to be drilled:
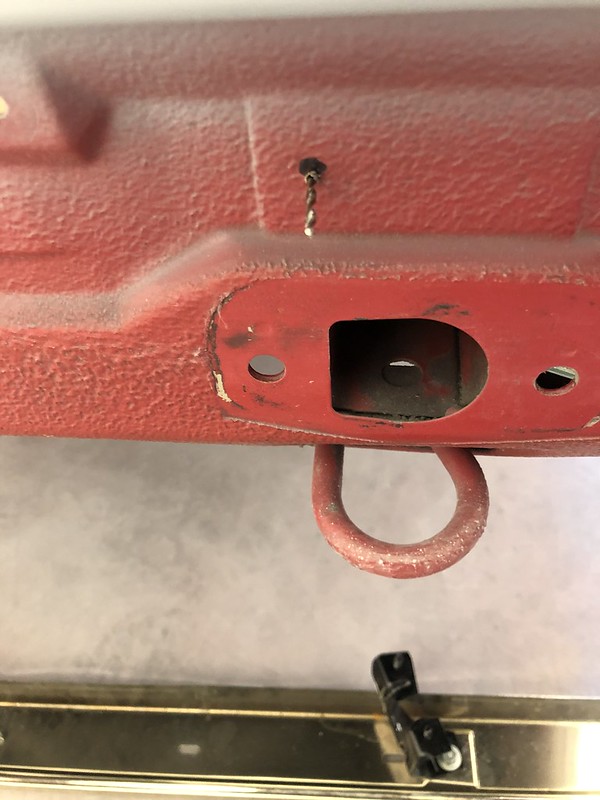
The euro brackets each have two studs, the bottom one is slightly larger than the other:
The larger of the two studs mounts into the hole left by the old bumper shock bolt, while the smaller of the two needs to be drilled out to fit into the rear valance:
If you look on the inside of the trunk in the area where I marked the drill holes, you will see a reinforcement "bracket" buried underneath the seam sealer:
Each of these "brackets" has two indents, one of which will correspond to where you'll need to drill your hole for the mounting bracket. Mine ended up both being the indent closer to the driver's side of the car. I drilled from the inside out to ensure proper alignment with my marks:
I then got the bumper all mounted up:
Next it was time to mock up the MTech apron, I was pretty excited to see what it looked like:
Looks pretty sweet! I have to adjust the muffler an inch or so towards midline to line up with the cutout better but that'll be no bid deal:
The last few sets of holes needed to be drilled into each of the rear wheel wells, these are drilled to 5mm per the install instruction:
And finally the angle bracket that bolsters the exhaust cutout:
This is drilled to 6mm per the manual:
Last, I needed to plug the holes in the rear valance where the old diving board bumper covers affixed to prevent having a swimming pool in my trunk. I sanded down the gravel guard, put some fiberglass drywall tape backing for support, and filled with metal-reinforced body filler:
This was then sanded smooth and all exposed metal and new drill holes coated with epoxy primer. This was all done PRIOR to my E46 endeavor.
I finished the E46 this past Friday, and over this past weekend I got ALL the wet sanding done and have scuffed all the jambs. I didn't have enough time to remask and get any painting done, but started a project that I am putting together a DIY on that I wanted done with most of the trim already off the car. I should have that finished and written up early next week, and then I'm ready to remask and get some paint on this thing! My hiccup with the E46 may be a blessing in disguise, it's been way too hot and humid to be painting in the garage and now that it has started to cool down a bit, I think I'll end up with a better finish.
'86 325e Zinnoberrot /// '02 325ci Schwarz II /// '18 M4 Azurite Black Metallic///
Oh, word of advice (if you haven’t already) use a gasket or some form of sealant to prevent water leaks into the trunk from those newly drilled holes for the euro bumpers.
you’ll see what I mean from my build thread.
E30 320i vert
But daily drive is Volvo V60 Polestar
nice work on both cars! I know the frustration that comes with doing maintenance on the daily that steals time away from the fun projects... but it's still satisfying to get it done. Looking forward to seeing paint on the car! Red m tech 1 cars look superb IMO
Alright guys, got a nice little project buttoned up today. I have all the interior trim out of the car including the door sill covers and such which are a huge pain to remove and are very easily broken. This also allows me access to pull up the carpet to run some wiring...
One of the few things I wish I had on the E30 is heated seats, they're just so nice when the weather gets cold. Luckily, you can still buy the OEM BMW heated seat elements, and the accessory wiring harness is also often up for sale either in the R3V for sale section or EBay, The last thing most of you will need are the heated seat switches. The install isn't all that bad honestly, and makes a world of difference (for me anyway) when driving the car in the colder months. So, while everything is already apart and accessible, I decided there'd be no better time to get this installed. I needed to buy some additional accessories as you'll see, but most people with later model cars shouldn't need to worry about these. I didn't find a great deal of info on the install on the interwebs, so I decided to write it up!
First off, here's the BMW manual on the install, it's very good but some of the pics leave a little to be desired:
The seat elements:
2x 64-11-1-376-034 (Bottoms)
2x 64-11-1-376-035 (Backs)
You'll need to source a wiring harness, I see them pop up all the time for sale for ~$50-100
You'll also need 2 heated seat switches.
Older model cars didn't seem to be offered with heated seats to my knowledge and thus are not pre-wired to accept the wiring harness. Later model cars, as far as I've read, came pre-wired for the heated seats and so all you'll need is the harness, the heating elements, and the switches.
For my car (early model), I needed to run an additional wire from the fuse box to the accessory connector C302 which is tucked up behind the pedal assembly and mounted directly to the firewall. As such, I also needed to purchase the following:
BMW Plug connector, P/N 61131362144
BMW dual leafspring connector P/N 61131370692
BMW 1.5mm cable P/N 61121391698
First things first, DISCONNECT YOUR BATTERY as you'll be working within the fuse box and in the harnesses under the dash. Next, you'll have to remove the door sill trim on both sides (the one that holds the door weather seals in place), remove your kick-panel speaker cover on the drivers side (not a bad idea to remove the passenger side as well, but I did it without removing), remove both seats, and unbolt the bar that connects the seat belt to the floor on both sides.
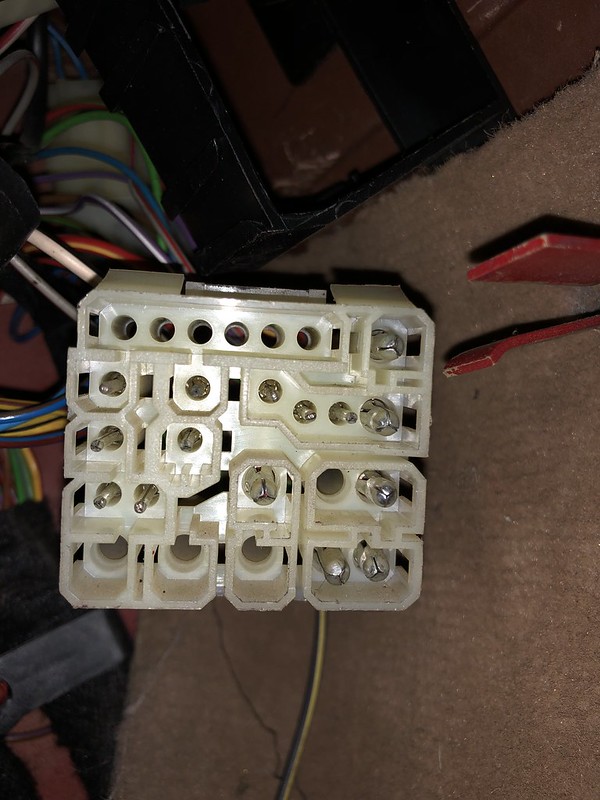
So here we go. Locate the accessory harness C302, it's tucked way up under the dash to the left of the pedals, mounted directly to the firewall. It looks like this:
If you look at the BMW electrical troubleshooting manual, here is what is wired into that harness (note: the below diagram is rotated 90 degrees from how the harness is mounted in my pic above):
What we are interested in is pin "U" in the above pic. As you can see, that spot has no pin installed on my harness, it's just an empty hole. In theory, late model cars should already have a pin here that is pre-wired into the fuse box.
Wires all removed:
Here's the spot you're after:
Here's the pin that you need, its a larger diameter, 3.5mm pin than most other male pins found in the car. Found this out the hard way by ordering the more common, 2.5mm pin by mistake:
Crimp, solder, and heat shrink it onto one end of your wire:
Next, install the plug into pin "U" on the C302 harness. It's easiest to remove the harness from the black plastic mounting bracket to do this as there's virtually no room to get your hands in there and pop it in. The harness has 4 flat tabs, one in each corner that you need to push down with a screwdriver and then just push the harness back and out of the bracket. It was also much easier to remove all the other wires, make sure to take pics of how they were located. They all should only be able to fit into one spot due to the geometry of the plugs, but having a visual of where they all go is helpful. It's tight under there so it was pretty much impossible to take a pic of this, but you'll see what I mean when your'e under there.
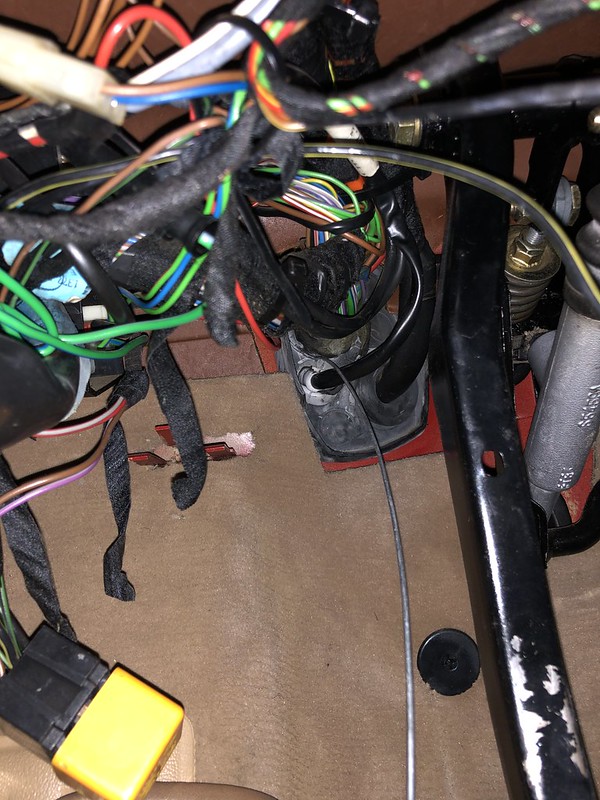
Pop the harness back into the mounting bracket and plug all the wires back in. Next, you'll need to run your new wire through the firewall and into the fuse box. I tried to run it within the large bundle of wires running through the fire wall, but it's wrapped too tightly and I couldn't get it through. I ended up just using a stiff wire and got it through the open end of the firewall grommet:
And pulled out to the engine bay:
Then I J'd the wire and pulled the new electrical wire up and through:
Next you'll need to pull the wire up and into the fuse box. You'll need to unscrew the 2 phillips head screws in the fuse box and remove that extra little fuse next to the fuse box so that you can separate it. One of the phillips head screws is under the K8 relay so you'll need to remove it. Again, the end of the fuse box grommet was taped into the large bundle of wires and was too tight, so I used one of the 4 extra little nipples and pulled the wire up through there:
I guess I forgot to take a pic, but now you'll cut your wire to length and then crimp, solder, and heat shrink your dual leafsrping connector to the other end of the wire. This connector looks like this and is the same as all the other connectors mounted in the fuse box:
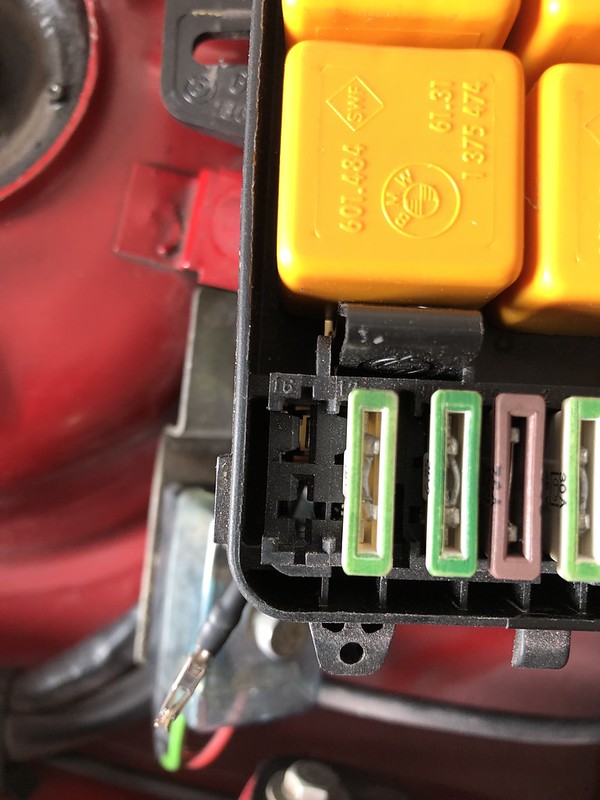
Per the above PDF, fuse location #16 is unused and has no connector present on the early cars. This is where, on the later cars, there should technically already be a connector attached to a wire that is already in place to "U" on C302:
Empty:
In order to get the new connector in there, there's a "holder" that needs to be removed:
There are 4 tabs in the fuse box that you'll need to press down in unison to remove it:
Comes out like this:
Now you can slide your new wire with the dual leafspring connector into the empty slot in fuse #16, then replace the "holder' to lock it in place:
New connector in place:
Now you can screw the fuse box back down, you're done there. Last thing you'll need to do per the above PDF is install a 15a fuse into space 16:
This connects your new wire to power through the fuse box.
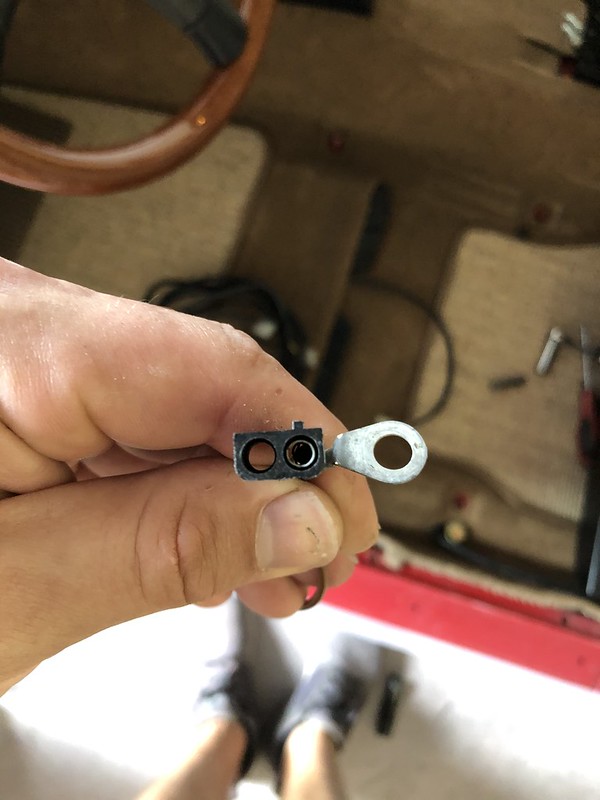
Next, you have to rout your new wiring harness under the carpet and where it needs to be. You will have to remove the center console (front and rear sections) to do so. It's pretty self explanatory, just cumbersome. The harness plugs into C302 pin "U" and can only go on one way due to a little nub on the harness:
The ground ring connects to the common ground screw located up and behind the ABS control unit under the left side of the dash:
Then, rout it along the side of the sill and up and under the carpet like so:
There are black plastic clips all along the wiring rout where the existing wires are already strapped into. I made sure to secure the new harness into theses clips but it's technically not 100% required if it's too tedious for you to do so. Tough to take pics balancing the carpet on your head, but it ends up like this:
Last for the wiring, you'll need to cut the holes in your center console for the switches. The template is already there underneath:
I was rushing to get it done when I cut mine and was using too large a cutting wheel with the dremmel, I ended up overextending the lines and you could see them with the switches installed. I'd recommend using a small drill bit to drill holes at each corner, then using a smaller dremmel cutting wheel to cut just inside the lines. The drill holes with allow you to cut the entire perimeter all the way through the plastic without going past the "dotted lines," then using a small file to file the rest of the plastic back until the switches fit. I ended up finding a nice replacement center console with the holes already there from the factory and ended up using it instead.
At this point, reinstall your center console, the sill trim and your kick panel covers. Pull the switch harnesses up through the holes you just made and install your switches. Note: The forward-most switch is for the driver's side, the rear switch is for the passenger side. You're now done with the wiring!
This post is quite long, and it's late. I'll post up the installation of the heating elements for the seats in the morning.
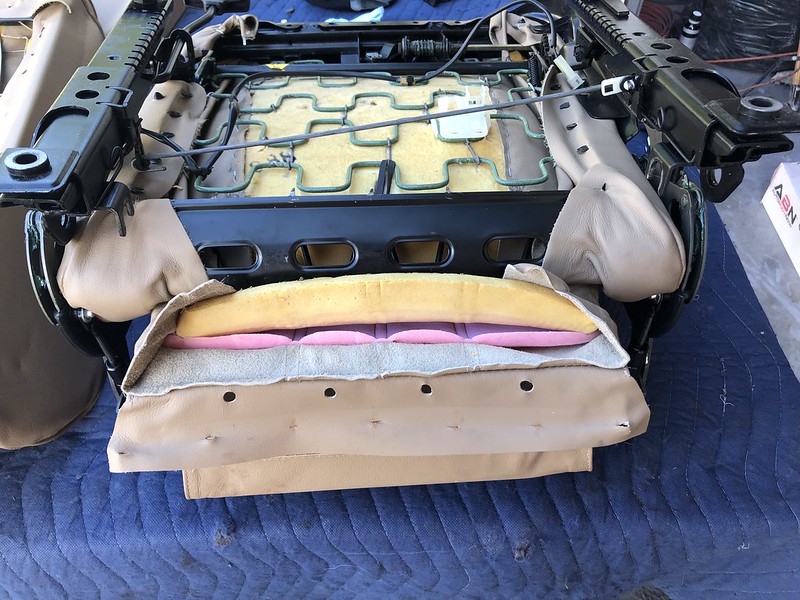
Now that you're all wired up, you need to get the seat heating elements installed in the seat bottom and backrest. It pained me to have to take my seats apart again but other than a few hog rings and one line of staples per seat, this was pretty easy.
In addition to just normal tools (a ratchet, phillips and flat head screw driver, etc) you'll need a pair of hog ring pliers and a handful of hog rings, as well as an OUTSIDE CLINCH stapler. See my earlier post detailing my seat reupholstery for why you need these.
I'm not going to write up how to take your seats apart, there are plenty of DIY's on that as well as my own earlier on in this thread. You need to separate the upper and lower halves and remove the tension bar underneath the seat bottom so that you have access to the foam padding underneath the leather in your seats.
Here's what you're looking for:
To get to this point, you have to remove the seat backs (2 phillips head screws at the bottom corners, then pop the seat release lever and cover off and slide up and out). Remove the plastic seat hinge covers (1 plastic flat head screw each) Then disconnect the seat release cables on either side of the seat hinges, and unscrew the two phillips head screws mounting the seat back to the bottom. Slide the seat back off the hinges.
I did the seat back first, the seat back leather is just held in by little metal teeth that go around the perimeter of the frame as well as one long plastic holder along the bottom frame. Pop the leather off all the teeth on the top of the seat by the headrest and remove the two leather straps and plastic holder from the frame on the bottom. I also found it easier to just remove the headrest
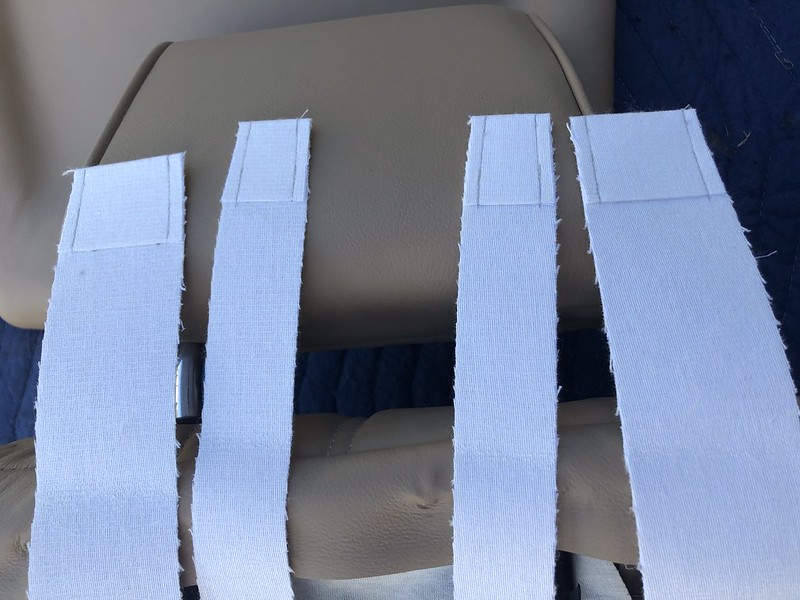
Here's your heating element for the back, the straps are longer than the ones for the seat bottom so don't get them mixed up:
You'll need to pass them over the foam but under the leather, conveniently there are these little pockets on the end to be able to slide a tool into the accomplish this.
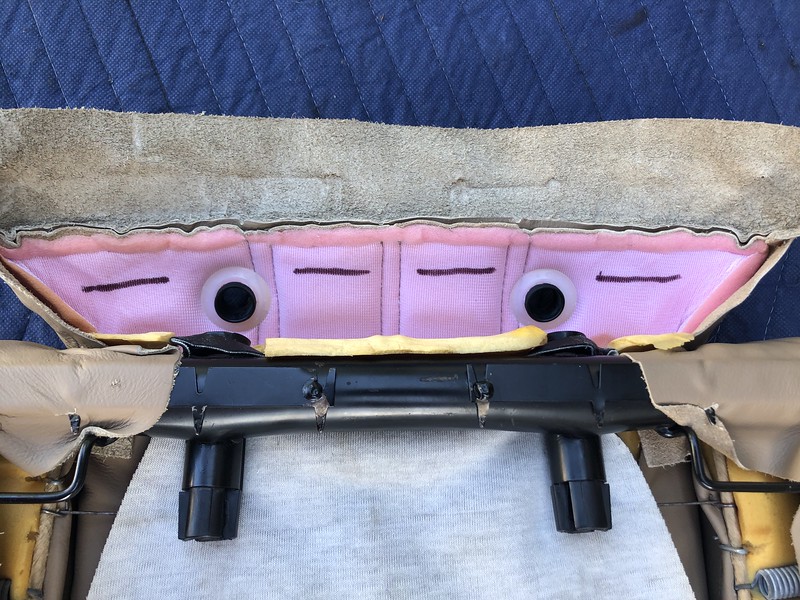
Now up by the headrest, take the leather off the little teeth along the top. According to the BMW install PDF, you'll need to mark where you need to cut the foam roughly 1.5cm from the horizontal seam in the leather and wide enough for the straps to fit through. YOU ARE NOT CUTTING THE LEATHER, just the foam. I used a sharp Xacto knife to make a small hole, then used sharp scissors to cut the foam so as not to poke through:
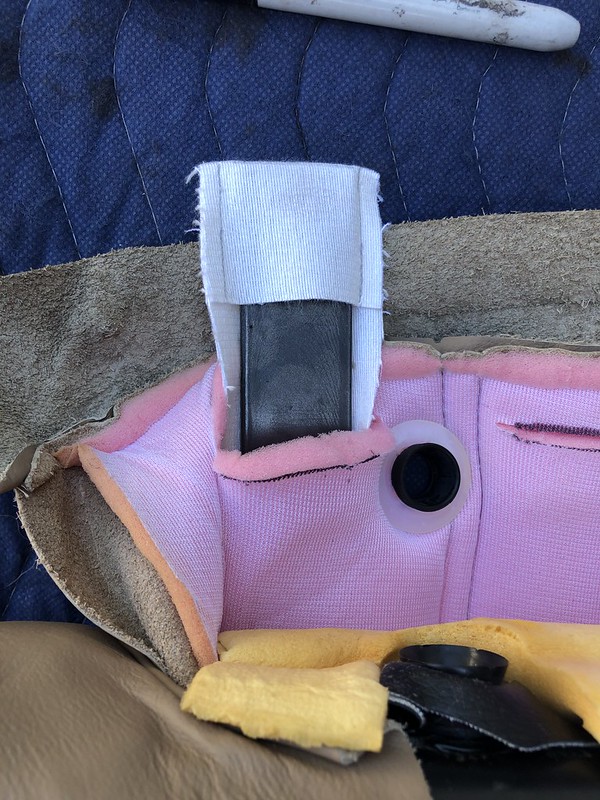
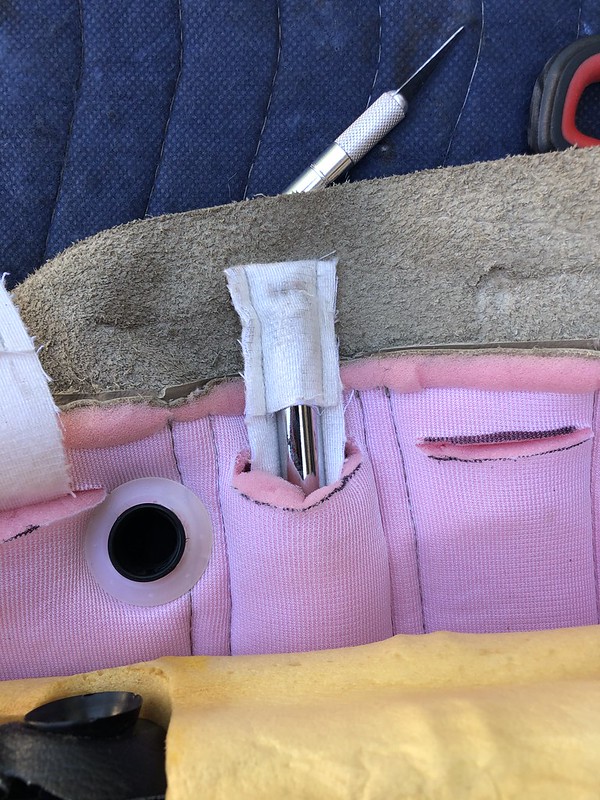
Now you'll simply need to pass the heating element straps through from the bottom. I used a flat piece of bar stock steel for the wider outer straps, the middle two straps were thinner so I used a long 20" extension, worked great:
Make sure you orient the wire for the heating element so that it's on the side of the seat towards the middle of the car (center console side of the seat, where the seatbelt receptacle is). As you'll see, you'll need to route the wire behind the seat bottom and under the seat, and if the wire is on the door side you risk someone catching their foot on it when getting in and out of the rear seat. This will make more sense later. The above pic is of my driver seat back, so the wire will run on the right side of the seat. Obviously for the passenger seat, the wire should run on the left side of the seat.
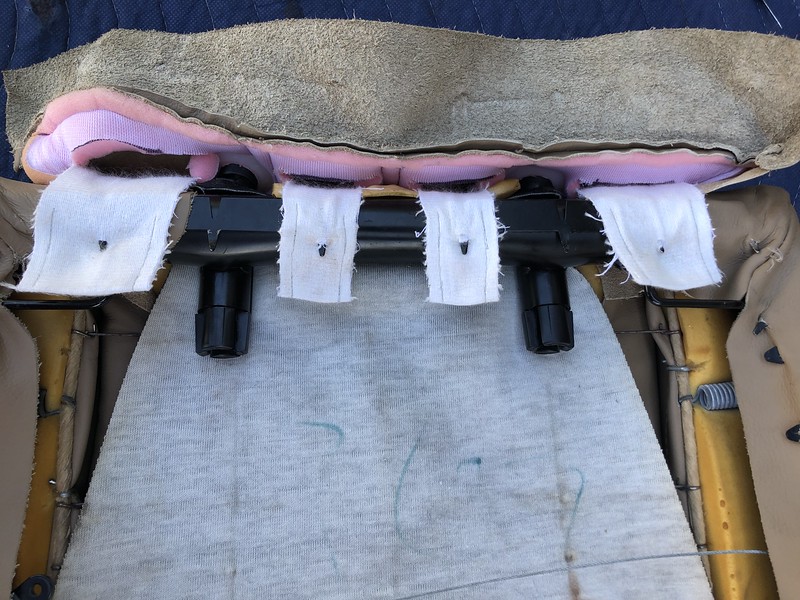
Now you'll need to poke some holes in the fabric of the heater straps and attach them to the metal teeth in the frame to keep them from getting pulled back through the foam over time:
Word of advice: you don't need to make the straps tight. Keep them loose, just enough to hold them in place. Since the straps run on top of the foam padding, cranking them down really tight will bunch up the padding and make the leather look all wrinkly. You're going to pull the leather back over them which will lock them in place anyway, they won't go anywhere:
The bottom edge of the heating element is just concealed within the leather, just reattach the plastic holder to the frame:
And the top is done!
Now for the bottom, it's essentially the exact same process however more disassembly is required. First, remove the 17mm bolts on either side of the seat hinges that connect to the tension bar under the seat.
You may need to remove the pins for the seat adjust function as well as the little circlip that attaches the hinge to the seat bottom to give yourself a little more wiggle room to get it out:
Slide the bar out:
And pull the leather off of the little teeth along the frame to expose the foam:
You'll also need to remove the thigh bolster, remove the seat bottom from the frame, and undo the front edge of staples to access the seat foam.
To remove the seat bolster, just remove the little metal clip and pin and slide it off the tracks:
Now cut the several hog rings that secure the seat bottom to the frame, I tried doing this without removing the seat bottom completely but I kept tearing the foam and removing it was way easier.
Remove the layer of staples along the front edge (near the thigh bolster) of your leather:
And again make your cuts in the foam along this front edge 1.5 cm from the seam edge:
Pass your heater straps through as before, with the wire towards the middle side of the seat:
Now restaple your front edge of leather, incorporating the straps into the staple line to keep them in place. I know this looks mangled compared to my other staple lines, but I redid my seats twice to get the leather nice and smooth when I first reupholstered them and I needed some fresh foam to staple into. I also tried to stagger them for better grip:
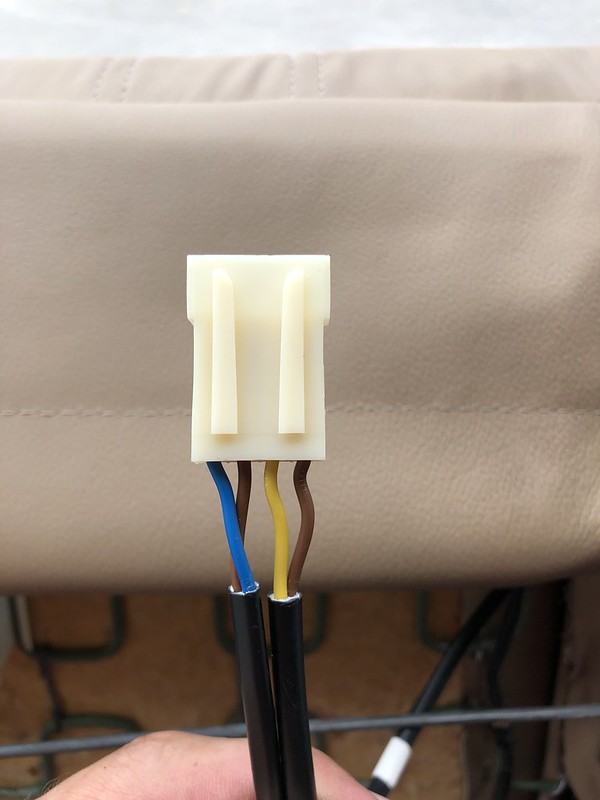
Now just reattach the seat bottom to the frame using hog rings in the same or similar locations to where they were before, and reassemble your seat. Last, you'll need to connect the wiring harness for the heating elements. The bottom heating element has a connector with two wires already attached, and the top element has 2 free pins:
Rout the seat back (upper) element wire around the back of the seat bottom and underneath the seat like so, securing to your seat piston with a zip tie. I assure you this will not impede the function of the piston or seat function and does not pinch the wire, I tried it. There's even some white tape already on the wire for the purpose of securing is this location:
Don't make the wire super tight, leave a little slack to allow the seat to fold forward without making the wire taught, risking damage to the heating element.
According to the install PDF, the two wires already installed are in positions 1 & 2. For positions 3 & 4, the yellow wire goes to position 3 and brown goes to position 4:
Ends up like this, (1)Blue (2)Brown (3)Yellow (4)Brown:
The wires coming out of the harness you installed under the carpet have different corresponding colors into the female end of this connector (I think driver is red/yellow and passenger is black/yellow) but the harness only attaches one way, and this is the correct orientation.
Install the connectors into the little plastic receptacle under the seat. The one on the left is for the seatbelt receptacle sensor (this is my driver's seat). The new heating harness has little grooves that slide into the other slot:
Now, just secure the wires to the seat bottom, there is already white tape where you should secure with a zip tie:
Wash, rinse, and repeat the above process for your passenger seat, again assuring that the wires are towards the center console. Last, reinstall your seats normally, but plug in the connectors. I recommend getting the seat in the car and plugging in the connectors before you bolt them in, there's not a lot of room to get your hands in there when the seats are bolted down.
Here's how the wire looks with the seat installed and fully tilted forward, this is why you need to leave a little slack:
Now reconnect your battery, start the car, and flip the switch. Let there be... HEAT!
Low:
High:
It worked! My buns will be nice and toasty once the cool weather hits. In NC, that'll be around January or so but I'll look forward to it!
Last little thing I did while I was in there was install some E28 lighted window switches, a small but nice upgrade to the regular E30 painted switches:
Hard to see in the pic but it looks really nice when all the interior lights are on in the dark.
Congrats, you're done! And you did all this as it would have come from the factory per the BMW manual, no wiring fuckery or anything. Enjoy!


Comment