-
the ziptie method on the bitch tube is the best for sure. I don't know how anyone would do it otherwise. I used two zip ties i think and just cut them off with a razor once it was all lined up. worked perfectly. -
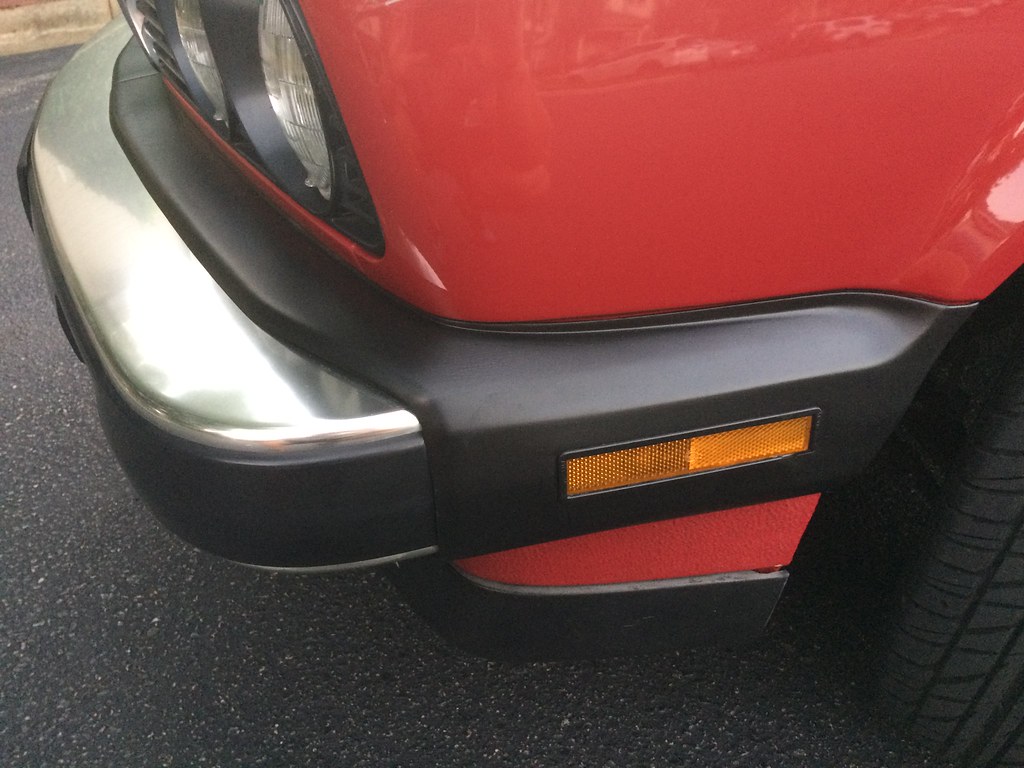
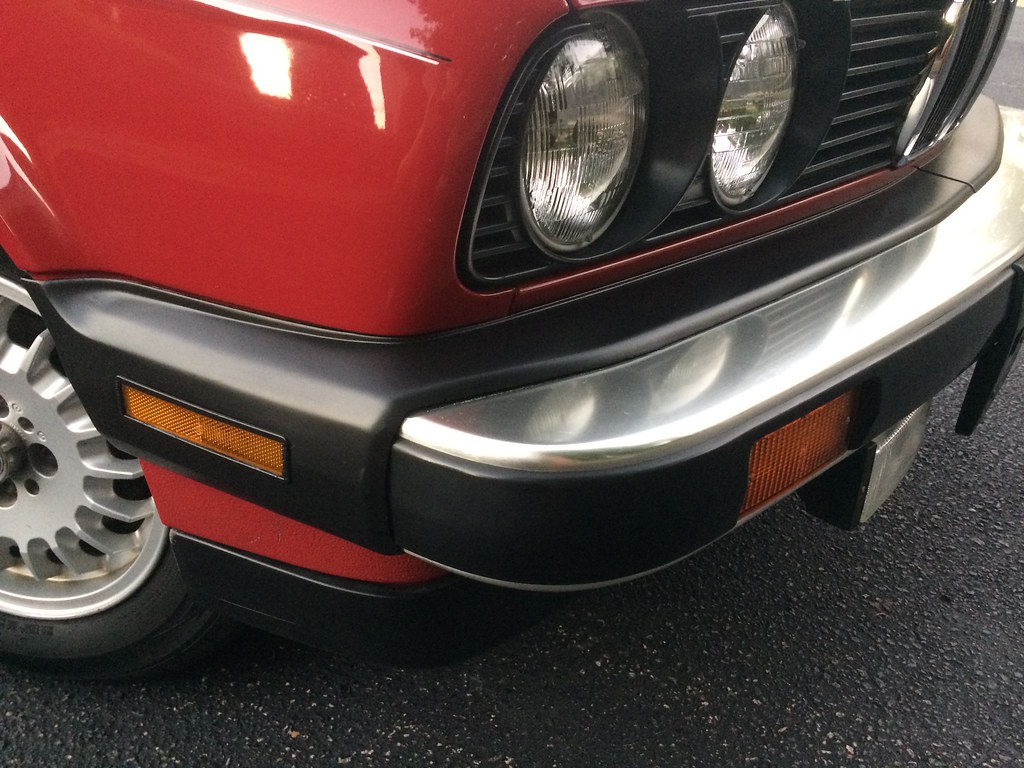
Thanks for the kind words, it was awhile ago now that I did it but if iirc I just used a drill with the foam polishing ball and went to town until I was happy with how it looked. The plastic for the bumper trim and air dam seemed a little different from the plastic of the bumper shrouds (a little harder and shinier, the bumper shrouds seemed softer and more rubbery in consistency). That's the reason I didn't Plasti Dip those parts. I don't think the compound would have worked as well either on the softer plastic of the shrouds, however did a really nice job on the bumper trim, made the plastic look nice and shiny. If you have really deep pits, you could try some wet sanding first, mine weren't too bad and I wasn't sure how it would work so just went ahead with the headlight kit and was happy enough that I left it alone.Originally posted by RainierLeave a comment:
-
I feel your pain on the bumper surround trim. Takes a lot longer than expected. Yours turned out fantastic, and looks OEM. Beautiful car as well.Leave a comment:
-
Thanks man! Finally got around to it, good to hear from you!Originally posted by Richter
The car was running great and I was really enjoying driving it around. Everywhere I went I got a compliment on it, a thumbs up here, a wave there. Had a few people come up to me while pumping gas asking about it. People really loved the little red car.
Around spring time of this year, I started having a problem with surging idle. The car would be fine when cold or under load, however once warm the idle would continually rev between 1k and 3k rpm. After doing a bunch of reading, I decided the most likely culprit was a vacuum leak and figured it was about time to tear into the engine bay.
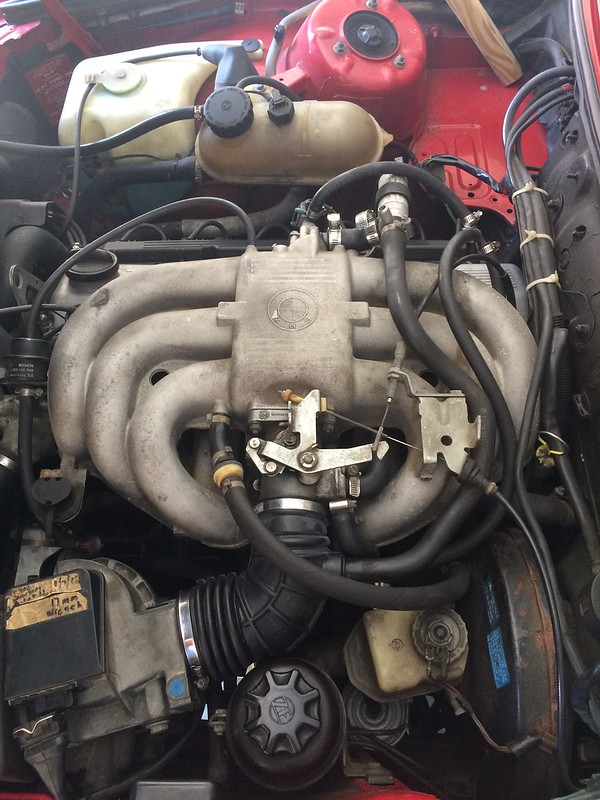
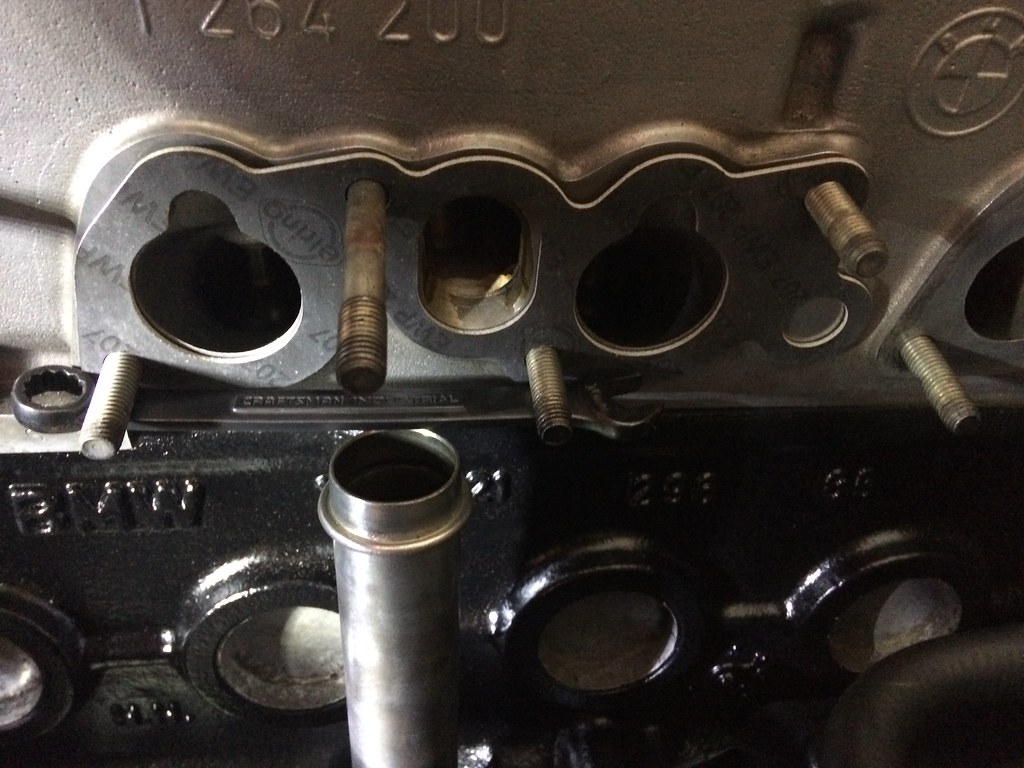
Not sure when, if ever the hoses were replaced. Note Big Al's super high-tech way of documenting oil changes on the AFM. I used the 'ol starter fluid test to see if I could find where the leak was coming from and it seemed to be coming from behind the intake manifold, which I had been hoping I wasn't going to have to remove. My reading on the "bitch tube" made me a little less enthusiastic about this project :(.
The intake came off easily enough which exposed all the heater core hoses underneath. Since I figured I'd never see them again I went ahead and replaced those too along with the heater core thermostat.
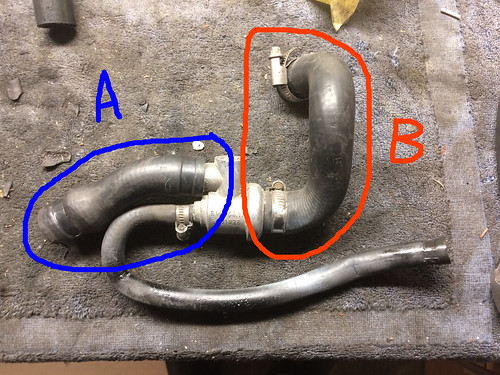
A helpful hint if you ever need to replace the tubes connected to the heater core thermostat: realoem.com lists two separate hoses for items A and B:
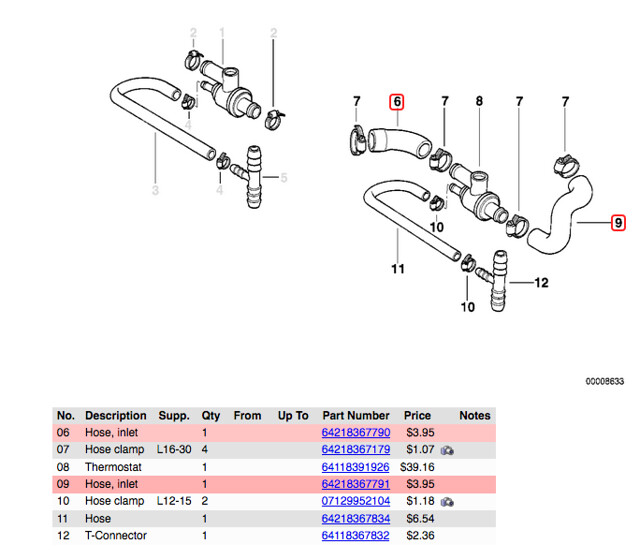
Items highlighted 6 and 9 (giggity) in the above diagram. If you look on the usual parts store sites (FCP, BavAuto, Pelican, ECS, etc), they come up looking like this:
Part #64218367790: ($30-40! depending on the supplier)
Part #64218367791: (Around $7-8)
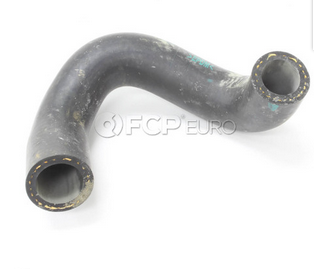
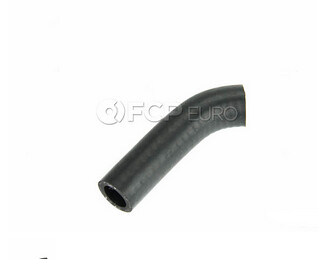
Should be all good, right? Well if you notice the realoem part #6 has the same diameter inlet and outlet, however part labeled "A" on my old thermostat has a slightly larger inlet diameter. The replacement part fit the thermostat but was too small to fit on the coolant tube on the back of the engine block.
The reason I mention this is that I wasted almost 2 WEEKS just sending back parts that didn't fit, reordering twice from different suppliers only to find that the new part didn't fit either. Some places listed a picture of the correct part "A" but the realeom part showed up at my door, super frustrating. After some head-scratching and a ton of perusing the parts websites for other options, I found this part: (BMW part #64211380527, selling for about $20)
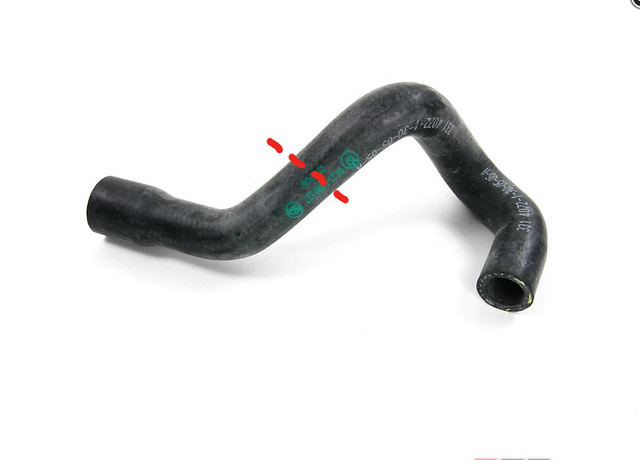
If you cut along the dotted line (It's even marked on the tubing), it yields both parts "A" and "B" for about half the cost. Seems like the parts suppliers are taking this part, cutting in two, and selling each part separately at a nice markup. Not a common part to replace, but figured I'd save others the headache (and money) of buying separately. I accept donations to my PayPal Albert.Simeone@gmail.com ;D.
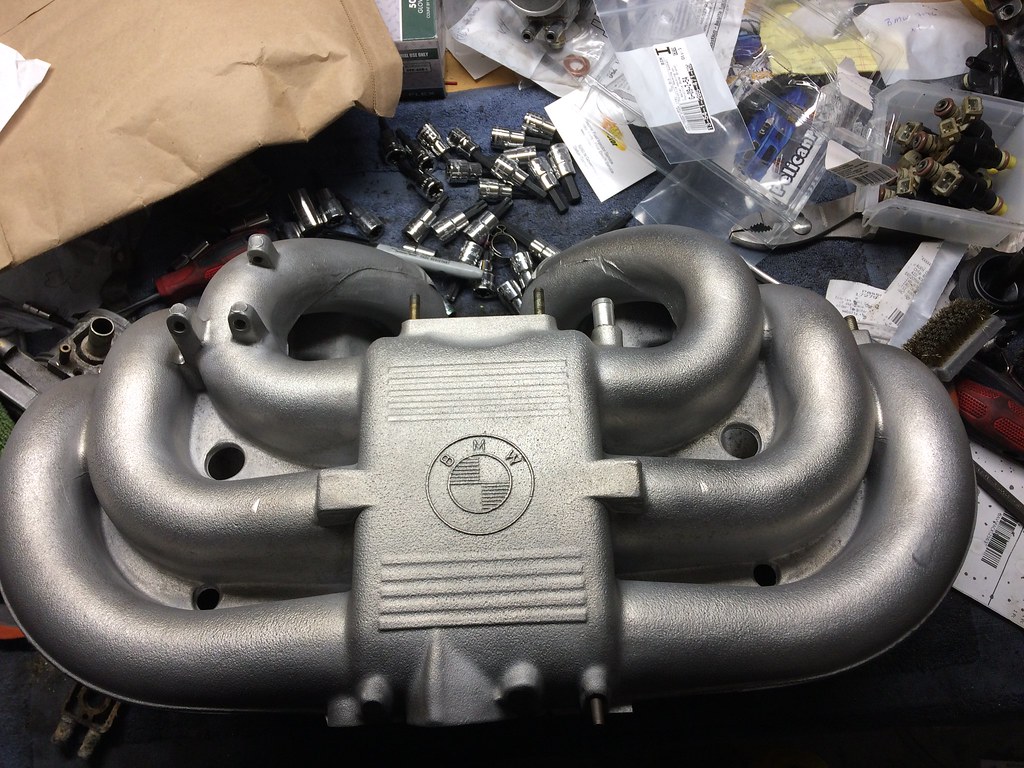
Engine block degreased and sprayed with VHT high-temp:
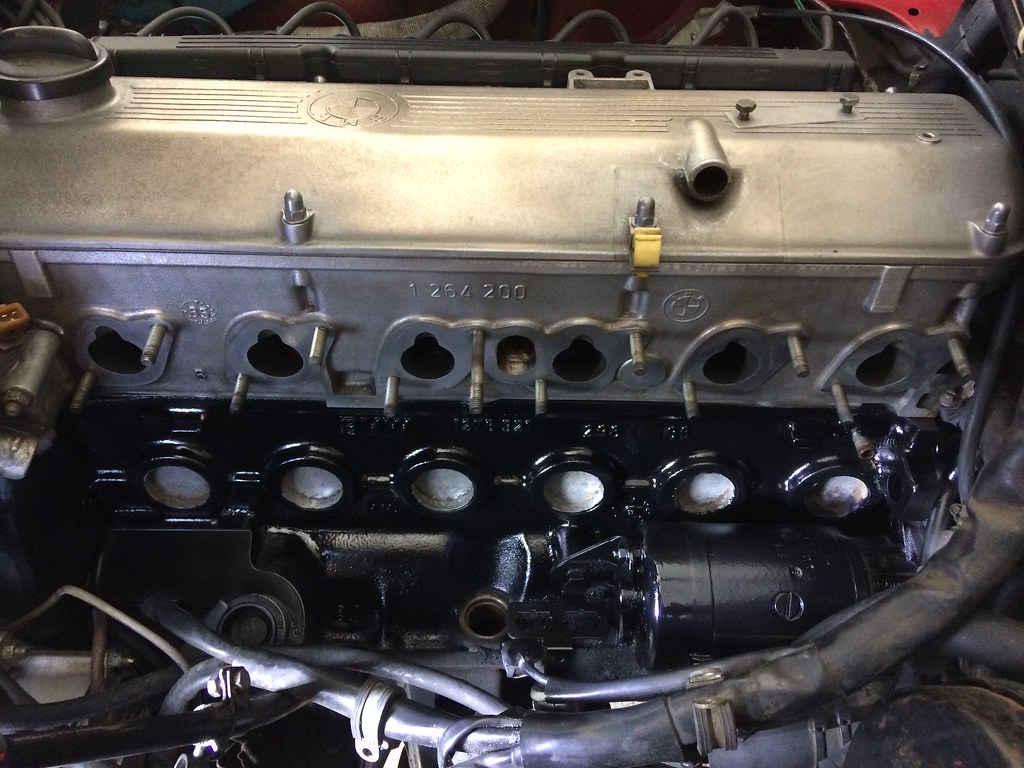
Baking-soda blasted and aluminum polished the intake and valve cover:
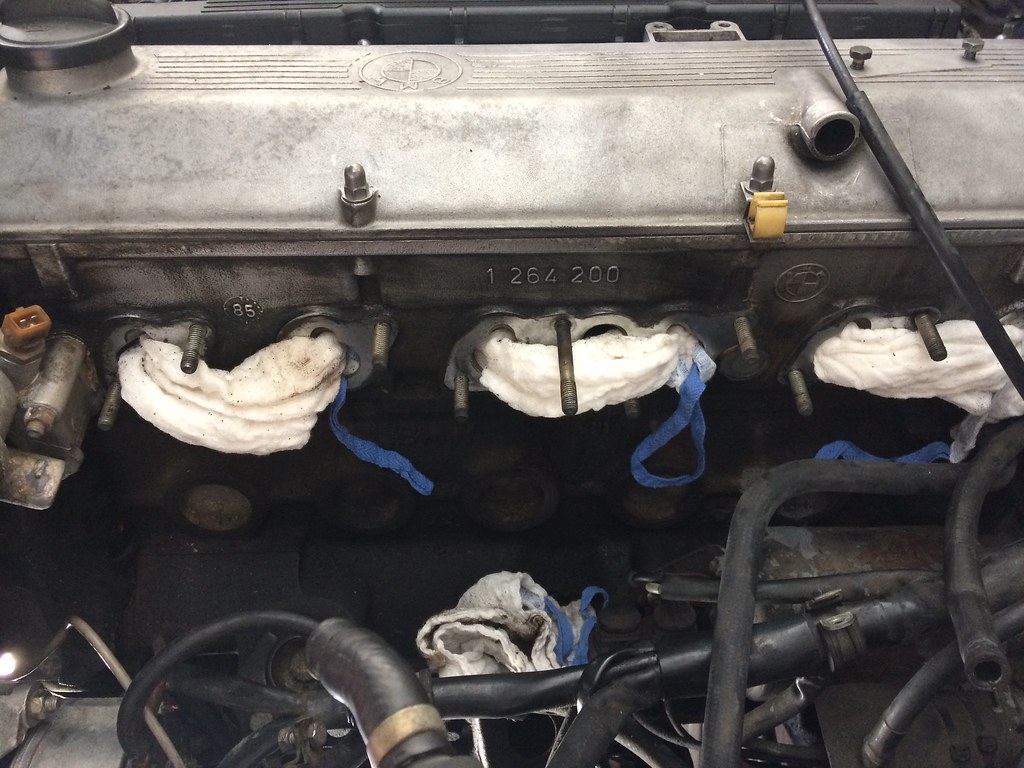
Regarding the Bitch Tube: I read a bunch of articles detailing different ways of getting the intake back on and found a couple different methods. One was placing a wrench between the tube and the intake studs to hold it down:
While good in theory, every time I got the intake close to fitting the wrench would move and the tube would go flying. I gave it about 3 tries and said screw it. The next technique: small zip tie on the tubing spring:
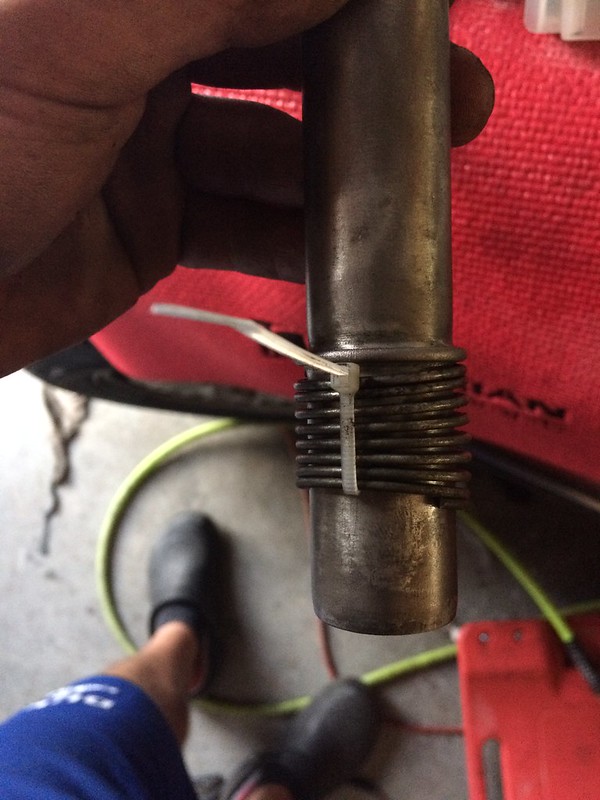
This worked like a charm and the intake was back on in less than 10 minutes, just remember to cut the zip tie off before you call it a day or you'll have a nice mess of oil on your floor on startup.
Mo' betta:
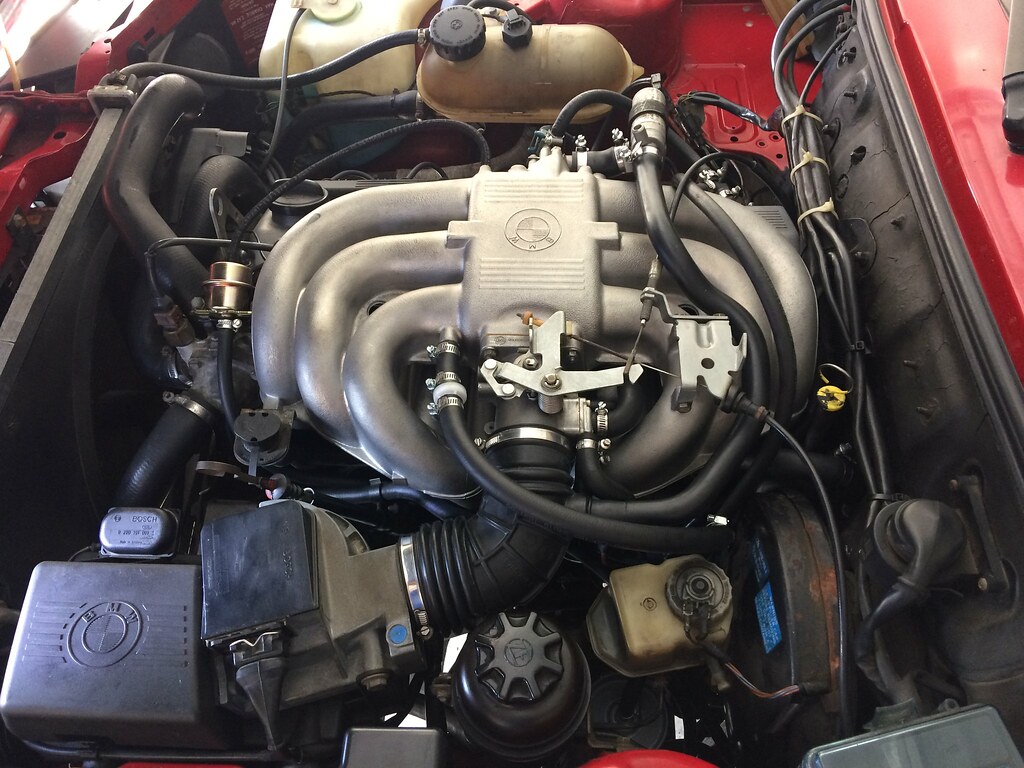
Also changed all fuel hoses, the fuel line dampener, cleaned the injectors and replaced the filters and o-rings, cleaned and painted the fuel rail, cleaned and replaced the throttle body gaskets, valve adjustment, valve cover gasket and valve cover studs (one of them stripped while tightening, d'oh!). Thankfully, the surging idle stopped. Still need to replace the coolant overflow tank, brake booster and brake fluid reservoir, they look so much worse now that the rest of the engine bay is clean.Last edited by Albie325; 04-10-2019, 06:58 PM.Leave a comment:
-
Interesting trick using the headlight restoration kit for the bumper trim, I need to try this on my 87 vert. Did you do anything special or did you just follow the instructions on the box as you would for lights? Amazing job you've done, the car looks great.Leave a comment:
-
Big Al's Revenge: an OEM+, MTech1 325e restoration
Hey R3V! Been a member for awhile now and a lurker for much longer. I'd like to start by thanking all of you for posting your DIY's, build threads, and discussions as they have been invaluable in learning the ins and outs of my car and planning this project. I've had the pleasure of speaking with, doing business with, and meeting some of you and I've finally gotten around to posting the build thread I've been talking about. I've been sourcing parts since I've had the car, and now that I have about 90% of what I need, it's about time to get started.
The car:
1986 325e, Prod Date 1985-12-03
Zinnoberrot (138) (nice!)
Automatic (ugh)
Upholstery (0156) Pearl Beige comfort, vinyl
S209A Differential lock 25%
S210A Dynamic stability control
S286A BMW LA wheel BMW Styling
S300A Central locking with antitheft system
S410A Window lifts, electric, front
S530A Air conditioning
S556A Outdoor temperature indicator
The story:
The car was originally purchased at Hassel Motors, Inc. in Freeport, LI NY:
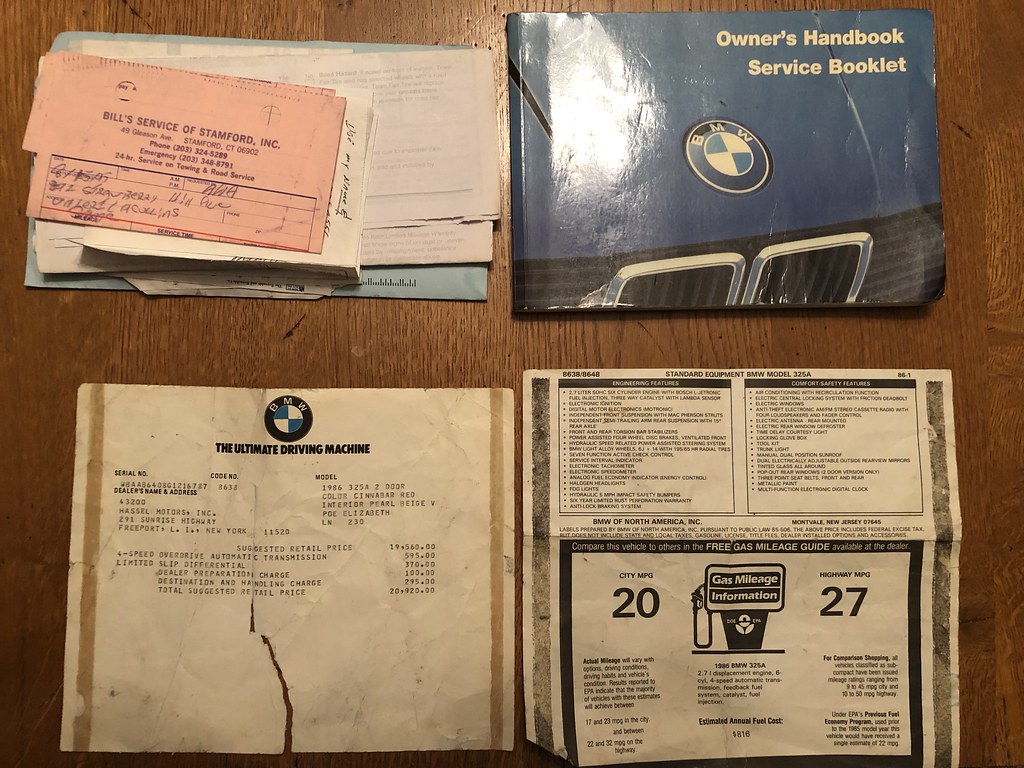
By 1997, the PO had moved onto something newer and nicer, and his wife was driving the car as her daily. They had also moved to my hometown of Stamford, CT by this point. She ends up overheating the car, blowing the head gasket and transmission. As they were not at all mechanically inclined, the car sat in their driveway for about a year, unable to sell it and not wanting to pay to fix it. Enter the 1998 National Lione Little League baseball season with Big Al (my dad) as our head coach. We draft a young up-and-comer who's father happens to have a nice little red car sitting in his driveway. As the season progresses, Big Al notices that the little red car hasn't moved in months. Curious, he inquires about the car and my teammate's father details its issues and his inability to sell it (leaking oil, bad tranny, dent in the driver's rear quarter panel, hole in the carpet from his wife's high heels, etc). Otherwise the car is mint, and Big Al needs a car to whip around town that gets better gas mileage than his Ford F150. My dad offers to take the pet rock out of his driveway for $2000 (in 1998 money), they settle on $2500, and the car is his. Being the handy and well-connected guy that Big Al is, he pulls the head and replaces the head gasket along with some other necessary maintenance (water pump, timing belt, cap, rotor, and the like) and swaps in a low-mileage salvage yard autotragic that he got as a favor. The car has been in our family ever since and is somewhat of a Big Al trademark to those that know him. I ended up actually learning to drive in this car, so it holds a place near and dear to my heart.
The car has been incredibly reliable with no major issues since we've owned it, the a/c was even ice-cold up until about 2 years ago. It eventually got the dented quarter panel fixed as well as a respray on a few of the body panels, but nothing other than basic maintenance. Summer heat or CT winter cold, the car started up every time. My dad kept it in the garage for the entire time we owned it other than the last year when he sold his business in preparation for retirement.
When my parents decided to move south and my dad wanted to get rid of the car ("what am I gonna do with the car? I can't take it with us... grumble grumble grumble,") I told him that if he sold it to anyone but me I wouldn't talk to him for awhile. After some hemming and hawing, we agree to split the cost to ship it down to me (now in Raleigh, NC) and call it even. I drive a hard bargain, what can I say .
.
Speaking of Big Al, here he is in his day with one of the 5 Datsun 1600's he owned, with me in the Zinno the day it arrived from CT:
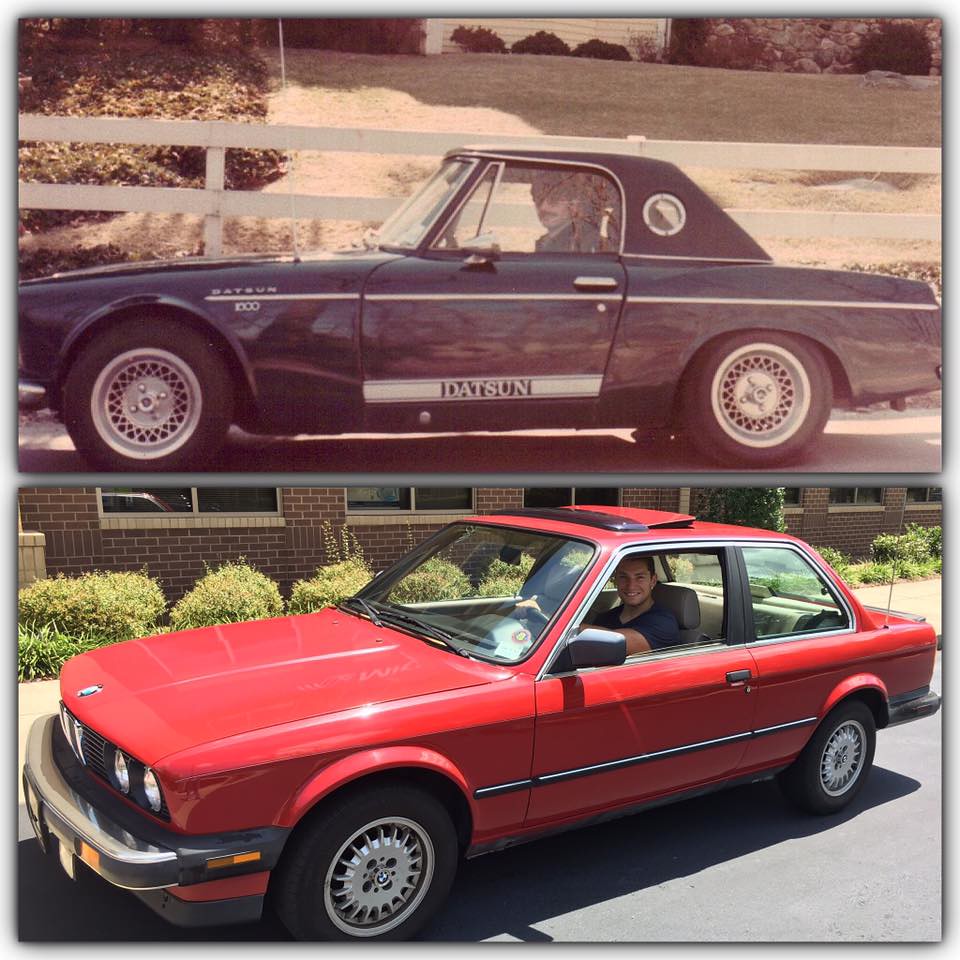
Like father like son as they say. Also note the epic 'stache on Big Al, another of his trademarks. I've literally never seen the man without it.
The Plan:
Let's be honest. It's an Eta. And an auto. It's not going to set any land speed records and I have other cars that I can go fast with. For that reason, I don't want to mess with the engine and frankly I want to keep the car what it was initially designed to be: a reliable, torque-y daily driver with some classic '80's style. I want to restore the car to its original former glory with some tasteful OEM+ upgrades. All OEM parts, no cheap stuff or shortcuts. I want it done and done right. Of the intended maintenance and upgrades:
Basic maintenance:- Water pump, timing belt, and tensioner (Done)
- Camshaft/crankshaft seals (Done)
- Cap, rotor, wires, sparkplugs (Done)
- Valve cover gasket, cam shaft end plugs, valve adjustment, valve cover studs and nuts (Done)
- Engine bay refresh (polish valve cover, intake manifold, degrease, repaint, etc) (Done)
- Intake manifold gaskets, throttle body gasket, throttle body coolant gasket (Done)
- Replace all rubber (heater core hoses, vacuum hoses, fuel lines) (Done)
- Replace all radiator hoses (Done)
- New coolant overflow tank (Done)
- New windshield washer fluid tank, replace all windshield washer components (Done)
- Rear main seal (Done)
- AFM refurb through BavRest (Done)
- Oil pan gasket (groan) (Done!)
- Upgrade hex-head head mount bolts to Torx bolts
Complete suspension refresh:- I've already sourced a West-coast, rust-free rear subframe and trailing arms. Strip, repaint, new Lemforder bushings all around (Done)
- Lemforder control arms (Done)
- Lemforder e36 M3 control arm bushings (Done)
- Billstein B8 Sport shocks/struts (Done)
- H&R Sport springs (Done)
- BMW front strut mounts (Done)
- Lemforder rear shock mounts with ECS reinforcement plate (Done)
- Purchased a 325ic front and M3 rear sway bar from yugonyc, new Lemforder swaybar links, OEM bushings and brackets all around (Done)
- Lemforder e36 tie rods (Done)
- Eventual steering rack seal refresh UPDATE: e46 ZHP steering rack swap, Garagistic adapter kit and solid steering coupler bushing (Done)
- SKF front wheel bearings (FAG were out of stock when ordered) (Done)
- FAG rear wheel bearings (Done)
Complete brake system refresh:- ATE brake booster (Done)
- ATE master cylinder (Done)
- New brake fluid reservoir (Done)
- Refurbished ATE/Girling brake calipers (Done)
- Brembo rotors (Done)
- Cool Carbon pads (Done)
- Pagid parking brake shoes (Done)
- ATE parking brake spring kit (Done)
- ATE parking brake cables (Done)
- ATE front and rear soft lines (Done)
- Replace corroded hard lines (Done)
- All new Bosch ABS sensors (Done)
- Replace ABS unit with refurbed unit by Jordan (Done)
Fuel system:- All new OEM** rubber fuel lines (Done)
- Spectra Premium gas tank (OEM just too unreasonably expensive) (Done)
- Bosch high speed fuel pump, both fuel line dampeners (Done)
- New Spectra Premium in-tank fuel pump (Done)
- Clean and paint fuel rail (Done)
- Clean fuel injectors, new filters and O-rings (Done)
Drivetrain:- 3.25 lsd via agent (highly recommend) (Done)
- 5 speed swap! (Didn't initially intend to, but purchased a complete setup from KrautnotRice while making a deal for window glass for a super good price, and the swap parts were from an '85 eta so should be plug-n-play) (Done!)
- Febi CSB (Done)
- New CV boots, refurb rear axles (Done)
- BMW Giubo (Done)
- BMW transmission mounts (Done)
- BMW engine mounts (Done)
Performance upgrades:- Jim Conforti chip (Done)
- Aforementioned 3.25 lsd (Done)
Exhaust:- Elring exhaust manifold gaskets (Done)
- All new exhaust studs/nuts (Done)
- Magnaflow 23553 Catalytic converter (Done)
- Bosch O2 sensor (Done)
- Billy Boat Exhaust (Done)
Interior:- Swap in crack free dash (have one) (Done)
- Replace comfort seats with sport seats, recover in LSeat.com Beige leather UPDATE: Autoberry Natural tan leather covers (Done)
- Install OEM BMW heated seat elements (Done)
- Rewebbed seatbelts by SafetyRestore (Done)
- Replace carpet (Done)
- Houndstooth door cards (Done)
- Upgrade steering wheel. Leaning towards Nardi classic mahogany with matching mahogany shifter (Done)
- BMW premium sound speakers/tweeters (Done)
- Consider new head unit UPDATE: Purchased VDO Continental TR7412UB-OR, with upgraded amber colored backlight and LED's by earthwormjim (Done)
- Euro clock vs replace bleeding 6-button OBC screen (Done)
- A/C system overhaul (It's too damn hot in NC) (Done)
- Bavarian Restoration cluster refresh (Done)
- Billet aluminum door pulls by Leogrande Racing (Done)
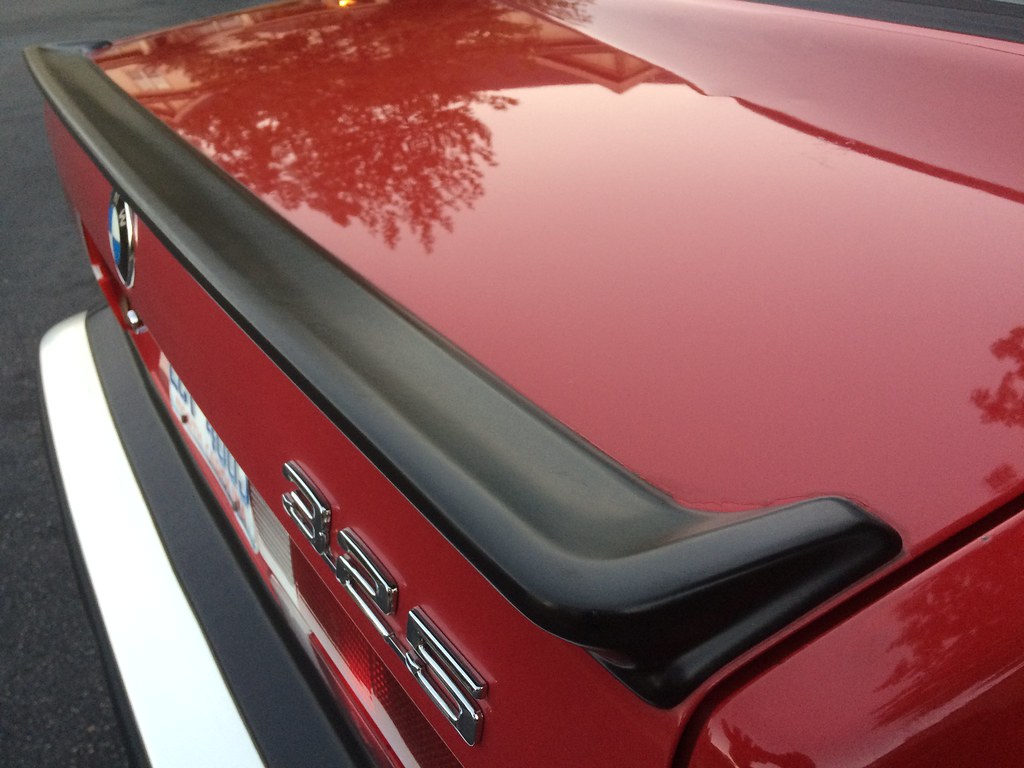
Cosmetics:- Refresh all bumper trim, side trim, IS spoiler (Done)
- New Roundels (Done)
- Euroweaves Purchased
- Euro Ellipsoid smileys, purchased from Cacciatore08
- Euro grilles
- ES or IS cowcatcher (I have both, can't decide which I like better. Leaning towards ES as would be more original, however the ES air dam needs more work)
- Need to decide on side skirt/rear apron combo. I like IS sides with Zender rear, but haven't been able to source the diving board Zender rear. UPDATE: MTech1 + Euro bumpers
- Replace vs polish driver's window (scratched to sh*t from PO removing parking sticker with razor blade) (Done)
- New chrome lock strips to front and rear windshields (Done)
- Repair rust in driver front fender from sunroof drip tube clogging (Done)
- Re-cover the vinyl on check panel trim (Done)
- Install E28 tool kit and inner trunk lid cover (Done)
- Clean and refinish Jack/lug wrench/wheel chock
- Replace door mouldings with new
- Eventual complete repaint (DONE!)
I'm sure I'm forgetting a few things but that should keep me busy for awhile.
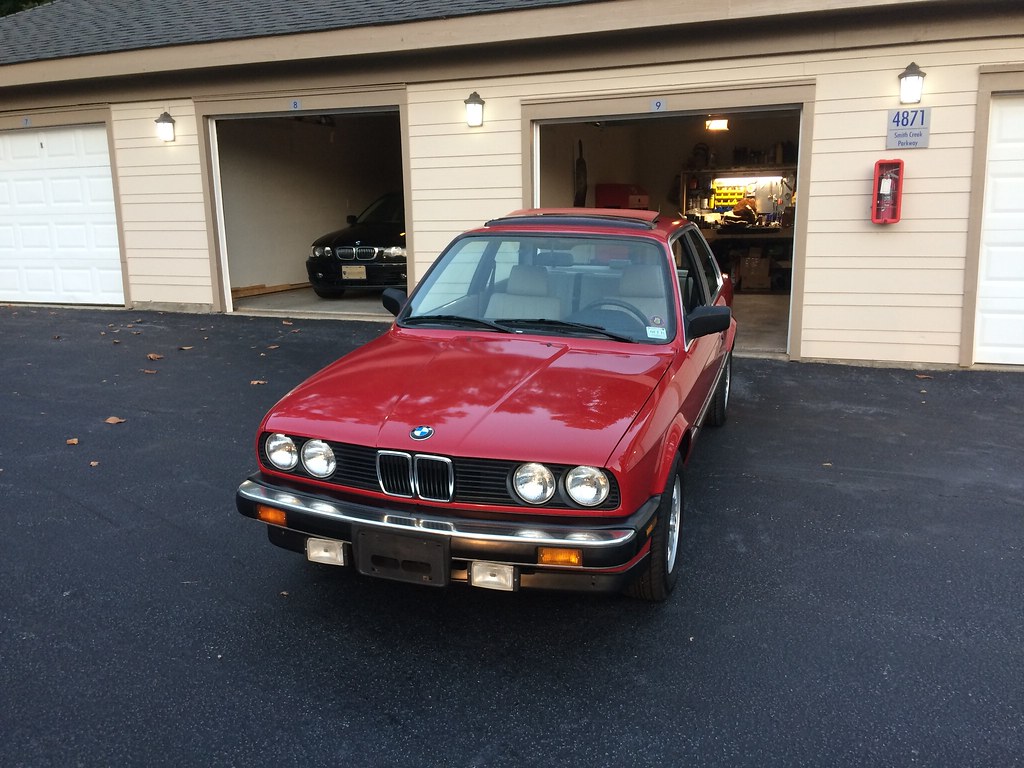
Anyway, here's a pic of how she looked the day she was delivered:

A little dirty, but otherwise as she was they last time I saw her. I didn't take many pictures early on as I didn't initially intend on making a thread, but after reading a few member's stories I got inspired. I'll do better moving forward with photo documentation.
My first order of business was to get the car looking presentable, so a wash and wax was in order. While cleaning, I noted how horrible the bumper shrouds and IS spoiler looked (essentially like crushed velvet due to pitting). I figured it best to pick some low-lying fruit as a first project with the car, and I was really pleased with the results. After a few hours of wet sanding with 120, 240, and 400 grit sandpaper, I used some primer/filler followed by 600 grit for what was left of the super deep pits followed by 3 coats of Plasti Dip. A word of advice when using Plasti Dip on anything: keep the spray cans soaked in a bucket of HOT water until just before you spray. Keeps the spray finer and the finish much smoother. I wasted a few hours peeling off layers that turned out blotchy due to the cans getting cold. I also used a headlight restoration kit on the front bumper plastic trim and front air dam.
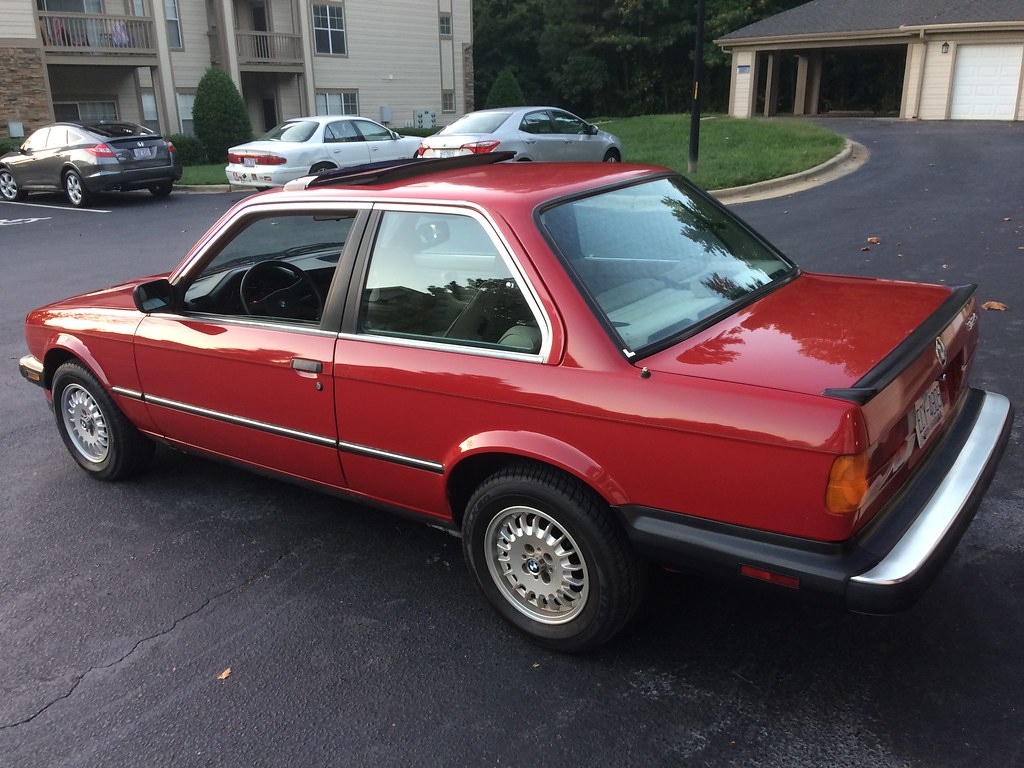
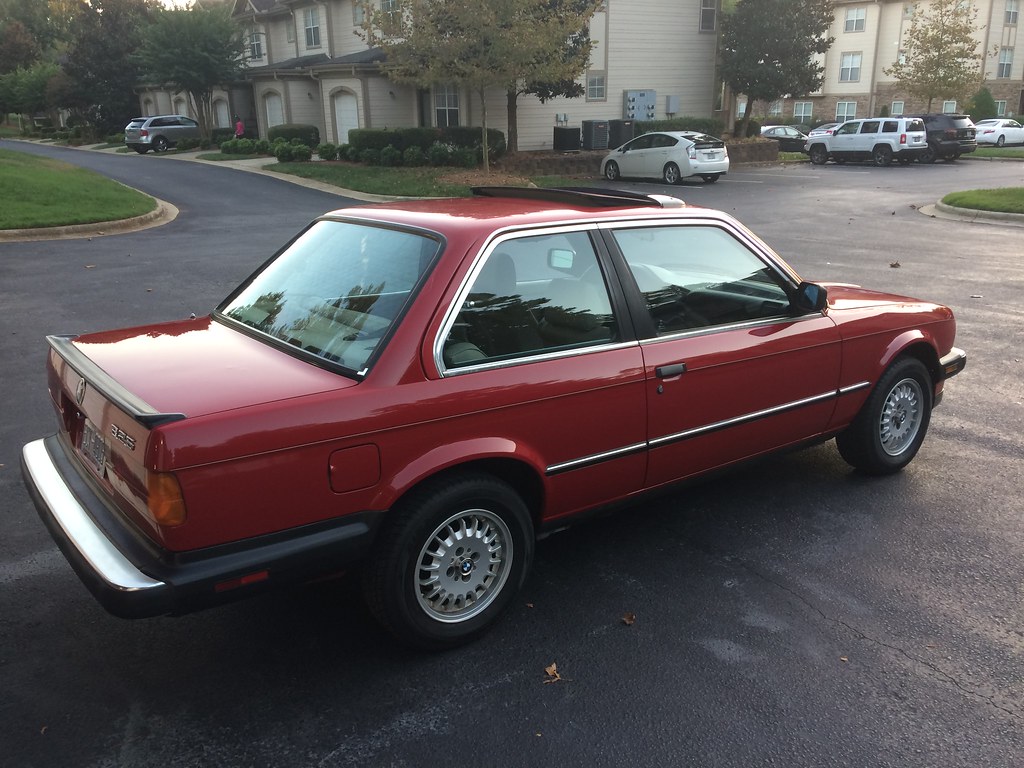
I wish I had taken some pics of the "before," they really looked terrible. Here's how we ended up:
(With my e46 tucked in the background)


Hopefully I haven't bored you too much. I've already completed a few projects that I'll add retrospectively over the ensuing days, and am in the midst of my big undercarriage refresh which I hope to complete over the next few weeks. I work a lot so it takes awhile to get solid garage time, but stay tuned and thanks for watching!Last edited by Albie325; 08-11-2021, 05:15 PM.


Leave a comment: