-
I love this level of documentation and detail. Nice choice on the head unit. I've been very happy with mine. The interface is really clean and simple... perfect fit for e30s. -
Nylon washers are a great idea, didn't think of that. I think that if the O-ring trick craps out I may try that next.Originally posted by Staszek
I'll take it! Thanks manOriginally posted by MR E30 325is
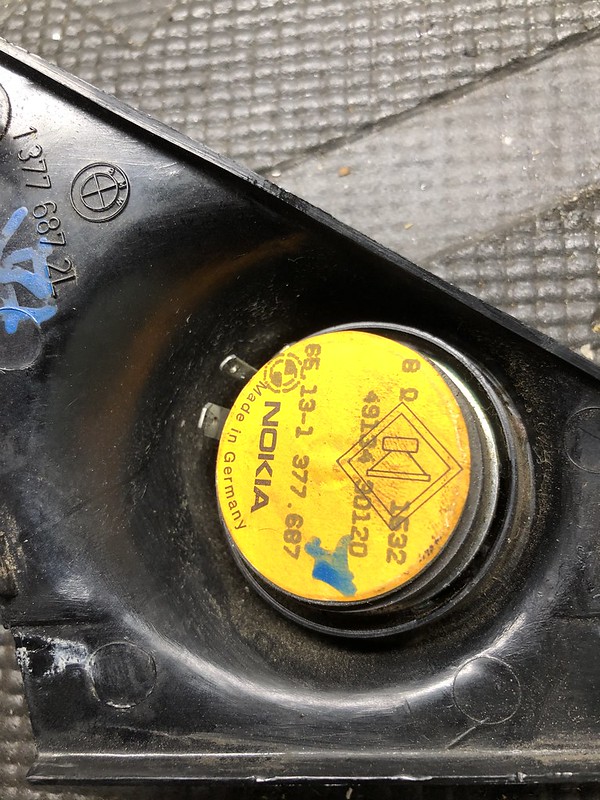
So I got the front premium speakers and tweeters wired up yesterday, here's how it went. I started by looking at the rear premium speakers with the tweeters already wired up. There should be no difference for the wiring for the front setup aside from the fact that the wires connecting the speaker and tweeters are longer. Note the side that the red resistor is on:

Disregard the purple and red wires, they were cut and sent with the speaker from the seller I bought it from. They will correspond to my Yellow/Red and Blue/Red (+) (Red/Black) and the Yellow/Brown and Blue/Brown (-) (Purple/Black) wires on my car.
As for the Green/Black and Solid Green wires, these should correspond with the Green/Gray and Yellow/Gray wires in the front doors. Here's where they are wired in:
The Green/Black is connected to the larger spade connector on the tweeter as well as the larger spade connector on the resistor side of the main speaker:
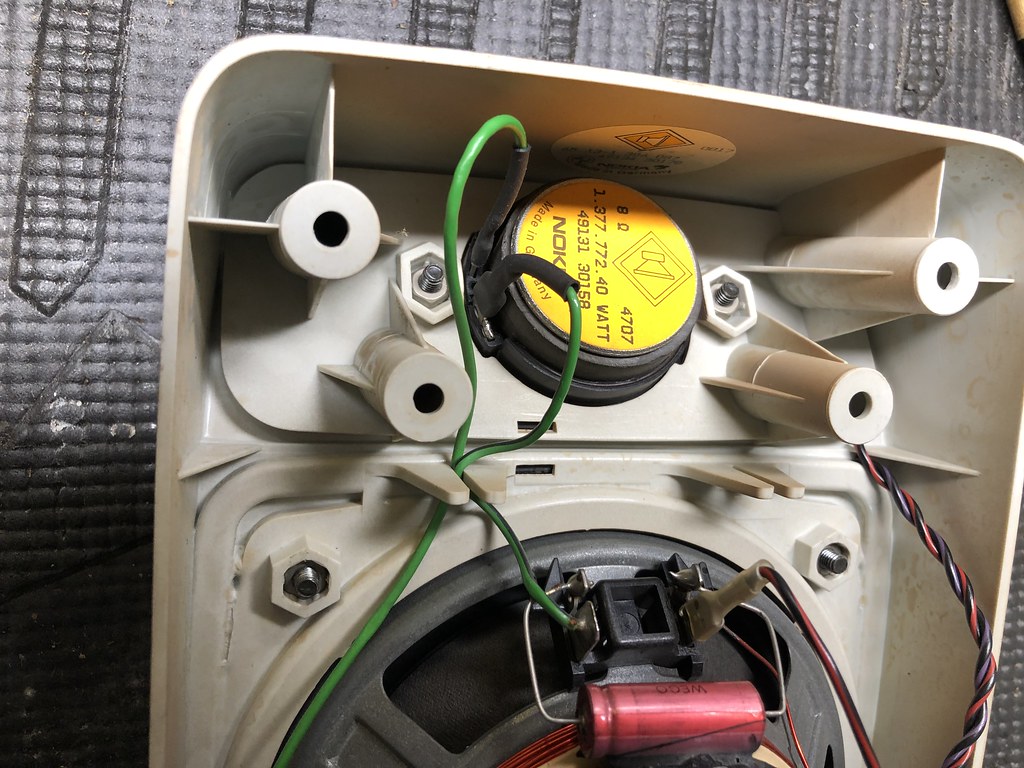
The solid Green wire attaches to the smaller spade connector on the tweeter and is soldered in to a small spade connector on the non-resistor side of the main speaker behind another already soldered wire:

In the door, the Green/Gray wires all have a large spade connector at both ends, and the Yellow/Gray wires have a small spade connector at the tweeter (drivers side only) and a random blue plastic cap on the speaker side. Based on this, the front tweeter wires should correspond to the rear speakers as follows:
- Green/Gray = Green/Black
- Yellow/Gray = Solid Green
Pardon my drawing skills, but here's the general schematic. The red resistor is facing toward the tweeter in the drawing as it is on the rear speaker:

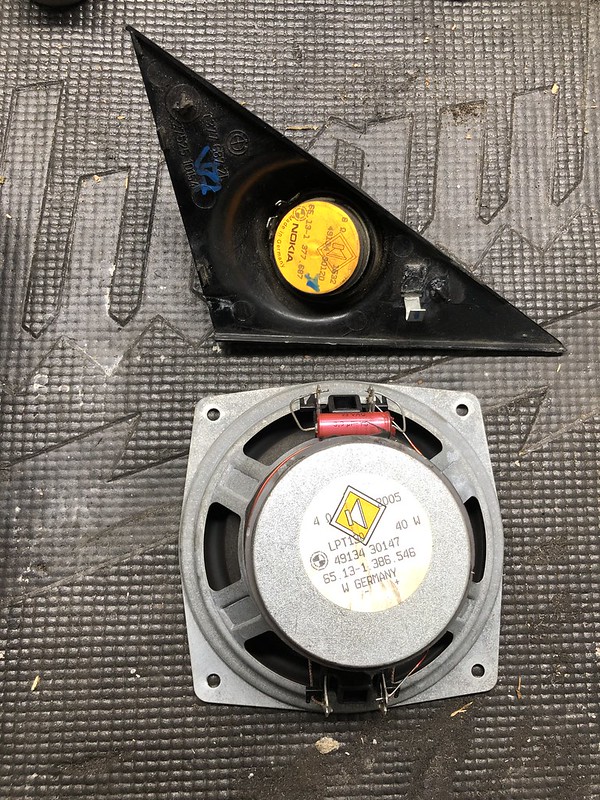
Here's the spade connectors on the speaker and tweeter:
Resistor side:

Non-resistor side:

And tweeter:
Here's how the same pics will look with the wires in place:


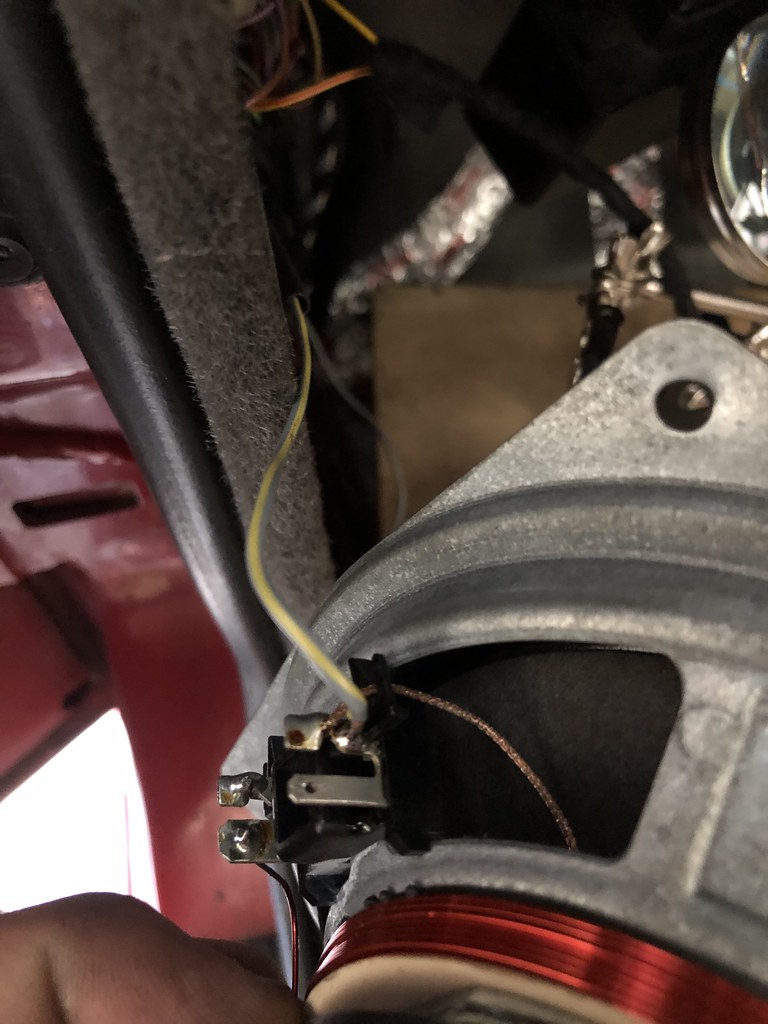
Here are the ends of the wires in the kickpanel:

For the Yellow/Red, Yellow/Brown (And corresponding blue wires on the passenger side) as well as the Green/Gray, just connect the spade connectors to the appropriate pin. For the Yellow/Gray, cut the blue plastic connector off and solder the wire onto the speaker:

Should be good to go:


Repeat on the passenger side, except that there's a different connector at the tweeter that looks like this:

If you don't have that short spade->plastic connector piece, you could always cut the plastic piece off the tweeter wires in the door and crimp on new spade connectors as they are on the driver side.
And that's it! hope it works.
Today I got a bunch of other random stuff done.
Got a bunch of trim items painted:
Before and after:

Polished and painted the third brake light:


Repainted a few other bits:

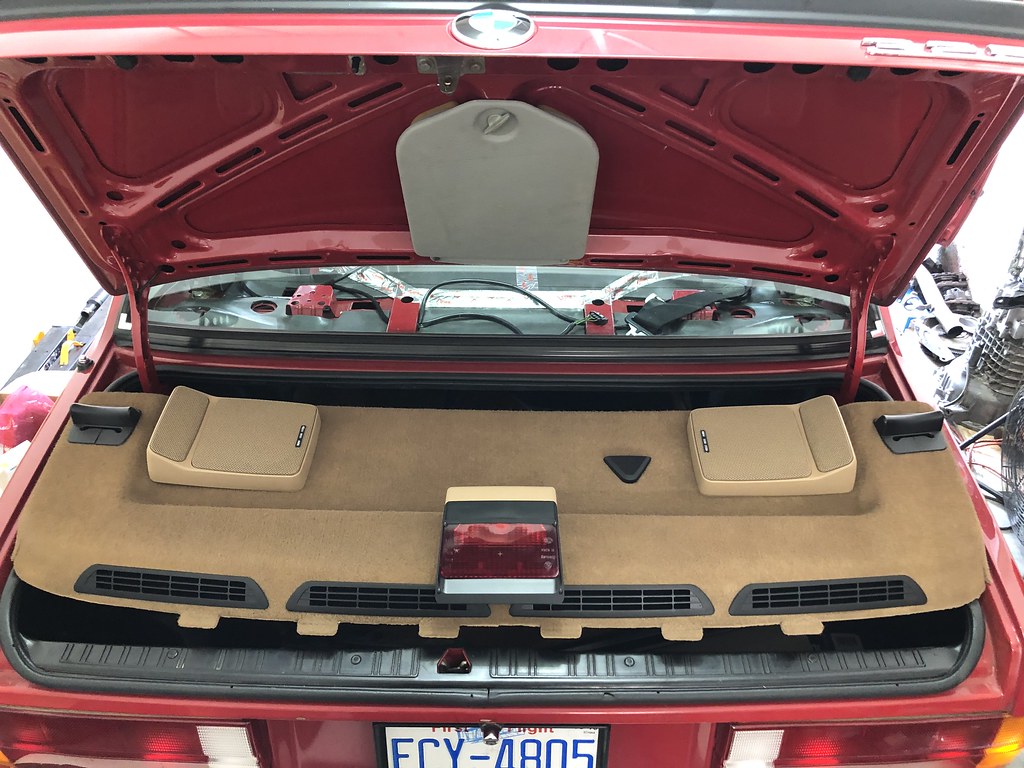
Rear parcel shelf all buttoned up:
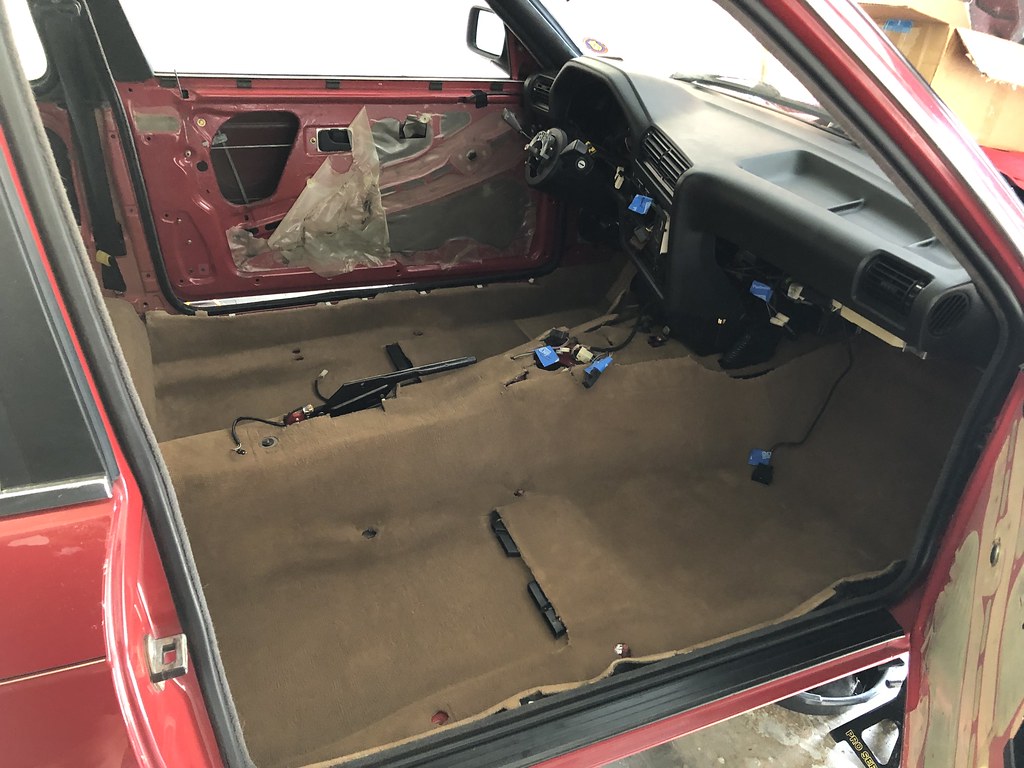
Carpet in:

And got the head unit and HVAC panel installed and upgraded to a euro clock:
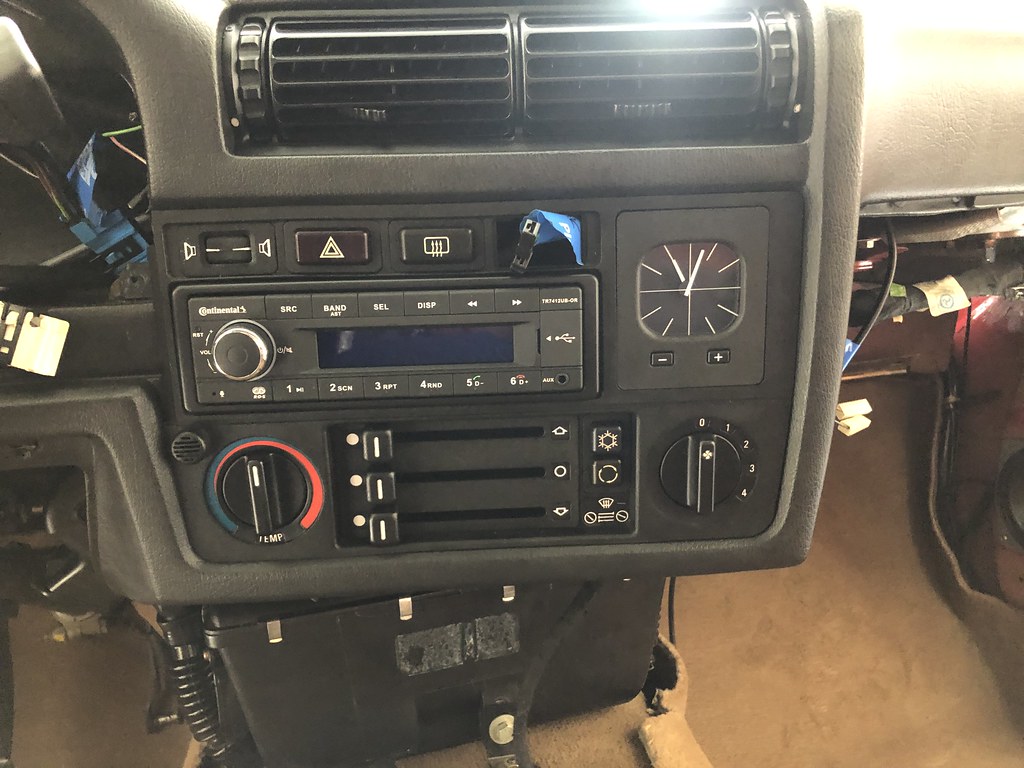
The window/mirror kill switch was broken so I ordered another. The fader isn't connected to anything, I think I'm going to follow a few other members' leads and install a blank switch that controls the antenna going up and down since I won't be using it as much with the new head unit in place and want to save the motor when I can.
I got the auto trans drained, all the auto trans coolant lines off, the exhaust off, and the driveshaft off. I found it easier to loosen the trans side driveshaft bolts from the inside:

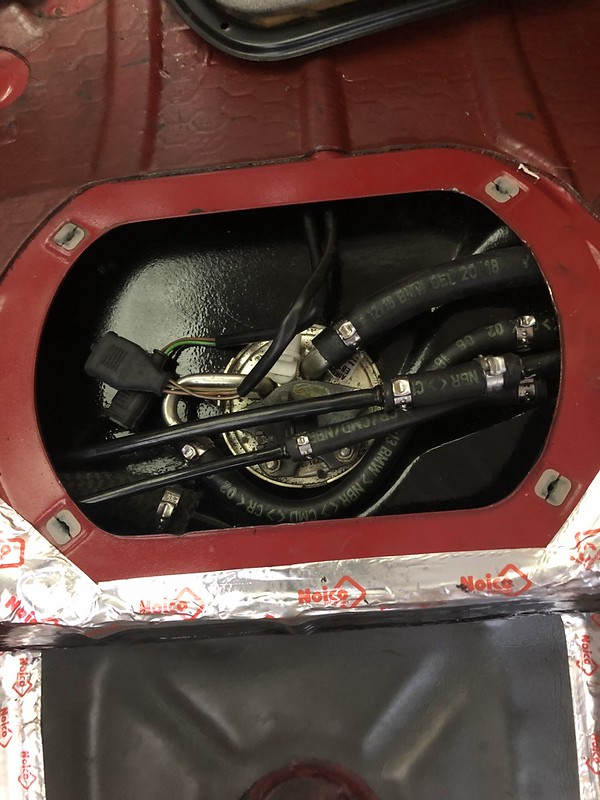
With the driveshaft out, I dropped the gas tank (again) to replace the CRP fuel hose I used under the tank. I mentioned this in a previous post, but I read a few horror stories about CRP hose cracking after only a year or two and have been freaked out since. The BMW hose wasn't in stock anywhere the first time around otherwise I would have saved myself the hassle.

Changed this short section of CRP hose as well:

It was a pain but I finally have all BMW gas lines and can sleep soundly:
I hit a snag removing the auto trans dipstick tube as I didn't have the right size wrench (30mm) and the adjustable wrench I had kept slipping. I ordered one and it should be here by the weekend so I can continue on with the trans removal.Leave a comment:
-
-
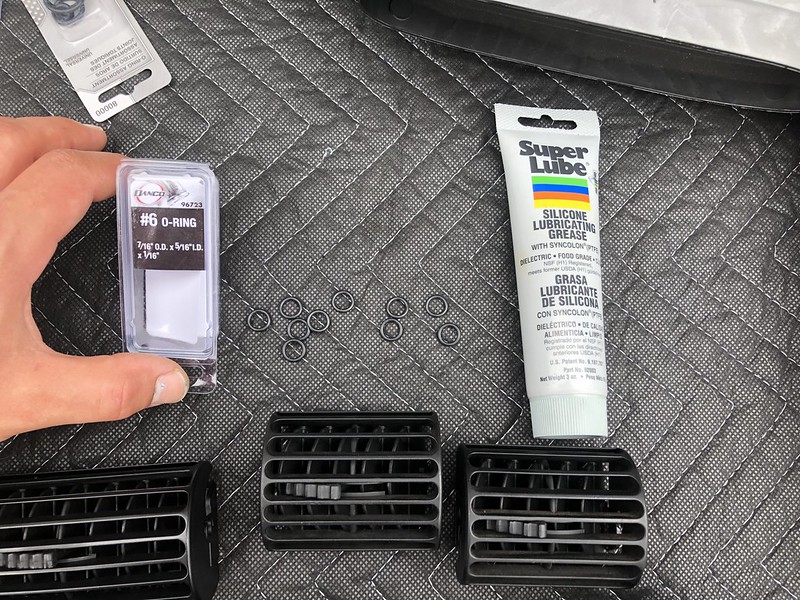
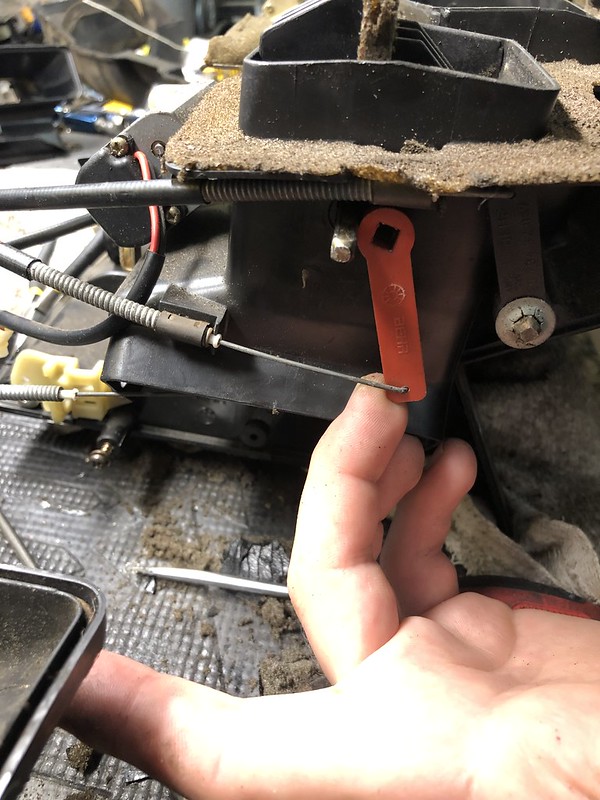
Melon, yah I about shit a brick when I realized that hole for the sensor wasn't pre-made and I'd have to do it. As for the vents, check out this thread:
The problem I was having was I'd point the vents at my face, then the first bump I went over the vents would fall and point at my balls. Not that that's a bad thing, but my face needs some love too. The O-ring wedges in between the vent and the vent housing to give it some friction to stay put.
So to remove the entire vent assembly, there will be two push tabs on the underside of the vent with a corresponding solid lock tab on the top:
Bottom in green, top in red:

I had the luxury of having the dash out, so from the underside of the dash I just pushed up on the two push tabs and swiveled the bottom side of the vent out past the tabs, then slid a thin flat head screw driver in between the dash and the top of the vent where that other tab is to release it and slide it out. With the dash still installed, I'm sure you can just slide the screwdriver or similar thin tool in to release the bottom tabs first followed by the top.
To remove that actual vent itself from the housing, pic #3 of the above thread shows how it pops in: there's a little J-shaped groove that catches the tabs on either side of the vent housing, with a little C-clip at the end that pops into place. To remove, I didn't use a tool the way the thread says. You simply rotate the vent down as far as you can, then continue to rotate down and press on the top of the vent (and push with your fingers from the inside as well) until you feel that little C-clip pop out then just slide the vent out. The vents popped out easier when they were still wet from cleaning.
As for the O-ring, I just put one on the tab in the vent housing lubed with some silicone and reinstalled the vent making sure the O-ring stays wedged between the vent housing and the side of the vent. I recommend only putting an O-ring on one side of each vent, not both. Putting it on both makes it too tight, I tried it.Last edited by Albie325; 06-25-2019, 06:01 AM.Leave a comment:
-
Nice move on the vents! I did the same except used #10 nylon washers with no silicone and it worked great.Leave a comment:
-
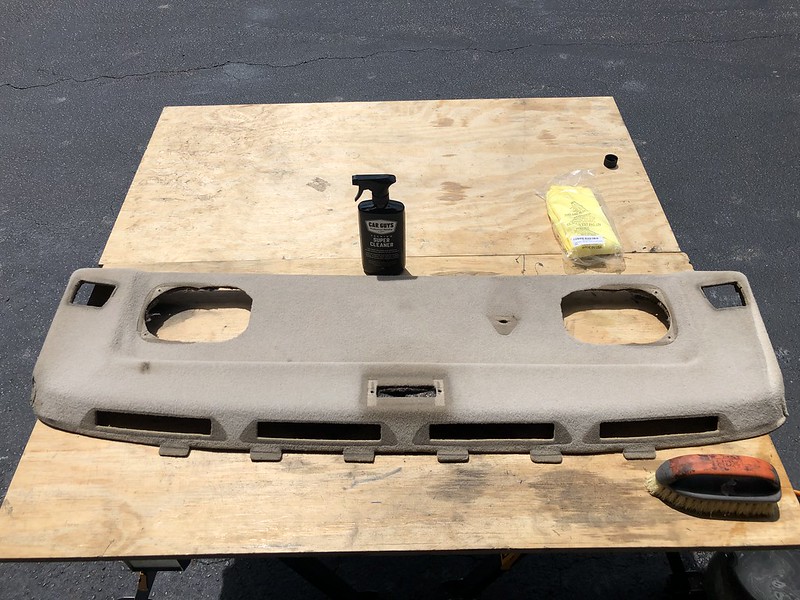
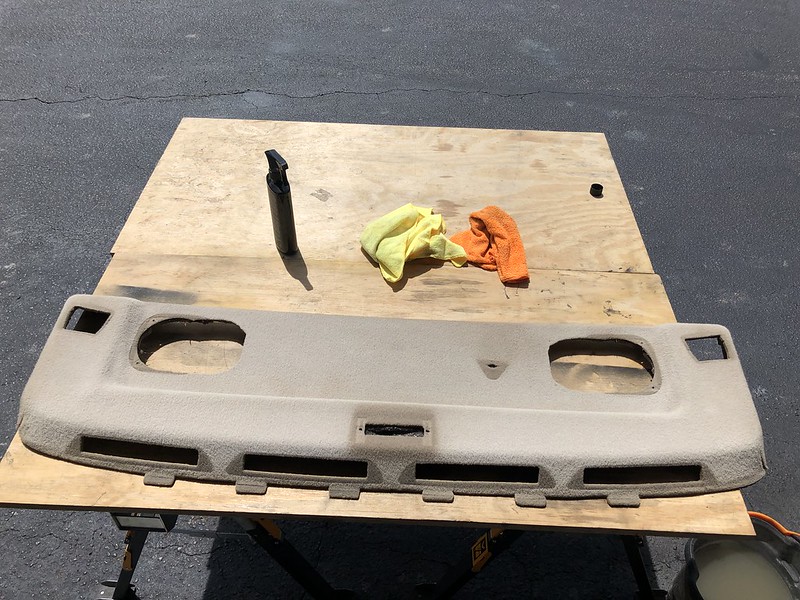
Thanks man, it's a tedious job but well worth it considering how filthy these things get over time.Originally posted by rzerob
I just ordered some 1" x 1/8" thick neoprene foam tape for the duct edges (this appeared closest in size to the old foam) as well as a roll of 1ft x 54" x 1/8" foam sheet for that aluminum tray. After doing the job, it may be easier to only get the sheet and cut everything to size that way (I think Melon did his that way), however I've found a few other uses for the tape and it's cheap enough. Here's the links on Amazon:
https://www.amazon.com/gp/product/B0...?ie=UTF8&psc=1
https://www.amazon.com/gp/product/B0...?ie=UTF8&psc=1
One roll of each is enough to do the job about 10X over.Leave a comment:
-
Dude!

That looks awesome!
Great job on the IHKS, it's really not bad once you get it apart.
Man, poking a hold in the evap core made me super nervous, but it all worked out pretty well.
Few questions;
How can I get the vents out without damaging the dash?
And some deets about the spacer to get the vents some resistance back.Leave a comment:
-
Great job on the HVAC assembly. I will be using this as a reference when I do the job myself. Where did you get all of the different foams? Do you have any links?Leave a comment:
-
Okay, been chipping away at some projects.
Got all the IHKS components cleaned and re-foamed:


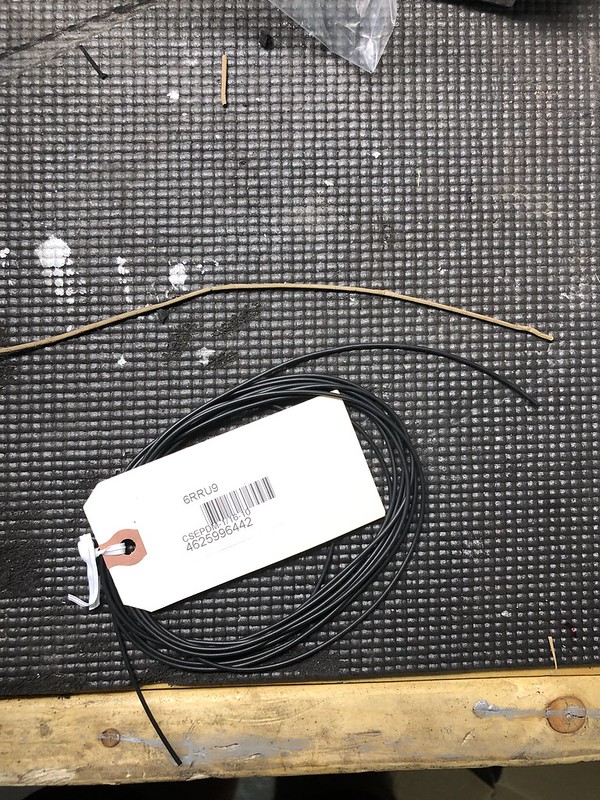
As for the rubber cord sealer along the seam of the two halves of the IHKS I mentioned in an earlier post, this is what I was talking about:

It also seals the AC evaporator core cover:

By now it had plasticized and crumbled in my hand. The part is NLA, however I ordered 10 feet of 1/16" rubber cord on Ebay and it was the perfect match:

I got all the damper flaps back in and connected and lubed the hinges with some silicone grease so they wouldn't squeak:

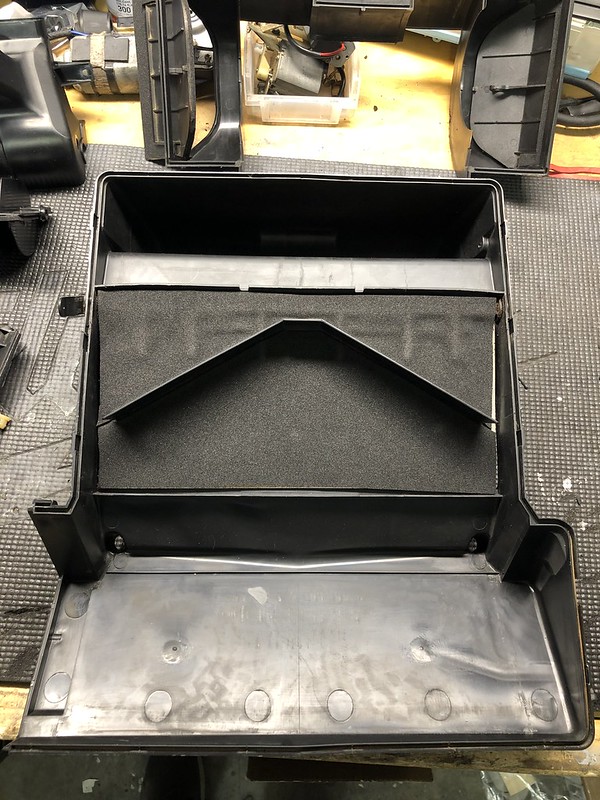
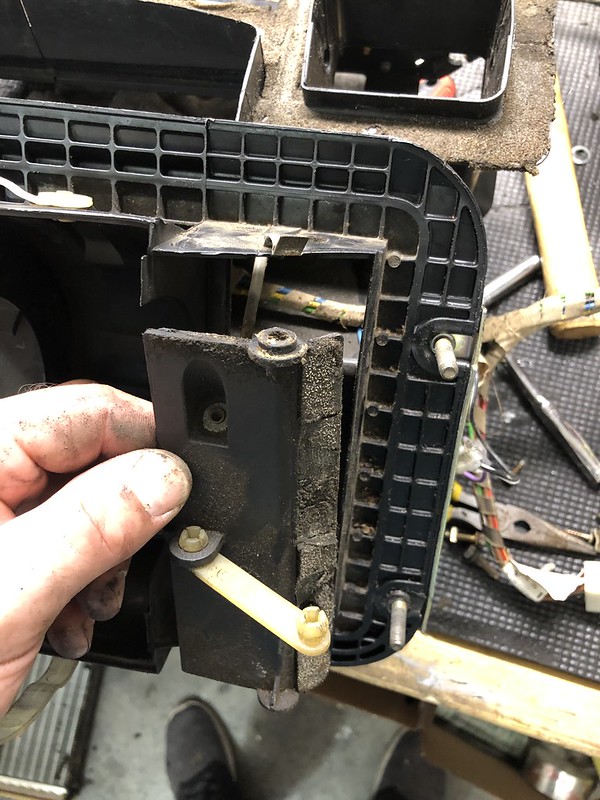
Got the two IHKS halves back together and put all the metal clips back in place. Then I went about replacing all the heater core and AC evaporator parts:
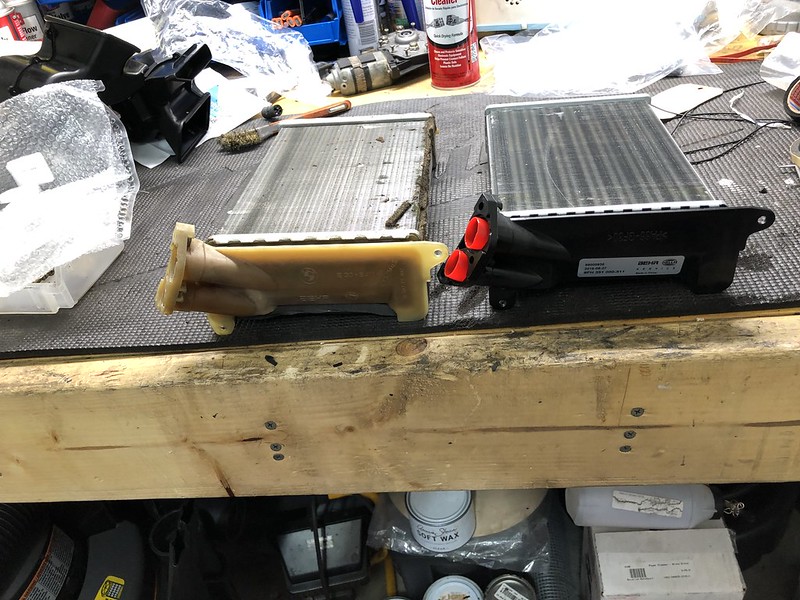
I could only replace the longer of the aluminum heater core pipes, the shorter one is NLA however mine appeared to be in good shape without any holes or pitting.
Be mindful before you trash your old heater core, you need to pop out these little square nuts and swap them into the new unit in order to screw the valve and aluminum pipes into place, there's also several of them in your old heater valve as well:

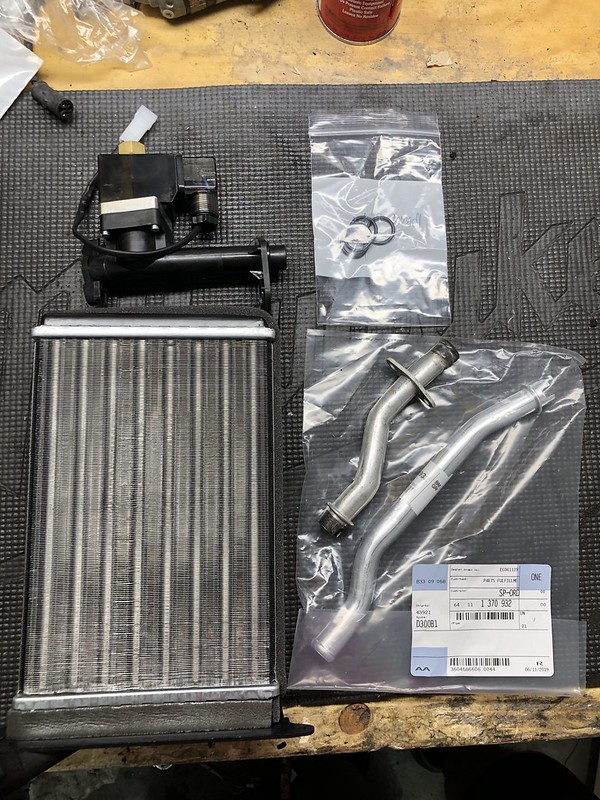
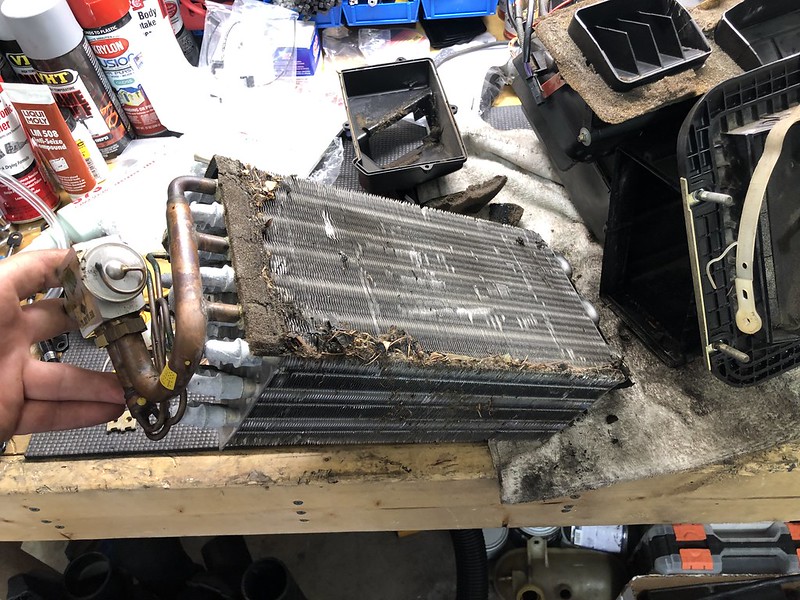
New expansion valve and evaporator core:
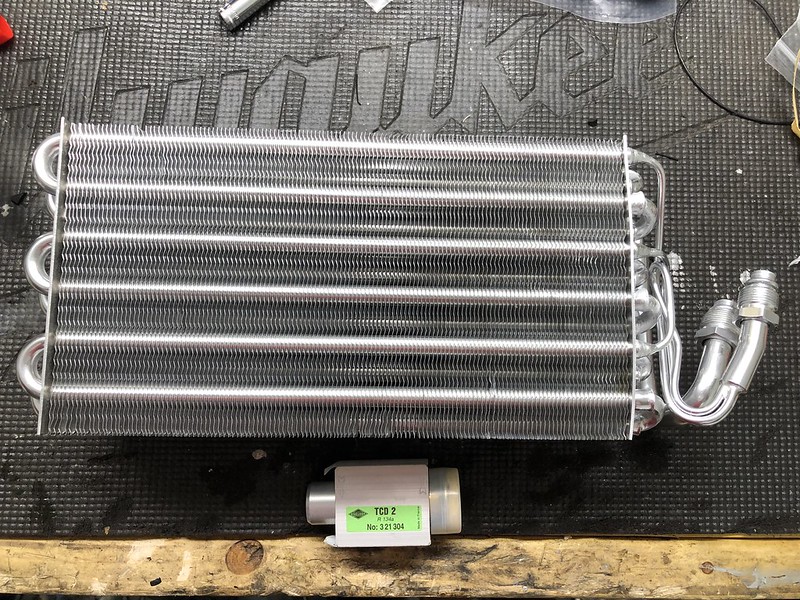
I replaced the O-rings and lubed them with PAO oil prior to install, you don't want to install them dry. I chose PAO as I'm going to keep the system as R-12, and PAO is compatible with both R-12 and R-134. All the seals, oil, and new components will be compatible with R-134 should I ever decide to switch over.
New temp gauge:


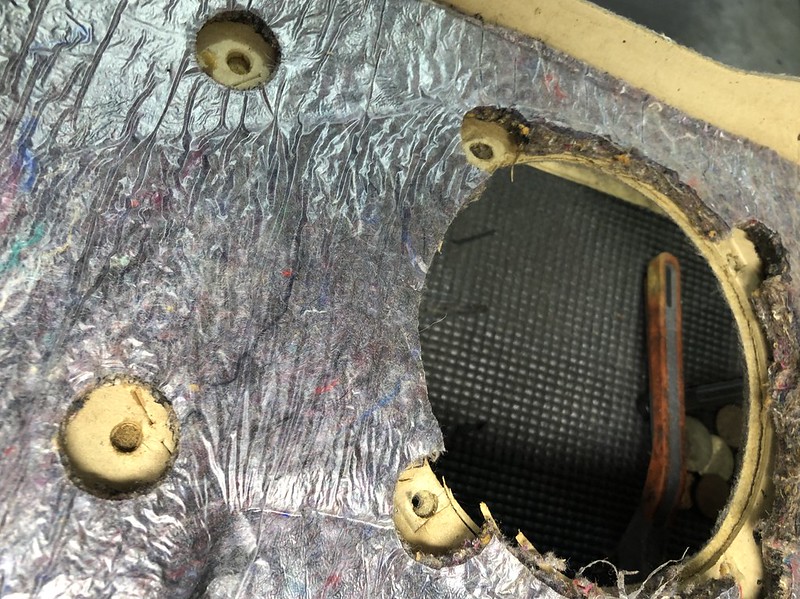
You have to uncoil that long sensor and use a long, thin punch to poke a hole in the evaporator fins in order for the sensor to slide in. I forgot to take pics of this, sorry for that. If anyone is interested I can take pics of the old one and show you what I mean.
New blower fan resistor, my fan was only working on full speed, a common indicator that the resistor is no good. Also replaced the broken fan shroud strap. My OCD is a little annoyed that the new one is black and the old ones were white but hey, I'm not racist:

New gaskets:
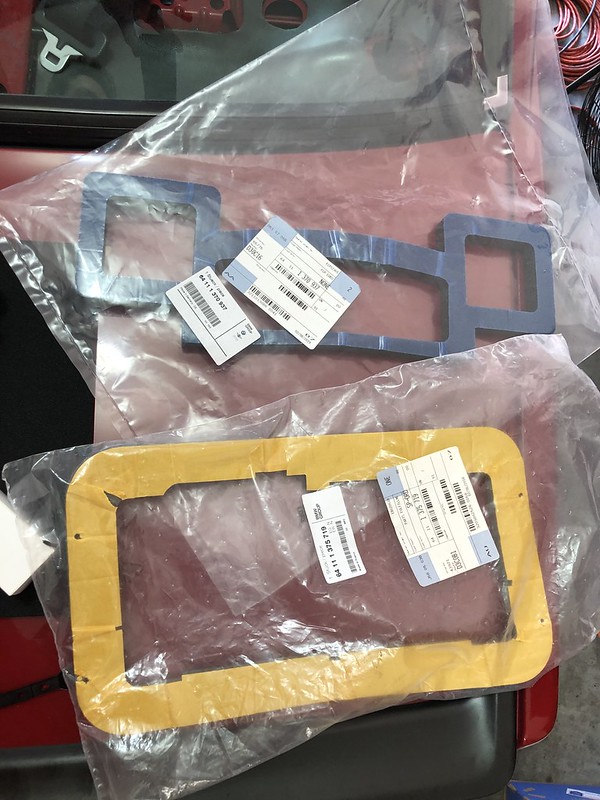
The bottom gasket which seals the IHKS to the firewall is actually the wrong one. There's apparently 2 versions. Hard to tell, but the one I ordered is a little too fat and the cutouts aren't right:
Took a couple extra days (and another $35) but this is the correct seal:

Got my extra carpet cutout in place:

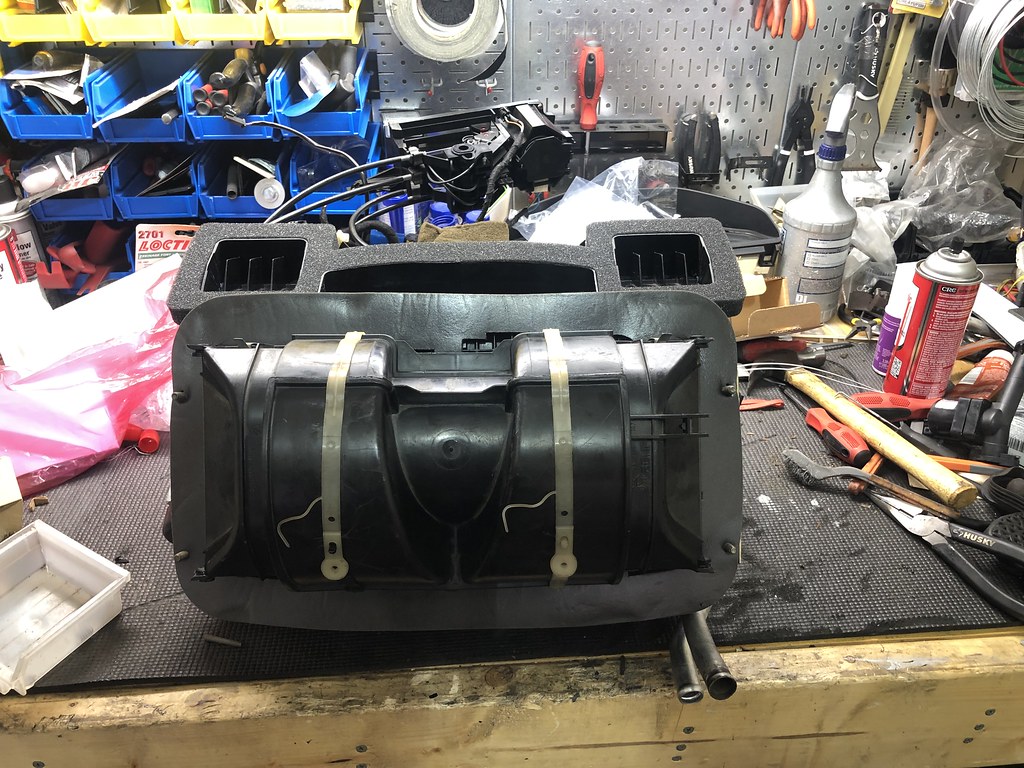
And got the IHKS installed:

Went to go put the firewall cover back on and realized how bad the foam on it was so fixed that too:


In between projects I took the better half out to the ballpark. I'm a huge Yankees fan and Aaron Judge and Giancarlo Stanton were rehabbing at AAA Durham (next town over from Raleigh) last weekend so I went to see them, pretty cool:

Anyway, back to the car:
I got to work on the rear parcel shelf to do the premium sound upgrade. As stated in multiple threads, the cutouts for the premium speakers are already there under the sound deadener, you just need to cut out the perforations:


Then just cut out the carpet with a sharp blade.
Got the carpet cleaned and redyed as well:

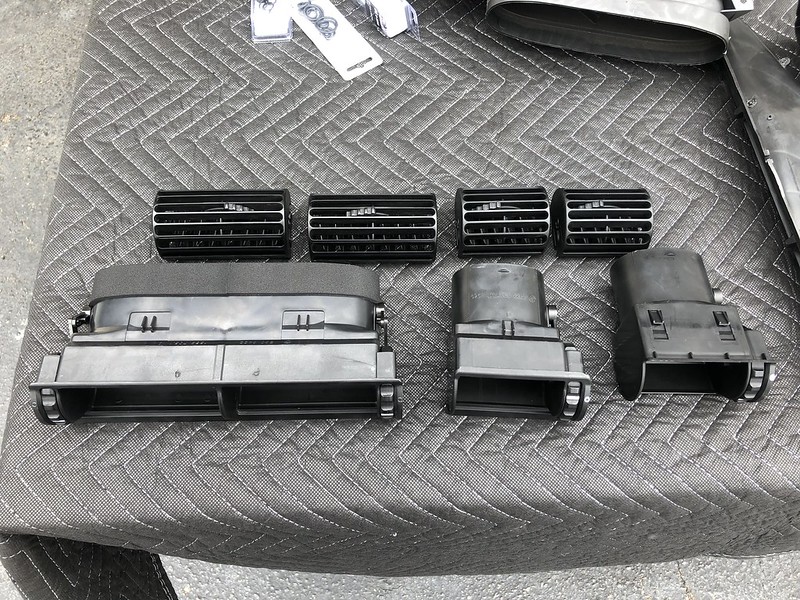
Also repainted the vents and seat belt holder:

Got the brake assembly and all associated parts installed, figured it would be way easier with the dash still out of the way:
No pictures, kindof tight under there. Even with the dash out it was still a chore to get to some of the nuts.
Probably not necessary, but after all the work on the carpet and floor I clamped the clutch master fill line in place rather than spill brake fluid all over the place. I'll do the same at the brake fluid reservoir when the time comes:

Last, I got to work swapping all the vents and ducts over from my old dash to the new one. I gave them a good cleaning first and replaced the foam:

My old vents were a little loose so I used a trick I found in a thread awhile back about making them tighter so they'd actually stay pointed where you want them to. A little rubber O-ring fit onto the pivot point and lubed with a little silicone grease. Much tighter and everything swiveled smoothly:

Could have probably gone with one size smaller O-ring but these worked well.
Once all the vents and ducts were in place, I swapped over my VIN tag and treated the dash with some Aerospace 303, came out looking pretty sweet:

I went about weaving the wiring harnesses back in through the appropriate holders etc. Took some time, but have all the wiring in the right spots nice and clean.
Ahhhh FINALLY I have a presentable dash:


Prior to calling it a day, I got the front premium speakers and tweeters wired up, I'll post that up tomorrow. With the dash finally installed I can get to work getting the rest of the interior in, which I hope to do tomorrow as well.Leave a comment:
-
Sure NOW you tell me. All good, I ended up buying some pretty cheap on Amazon and got the IHKS all sorted out. Waiting on one of the foam seals to come in, apparently there’s 2 similar but different ones and of course I ordered the wrong one. Thanks for the offer thoughOriginally posted by MelonLeave a comment:
-
Dude, I forgot to tell you, I have plenty of neoprene if you want it.Leave a comment:
-
I hope so!Originally posted by Tzantushka
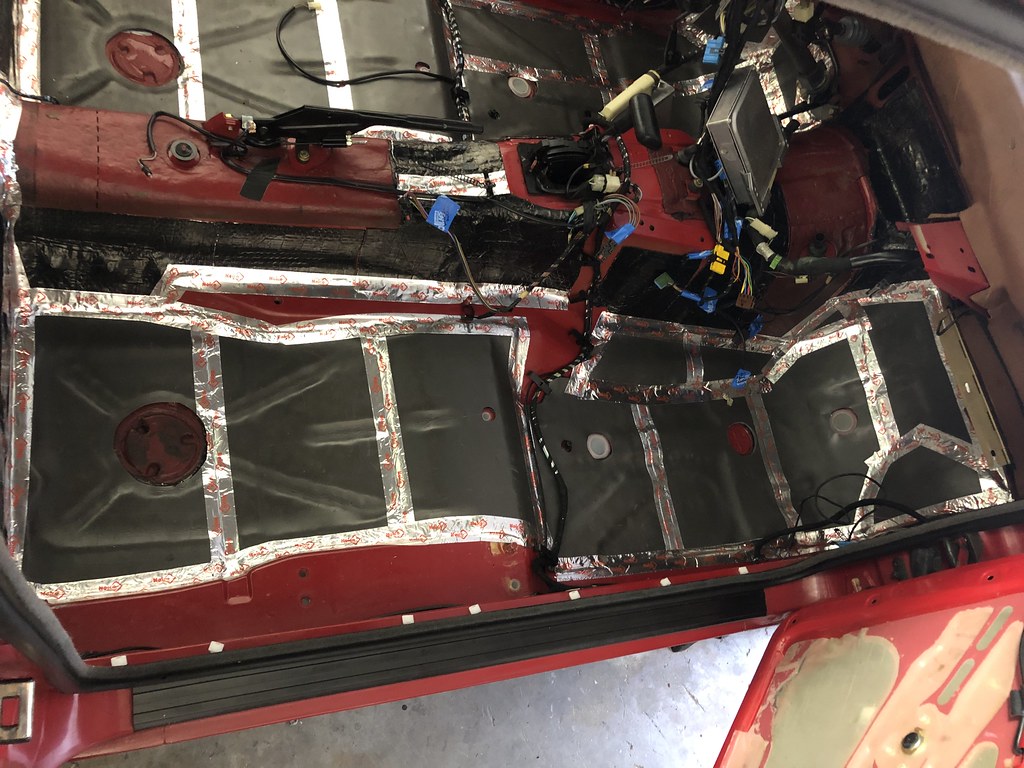
Spent the day putting sound deadener throughout the cabin:
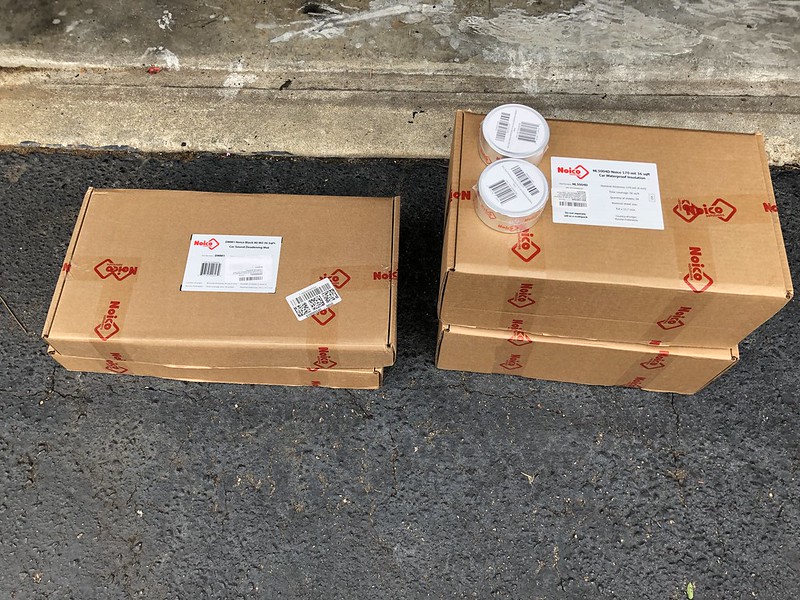
I went with Noico, they had great reviews and price was right. I also saw another R3V'er who used it in his build and liked it. I used 80mil as a base, and in places where I had enough room for it I also added a layer of 170mil neoprene over the top.


I made sure to keep all drain plugs exposed.
After what seemed like a game of Tetris from Hell, I got the entire interior done:


I found evidence of the repair to the driver's rear quarter panel, if not for the filler from pulling out the dent I would have never known it was there, the shop that did the work did a really good job:

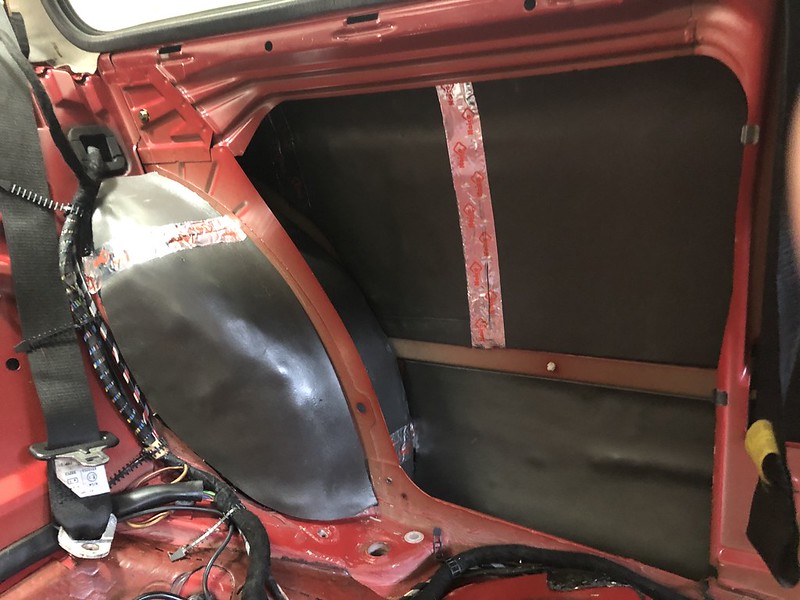
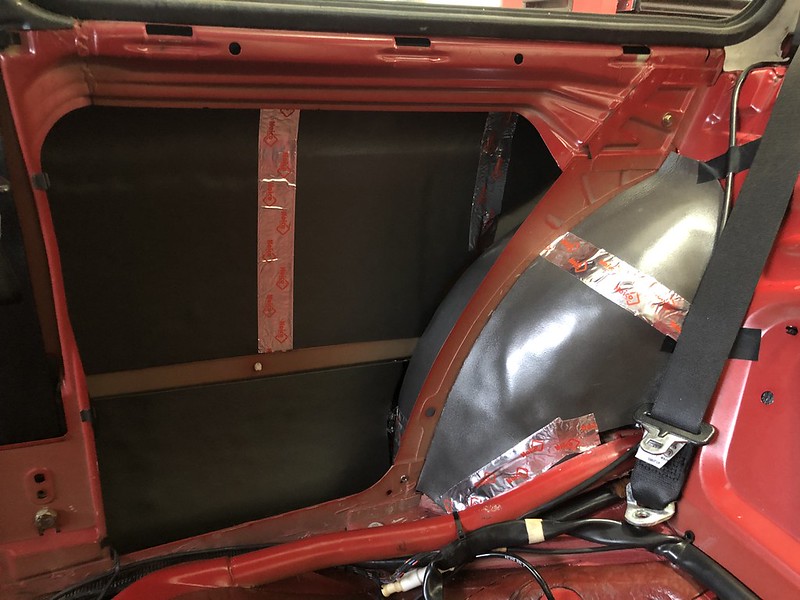
Hopefully this will help the rear deck speakers sound a little more lively:

I bought 72 sq/ft of each layer, I could have probably gotten away with just one box of each for the interior. I didnt use the 170mil for all sections as it was pretty bulky and I didn't want to have fitment issues with the center console and rear seats. Theres also already factory sound deadener to much of the interior so I left it in place and didn't really go over it.
I still need to do the inside of the doors and the trunk. I left the windows rolled down when I disconnected the battery so can't get to the exterior panel, and the trunk is full of interior parts. My driver's window regulator clicks when the window is rolled all the way down so was going to refurb both of the regulators anyway, I'll add the deadener to the doors when I have the glass and all the mechanisms out.Leave a comment:
-
Great work, this is going to look and feel like a new car when done!Last edited by Tzantushka; 06-12-2019, 05:06 PM.Leave a comment:
-
Got some odds and ends done over the last few days.
First I wanted to get all the wiring done and tidied up so I could get it all out of my way.
I ordered some speaker wire from Crutchfield, but then I had an epiphany: I need an extra blue/brown and yellow/brown. Why not just use the "spare" blue/brown I already have, and then just unsplice the yellow/brown from the front speaker and reroute it directly up to the head unit? So that's what I did.
Here's the extra random blue/brown from the front speakers that was routed over the center console:
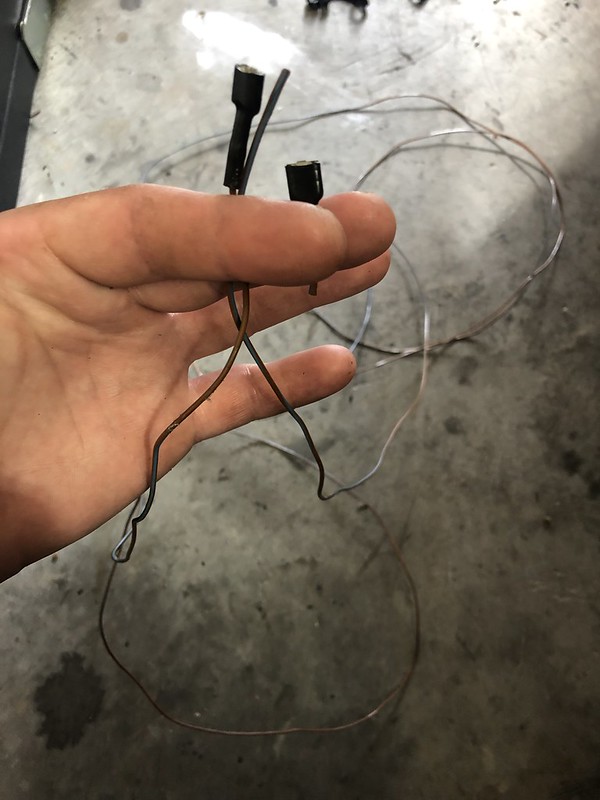
Left the Blue/brown from the fader connected to the passenger rear Blue/Black. Cut the passenger front Blue/Brown and soldered in my "new" blue/brown:

Original BMW speaker wire still in great shape:


Keep it tidy:
Unspliced the driver front yellow/brown and just ran it directly to the head unit:

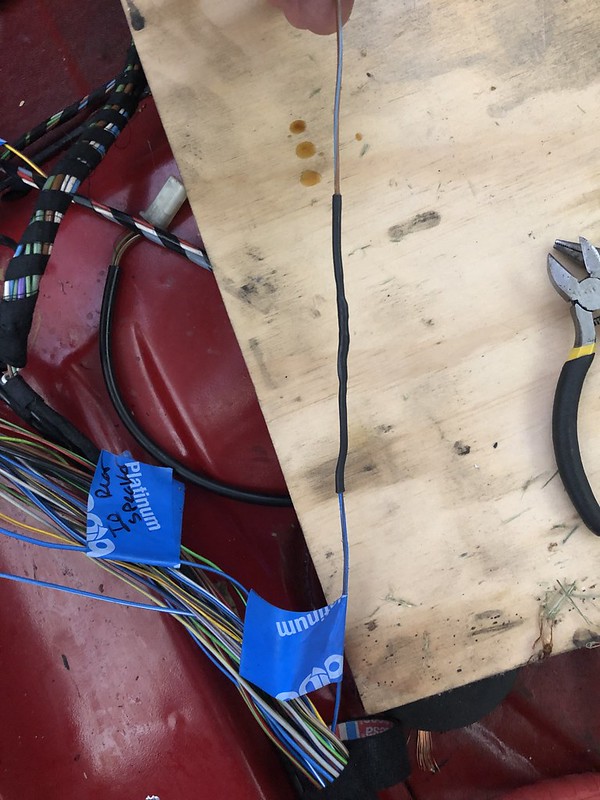
Rewrapped all the looms in fresh Tesa tape as well.
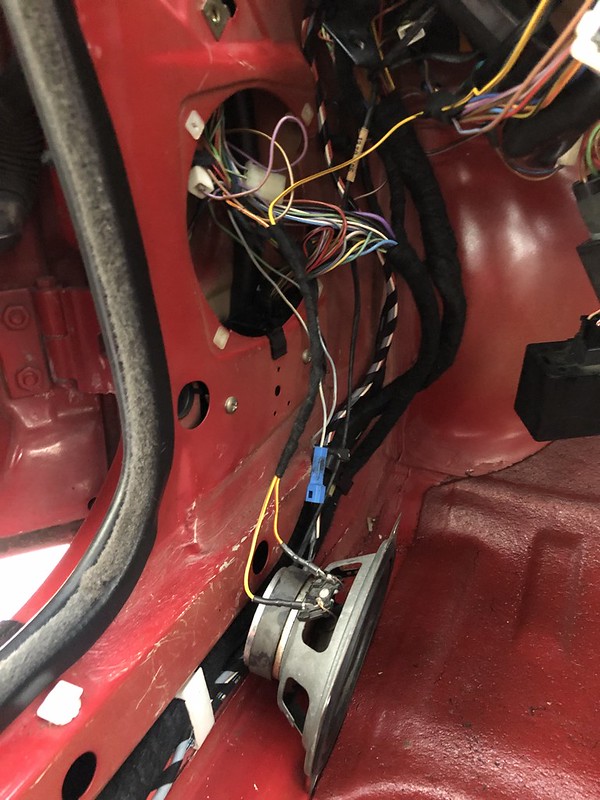
Then I went and wired in the new connectors for the headunit:
8 Channels for the speakers:

And 5 wires for the power input:
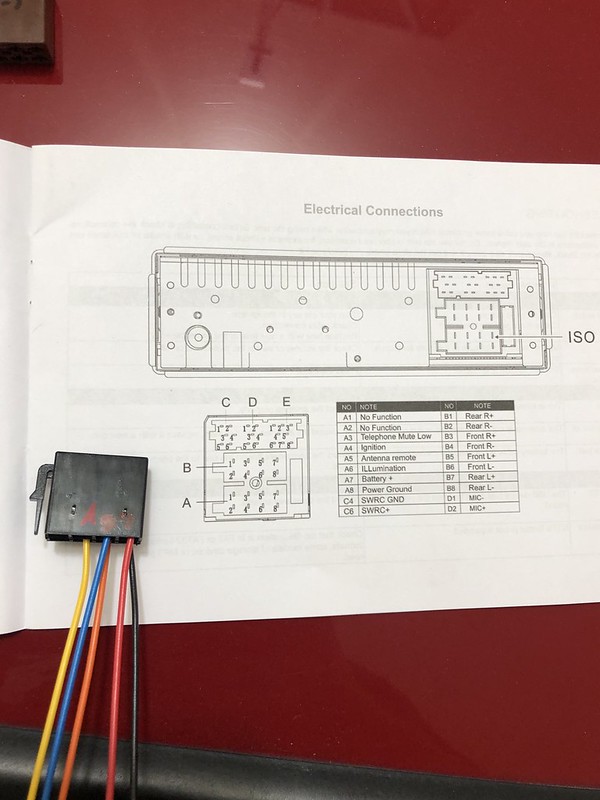
Matched all the wiring up based on the old connectors:


Based on the diagrams above, here's how my wiring matched up:
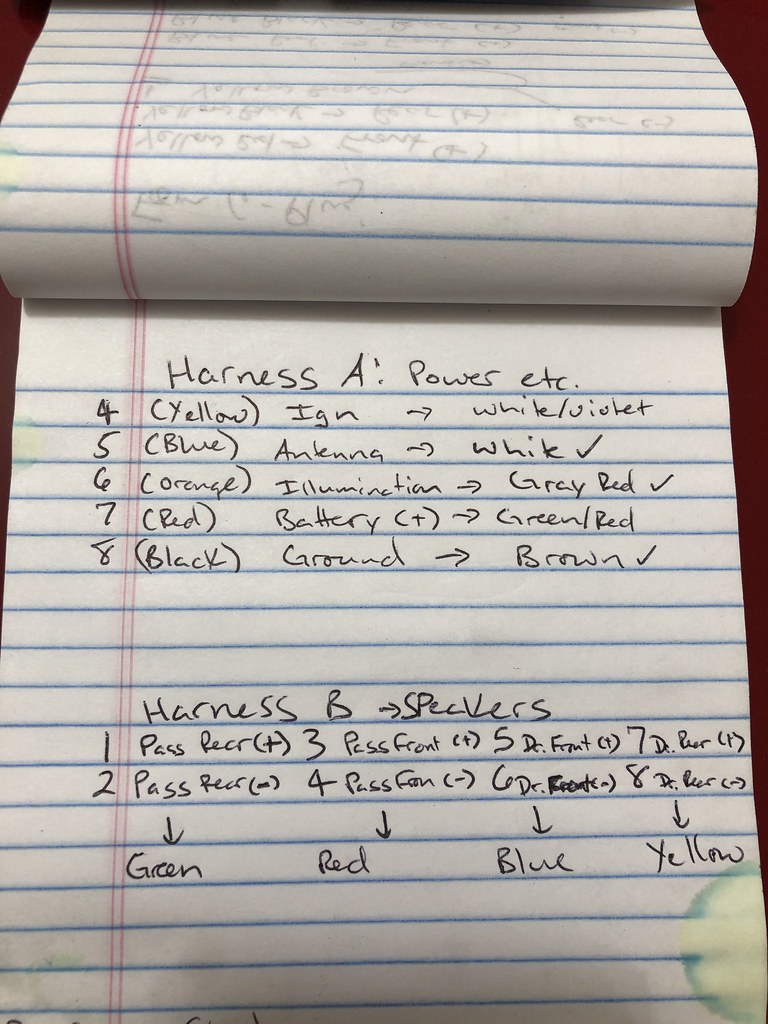
Was a little nervous to cut out all the old connectors:

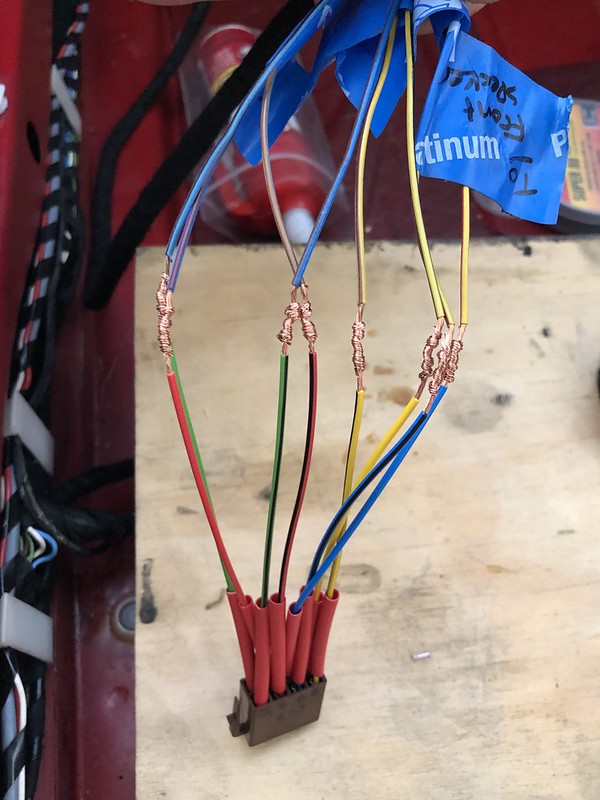
Soldered them all up and slid on some heat shrink to finish the deal:


Fingers crossed it all works as expected. Will wire up the speakers and front tweeters once the rest of the interior is back in.
Also got to work breaking down and cleaning the IHKS, it certainly needed it:

Evaporator core:
As for taking the system apart, it's pretty intuitive. Remove all the little silver clips to separate the top and bottom halves. The only tricky part was figuring out how to get a few of the damper flaps out. There are 2 square metal rods that run along the inside of the unit that hold in the two flaps for the the main cabin blower, and another for the long middle windshield defrost flap:
Remove these metal end clips, there are two more on the other side as well:

Each of the cable connector arms slides off:
Then you can tap the rod through and pull it out the other side:

Then you can GENTLY spread the vents apart and pop the dampers out. Be careful as you can easily crack the plastic.


The remainder of the dampers just pop out, some can be stubborn. Use a plastic pry tool to help you:
Used the compressor and a pressure washer nozzle with some Simple Green to clean everything up.

Soaked all the smaller pieces in a bucket, the old foam pretty much dissolved in the water. What was left of the adhesive peeled off pretty easily after 20 minutes in the water. I'm waiting on some new foam to come in as well as a roll of rubber cord for the gasket seal between the upper and lower halves (you'll see what I mean when it comes in) so I'll finish up with the cleanup and reassembly in a later post.
Today, I got the carpet redyed. I decided to go with the spare carpet, but ended up cutting out the missing center console section from the original carpet as it was in good shape. This way, I'll still have carpet underneath the IHSK and center console but can now remove the remainder of the carpet if I ever need to without having to take the whole IHKS out. Thanks to Melon for pointing out how convenient that could be.
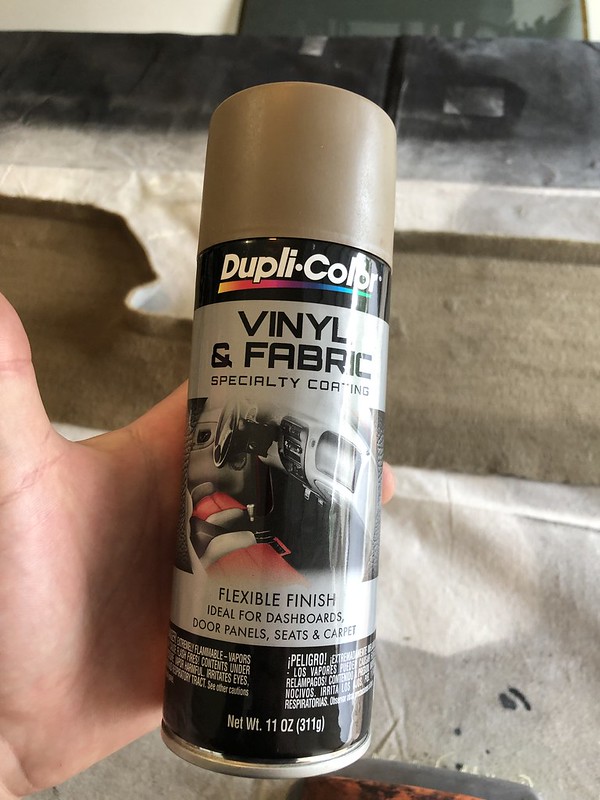
I used DupliColor vinyl and fabric paint, I chose Medium Brown as I read their Desert Sand is much too light. I started with the rear carpet:
Spare main carpet on the left, original on the right. Obviously you can see where I painted and where I didn't on the rear section:

I ended up doing 3 coats, it honestly looked really good after just 1. I brushed the carpet in between coats to keep the nap soft using a nylon bristle scrub brush. For each coat, I brushed the carpet uniformly in one direction and applied a coat. For the next coat, I brushed the carpet uniformly in the opposing direction and applied another coat, and so on so that the paint got into the fibers from all directions.
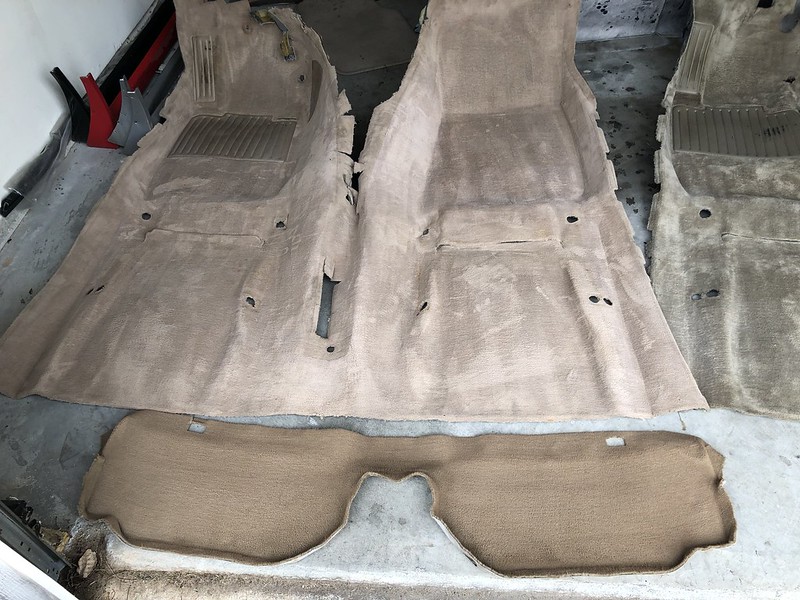
I was hoping to get away with not painting the main carpet section as the spare carpet actually looked pretty good, but the color was way off. So I continued:
For the vinyl inserts, I used SEM Vinyl Prep prior to spraying:
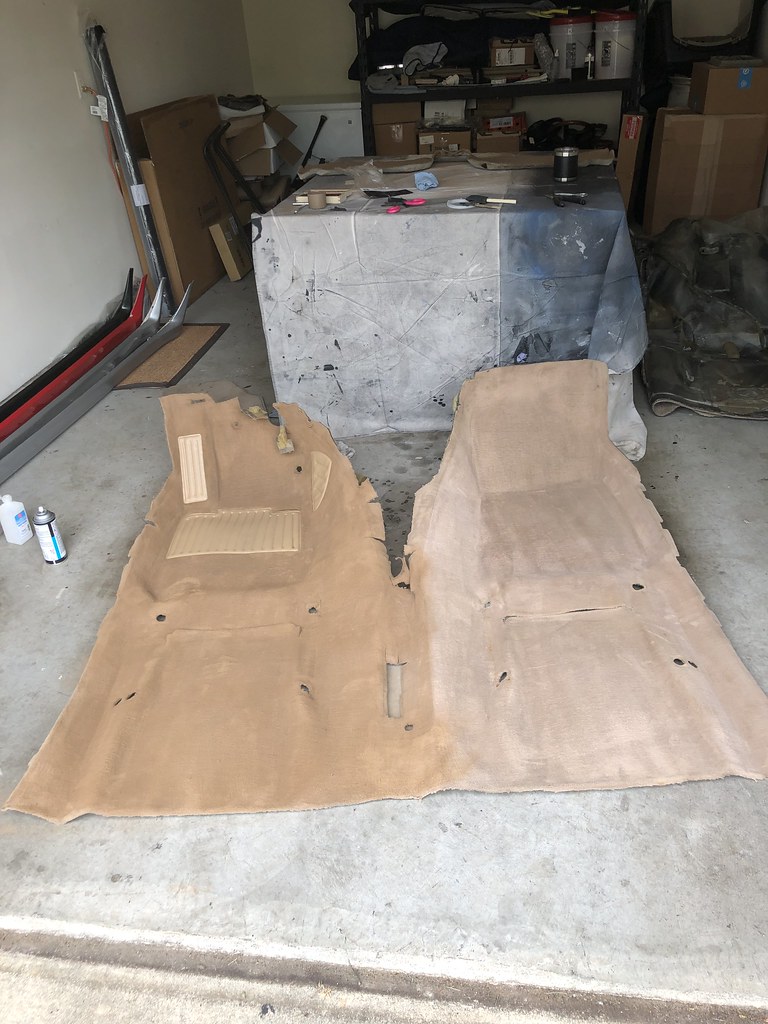
All done:
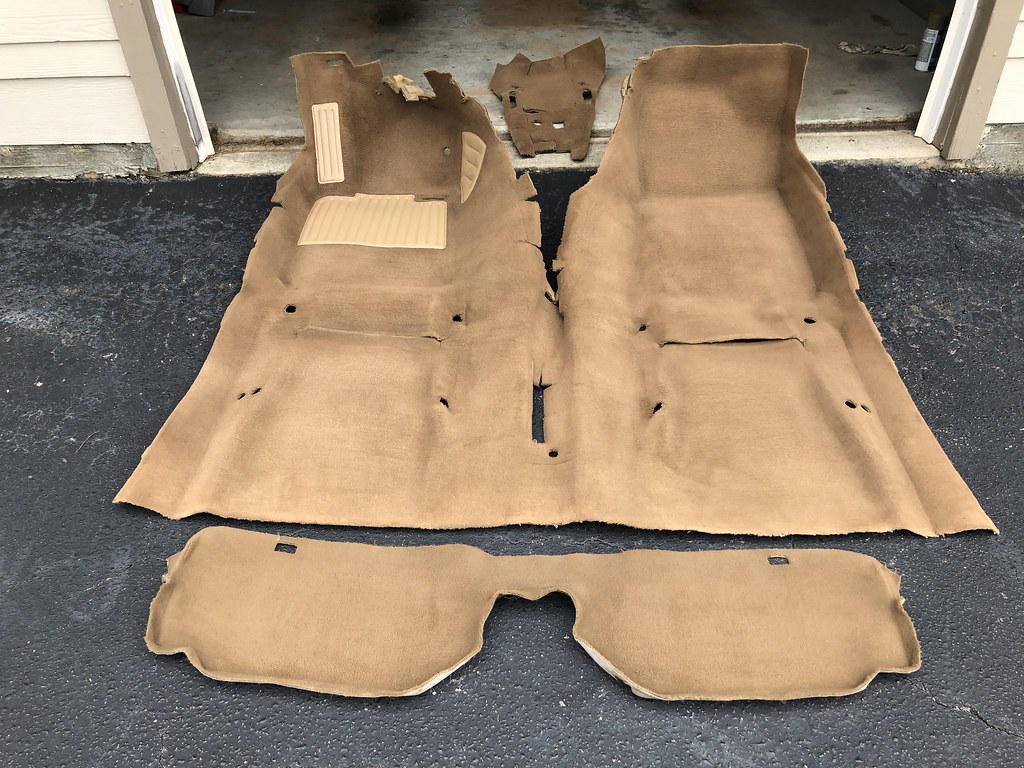
I did 3 coats, which used up 3 total cans of paint. I bought 10 cans after reading some other DIY's. I guess going from a light color to a slightly darker light color uses a lot less paint than trying to go from anything to black. I still have a few other items to paint, but looks like I'll have a ton leftover. The carpet feels just like regular carpet, not hard or rough at all.
I also removed the old monopedal as I figured there's no easier time to take it out than with the entirety of the dash out of the way:
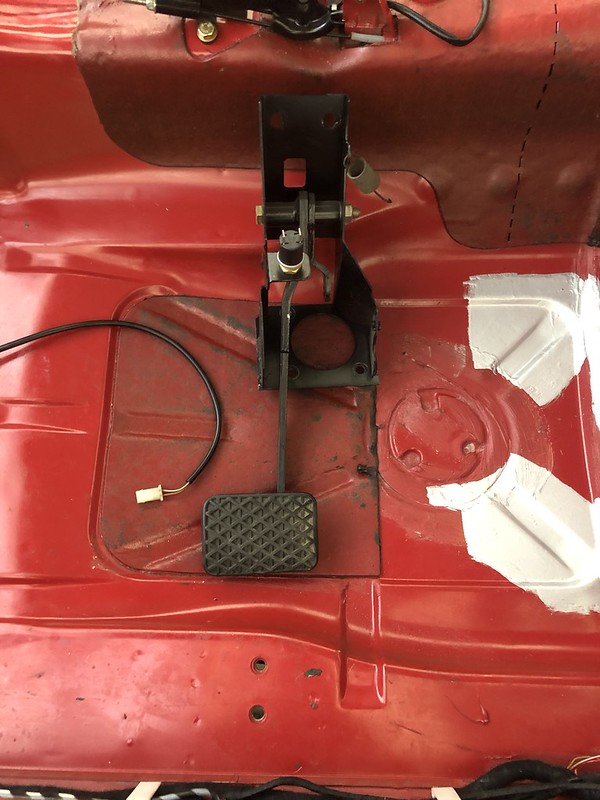
Cleaned up the manual pedal setup:
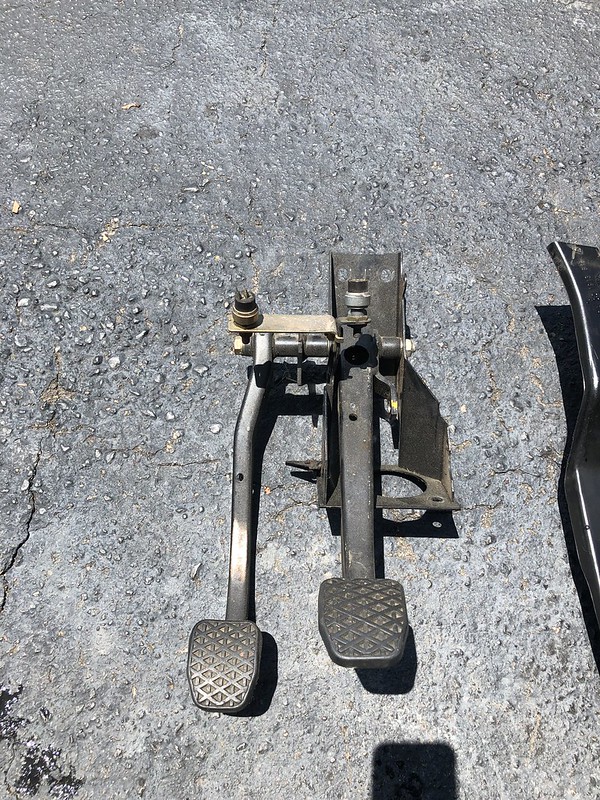

Some adhesion promoter and a couple coats of SEM Ultra Black Satin later:

No turning back now...Leave a comment:


Leave a comment: