Announcement

Collapse
No announcement yet.

Big Al's Revenge: an OEM+, MTech1 325e restoration

Collapse
X
 
  • Filter
  • Time
  • Show
Clear All
new posts

    PS. Small tip on car photoraphy even though I'm not a photographer either: Car pics usually look more dynamic when there is more free space in front of the car than at the back. If the image is cropped right in front of the car it feels a bit crammed. Like there is no where for the car to go (even though it's parked)

    Thats why these pics:


    Work better than these:


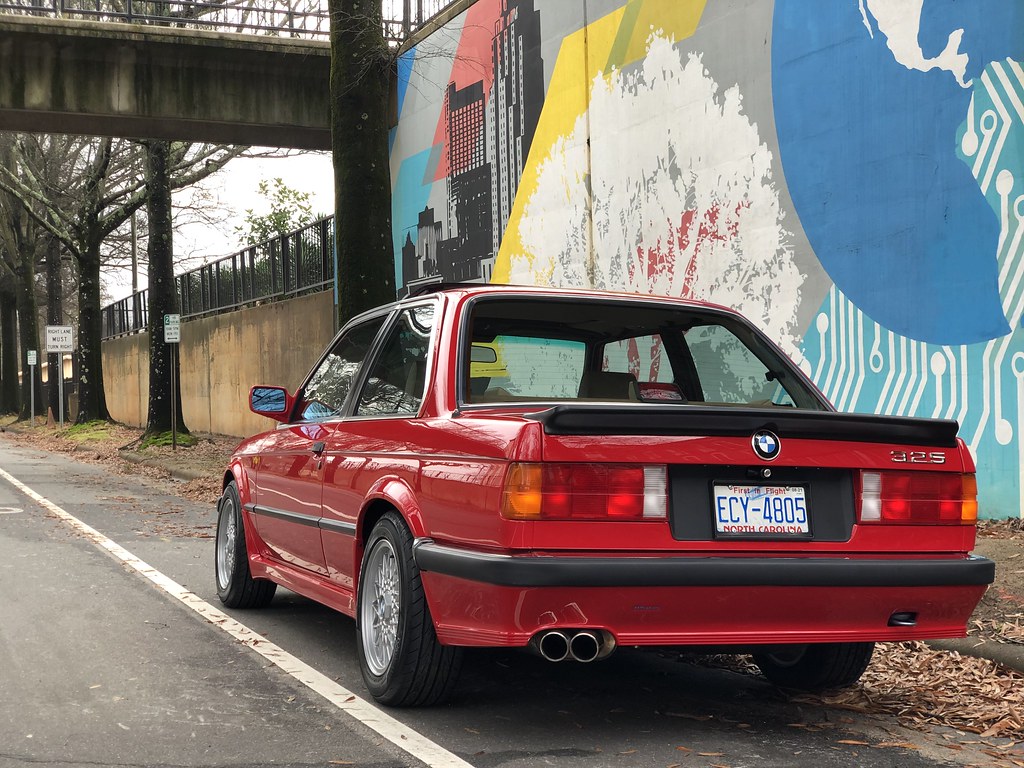
    Especially this shot would be awesome if there was more room in front of the car. That would also take in more of the mural which is more interesting background that the traffic lights and the sky in the distance. But this really is nitpicking. The shots look great anyway. Even though te day is cloudy, the light works well for the vibrant colors of the murals and the car.
    E30 Armo "330i"

    Comment


      Originally posted by Staszek
      So beautiful! I may have missed it earlier in the thread, but why does your toolkit look so different and how did you get the sweet padding for the trunk lid?
      It's actually an E28 tool kit, but E30's come with the extra two screw holes already in the trunk so I'm not sure if it was an upgradeable option? As for the cover, it's part # 51491916246. It is made to fit they regular small tool kit so I had to modify it to accommodate the larger E28 version.

      Originally posted by Skarpa
      PS. Small tip on car photoraphy even though I'm not a photographer either: Car pics usually look more dynamic when there is more free space in front of the car than at the back. If the image is cropped right in front of the car it feels a bit crammed. Like there is no where for the car to go (even though it's parked)
      Wow, that makes a lot of sense now that you mention it! Will have to give it a shot


      moatilliatta mike.bmw monty23psk as long as it actually happens, I plan on being there! No excuse not to for once
      '86 325e Zinnoberrot /// '02 325ci Schwarz II /// '18 M4 Azurite Black Metallic ///

      Albie325 Build Thread | Albie325 COTM Jan 2021

      Comment


        This is really an incredible build. I am putting together my 323i MT1 car and had some questions

        - what exact SEM trim paint did you use (satin, matte, gloss etc) and what buffing compound did you use you for the "chrome" trim

        Also I maybe I missed it, but where did you get the template for the side skirts, I have yet to mount mine...
        1988 325iX - sold but not forgotten
        1984 MTech1 323i

        Comment


          Originally posted by 6A LDY View Post
          This is really an incredible build. I am putting together my 323i MT1 car and had some questions

          - what exact SEM trim paint did you use (satin, matte, gloss etc) and what buffing compound did you use you for the "chrome" trim

          Also I maybe I missed it, but where did you get the template for the side skirts, I have yet to mount mine...
          Thanks! Happy to help with any advice.

          The SEM trim paint I used was SEM Trim Balck Ultra Satin 49143. I've used that on a bunch of items and it seems to match very well with the OEM texture.

          As for the buffing compound on the chrome trim, I just used the Mequire's M100 Mirror Glaze Pro Speed compound, same thing I used as the final step for the paint. It's a mildly aggressive abrasive and didn't do much for any deeper scratches but did great on getting the haziness and water spots out of the chrome pieces (they're not actually chrome, but polished aluminum).

          I should have posted some pics of the SEM can and Mequire's bottle earlier on in the thread if you want to see what they look like.

          I unfortunately did not have a template for side skirts, they are NLA and no one seemed to have any. I used the skirts themselves as well as some masking tape to measure out where the holes should go, and I posted a PDF to the sideskirt manual that has the hole diameters. There's an install post a few pages back in the thread for each of the MT1 components.

          '86 325e Zinnoberrot /// '02 325ci Schwarz II /// '18 M4 Azurite Black Metallic ///

          Albie325 Build Thread | Albie325 COTM Jan 2021

          Comment


            Originally posted by Albie325 View Post


            Thanks! Happy to help with any advice.

            The SEM trim paint I used was SEM Trim Balck Ultra Satin 49143. I've used that on a bunch of items and it seems to match very well with the OEM texture.

            As for the buffing compound on the chrome trim, I just used the Mequire's M100 Mirror Glaze Pro Speed compound, same thing I used as the final step for the paint. It's a mildly aggressive abrasive and didn't do much for any deeper scratches but did great on getting the haziness and water spots out of the chrome pieces (they're not actually chrome, but polished aluminum).

            I should have posted some pics of the SEM can and Mequire's bottle earlier on in the thread if you want to see what they look like.

            I unfortunately did not have a template for side skirts, they are NLA and no one seemed to have any. I used the skirts themselves as well as some masking tape to measure out where the holes should go, and I posted a PDF to the sideskirt manual that has the hole diameters. There's an install post a few pages back in the thread for each of the MT1 components.
            Thanks, I couldnt quite make out the 49143 in the picture
            1988 325iX - sold but not forgotten
            1984 MTech1 323i

            Comment


              This is the first time in a long time that i've been just blown away by the quality of a build. Great work, OP! Looks incredible. I love all the attention to detail.
              clutchCTRL!
              Move with a purpose.
              - 1991 325iX 4dr/5spd
              - 1976 2002 SlickTop/2.7i M20/G260
              - 2000 323i AT
              2016 Mazda CX3 Sport AWD

              Comment


                Originally posted by kid325e View Post
                This is the first time in a long time that i've been just blown away by the quality of a build. Great work, OP! Looks incredible. I love all the attention to detail.
                Thanks man! Lot of work but has been more than worth it.

                6A LDY Hey I made a mistake as to which compound I used for the chrome trim. I actually used Meguire's 210 Ultra Pro Finishing compound. Its a much finer cut than the other one I mentioned, was out in the garage today prepping the car for ceramic coating and realized I mixed them up, my bad
                '86 325e Zinnoberrot /// '02 325ci Schwarz II /// '18 M4 Azurite Black Metallic ///

                Albie325 Build Thread | Albie325 COTM Jan 2021

                Comment


                  Originally posted by Albie325 View Post

                  Thanks man! Lot of work but has been more than worth it.

                  6A LDY Hey I made a mistake as to which compound I used for the chrome trim. I actually used Meguire's 210 Ultra Pro Finishing compound. Its a much finer cut than the other one I mentioned, was out in the garage today prepping the car for ceramic coating and realized I mixed them up, my bad

                  I figured you meant something from their 200 series like 205. Ive never tried the 210 so I might pick some up!
                  1988 325iX - sold but not forgotten
                  1984 MTech1 323i

                  Comment


                    Been a minute since the last update, so figured I'd start with some VINTAGE PREP!

                    Officially registered for Vintage 2021 last week. Have been waiting to do anything on the car until I could get it washed after driving it for a bit. The car wash station at my apartment complex had been closed for the winter up until two weeks ago. The first nice day it was open I got to give the car its first bath since getting repainted:


                    Next on the agenda was to get some protection on the paint, I decided to ceramic coat the car and ended up going with CarPro poducts:


                    I purchased their "Eraser" IPA solvent cleaner, "Essence" pre-ceramic gloss enhancer and surface prep, "CQuartz UK 3.0" ceramic sealant, "Gliss" topcoat, and "Reload" ceramic booster and silica sealant. Also shown above is their "Skin" ceramic coating, used specifically for going over PPF.

                    Got all the rubber bits masked off again and the rear spoiler removed:


                    I didn't mask off the front fenders, hood, or MTech valance as I plan to have those wrapped in PPF, hence the "Skin" product I bought to go over that once it's done. I have my F82 completely wrapped in PPF followed by ceramic coating and it's the best money I've ever spent. I didn't feel like the expense to have this car completely covered was warranted, but will settle for just the front end and likely the MTech rockers. I plan on driving the car the 4.5 hours out to the Vintage so the front end is a must for those highway rock chips!


                    Started by using the "Essence" pre-ceramic prep. It's essentially a very mild polish infused with SiO2, it's supposed to condition to surface to accept the ceramic to follow:


                    It did a really nice job of getting some of the faint spiderwebbing out of the clearcoat that I already accumulated just from driving around for ~200 miles.

                    There's not much to the ceramic coating, you basically clean the surface with the IPA solvent, then using the supplied foam block and felt pads you apply in a criss-cross pattern to roughly a 2x2ft section at a time, then buff off with a microfiber towel. You know it's ready to buff off when the clear streakiness of the product turns into a trademark "rainbow" color similar to the appearance of an oil slick on pavement. It's supposed to be "super obvious" when this change occurs according to some of the tutorials I read, however I found the change to be very subtle.

                    I put a total of 2 coats of the CQuartz UK 3.0, followed by 1 coat of the Gliss topcoat, then finished with the Reload SiO2 sealant. The reload sealant adds a layer of hydrophobicity to prevent water spotting in underlying ceramic coat, which is prone to happen.

                    Also, I recommend using a low-pile microfiber towel like this:


                    I initially started out using a higher pile buffing towel like this:


                    However the coating has a certain "stickiness" to it as it cures and the fluffiness of the buffing towel caused some microfiber fuzz to stick to the surface. The low-pile towel did a much better job.


                    It took me a few days to get the car totally done as I wanted to let each coat cure for 24 hours prior to applying the next. Once the car was done, I went about getting the MTech spoiler re-mounted.


                    monty23psk I remember you asking about the underside of the spoiler so I wanted to get some better pics for you:


                    You can actually see the outline where the old "foils" on each end were:


                    I have the OEM foils as well as the double-sided tape:


                    Problem is they're 30 years old and the foam was all brittle. The driver's side foil basically disintegrated when I tried to pull the paper backing back:


                    The passenger side was actually still soft and the adhesive was good so I used it:


                    And improvised the other side. I had wider double sided tape but it was permanent water proof adhesive and I didn't want to use it in case I ever have to remove the spoiler again.


                    Then got the center section re-taped:


                    Make sure to keep this groove on each end clear of tape, it's what allows any water building in front of the spoiler to seep through and drain down the back of the trunk lid:


                    Got the ends started:


                    Peeled the backing off the end sections and remounted the lid, then pulled the backing off the center section after it was lined up:


                    I didn't take any before pics, but the ends of the spoiler had about a 2mm gap between the black spoiler rubber and the trunk lid. Now there's no gap, more better:


                    Here's that groove on the underside I mentioned earlier, the tape along the front edge directs the water here to be drained down the back of the trunk:


                    And that's where we're at. I'm hoping to get a quote on the PPF for the front end in the next week or two. Pollen season has officially started in NC so I really don't want to take the car out until it dies down a bit more

                    Last edited by Albie325; 03-28-2021, 06:24 PM.
                    '86 325e Zinnoberrot /// '02 325ci Schwarz II /// '18 M4 Azurite Black Metallic ///

                    Albie325 Build Thread | Albie325 COTM Jan 2021

                    Comment


                      Great to hear you are registered. Can't wait to see this car in person. I bought my mtech1 foils back in 07 or 08 and have been in the house under A/C, so hoping I don't encounter what you did. Only time will tell.
                      Alex 88 m5 | 91 318is | 19 Subaru Ascent
                      BMW Tool Rentals & Fender Roller

                      Comment


                        Sexy ride!
                        Projects Hartge,Alpina & AC Schnitzer Builds.http://www.r3vlimited.com/board/showthread.php?t=280601
                        http://www.r3vlimited.com/board/showthread.php?t=227993
                        http://www.r3vlimited.com/board/showthread.php?t=289362

                        DSC04926 by Raul Salinas, on FlickrDSC03413 by Raul Salinas, on Flickr

                        Comment


                          Good choice with the CarPro.
                          Very easy to apply and great results.

                          I would also recommend CarPro Dlux for your wheels and external plastics and hard rubbers.
                          Used on my basketweaves, yes tedious to apply, but saves a lot of cleaning time down the road.
                          E30 320i vert
                          But daily drive is Volvo V60 Polestar

                          Comment


                            Been meaning to post an update on here but haven't had a ton to do on the car lately other than drive it. A few of these small projects were done in preparation for the Vintage in May. When it was cancelled I think it took a little wind out of my sails as I wasn't sure I'd be able to make any rescheduled dates as I now travel a decent amount for work.

                            Back in May when the initial date of the Vintage was, I decided I needed to bite the bullet and finally add a fire extinguisher. Had been meaning to do so for awhile but hadn't gone on any long drives with the car. With a 5 hour drive to and from the mountains of NC staring me in the face, the time was now:


                            I opted for a HalGuard H3R clean agent extinguisher, more pricey than the basic dry chemical ABC extinguishers but if I ever need it, I don't want to ruin my car in the process. The bracket I used was the same as mike.bmw. I tried a couple different mounting positions and ended up settling on behind the rear passenger seat. I thought it worked pretty well although it doesn't allow me to put the passenger seat all the way to the rear, the main reason why I chose not to mount it on the driver side. Shouldn't matter, the only passenger I ever really have in the car is my wife and she has plenty of room as it sits:


                            Tucks away pretty nicely, but still easily accessible if needed:


                            A big reason I decided to do this is one day I noticed a fuel smell with some drops of gasoline on the ground after driving to the gym in my E46, found the fuel hoses to the fuel filter looking like this:


                            I had replaced this fuel filter maybe 2 years ago using the same CRP hoses I had initially installed on the E30, makes me feel better about my OCD when I re-replaced all my hoses with the OEM stuff. Luckily I still had enough of the BMW line to replace these as well.

                            Another small project I knocked out was installing a battery tie down. I had noticed that when going over bumps, I could hear my battery bouncing around in the back. Upon some digging on realoem, I realized I was missing the tie down clamp and bolt, it had never been there since I've owned the car and I didn't even realize it was a thing. I had contemplated jimmy rigging my own setup in the past but when I found that there was some actual parts I of course had to install them. I decided to buy a new battery tray as well:


                            There's two small screw holes in the battery tray that the clamp and bolt can screw into. For my battery, it was the innermost hole:


                            Took all of about 5 mins to install but what a difference not hearing your battery jostling around going over speed bumps.

                            Since May I hadn't done much... until I found out this week that I have a 3 day weekend at work for this weekend! I kept my original registration for the Vintage so will be able to make it out to the mountains for Friday/Saturday.

                            In preparation for the drive and having the car all buttoned up, the last two small things I've been meaning to do was to refinish my trunk tools and make repros of the MTech 1 undertrays. I started out with refinishing the trunk tools, they were a bit rusty:


                            The jack had the worst of it:


                            After some wire-wheeling and a few coats of SEM Trim Black Ultra Satin and Alumablast, they came out looking good as new:


                            Will post an installed pic once the paint fully cures but I was very pleased.

                            Next, I was just about due for an oil change so decided to knock that out today along with an engine flush and Ceratec treatment since it was 75 and beautiful out:


                            With the car on jack stands for the oil change I decided to fab up one of the few items for the MTech1 kit that I didn't have and is NLA, the front valance under trays. There are some aftermarket repros made in Europe however they are stupid expensive for a couple small pieces of plastic (~$150-200 last I checked). I decided to make my own from some ABS plastic sheets.

                            The pieces go here on either side and basically fill the gap between the MTech valance and the belly tray:


                            I started by making some templates out of cardboard:


                            After some tweaking:


                            Final(ish) product:


                            Pretty close considering they should look like this:


                            I added the tabs to work with my early model underbelly tray, see the pic above. My original US valance tray has the tabs and I want the MTech trays to fit more seamlessly than just flapping in the breeze. I ran out of time today to get the pieces cut from the ABS plastic, but once I get that done I'll post up some pics to show what I mean.

                            Looking forward to meeting some of you in a few days! Pumped I'll be able to make it to at least some of the event.


                            '86 325e Zinnoberrot /// '02 325ci Schwarz II /// '18 M4 Azurite Black Metallic ///

                            Albie325 Build Thread | Albie325 COTM Jan 2021

                            Comment


                              Awesome work! I'm heading to Asheville on Thursday. Will be there until the following Wednesday! :-)

                              Comment


                                nice floor mats! it all looks great
                                88 325is. S54, CSL airbox, Motec M800, Motec C127, Motec PDM15, Stoptech STR, MCS 2 way coilovers, Forgeline wheels, Recaro SPA, Eisenmann, Personal, lots of custom.

                                90 318is. As new OEM+, BBS LM, AST 4210 2 way coilovers, Wilwood SL6R/SL4R, Dynaudio, Recaro Experts

                                Comment

                                Working...
                                X