If this is your first visit, be sure to
check out the FAQ by clicking the
link above. You may have to register
before you can post: click the register link above to proceed. To start viewing messages,
select the forum that you want to visit from the selection below.
Of the same accord about IE. Great products, good prices, nice people. Only thing is it can be tough to get in touch with someone with the company sometimes.
Sent from my HTC One A9 using Tapatalk
Originally posted by flyboyx
how about if i yank the anal beads out of your ass like i'm trying to pull start a chain saw?
File this post under "Things To Do While Waiting for New Valves"
Since the demise of E30Tech, information about wasted spark ignition for E30s is sparse and scattered everywhere. I'll pull it all together here and fill in the missing links.
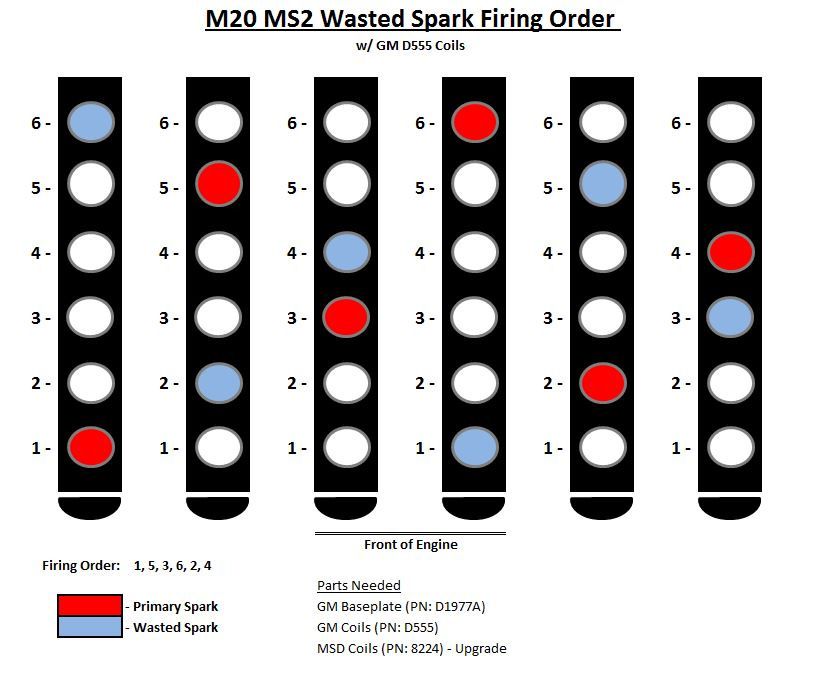
First, what is "wasted spark"? It means firing plugs in cylinders that are not in their compression stroke. Hence the "wasted" spark. It's been used on all kinds of engines. Heck, the Model T Ford used a wasted spark mechanical ignition.
For the E30 M20, wasted spark works as shown below. Pairs of plugs are set up on a single coil which fires twice during the engine cycle. Every time a coil fires, one spark is used and the other is wasted. M20 firing order is 1 5 3 6 2 4. Plugs are paired on coils as A:1,6 B:5,2 C:3,4. Now all an ECU has to do is fire the coils ABC ABC continuously and the firing order is correct.
Now some of you are thinking "Hey, why not just have one coil per plug?". That's a great idea. I was going to do it. "Coil Over Plug" is easy using a VW 06E 905 115E shown below. It's a coil that fits directly over your plug, including a built-in coil igniter. Sounds like a deal for $20 each. You can drive it directly with logic levels from a MegaSquirt. However, you do NOT want them close to an exhaust manifold or they'll fry. Great for normally aspirated engine. Not so much for my Turbo build.
You can also do "coil near plug". Chevy LS1 or LS2 coils are popular for this application. basically there is a very short plug wire between the plug and coil. The coil wiring loom becomes low voltage. Sounds interesting, but again I don't like having to mount the coils near the turbo.
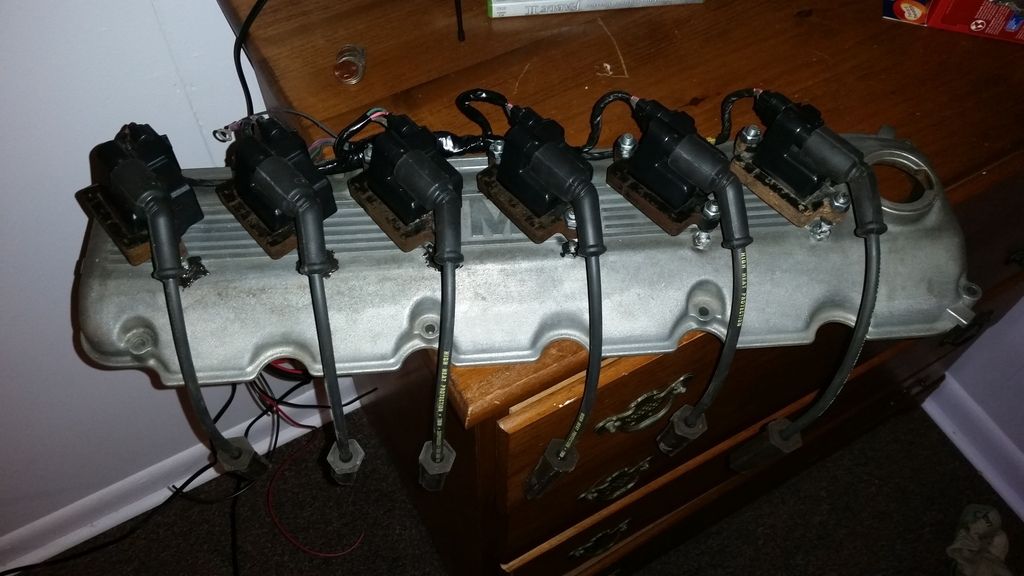
I decided to stick with a proven method used by many E30 guys. Three dual coils (per above), a coil mounting plate and separate coil igniter. I went with the stand alone igniter since I already had a DIYAutotune MSPNP2 ECU. It only has logic level outputs for extra coils. (Whodwho on this board sells one with built-in igniters.)
What was missing is detailed instructions. I wanted to see how everything fits together on paper, and also know the math works. Didn't exist, so here it is in one place.
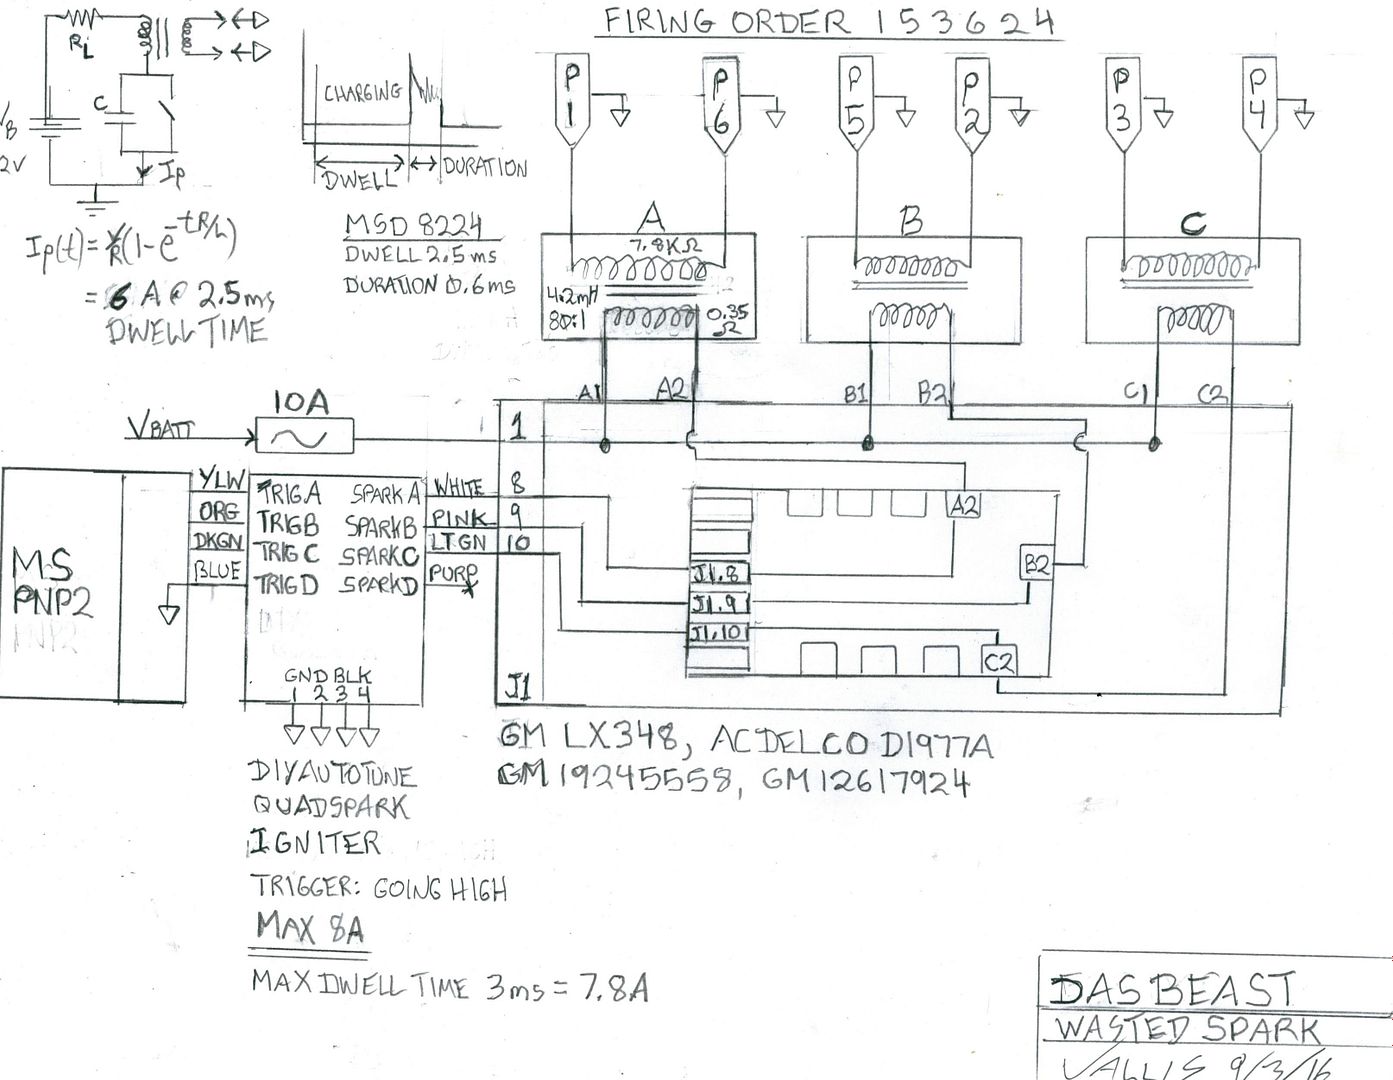
There's a lot going on in the diagram below. First, a parts list:
ECU: DIYAutotune MSPNP2 B8793 E30 Megasquirt2
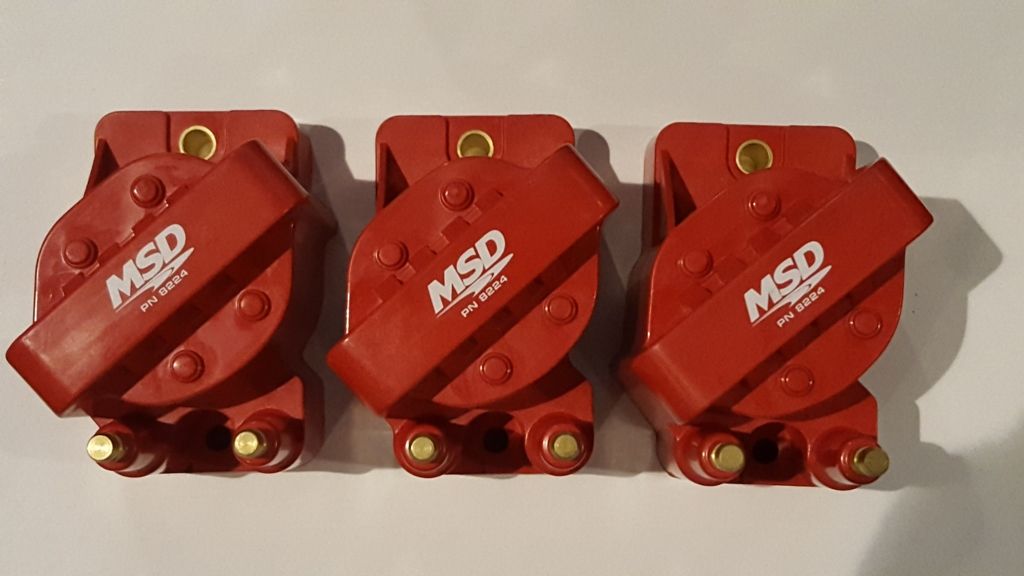
Coils: 3 x MSD 8224
Coil carrier: GM LX348, 19245558, 12617924, Delco D1977A (eBay)
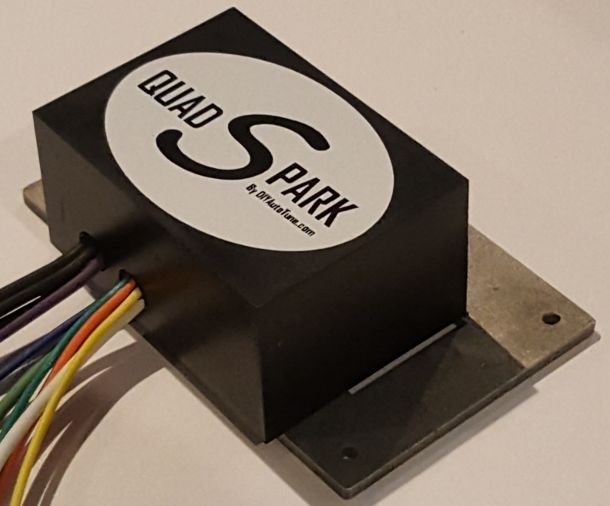
Igniter: DIYAutotune QuadSpark
Plug Wires: IE Kit Yes, I could have "rolled my own" but I wanted something known to work instead of re-inventing the wheel.
By reading everything above, the schematic should make sense. Coils A,B and C drive plugs 1-6, 5-2 and 3-4. Resulting firing sequence is 1 5 3 6 2 4. Coils plug into a GM ignition control module which is gutted and re-wired. (More on that later). Coils are fired by the QuadSpark, which is triggered by the ECU.
Reality check: The math in the upper left corner is an electrical model of this ignition system. Plugging in MSD 8224 specs and coil dwell (charging) time the maximum primary current is 6 amps. QuadSpark is rated for 8A so that's Ok. It probably has some guard band built in, so I'll use a 10A breaker on the 12V supply.
Here are the coils. Quality items. Very heavy.
QuadSpark is a nice unit as well. It has a heavy duty metal heat sink for attachment to your engine bay.
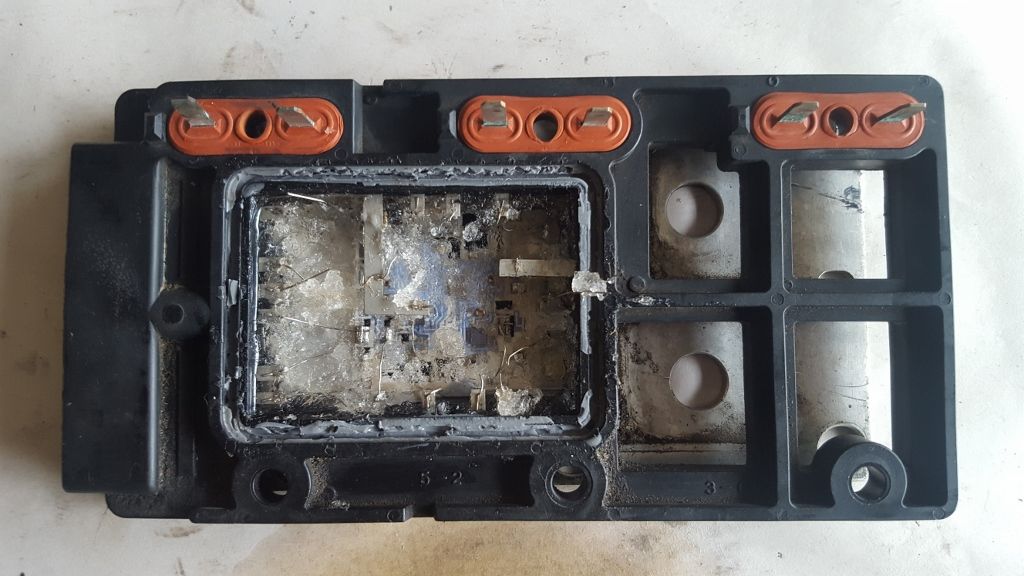
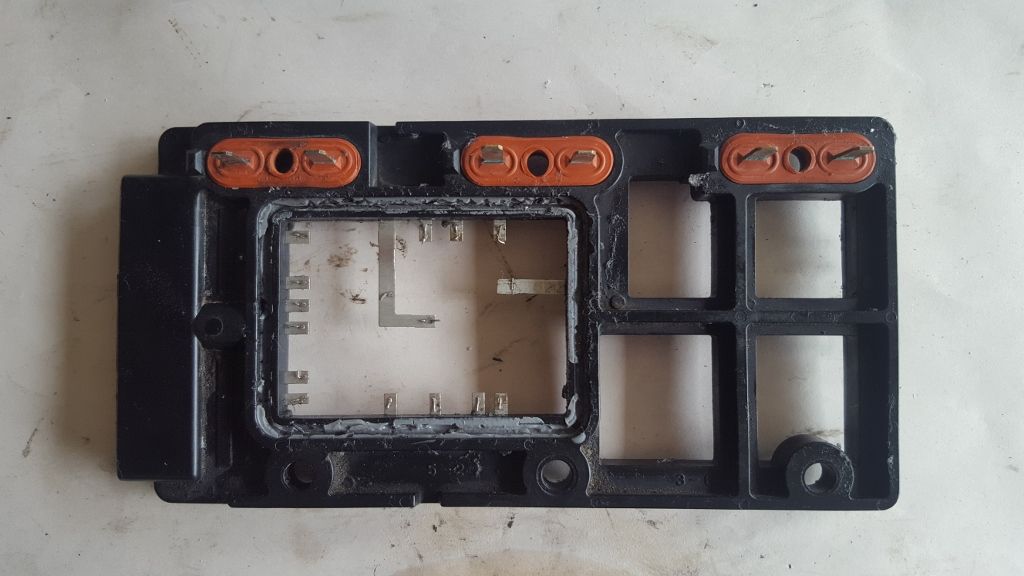
And here's the coil carrier with the electronics module opened up. What a freaking mess. Someone decided they needed to fill it with nice insulating "goop". Which is totally impervious to most chemical solvents known to man. Who knows how carcinogenic the damn stuff is. (I wore gloves)
Nothing survives "Goof Off". Removed the heat sink, and scrubbed the crap out of what was left while in full hazmat gear and respirator. Turned out great.
Since we have a schematic the rest is easy. I'll post some pictures of the electronics work next.
"And then we broke the car. Again."Mark Donohue, "The Unfair Advantage"
Please elaborate... As far as I'm
Concerned IE has fantastic products.
"Heavy duty" rockers (Spitting their pads)
Any poly bushing of theirs (Bushings disintegrating)
Customer service. (Ordering parts and not receiving them.)
Posi-lock style rear trailing arm adjusters (Latest)
Most recent, I have ordered 4 of their posi lock kits for 2 subframes to be prepped (camber and toe)
I needed them to be at the powdercoaters like a month ago and they still haven't came up to a solution
Mismatched batch of adjusters with 2 different styles of teeth... after I prepped all of them and had time invested... As I called to ask what the hell, they were like , oh yeah we've had that issue and had to send them back to manufacture.. WTF DO I HAVE A SET IN MY HANDS WASTING MY TIME.
They offered their "UPDATED" version which they were trying to sell me on, As previously when ordered that this shoulder version was the "Latest" that I had in my hands, But now they have an updated version they were trying to sell me had no shoulder. Every tried aligning one of those? Like banging your head on a knife edge under a car.
Bars are fine though..
Even UUC can make those. ;-)
I was up above it, Now I'm down in it ~ Entropy - A Build thread. @Zakspeed_US
Any poly bushing of theirs (Bushings disintegrating)
Customer service. (Ordering parts and not receiving them.)
Posi-lock style rear trailing arm adjusters (Latest)
Most recent, I have ordered 4 of their posi lock kits for 2 subframes to be prepped (camber and toe)
I needed them to be at the powdercoaters like a month ago and they still haven't came up to a solution
Mismatched batch of adjusters with 2 different styles of teeth... after I prepped all of them and had time invested... As I called to ask what the hell, they were like , oh yeah we've had that issue and had to send them back to manufacture.. WTF DO I HAVE A SET IN MY HANDS WASTING MY TIME.
They offered their "UPDATED" version which they were trying to sell me on, As previously when ordered that this shoulder version was the "Latest" that I had in my hands, But now they have an updated version they were trying to sell me had no shoulder. Every tried aligning one of those? Like banging your head on a knife edge under a car.
Bars are fine though..
Even UUC can make those. ;-)
1. If your referring to the billet ones they made long ago that was one batch and the fixed it. The new HD rockers are only ones on market that i know of beside VAC which are significantly more money
2. The poly bushing issue was from long and resolved also poly has a shorter life span when in high heat environments.
3. Just sounds like honest mistake.
4. I can agree customer service if your emailing them is poor at times but I have been out to irelands before and they are a busy place with only a hand full of guys and a huge customer base to attend to.
Ive spent thousands with that place and have no complaints really.
Now back to DAS street beast build pls
1989 325isl1984 euro 320il1970 2002 Racecar 1991 318i 4dr slick top
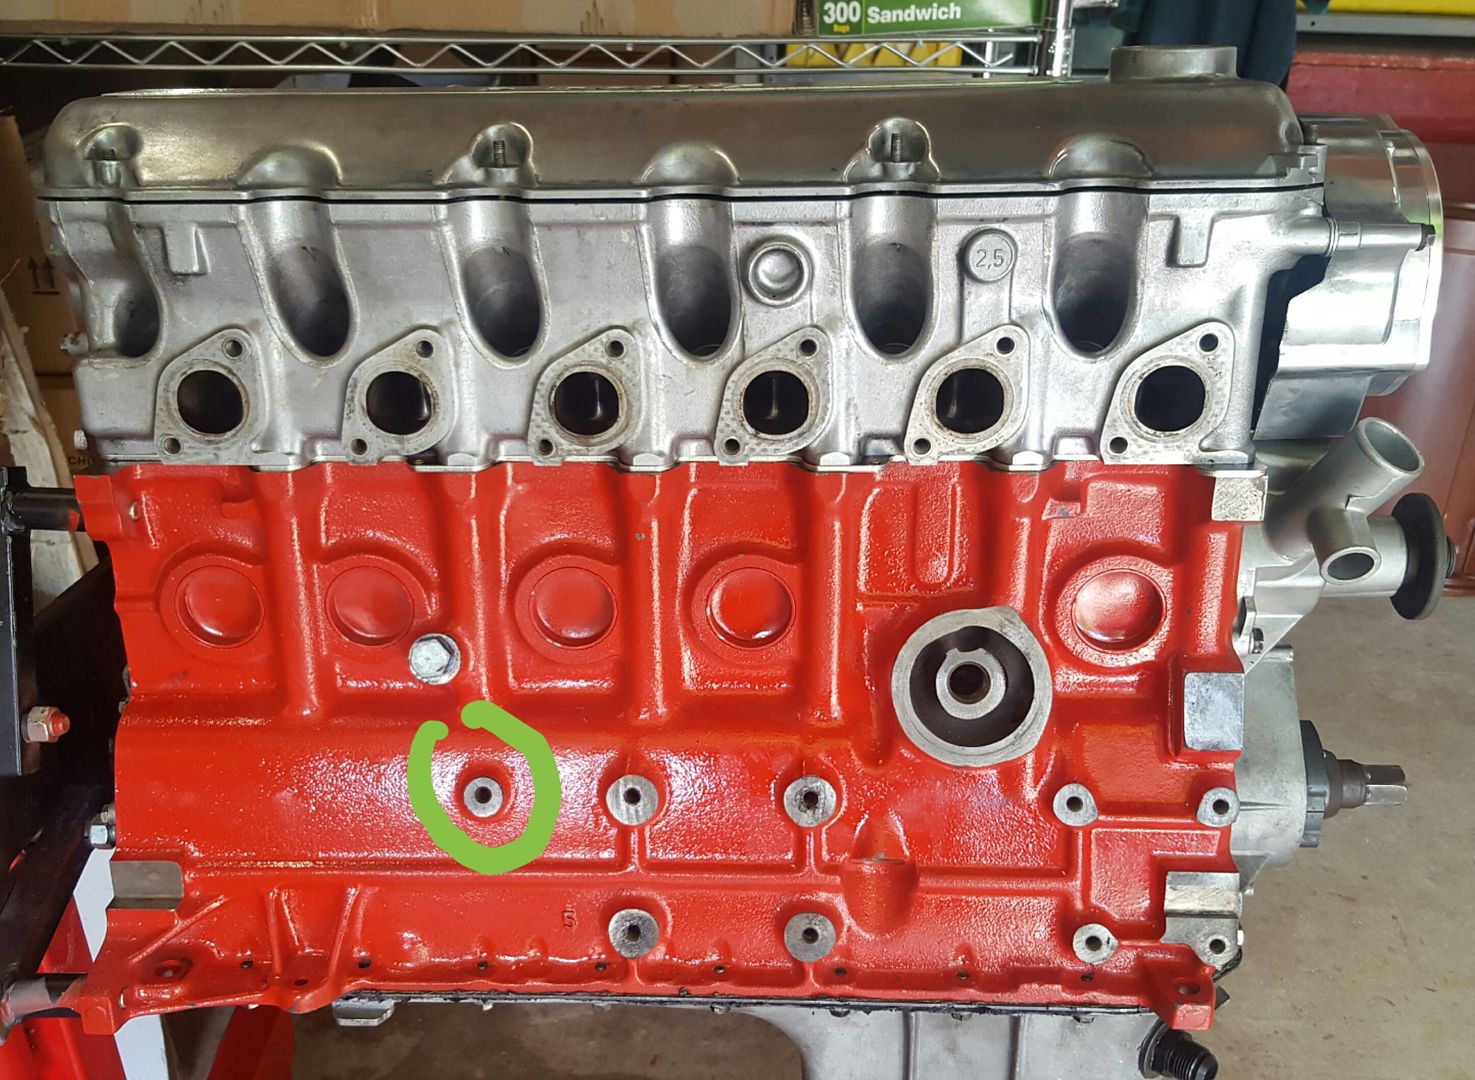
You may want to check those valve guides since the head is back apart anyway. They are only brass and it takes a lot of force to bend a valve. Hopefully they haven't been oval-ed or tweaked. If a new valve has wiggles room in there you will certainly have a problem very quickly.
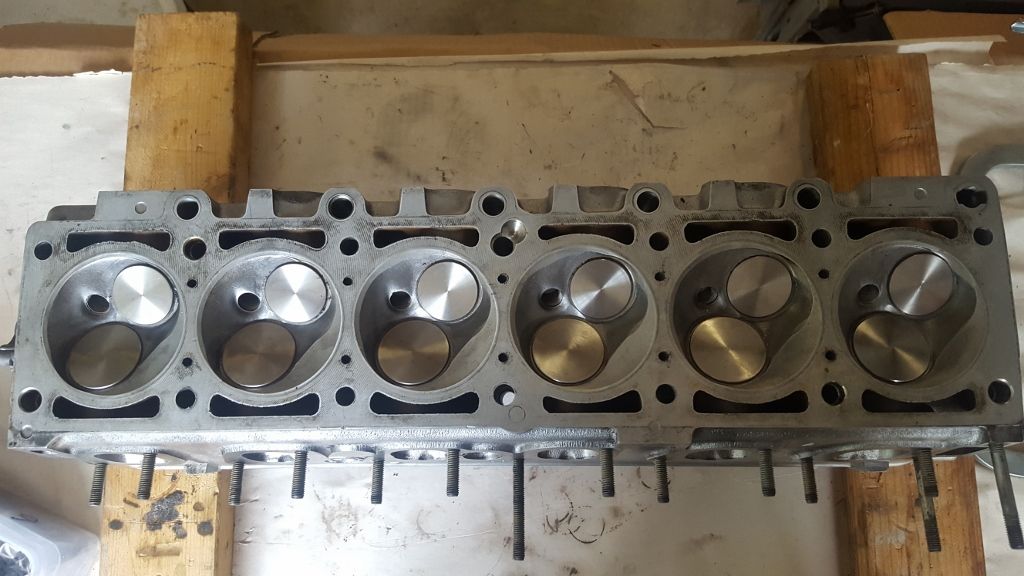
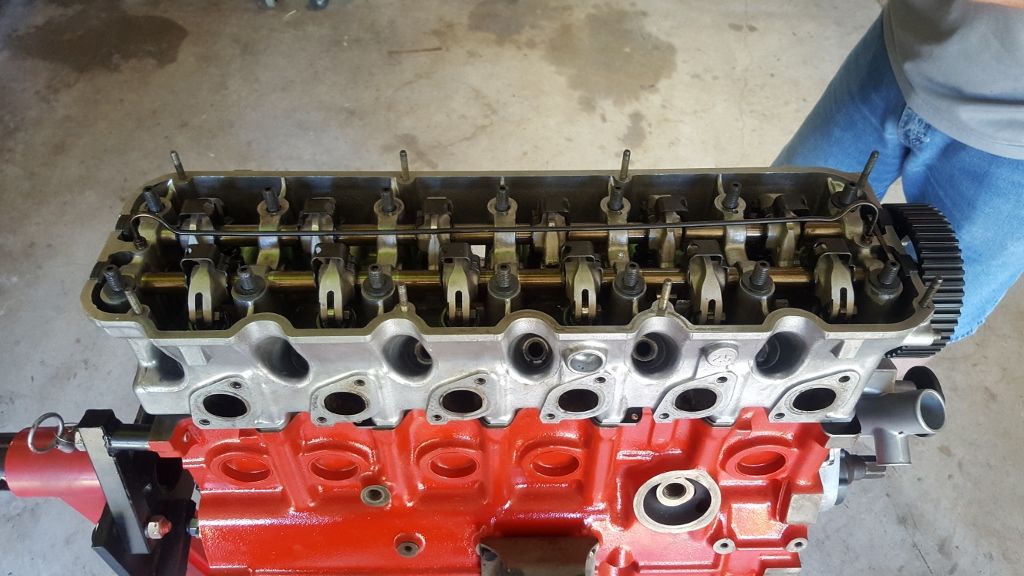
Valves are finally in. Upgraded to stainless steel, since they were cheaper than stock OEM. Valve guides checked ... not damaged. Valves in place and looking good in their seats.
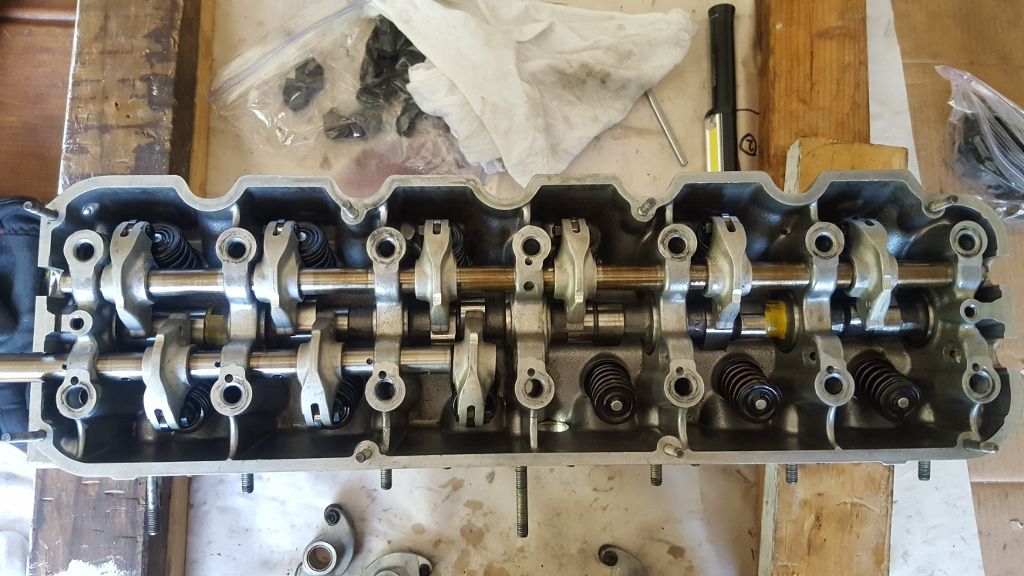
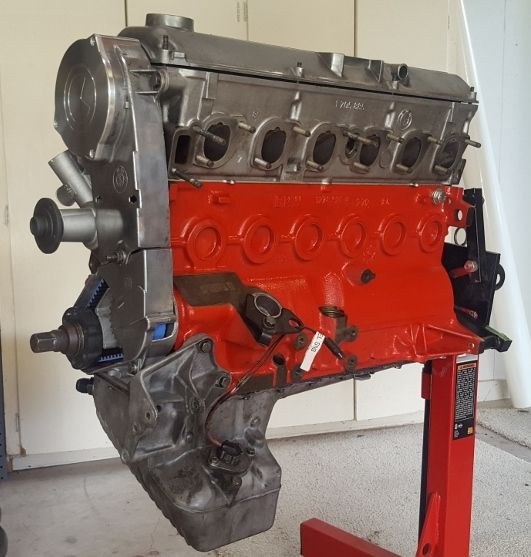
Head build in progress. Went quickly since we have some experience. :devil:
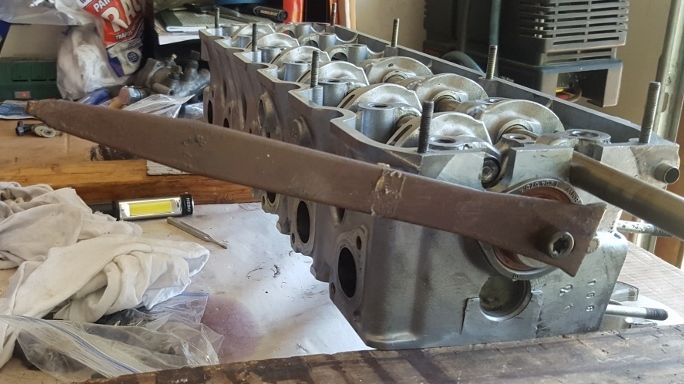
Everyone building an M20 head needs this tool. Great for adjusting the cam lobes angle while installing springs and rockers.
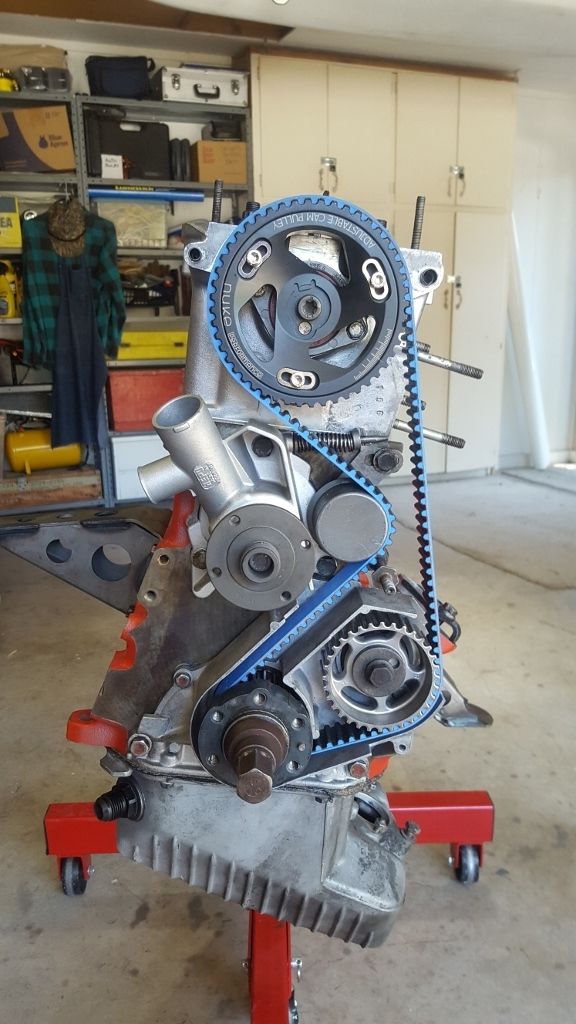
Head in place. Torqued everything down to 20 ft-lbs, then 40 finally 65. Studs held fine.
Kevlar timing belt went on in five seconds flat. Timing marks lined up correctly this time. :devil: Crank turned with one finger on the breaker bar. Nice!
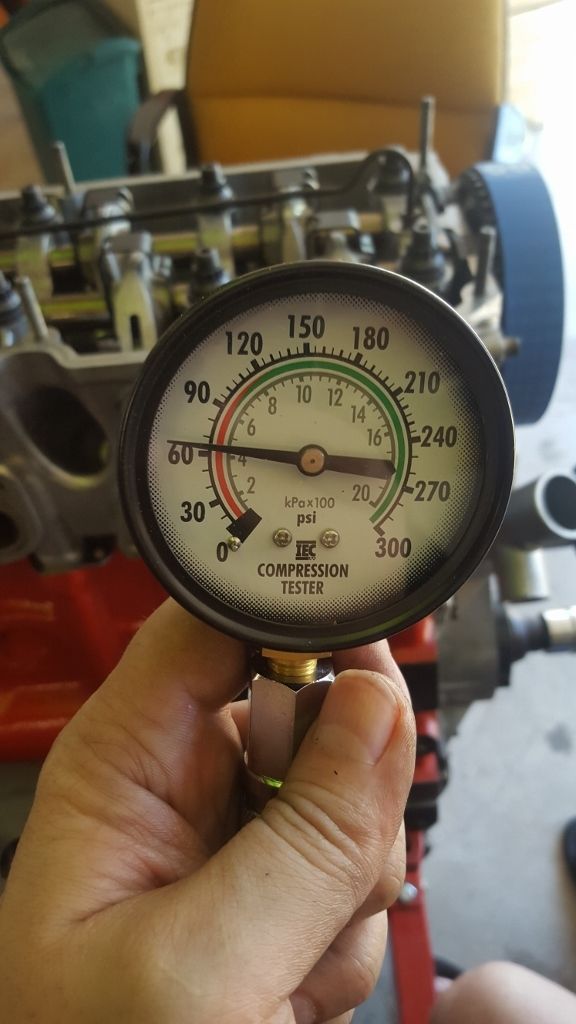
Compression tested all the cylinders. 60 psi is pretty good for a single hand crank. They all came in at the same reading.
Started putting on all the "fiddly bits".
And here's the end product. Looking really good with polished timing covers, distributor delete and polished valve cover. It's mostly ready to drop in the car. We'll put the harmonic balancer, pulleys and crank sensor on before install. Anything else that could break off will wait until the engine is in.
"And then we broke the car. Again."Mark Donohue, "The Unfair Advantage"
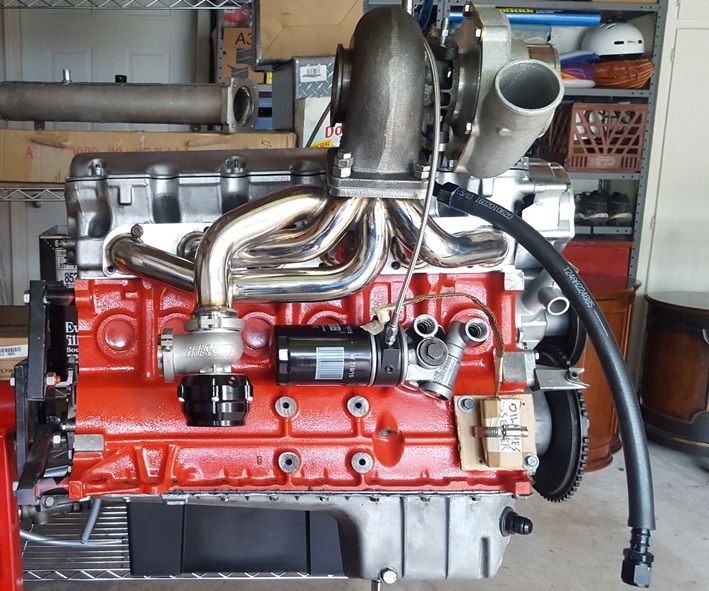
Deleted the extra pulley on front of harmonic balancer, since we don't have AC or power steering. You can see it of you look close on the bottom right. Single drive belt will be one less thing to break.
Bolted on the manifold and turbo. Did some test fitting for the oil system. Going to need some new parts for this to work the way I want:
- A shorter turbo oil feed. Will use 18" braided stainless 3AN F-F90
- Longer 10AN stainless oil drain hose with 90 degree elbows on each end
- VDO oil pressure sender 360-003 (1/8" NPT) bolted to AC mounting
- 10" braided stainless AN4 hose from sandwich plate to oil pressure sender
- Replace idiot light oil pressure switch with oil temp sender VDO 323-092 M12x1.5
- VDO 350-066 oil pressure gauge
- VDO 310-106 oil temperature gauge
Summit Racing sells all the bits and pieces.
"And then we broke the car. Again."Mark Donohue, "The Unfair Advantage"


Comment