Announcement

Collapse
No announcement yet.

E30 1986 2-door from ESTONIA - restoration project.

Collapse
X
 
  • Filter
  • Time
  • Show
Clear All
new posts

  • MarkoEST
    replied
    Originally posted by Northern View Post
    That metalwork is so clean, and I really like that 4-post lift. If I ever build another garage, it will hopefully have some storage like that.
    This guy is a magician. He is much younger than me and he can do a really good job. Not the cheapest place but when it comes to restoration of an old beemer, then quality is the top priority. I don't want to discover any rust after few months of driving.
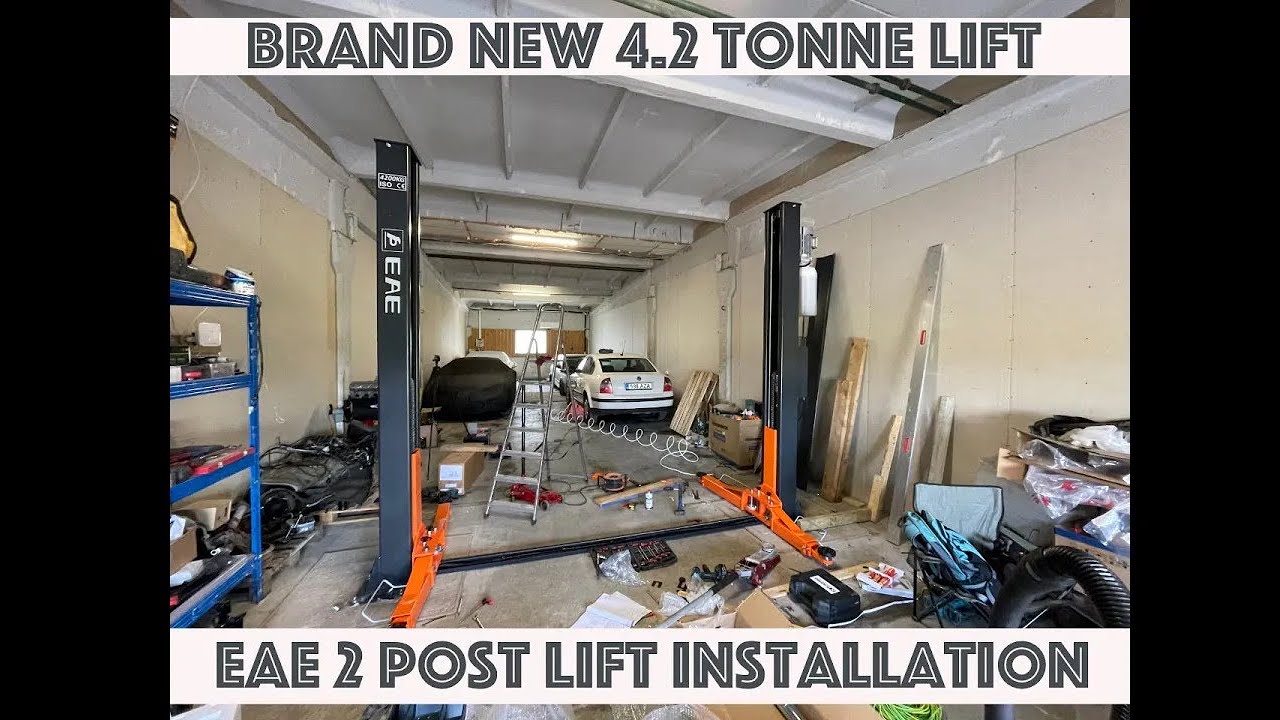
    The 4-post lift is a great way to save some space and gives me more room to operate in the garage. Of course it would be great if it goes little bit higher so you don't hit you head, but then i just have to be careful when running around in the building. :)

    Leave a comment:


  • Northern
    replied
    That metalwork is so clean, and I really like that 4-post lift. If I ever build another garage, it will hopefully have some storage like that.

    Leave a comment:


  • MarkoEST
    replied
    Good evening dear readers!

    It has been a while since i last posted here. There is a good reason for that, actually. I suppose everyone in here already thought that i gave up and toss that junk over to the scrapyard, but NO!
    Just I had lot of other things to do and also i was financially in a pretty bad situation so i had to postpone my E30 project. Now i'm back and we can go on what was left unfinished.
    Today i got a phone call from a courier that i have a package from Valcas Garage. Thats was good news. I was waiting for that to arrive already last week. But it finally appeared.
    As you all remember i had few rust holes in the chassis and restoring these spots are very time consuming and also takes lot of hours and money. It was easier to buy the pieces and juist replace them not to fabricate them in house. So what i bought ?

    I have battery in the front under the bonnet and i will keep it that way, i decided to replace the bottom part of that battery tray. Everything else around it is fairly okay.

    Click image for larger version

Name:	akukasti_alus.jpg
Views:	125
Size:	153.5 KB
ID:	10123476

    Also the front corners were pretty bad looking. Last year when i checked Valcases homepage they didn't have these left pieces or i just have a bad memory. Luckily now they had and i had to have them. Makes welders life much much easier.

    Click image for larger version

Name:	esim_nurga_plekid.jpg
Views:	111
Size:	148.9 KB
ID:	10123477

    Front left and right floor panels plus rear left floor panel. I accidentally bought that last one. But what will you do if you are not careful and pay for everything whats in the basket. :D

    Click image for larger version

Name:	p6hjaplekid.jpg
Views:	102
Size:	168.7 KB
ID:	10123478

    I don't even know how you call them ? Both left and right front pieces in the engine bay were half gone so new ones are taking their place.

    Click image for larger version

Name:	vas_parem_ninaplekk.jpg
Views:	109
Size:	149.2 KB
ID:	10123479

    Also left ourter and inner wheelarch will be replaced.

    Click image for larger version

Name:	erinevad_plekid.jpg
Views:	108
Size:	177.8 KB
ID:	10123480

    Thats for today. I hope i'm able to update this thread sooner than last time. :)

    Cheers and take care!

    Leave a comment:


  • MarkoEST
    replied
    Originally posted by Andy348 View Post
    Hell of a project. Looking forward to seeing the finished product!
    Trust me you are not the only one. :D Concidering that there is at least 200+ hours of welding ahead and i need to eat too, then the project will be on its wheels by the end of 2024 or in the beginning on 2025. But you never know. Maybe sooner or maybe later.

    Leave a comment:


  • Andy348
    replied
    Hell of a project. Looking forward to seeing the finished product!

    Leave a comment:


  • MarkoEST
    replied
    Originally posted by Panici View Post
    Great peek into the chassis.
    Can't say I've ever seen the inside of the subframe mounts, or the rear spring perch on the frame deconstructed.

    Do update us on the new lift! :o
    Same here. Never seen inside of E30 chassis as well. At the moment project is on hold because of other bigger project he has. And i don't mind at all. Gives me time to save some money for the whole restoration project maybe. :)

    About the lift ? Its twinbush https://www.twinbusch.de/product_inf...roducts_id=433 and lifting capacity is 3600kg. On the lift i have at the moment M5 and 911. They weight about 3300kg and the middle beam is bit bent which should not be a problem. I rememeber my last boss had same parking lift and there was a Lada and a Datsun Cherry on it. The beam was bent same way. So i'm not too worried. :)

    Click image for larger version

Name:	IMG_5969.jpg
Views:	176
Size:	169.7 KB
ID:	10109091

    I also bought new daily project which need some work.


    Leave a comment:


  • Panici
    replied
    Great peek into the chassis.
    Can't say I've ever seen the inside of the subframe mounts, or the rear spring perch on the frame deconstructed.

    Do update us on the new lift! :o

    Leave a comment:


  • Mazi!
    replied
    Nice job!

    Leave a comment:


  • MarkoEST
    replied
    When you have too little space but too many cars.

    Click image for larger version

Name:	8B7879D8-E21C-489E-9E6F-01006A4CA6F4.jpg
Views:	152
Size:	170.7 KB
ID:	10107950

    Leave a comment:


  • MarkoEST
    replied
    Originally posted by abit View Post
    really nice job you are doing there! greetings from Latvia.
    Thanks neighbour! :)

    Leave a comment:


  • abit
    replied
    really nice job you are doing there! greetings from Latvia.

    Leave a comment:


  • MarkoEST
    replied
    New spring perches fabricated. Needs grinding in to shape before welding them back.

    Click image for larger version

Name:	vedruplaadid_vana_vas_uus.jpg
Views:	242
Size:	210.5 KB
ID:	10103379

    Click image for larger version

Name:	parem_koobas_tala_auk.jpg
Views:	215
Size:	141.5 KB
ID:	10103380

    Click image for larger version

Name:	parem_koobas_tala_auk1.jpg
Views:	219
Size:	141.8 KB
ID:	10103381

    Click image for larger version

Name:	parem_koobas_tala_l6ige.jpg
Views:	212
Size:	147.3 KB
ID:	10103382

    Click image for larger version

Name:	parem_koobas_tala_auguta.jpg
Views:	215
Size:	142.5 KB
ID:	10103383

    Leave a comment:


  • MarkoEST
    replied
    New fuel tank ventilation pipe in place.

    Click image for larger version

Name:	vent_toru_paigas.jpg
Views:	219
Size:	143.6 KB
ID:	10103373

    In the right wheelarch there were some ungly looking rustholes and brackets.

    Click image for larger version

Name:	parem_rattakoobas_enne.jpg
Views:	219
Size:	162.9 KB
ID:	10103374

    Click image for larger version

Name:	parem_rattakoobas_valmis2.jpg
Views:	225
Size:	134.4 KB
ID:	10103375

    Click image for larger version

Name:	parem_rattakoobas_l6ige.jpg
Views:	218
Size:	155.6 KB
ID:	10103376

    Click image for larger version

Name:	parem_rattakoobas_valmis.jpg
Views:	222
Size:	158.2 KB
ID:	10103377

    Not anymore. :)

    Leave a comment:


  • MarkoEST
    replied
    I don't know about you, but woke up around six am(i think i'm getting old) and thought this would be the perfect time to update my thread a little bit.
    Total 89.5 hours spent for cutting, welding and fabricating and the result is visible on the pictures. But lot of hours ahead to make this car good solid E30 again.

    I ordered this rear frame piece 25th of May. 28th of August finally recieved it. I hope it will fit..

    Click image for larger version

Name:	turvav88_tala.jpg
Views:	245
Size:	187.7 KB
ID:	10103367

    As i mentioned in my last post, that the ventilation pipe metal piece was wrong thickness and we couldn't use it. So my friend made a new one and it fits like a glove! We have a saying in our country: There is no unsolvable situations, there is only incapable people.

    Click image for larger version

Name:	vent_toru_plekid.jpg
Views:	227
Size:	236.3 KB
ID:	10103368

    Click image for larger version

Name:	vent_toru_plekk_selfmade.jpg
Views:	234
Size:	135.2 KB
ID:	10103369

    Click image for larger version

Name:	vent_toru_ots_v2limine.jpg
Views:	226
Size:	136.7 KB
ID:	10103370

    Click image for larger version

Name:	vent_toru_valmis_koobas.jpg
Views:	230
Size:	167.5 KB
ID:	10103371


    Leave a comment:


  • MarkoEST
    replied
    Other side there is a tank ventilation pipe. I bought https://www.specialclassicparts.de/e...vent-repairkit and the plate thickness is bit different than the original. Original sheet used to build the car is 0.8mm but the one i got is 1.2mm thick. 0.4mm thicker and if you gonna install it like it should be then there will be stupid and ugly looking lip. And i don't want and like that. So he will fabricate this small piece of metal.​

    Click image for larger version

Name:	vent_tou_plaat.jpg
Views:	231
Size:	99.3 KB
ID:	10103361

    Click image for larger version

Name:	tala_vana.jpg
Views:	218
Size:	160.2 KB
ID:	10103362

    Click image for larger version

Name:	tala_vana1.jpg
Views:	220
Size:	132.9 KB
ID:	10103363

    Click image for larger version

Name:	tala_uus.jpg
Views:	221
Size:	231.0 KB
ID:	10103364

    Click image for larger version

Name:	upsidedown.jpg
Views:	214
Size:	197.9 KB
ID:	10103365

    Leave a comment:

Working...
X