
Thanks man!
Ha, I mean I haven't driven a swapped iX. But according to some people I know that have one fitted it's very good.. :)
-
Today I got some help from my collegue to mill the holes/pockets in the subframe and steering rack.
We decided to resurface the subframe again as the subframe rocked just a few hundreds on the surface I milled on the manual mill.

Second operation was milling the holes and counterbores for the centering sleeves. After aligning the subframe and taking the zero point, the mounting surfaces were retaken to the original plane.
Then milling the screw holes and counter bore.

Then it was time to mill the steering rack, it took some figuring out and fiddling to get it all setup. some big parallels, V blocks and gauge blocks later..
(I don't have a picture of the actual setup though)

Only a small amount of material had to be removed from the steering rack, just the corner was touching.

Next up was the steering rack spindle/gear housing, I had already measured it on the CMM, after some 5 axis programming, I milled the quick connect couplings bigger and threaded the holes to M16x1,5
On the bottom hole there was some material broken off, I laser welded this section so I had a smooth surface for sealing.

After milling / tapping on the machine (only tapped 10mm deep, the rest is done by hand)


Also disassembled the actual steering rack, only thing left to do it shortening the shaft.

Very happy with the results thus far, only need to modify or make new hard lines for the steering rack and of course shortening the shaft.
I'll be glad once it's fitted under the car, took quite a bit more time than anticipated :)Leave a comment:
-
-
RE the gearbox rebuild is it fairly self explanatory how it comes apart? I need to do mine soon.Leave a comment:
-
Got some more work done at my work (obviously after hours haha)
I stripped the hex nut on the X3 steering rack, so I needed another way to loosen the big plug, luckily there are some teeth.
After some CAD/CAM, milling and wire edming..


When trying to remove the centering sleeves/bushings on the spare subframe (the one I'm modifying) I had to weld them shut and hammer them out of the pockets.
Unfortunately BMW doesn't sell these separately, so new ones had to be make. I needed two to fix the steering rack in place anyway so I ordered some extra ones to modify.
BMW decided to use 15,17-15,18mm plugs, a strange dimension as all the ones I found are 16mm outside diameter
A little fixture was milled

And the sleeve fitted, I gave them 0,01/0,02mm of play (15,16mm) nice slip fit

I also wanted to drill the holes for the subframe and steering rack but unfortunately the manual mill it too small (and I never worked with the bigger CNC mill)
Although the interface/operating system it the same, there are a couple of differences in the way it's operated.
I texted my collogue and he is willing to give me a hand with milling the holes for the centering sleeves in the subframe and steering rack


Leave a comment:
-
Today I had a couple hours to spare and decided to start the machining of the iX subframe for the X3 steering rack conversion.
To have a good reference I cleaned the bottom of the subframe on the manual mill.

Bolt hole also cleaned

Meanwhile I also let the wire EDM cut some shims for the Getrag transmission, BMW asks 14-15€ depending of the thickness.
A bit steep if you ask me.


Leave a comment:
-
-
Small update regarding the gearbox rebuild/X3 steering rack swap.
I've had a local machinist weld the original holes of the spare subframe shut, I still need to drill the new holes to mount the X3 rack.
To fix the rack in place, I also got some bushings/sleeves. I will counterbore the holes in the subframe and rack for these sleeves this way it's centered on fixed locations rather then some screw holes.
First part orders have also arrived, X3 steering rack boots, some alternator parts and bearings for the transmission + a bunch of other stuff..
This weekend I glass bead blasted the aluminium covers of the transmission, alternator and steering rack. I still need to do the engine mounts and subframe as well but I ran out of time.

Some blanking plugs for hydraulic fittings were the perfect plug to screw in to the old seals (which will get obviously replaced.)
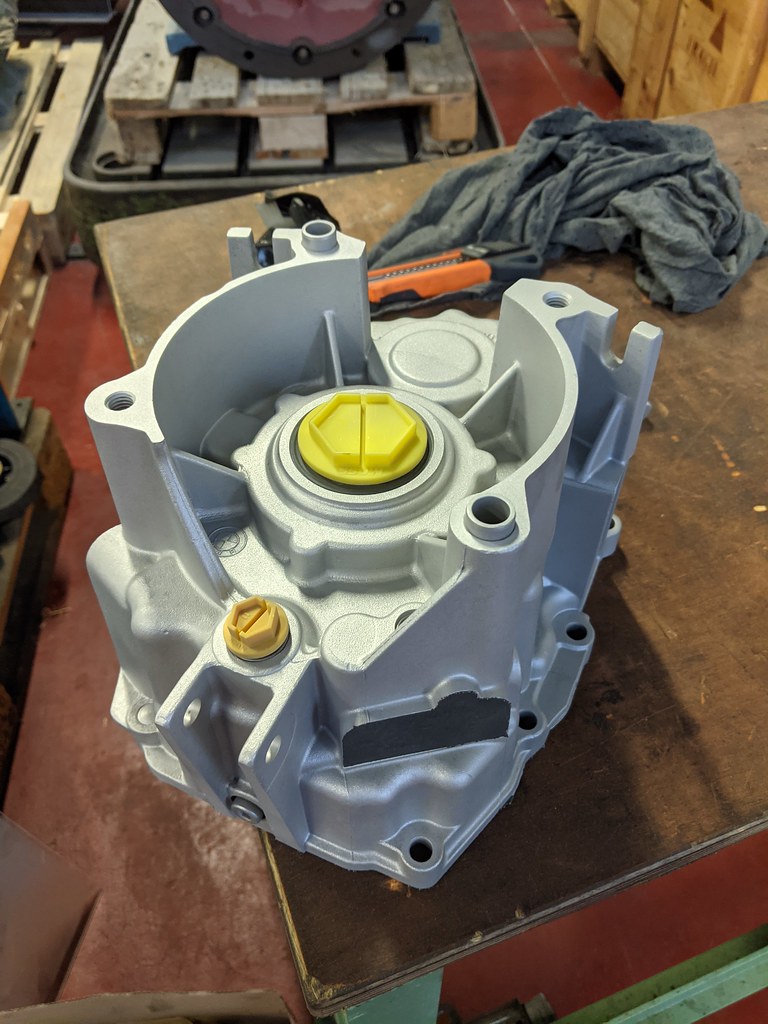
Also some steel parts for sandblasted which will get replated and some will receive paint as well.

After blasting the parts, the fun work continued.. ceramic coating the parts.. took some time to get into all the nooks but it's finished!


Next up I'll be making a special tool to disassemble the X3 steering rack as I need to shorten the steering rack shaft to get the bumpsteer back to original.
(I stripped the hex nut on the plug, hopefully I can get it loose by using the grooves in the plug, pictured here)


Leave a comment:
-
Yes, the two worn down bumps will get laser-welded. forged isn't the correct term but hardend.
I still need to test the hardness of the shaft with the instruments I use at work, then I can determine to use regular or hard filler material for the laser-welder.
Thanks guys! Your comments are much appreciated! :)
Leave a comment:
-
Nice, looking forward to see all the cleaned gearbox parts and pumps. For the selector shaft it are the two indents that you are going to laser weld/fill?
It this going to be the same hardness as the shaft itself? I presume this was originally forged?Leave a comment:


Leave a comment: