Announcement

Collapse
No announcement yet.

Early model 325e Rustoration

Collapse
X
 
  • Filter
  • Time
  • Show
Clear All
new posts

    Early model 325e Rustoration

    Being in the rust belt, I searched for months across the US (mostly looking out West) in order to find that shining example of an e21 (yes, an e21). I was getting so desperate for a new project I even started to include other early models in my nationwide search, like the e12 and e24. I paid for multiple PPIs and received hundreds of photos, but nothing panned out, all for different reasons. Then as I began to lose hope, a local e30 popped up for sale on CL. The seller said it had been in his barn for close to a year and that he never got around to "fixing it up". Apparently the owner prior to him had dumped thousands of dollars into the car (including a replacement motor) within a 2 year period prior to the sale to the now current owner. Against my better judgement, I went to check the car out in person the following day.

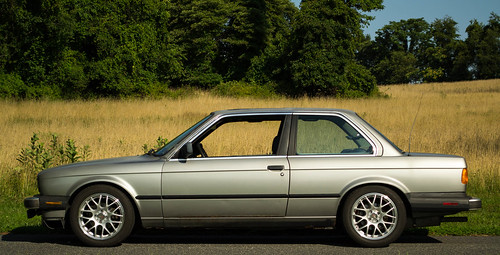
    For a 36 year old car, it looked fine. The paint had less fade than I would have expected and the body panels less dents than anticipated. Upon closer inspection, there were some "less than awesome" body repairs performed, including some sheet metal screwed-in to replace the rotted rocker panels and a fiberglass patch to fix a hole by the dead pedal. The transmission (5 speed) didn't like to stay in 3rd gear, the gauge cluster was out of an "i" model, and the odometer recently stopped working. Under the BavAuto seat covers, the driver's seat bolster was badly torn. The muffler was half gone, the entire rear subframe looked like it had been sitting in salt water for months, and everything smelled like mold. I held out hope that the replacement motor that was installed was a M20B25 because of the new tach (spoiler alert: it was another B27).

    So, what do I do? Keep on searching?
    I negotiate the price down a couple hundred bucks and leave him a deposit. I come back a couple days later with the rest of the cash and drive this thing 40 minutes back to my house:


    Click image for larger version

Name:	20200523_091002.jpg
Views:	855
Size:	74.8 KB
ID:	9953648

    So, my months of searching for a rust free e21, e12, e24, 2002, etc. ended with buying one of the least desirable (IMO) e30s (US early model ETA). And it was rusty. I guess my girlfriend is correct when she says I have a penchant for crappy old BMWs.

    Anyways, I'm glad to be here and I will keep this thread updated with my adventures in "Rustoration"!


    #2
    Once I remembered that rust is always AT LEAST 3x worse than what you can see on the surface, I started to tear into the car. What I found put me at a crossroads: do I spend the money (as little as possible) and time (probably a ton) to fix these issues or do I put back what I've torn apart and list it up for sale? After some soul searching, I decided I would bite the bullet and address the issues myself. I'd like to say that I gave myself a pep talk and ultimately grew as a person. Realistically, the reasons I stuck it out were because 1.) I couldn't sell this heap to another person in good faith knowing the issues I found, and 2.) because the previous seller left up his original ad for like 2 weeks after I bought the car. Some of what I found:

    Click image for larger version

Name:	pass floor top.jpg
Views:	747
Size:	75.1 KB
ID:	9953661

    Passenger side floorpan was rotted from the inside out. The foam under the carpet was moldy and wet.

    Click image for larger version

Name:	pass footwell.jpg
Views:	715
Size:	67.6 KB
ID:	9953662

    Passenger footwell had a questionable repair from outside the car. A loose piece of 22ga sheet metal was also attached from the inside but I took the picture after I tore it out (you can see the bolt that held the interior sheet metal in place).

    Click image for larger version

Name:	reardiff.jpg
Views:	705
Size:	85.1 KB
ID:	9953663

    Rear diff housing with bad rust scaling. Rear trailing arms covered in just surface rust (hopefully). Exhaust had a gaping rust hole and exhaust hanger brackets were barely hanging on. Spare tire well was surprisingly fine.

    Click image for larger version

Name:	sideskirt.jpg
Views:	703
Size:	78.9 KB
ID:	9953664

    Some "less than awesome" rust repair/cover-up on the rockers and fender.

    Click image for larger version

Name:	driver footwell diagram.jpg
Views:	702
Size:	73.5 KB
ID:	9953665

    Janky fiberglass repair (from outside the car) and more rust holes that went unaddressed.


    So, is this car a lost cause or is this condition just the norm when dealing with a rust belt e30? Should I have given up and chucked the car back up on Craigslist to let someone else deal with it? Probably would've taken a hit financially, but would have saved some effort.

    Anyways, anyone want to trade me for an e21? straight up.

    Comment


      #3
      Anything can be repaired with sufficient time (and money). I just addressed similar or worse rust on my 36 year old “undesirable” 318i. I was starting with a non-running car that had sat for 10 years. For 6 months after tearing the car apart to see just how bad things were I debated whether I was in over my head and spinning my wheels. But since it had been my first new car, I was determined not to let it end up in the crusher. In hind site I would do it over again, especially with the knowledge I gained in the journey. I had a blast driving the car this summer. Now there are replacement panels for many of the common rust areas making the journey easier.

      Comment


        #4
        If you plan to go Euro bumpers in the end you could end up with a desirable car. With the diving boards in place it's just a money pit/passion project to do because you enjoy the doing aspect of owning an older BMW.

        Comment


          #5
          I started this thread as a way to keep myself motivated and to also solicit feedback and similar stories from members. I appreciate any war stories or advice.

          So, my original goal is to get this car as close to 100% as possible with spending as little as possible. At this point the interior was stripped sans the dashboard. The carpet came out relatively easy (with a couple snips around the center console required) and the foam was properly secured in my trash can. I wanted a better gauge of the condition of the carpet, so I gave it a quick power washing with a mix of spray upholstery cleaner and car wash suds.

          Before:
          Click image for larger version  Name:	carpet before.jpg Views:	0 Size:	67.6 KB ID:	9953759

          After:
          Click image for larger version

Name:	carpet after.jpg
Views:	679
Size:	60.5 KB
ID:	9953767

          You can see from the "before" picture that the inside-out rusting had taken a toll on my seat rails, so that was next in line for a quick refresh.

          Click image for larger version  Name:	seat rail rust.jpg Views:	0 Size:	92.7 KB ID:	9953762

          I attacked both rails with a wire wheel on my dremel and used some wire brushes for the harder to reach areas. Cleaned up the rust flecks then hit both with a couple coats of primer and a couple coats of gloss black.

          Click image for larger version  Name:	seat rail painted.jpg Views:	0 Size:	55.5 KB ID:	9953763

          The rust damage left some pitting near the brackets, but nothing major. I kept addressing the low hanging fruit first as a way to keep this moving and to keep motivated on my rustoration.
          Last edited by OBD2; 10-02-2020, 07:53 AM. Reason: pictures

          Comment


            #6
            Went through some similar rust repair on mine. You can check out my thread if you need some motivation
            1989 325i LS Swap (Money Pit):https://www.r3vlimited.com/board/sho...d.php?t=244933
            COTM Feb 2019: https://www.r3vlimited.com/board/sho...d.php?t=428404

            Comment


              #7
              Continuing my quest for cheap or free upgrades, I decided to "drain my bumpers". A euro bumper may be in my future if I decide to go 'all in' with this ride, but this will suffice for now. The bumper tuck was as messy as anticipated. I highly recommend creating a shroud around the drill as to not get hosed with fluid.

              Before:
              Click image for larger version

Name:	side bumper stock.jpg
Views:	747
Size:	80.8 KB
ID:	9953785

              During:
              Click image for larger version

Name:	front shock drain.jpg
Views:	686
Size:	73.2 KB
ID:	9953786

              After (before trim re-spray):
              Click image for larger version

Name:	side bumper tuck.jpg
Views:	679
Size:	60.7 KB
ID:	9953787

              I applied a dab of RTV over the holes I drilled into each shock to prevent moisture from entering. I feel confident the drained and compressed shocks will not decompress on their own, so I did not weld them in place once I had them compressed. I also trimmed about an inch off the front plastic bumper trim, sanded, primed, and applied some gloss black to try to bring the trim back to life. I performed the same steps on the rear bumper, but did not trim the plastic. I hit both chrome bumpers with some polish to freshen them up as well. The front and rear sidemarkers got their own plastic polish treatment. The brackets inside the rear chrome piece that attach to the shocks are riddled with rust. I decided to just hit those with some rust encapsulator as removal and replacement of just the brackets seems impossible without destroying the bumper. Overall, I am satisfied with the results and the new look of the car.

              Final product:
              Click image for larger version

Name:	sideshot bumpers tucked.jpg
Views:	674
Size:	82.4 KB
ID:	9953788

              Comment


                #8
                Much better purchase than a E21, keep at it and you will end up on the right side of things
                Simon
                Current Cars:
                -1999 996.1 911 4/98 3.8L 6-Speed, 21st Century Beetle

                Make R3V Great Again -2020

                Comment


                  #9
                  Your floors look like my first e30. The PO had riveted on old licenses plates to coverup the rust hole. Looking forward to seeing your progress.

                  Instagram: Reichart12

                  Comment


                    #10
                    Originally posted by Reichart12 View Post
                    Your floors look like my first e30. The PO had riveted on old licenses plates to coverup the rust hole. Looking forward to seeing your progress.
                    I did some more digging and found that the metal patch used on the passenger side footwell is screwed into the frame rail (pic in my second post). It also appears that same patch extends up the fender and the PO sealed the seam with RTV? fiberglass? and some spray paint. Looks real sloppy up close.

                    Click image for larger version

Name:	rocker.jpg
Views:	681
Size:	71.3 KB
ID:	9954010

                    Oh well. This is pretty low on my list of areas to address. In fact, other than the drivers side rocker with the bolted on patch (pic in my second post), these are on the only visible body panels that aren't in good shape.

                    Anyways, I hopped on FB Marketplace and picked up a lightly used 110V Hobart welder. Then I went to Tractor Supply and got some Argon/CO2 gas and .030 steel welding wire. A buddy of mine helped me get everything up and running and even gave me some 16ga steel sheets! I got out my angle grinder and started cutting out some patches for my floorpans (two round patches to be exact). I dialed in my welder and started laying down some very amateur looking tack welds:

                    Click image for larger version

Name:	driver side patches 10-2.jpg
Views:	666
Size:	61.3 KB
ID:	9954011

                    Word to the wise: Clean the undercoating off the bottom of the car unless you want it to light on fire when you weld. An angle grinder with a wire wheel or flap disc works nicely. Wear eye and ear protection The undercoat kind of turns into a cobweb when you grind it off which I found interesting.

                    I may hit it with some tacks from the underside as well. There is some decent overlap between my patch piece and the floorpan (1/8" or so). The piece does not fit snug like a puzzle piece like you see the pros doing on their youtube videos. Once all my patches are in and looking decent, I'll hit the edges with some seam sealer on top and bottom.

                    You will also notice in the picture above I removed all of the "black tar" sound/vibration deadening material. This was a real pain but I wanted to uncover any and all rust on these pans. I've seen videos of people using dry ice to help remove it. I chose the mallet and chisel method. A paint scraper and mallet also works surprisingly well. I plan on spraying the entire floor with a Rustoleum-like paint and using some rust encapsulator on areas that have some pitting. Any rust holes will be patched after being cut out and the edges hit with some weld-thru primer. I'm still deciding what I'm going to do regarding insulation/foam under the carpet, but I have a lot of time to decide.

                    Click image for larger version

Name:	rear tar removal.jpg
Views:	660
Size:	77.6 KB
ID:	9954012

                    Comment


                      #11
                      I took a break from welding and decided to start attacking another area of the car. It's actually easier to stay motivated on a project when there are different types of things that need done. Who knew?

                      I bought a rear suspension refresh kit from ECS Tuning with the idea I would just replace the rear shocks and end links and call it good. But, after seeing the overall poor condition of the rear subframe and all the bushings, I decided I would go all-in and make this car exactly how I wanted it. I wouldn't feel safe driving it in the current condition, nor selling it to someone else. So, I am no longer tracking costs and trying to turn any kind of profit on this build.

                      I doubt the rear shocks were original, but they looked it. The top spring mount had also seen better days.

                      Click image for larger version

Name:	strut and spring mount.jpg
Views:	680
Size:	70.1 KB
ID:	9954443

                      I cleaned up the mounting point and bought some KYB struts to replace the worn out BMW-branded ones. However, the KYBs may go up for sale since I'm no longer trying to stick to any sort of budget. I plan on welding a hefty L-bracket to reinforce the mounting point.

                      Click image for larger version

Name:	spring perch clean.jpg
Views:	630
Size:	47.5 KB
ID:	9954444

                      Any idea what is going on with my tail light wiring? My only guess is that the PO rigged up something so he could plug in trailer lights because the car came with a poorly installed hitch. It looks real sketchy. I will be asking a lot of questions here and also reading through build threads, like Albie325's, to get ideas and answers.


                      Click image for larger version

Name:	wiring rear.jpg
Views:	638
Size:	77.7 KB
ID:	9954445

                      Comment


                        #12
                        Any welders or fabricators out there? I'm looking for some honest input.


                        I continued down the path of stripping and assessing the condition of my 325e. I removed all the "quick fixes" that were performed by the PO, which included a fiberglass repair of the driver's side wheel well and jack point, screwing sheet metal into the passenger side frame rail to patch the passenger floorpan, and using (what appears to be) caulking to fuse any smaller gaps where panels used to join. The pictures below are now what I'm left with:


                        Driver's footwell:

                        Click image for larger version  Name:	driver floorpan stripped.jpg Views:	0 Size:	58.2 KB ID:	9956932

                        Passenger footwell:

                        Click image for larger version

Name:	pass floorpan stripped.jpg
Views:	617
Size:	47.8 KB
ID:	9956937
                        Driver inner wheel arch:
                        Click image for larger version  Name:	driver front wheel arch.jpg Views:	0 Size:	70.0 KB ID:	9956935

                        The rust decay is daunting. You can see the inside rockers, floorpan, and firewall are all in rough shape. I have a long road ahead if I continue with my repairs and a steep learning curve to weld areas where it looks like 3 different body panels meet. There are also rust holes on the trunk floor above the arches, front fenders, and the rear subframe/diff may be toast due to rust (not pictured).

                        So, for those with more experience in rust repair and restoration, is this body too far gone? Should I just cut my losses now and start a part out?

                        Let me know your thoughts...
                        Last edited by OBD2; 10-21-2020, 07:22 AM. Reason: pics

                        Comment


                          #13
                          If it were me:

                          Since you indicated that budget has increased, I would much rather spend less time doing rust repair and use your increased budget to find another shell in better shape.

                          This car isn’t going to cost you less than buying a nice car, in time or money, and the further you dig, the more you’ll uncover.
                          1990 Brilliantrot 325iS Build Thread
                          1989 Zinnoberrot M3 Build Thread

                          Comment


                            #14
                            Originally posted by AWDBOB View Post
                            If it were me:

                            Since you indicated that budget has increased, I would much rather spend less time doing rust repair and use your increased budget to find another shell in better shape.

                            This car isn’t going to cost you less than buying a nice car, in time or money, and the further you dig, the more you’ll uncover.
                            I appreciate the feedback Bob!

                            Comment


                              #15
                              I had doubts about my project after discovering the extent of the rust and all the issues that needed to address. I also started my project with no prior MIG welding experience. I spent 6 month checking out other peoples projects and I found this site really helpful https://retrorides.proboards.com/thread/70135. The best advice I got was always make a template and don’t think you need to always make the patch in one panel. I think this was the first repair I did on my car. It doesn’t need to be pretty, just structurally sound.
                              Attached Files

                              Comment

                              Working...
                              X