Panici's '87 325is E30 - Boosted In Bronze

Collapse
X
 
  • Time
  • Show
Clear All
new posts

  • Panici
    replied
    Engine Test Fire!


    Worked hard again this weekend on the car. I estimate 13 hours of solid wrench time over two days.

    Made up a -4AN turbo oil feed line using JEGS Pro-Flo 350 Black Nylon Braided Hose. It’s rated for 300F
    so I'll be using some heat wrap near the turbo. Wanted a Nylon line as I'm routing it tight to the head
    and SS line can rub through adjacent components.
    Used a 120deg fitting on the turbo side to route the line a little nicer.

    Reused the existing turbo drain from the parts kit but had to cut and refinish the stripped end of the
    fitting for the drain-to-timing cover.

    Installed a MaximumPSI M50 Boost-proof ICV hose kit with Billet ICV barbed fitting and 3” silicone
    elbow. Added two 1/8” NPT nipples to the bottom of the manifold as a vacuum/boost source.
    Installed the clutch master to res line.
    Installed the M50 intake manifold with new gaskets on the runners and throttle body (with adapter
    plate). Happy that my brake booster still clears the intake as I shimmed the passenger side motor mount
    up and moved the booster back (since the previous engine install.)

    Deleted the intake oil separator. Installed a RallyRoad Billet fuel rail, Injector Dynamics ID1050x
    injectors, 034Motorsport injector adapters, JEGS fuel pressure gauge.
    The AN barb fittings I bought for the rail are the wrong size (too big). I made it work to test fire but have
    ordered a few more (expensive) AN bits to make the setup cleaner.
    Wrapped the motor mount and arm in heat wrap, and applied DEI Reflect-A-Gold to the frame rail
    where it is very close to the exhaust manifold.
    Changed the oil with some fresh Shell Rotella T6 15w40 and MANN filter. Found out my front fuel line is
    right over top of the filter housing and in the way of servicing the filter.
    Installed the dual TIAL MV-S wastegates with green 4lb springs.

    The First Startup:
    I pulled the Fuel Pump relay and turned the key intending to prime the engine with oil. Instead of the
    engine turning over, I was greeted with a whirring from the starter and nothing else. Sounded like the

    bendix was not extending/engaging with the flywheel. This was a little baffling as this is the exact same
    starter and flywheel as I previously ran, (and I didn’t even unbolt the flywheel when I changed the clutch
    and trans). After a shower and sanity check post on R3V facebook, I went back to my pictures of the
    previous engine assembly in 2020 and found the small Blk/Yel starter wire should be on the bottom
    terminal, not the top. Thanks to my efforts of optimizing everything under the intake manifold, I was
    able to change the wire position on the starter without pulling the intake off again.

    After building oil pressure on the starter, I installed the fuel pump relay and the new Aeromotive 340
    fuel pump came to life. Cycled the key while watching the fuel pressure gauge, and could hear when
    everything was primed and ready to go.

    Made a quick adjustment from the previous tune by changing the Req Fuel in the MS3X for the new
    1065cc injectors.
    Turned the key one final time, and the engine roared to life! Ran it for less than a minute doing a quick
    walkaround (as the cooling and power steering systems are both dry).

    Needless to say, I was very happy to hear the E30 run after so much time! Last time it spun under it’s
    own power was October of 2020.
    This was my first foray into engine internals, and it was a relief to see 50lbs of oil pressure and no
    strange noises or leaks.

    There is still plenty left to do before the car is ready to hit the road, but this is a big motivator to keep
    pushing forward.

    https://www.youtube.com/watch?v=k-o9x1n8zdA
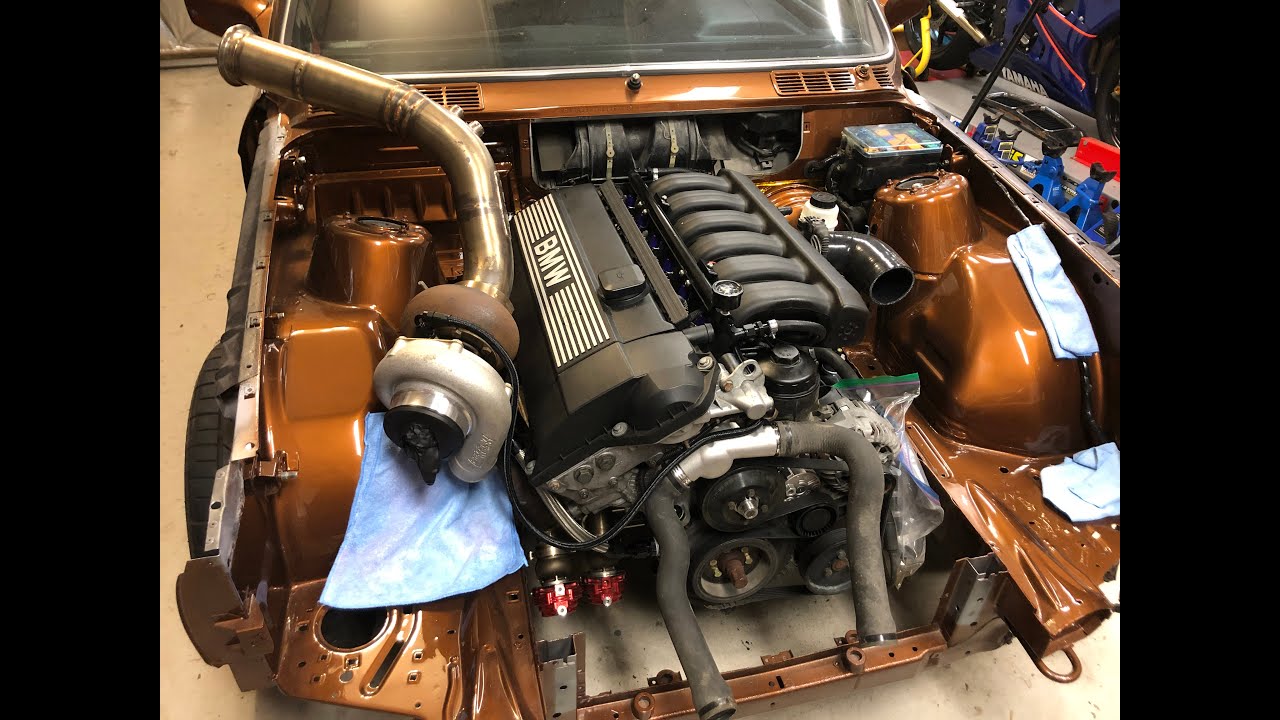


    Last edited by Panici; 12-21-2022, 06:07 AM.

    Leave a comment:


  • Panici
    replied
    Chassis Harness Thinned. Trunk Reinstalled.


    I was playing with the idea of routing the chassis harness through the fender channel, but ultimately decided to hold off for now. It involves cutting every single wire, and extending them as needed. This would be two splices per wire and take quite a bit of time. Can be a future job if i'm so inclined.

    I did spend a decent amount of time thinning out the chassis harness. I cut the ABS computer connector off under the dash, and was able to pull some of those wires (that are straight runs without splices) right out through the fusebox. I also deleted the wires for wheel speed sensors, A/C, fog lights, rad temp switch, coolant level, washer fluid level.
    In the first picture, the wires on the right hand side were deleted!

    Unfortunately without pulling the entire chassis harness, there is not enough slack to get inside the fusebox to remove the rest of the wires. As a stopgap, all of the extra wires were cut near the fusebox, given three coats of liquid electrical tape to seal them off, and then wrapped in 3M Super 33+ electrical tape (as was the rest of the harness).

    As the chassis harness is now about half the previous size, I am hoping I can tuck it nicely under the lip during final assembly.
    I routed the hood release cable out through the fender, hoping I have enough length here when the core support goes back on.

    In other news, I installed the power steering lines, E36 FPR, and VDO oil pressure sender (with different fittings and a much shorter braided line then previously used).

    Also put the truck interior back together. Installed brand new Hella license plate lights. Will need to pull the trunk partially apart again to mount the bumper surrounds, but for now it's all in place.


    Leave a comment:


  • Northern
    replied
    Originally posted by Panici
    Sometimes a single AN fitting or coupler can hold things up when there isn't a local race shop.
    Tell me about it. I've had a few of these with small items from some obscure spot in the US or further that made me end up sitting there for weeks waiting on the one part to bolt x to y.

    Leave a comment:


  • Panici
    replied
    Originally posted by Northern
    ooh it's really coming together now
    Hoping I have all the parts on hand for the turbocharger setup. Sometimes a single AN fitting or coupler can hold things up when there isn't a local race shop.


    Originally posted by 2mAn
    That backseat is amazing
    I've always liked it as well. Something special about the cloth houndstooth compared to "regular" black leather IMO.
    Seat back is supported by the old-school horsehair (are all E30 rear seats like this?), gives the car that classic upholstery smell when it sits closed up for a while.
    Last edited by Panici; 06-07-2022, 08:46 AM.

    Leave a comment:


  • 2mAn
    replied
    That backseat is amazing

    Leave a comment:


  • Northern
    replied
    ooh it's really coming together now

    Leave a comment:


  • Panici
    replied
    Originally posted by mikey.antonakakis
    I just did the Garagistic chassis-mount shifter, with new selector joint and DSSR from them. Was a little disappointed with the DSSR, pretty thin-walled on the clevises and within a week mine developed some slop due to the holes in the DSSR ovaling out on one end. Not the end of the world and you’d probably have to pay a lot more for a better DSSR.
    Ah sorry to hear about the DSSR ovaling out. Will keep an eye on mine and can reinforce if needed.
    I installed my seat today, and it looks like I'll be lengthening and slightly twisting the DSSR to get the shifter where I want it.
    But I'm going to wait until the car is driving so I can feel out the shifting on the road.


    ----------------------------------------------------------------------------------------------------------------------------------------------------

    Interior (Mostly) Installed.

    My focus today was getting the interior together. I managed to find everything in the various storage spots except the door tweeter pods.
    Can't remember if I took them off before it went to the bodyshop or not. If anyone has a set they'd be willing to part with please let me know.

    Before the interior install, I was thinking my parcel shelf (which I previously refinished in grey) wouldn't work with the new CAtuned black headliner. As it turns out, it helps to tie in the lighter Anthracite grey/houndstooth cloth of the seats. The headliner is pretty dark, I had to shine a shop light right at it just to make it visible on my phone camera!

    As a final task, I started assembling the trunk trim, but stopped as I wanted to paint the white seam sealer in the trunk (from the quarter panel repair) with some black oil-based paint. Will do a second coat tomorrow for maximum coverage.
    Not that any of it will be visible through the trunk carpet, but I like the black better than white.


    Tweaters MIA. WTB two covers & tweeters.
    Last edited by Panici; 06-05-2022, 12:04 PM.

    Leave a comment:


  • mikey.antonakakis
    replied
    I just did the Garagistic chassis-mount shifter, with new selector joint and DSSR from them. Was a little disappointed with the DSSR, pretty thin-walled on the clevises and within a week mine developed some slop due to the holes in the DSSR ovaling out on one end. Not the end of the world and you’d probably have to pay a lot more for a better DSSR.

    Leave a comment:


  • Panici
    replied
    Chassis Mount Shifter & Carpet
    • Finished up the battery cable tuck under the driver's side footwell.
    • Installed a new gas filler neck gasket.
    • Installed a CRS Chassis Mount Shifter w/Delrin knob.
    • Scrubbed & Installed the original carpet

    I dug up an old M50/G260 swap DSSR from garagistic that I didn't end up using when I first put the M52 in the car.
    It had the requisite twist in the rod for the swap, which was easily remedied with the welder. Also needed to clearance one of the pins to fit the CRS needle bearings.

    Installed the chassis mount shifter with some large washers to spread out the load. Lengthened the adjustable throw which was set to shortest as default.

    Still need to customize the throw, shifter length, and position once the interior has been installed.
    Thinking the current height is a bit too aggressive for the look I'm going for, but since it's steel I can cut/weld it to preference.


    Now that the interior is ready to go back in, I dug my original carpet out of the basement.
    One hour of vacuuming and carpet cleaner later, and it looks passable. Now need some floormats to hide the worst spots on the carpet.
    Ended up trimming the top edge (on both sides) to clear everything I have tucked up under the dash.
    May eventually paint the carpet black, but for now I'm excited to just have carpet in the car for the first time since 2014!


    Last edited by Panici; 06-05-2022, 12:03 PM.

    Leave a comment:


  • Panici
    replied
    Originally posted by Albie325
    Have been off the site for a bit, finally logged in and yours was one of the first builds I looked up. Progress looks great brother! I would have been pooping my pants getting the engine in without scratching the paint...
    Welcome back!
    Thank you, it's been slow but steady since the warm weather arrived.
    Starting this week I booked off Fridays from work (through the summer), so I'm planning to ramp up the build.

    It was definitely a careful process getting the engine in with the fresh paint. Having the turbo manifold sit so close to the chassis was also an obstacle. Those padded moving blankets were critical!
    Wouldn't have been able to do it without the removable core support.

    The only tiny paint chip I have so far is from a ring connector catching on the driver's side strut tower when pushing wires through the firewall grommet. I'm sure more are inevitable as I can't wait to put some miles on the car! Hopefully I can get some touchup paint made, as it's a custom paint colour.

    Leave a comment:


  • Albie325
    replied
    Have been off the site for a bit, finally logged in and yours was one of the first builds I looked up. Progress looks great brother! I would have been pooping my pants getting the engine in without scratching the paint...

    Leave a comment:


  • Panici
    replied
    Engine Bay Wiring + Fuel Pump Wiring


    I got in ~10 hours of wrench time on the E30 this weekend!

    As I mentioned previously, I shaved the hole in the engine bay for the main positive power cables.
    This meant I needed to get power into the bay in an alternate spot, keeping in mind that these are some heavy gauge (factory unfused) cables.
    I had considered punching a hole in the firewall and using an appropriate fitting, but ended up with a better solution.

    I dug into my parts bin and found the main battery feed from my '86 325e parts car. I was able to tuck this behind the heater core and into the driver's side under dash area. I bought a 300A fuse holder suitable for 0AWG and used this to splice the original and spare main power cables together under the passenger side dash.

    Back on the driver's side, I fed the fusebox main power feeds and the large starter feed through the factory firewall grommet. I connected these all together under the dash (secured appropriately) and wrapped the connections in a hefty amount of high quality electrical tape (even though they are away from any metal). As this is now a fused connection I'm not worried about it grounding out, although I may size down that 300A fuse to something smaller for more protection.

    I still need to wire in the small gauge battery feed (with the factory fusible link in the trunk) to the relay box power. It has been pulled through the firewall, but I ran out of appropriate terminals to finish the job.


    Looking back on my rewiring of the Aeromotive fuel pump (on Post 352), I wasn't happy with the grounding wire just clamped to the metal shell. Last thing I want is a spark inside the fuel tank due to a bad connection! So I ran a small bolt through the housing in a tapped hole, and used this as the fuel pump ground. Ended up being a messy job as the fuel tank was at a positive pressure and I neglected to crack the gas cap first.


    I installed the coil packs and harness, and checked clearance to my downpipe. It will be tight but it does clear with a small air gap. I threw on some Thermo-Tec heat wrap, and will be wrapping the downpipe as well.


    Next I started on the main engine harness. I pulled it through the firewall, and started buttoning things up on the factory wire tray.
    Mounted up my relocated fuse box, and crank sensor.

    Even went to buy a replacement label maker as my old unit was inop.


    Leave a comment:


  • Panici
    replied
    Originally posted by paynemw
    looking great! keep up the work
    Thanks you! Another day of work and I should have most of the engine wiring done.
    I've been reworking the main power routing as I shaved the original engine battery tray hole.


    Originally posted by 2mAn
    ***Disclaimer: R3V is getting soft in its old age ***
    You should get your sis an E30 and have her get an account here. We will treat her nice. Promise

    I don't know about that, but she does now drive a Subaru Forester with a manual transmission, so I call that a win.


    Originally posted by Northern
    I like the progress. Wild that everything fits so well without cutting battery tray, bending the frame rail lip, etc.
    I wouldn't go with "so well".
    I've had to make a spacer for the passenger side motor mount (1/4" steel plate) to get the clearance needed.
    Need to do the same with the rear trans mount to keep things aligned (I have washers in there now while the car is parked). I imagine this will make the already-tight intake manifold to brake booster clearance even worse. May need to get creative with modifying the intake manifold.

    The downpipe is actually touching both the battery tray and the coil beauty cover right now. It needs some heat and serious hammering to make room.


    Last edited by Panici; 05-26-2022, 04:30 AM.

    Leave a comment:


  • Northern
    replied
    I like the progress. Wild that everything fits so well without cutting battery tray, bending the frame rail lip, etc.

    Leave a comment:


  • 2mAn
    replied
    ***Disclaimer: R3V is getting soft in its old age ***

    You should get your sis an E30 and have her get an account here. We will treat her nice. Promise

    Leave a comment:

Working...