If this is your first visit, be sure to
check out the FAQ by clicking the
link above. You may have to register
before you can post: click the register link above to proceed. To start viewing messages,
select the forum that you want to visit from the selection below.
Coming from someone only making 300whp-ish on euroweaves, I bet you'll blow those tires off with a proper tune
This is such an impressive thread - the rust, the smashed rear-end, full respray, turbo setup, what a life this machine has lived. Love that you're running diving boards too
Glad you made a new thread about the wheel hop issue, otherwise might not have strolled into this thread. Probably would have never even seen the post - I tend to go straight into the "help me" threads - lackey on the build threads. :(
Car looks great! Are you going to get it on a rolling road to sort the tune and get some numbers?
Thank you! I'll be able to sort the tune on the street/track with some driving time.
I've been driving the car sparingly until I have the paint corrected and PPF installed.
Once I have it dialed in @ 4psi i'll take it to a rolling road for a few pulls just to get an idea of power numbers.
Originally posted by e30m3s54turbo
Like the project!
Do you have part number to K&N filter?
The filter is a Burger Tuning BMS Silicone Single Turbo Filter.
They've designed it specifically for mounting directly to a turbo inlet.
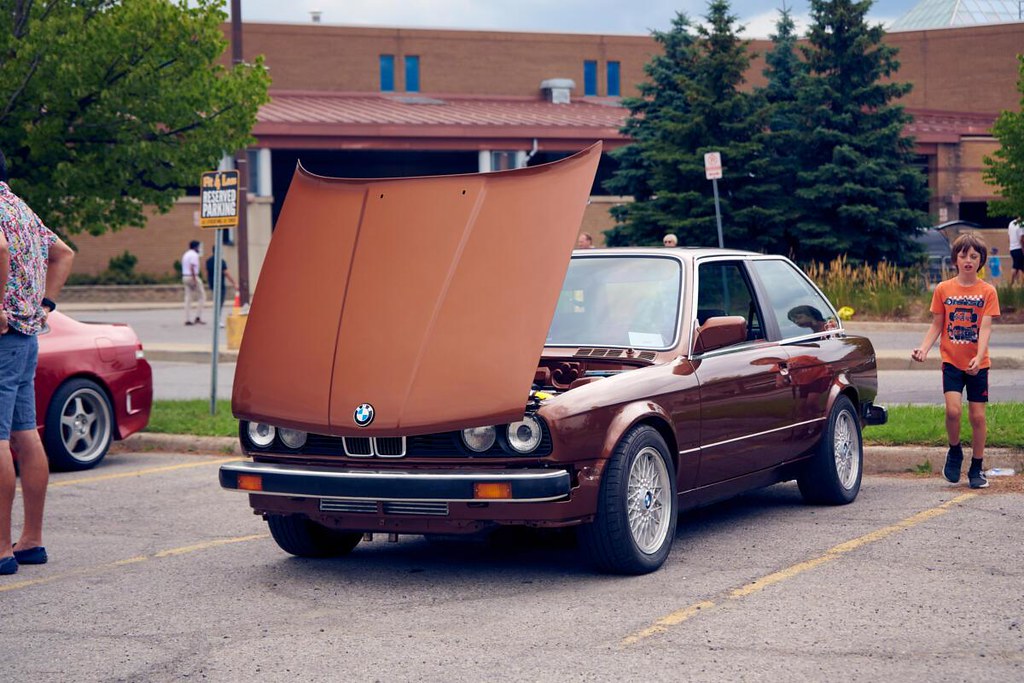
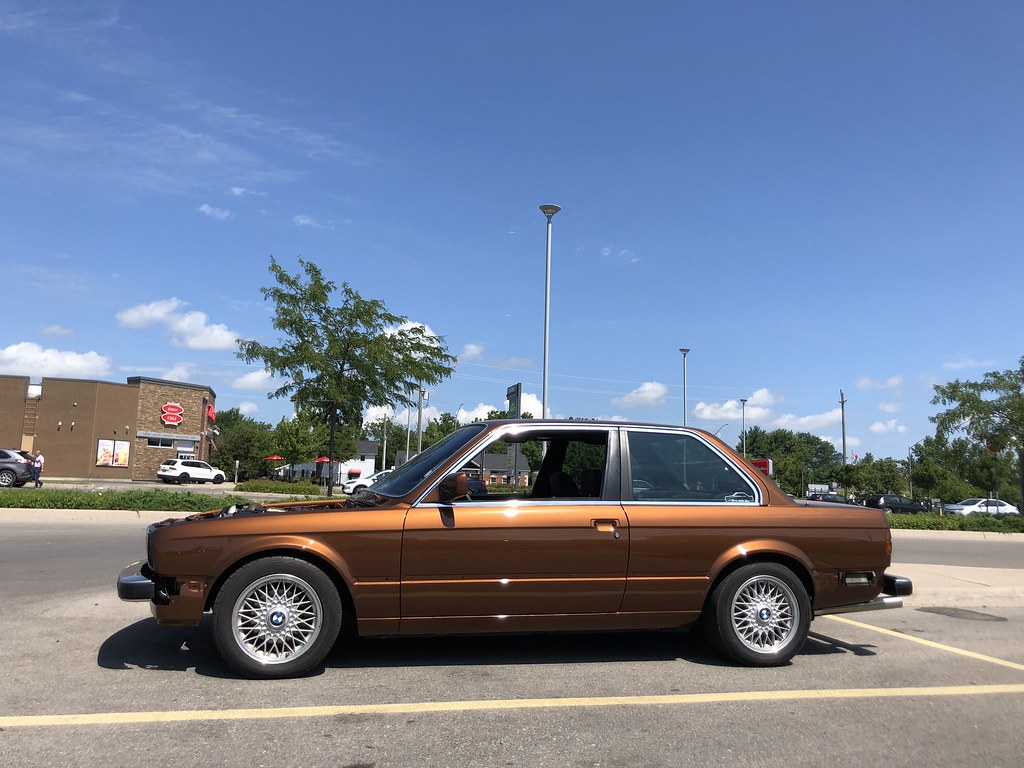
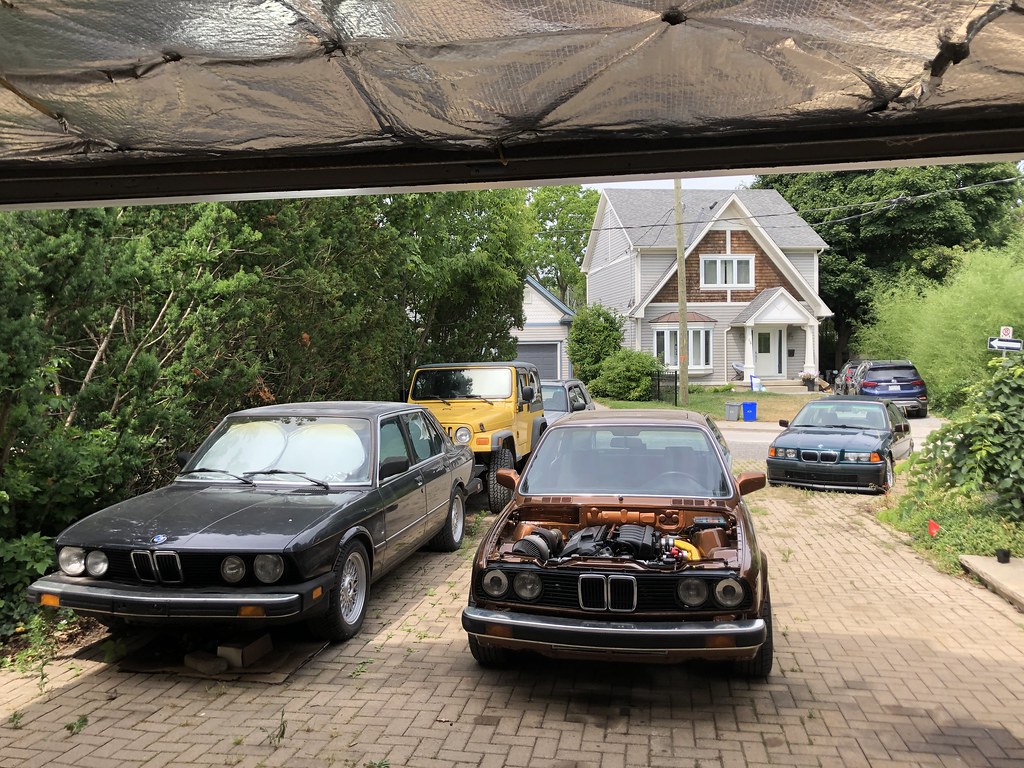
Drove my E30 ~400km round-trip to a car show in London, Ontario on Sunday.
The show was called Oblivion, and is all about 80s and 90s vehicles and nostalgia.
It was an overcast day; The paint under indirect lighting looks like a normal brown colour.
Most folks gave the car only a passing glance in it's unfinished state, until they saw the engine bay & huge turbo.
The rain stayed away until the very end of the show, and the car performed flawlessly on the drive!
I will say it definitely needs a quieter muffler and a re-gear.
Changes since my last update:
Bumped the coil dwell time up from 1.5ms to 2.5ms for the trip to Oblivion. Car no longer breaks up at the top end. Logs of the drive reviewed afterwards still show some funkiness up top. Bumped coil dwell to 3ms and pulled some fuel for the next test.
Eastwood Internal Frame Coat in the rocker panels
Lloyd Mats Ultimat Floor Mats (Black) Front & Rear
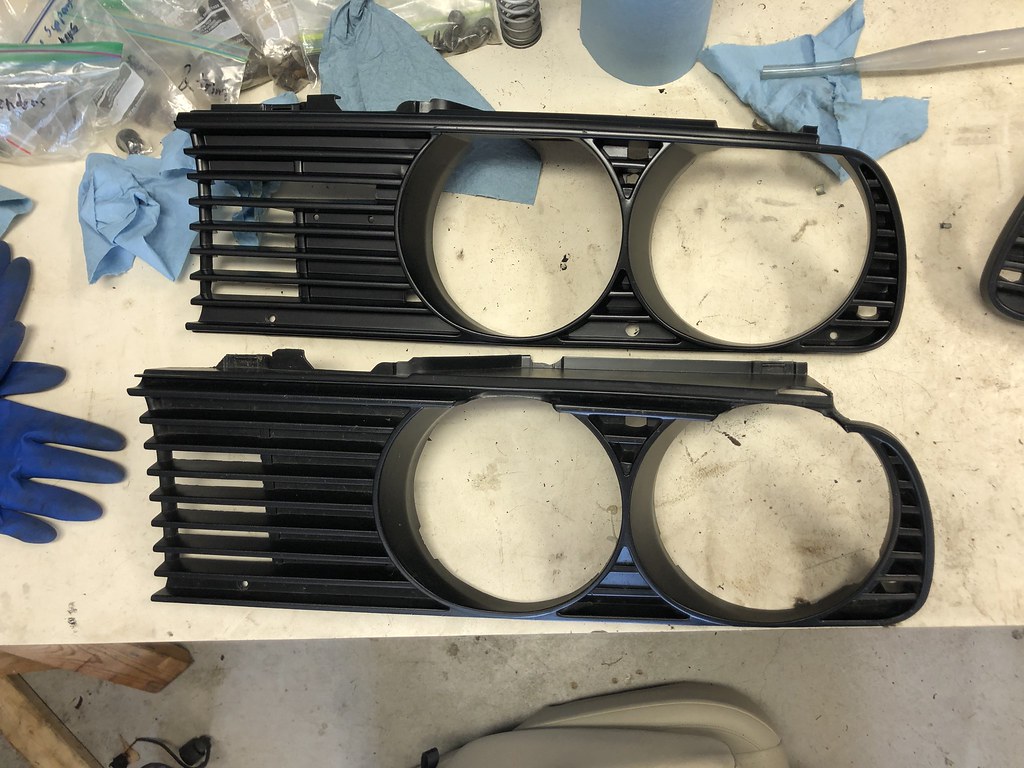
Euro Grilles (refinished, have some holes in top edge from eyelids)
In-tank fuel pump hose changed to Submersible-rated Gates 27097 (3/8" ID)
I test fit the quarter hood and then installed the full hood. It is resting on the turbo blanket but it fits!
Got another drive in yesterday, 30km more of clutch break in.
Moved the hood release handle up closer to the firewall. Still works great and gave me just enough slack for the tucked hood release cable running through the fender.
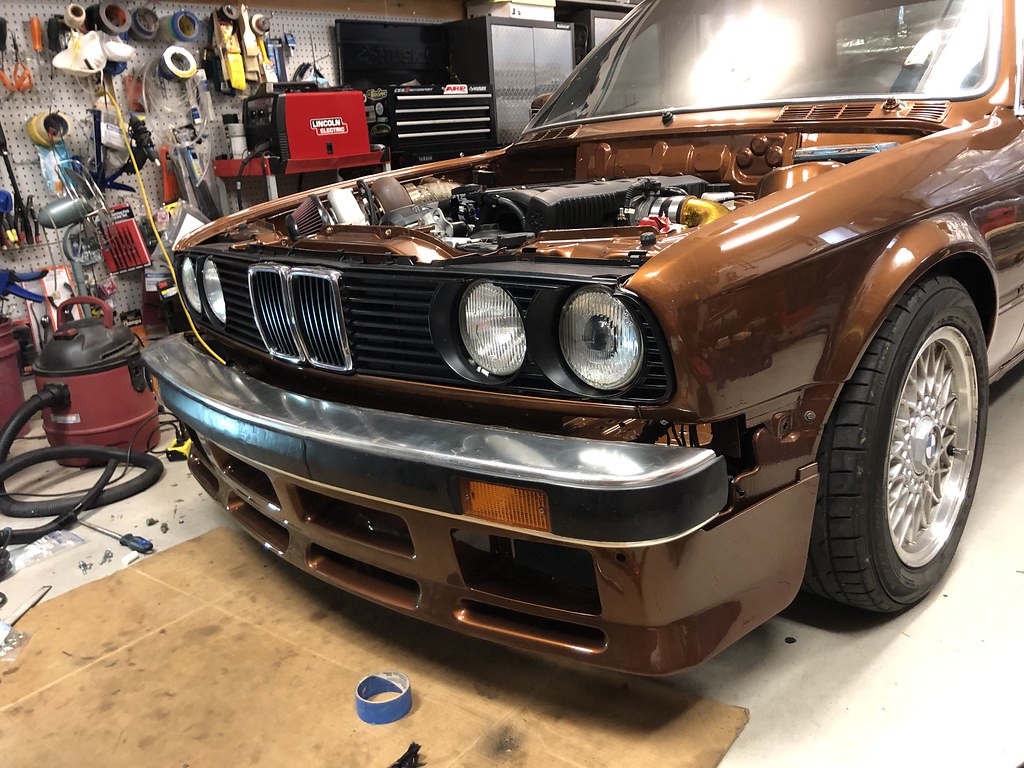
Cut the front valance holes larger to get more air at the intercooler and radiator. Installed rivnuts for the airdam.
Test fit the front airdam. Will need to reinforce the middle of the valance to the radiator core support. Airdam isn't going to be installed for good until it's been wrapped in PPF.
Installed a vintage (1978) VDO Boost Gauge in the front ashtray location.
Adjusted the chassis-mounted shifter for slightly longer throws, as 2nd and 4th gear were virtually in the same place previously.
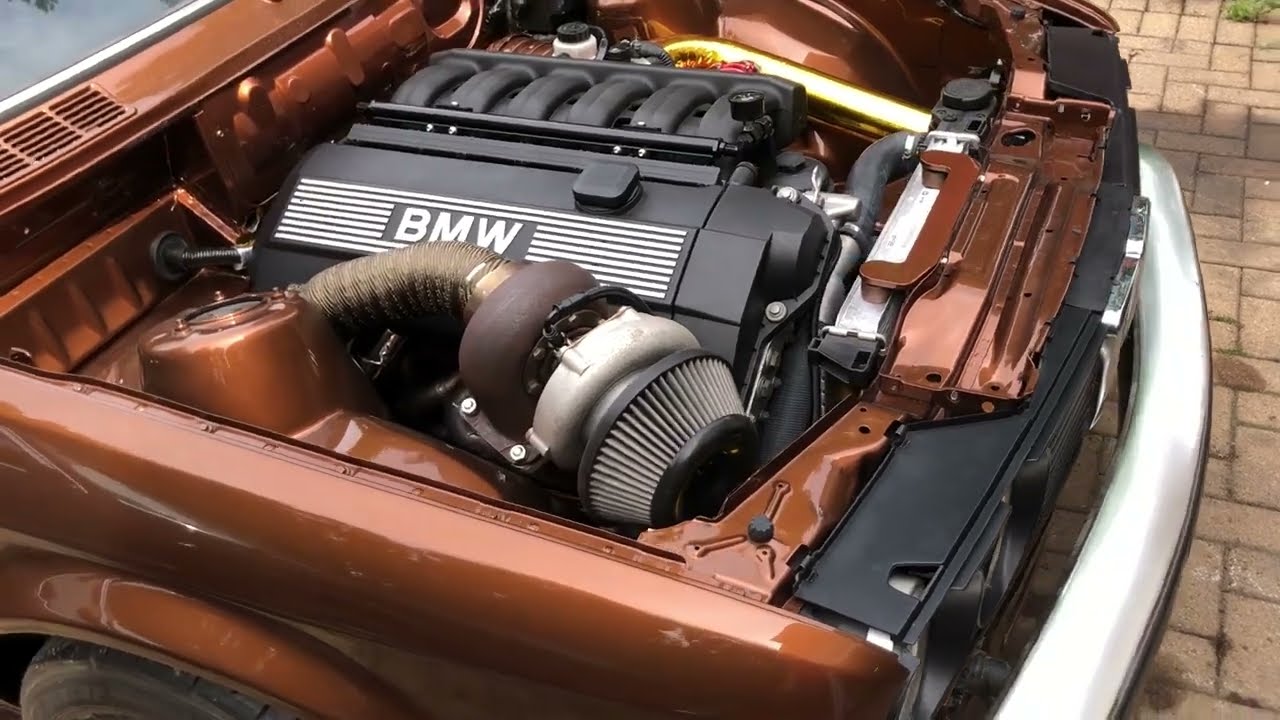
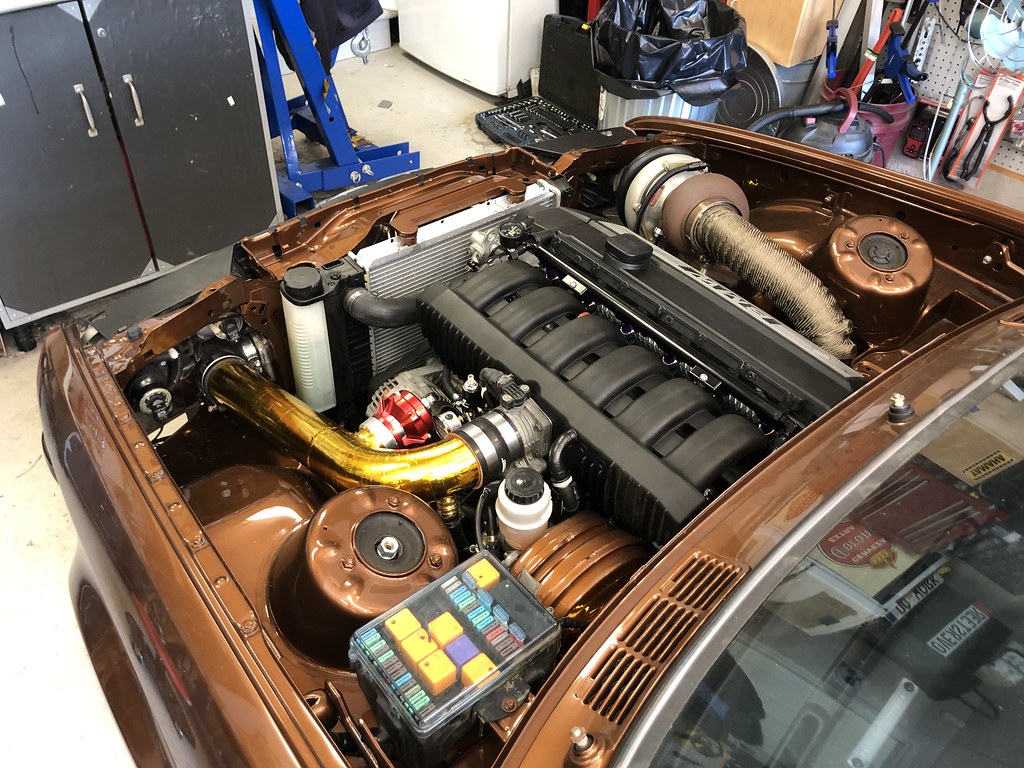
ARP Head Studs re-torqued after heat cycling. The valve cover just sneaks off past the turbo and downpipe.
Installed the heavier Tial Q BOV spring.
Plumbed the ICV into the charge pipe. Have a nicer fitting on order.
Cleaned & Oiled the air filter.
Have about 120km on the new clutch now. Lots of stops and starts. So tempting to go WOT but have resisted the urge.
The clutch shudders quite aggressively from a stop with the 7.5lb lightweight flywheel. The engine actually moved so much that the turbo flange kissed the chassis and nicked the paint. Snugged up the lower motor mount bolts but they weren't loose. Think it's just the soft rubber E28 mounts.
I have started clearancing the flange carefully with a file, will take some effort and probably a more aggressive file to get it down in size.
I am already over the screamer pipes. It's WAY too loud whenever i'm in boost. Can't wait to recirculate the gates.
Think I will also be going with a resonator or larger muffler.
The 3.73 gears are definitely a poor match with the ZF320 ratios. Need to refinish that 2.79LSD and install, but will wait until the clutch is broken in. Have been starting in 2nd but it's nice to have the granny low 1st gear to start on hills for now.
Oh and that new brown BOV spring is too stiff (reading measurably less vacuum at idle now that my ICV is plumbed into the charge pipe). Turbo flutter does sound amazing though and won't hurt anything at 4psi on a ball-bearing turbo. Will try the white spring again as a next step.
Tuning is almost too easy. Lots of practice getting my boosted miata tuned up perfectly, and this MS3X has AFR protection and knock sensors to keep things from going south.
Paint looks amazing in full sun, even though it's still dusty!
Going to echo on what has been said. Congrats and it truly is one of my fav colors of all time. I think it works very well on E30s, love how your car is coming along.
Fresh and clean engine bays make me happy.
You get the same kit I have? ESG Prints? I need to get my lights in too. Looking forward to being able to see at night.
Dig the E28, for so long they were underappreciated. The whole "wish I had a warehouse and kept all those cheap cars I could have grabbed long ago" vibes are present.
Thank you! So glad I went with Ipanema brown instead of Marakesh brown, which IMO doesn't pop in person. All the Marakesh pictures online seem to be edited or have "filters".
This colour is very dynamic, it looks like a plain dark brown in the shade, and then pops to a gold in the sun. Can't wait to take some SLR photos when it's all cleaned up.
I have the 9006 Morimoto setup for the US Ellipsoid halogen projectors. 50w AMP XB Ballast and XB 5000k bulbs. I don't drive the car enough at night to justify a full retrofit.
Glad I grabbed the E28 while I could. I watch the local classic BMW listings and hadn't seen one pop up for years. It was expensive for the condition, but the markets are crazy now and the values are only going up. I've barely poked at it, but I don't think it will take much to make it a driver.
I've had it since mid-April, and it's very strange for me not to just jump in on a new project. But the E30 takes priority.
I did clean the interior and fill some holes with a radio delete panel + window switch from my E30 parts stash.
Going to echo on what has been said. Congrats and it truly is one of my fav colors of all time. I think it works very well on E30s, love how your car is coming along.
Fresh and clean engine bays make me happy.
Originally posted by Panici
That reminds me, I have a Morimoto HID kit ready to replace the eBay special in my low beam projectors.
You get the same kit I have? ESG Prints? I need to get my lights in too. Looking forward to being able to see at night.
Dig the E28, for so long they were underappreciated. The whole "wish I had a warehouse and kept all those cheap cars I could have grabbed long ago" vibes are present.
Congrats on the successful first drive! I love the color, looks so good in the sun! Bay is looking prime too
Thank you! It was a big step. I forgot what a nice place to be the interior is.
(Better then ever now that it has Hushmat sound deadening and a full interior carpet for the first time since 2014.) I should get some floormats for it.
Would you believe that most of the car is still covered in 9 months of shop dust, and the clear coat hasn't been cut/buffed yet? It is going to look epic once it comes back from a little bodyshop TLC.
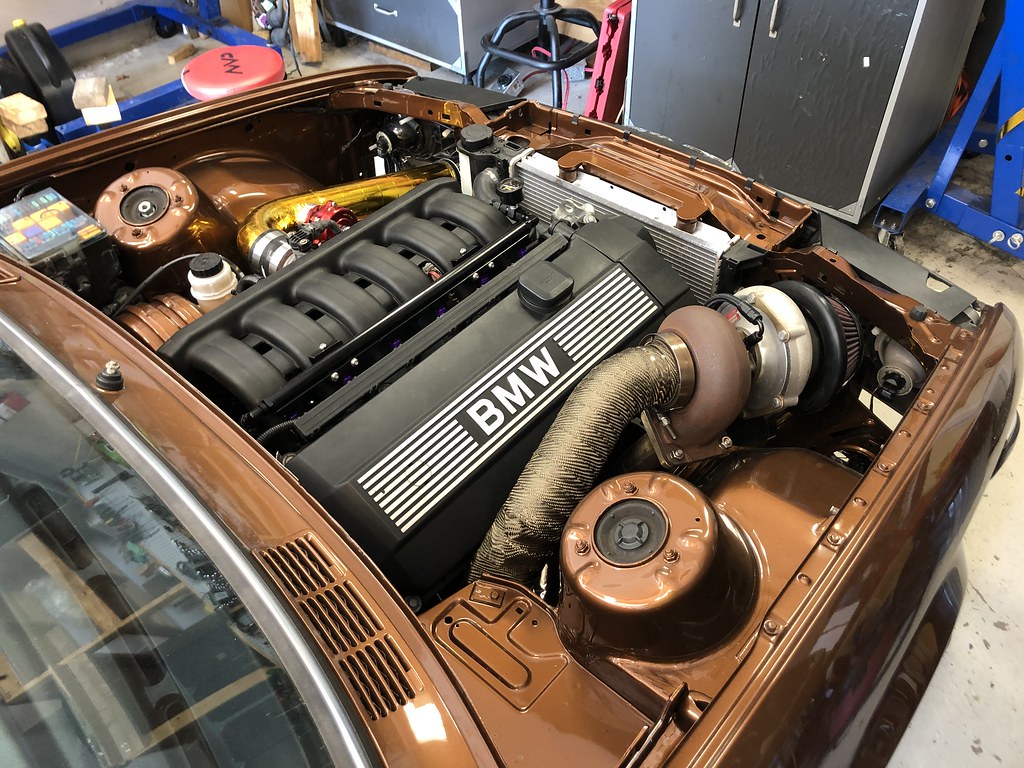
Engine bay is coming along.
Chassis wiring harness that I thinned out tucked nicely under that fender lip once I put some silicone caps on the fender mounting screws.
Still need to hook up the headlights, horn, marker lights (when DB trim is installed), and install the washer fluid res.
That reminds me, I have a Morimoto HID kit ready to replace the eBay special in my low beam projectors.
Also need a new throttle cable. The one currently in there was bodged together when I first did the motor swap, and I had to take it apart recently as it is fraying internally. It's running in front of the brake booster now and I'll be routing it hidden underneath once it is replaced. I hear an E36 throttle cable is a good fit.
Shot black rubberized undercoat in the front wheel wells as recommended by the bodyshop. Prevents stones from chipping the fresh paint in the engine bay from the backside.
Installed thinner SPAL pusher fan (30100401). It's 11mm thinner in exchange for 300cfm less airflow.
Installed the front end sheetmetal. Fitment isn't 100% as the intercooler is still in the way of everything, but it does work and this isn't a show car!
Trimmed both the headlight brackets and the highbeam housings themselves for intercooler clearance. Had to get creative with a custom mounting point on the driver's side, as I had to cut that side more aggressively for clearance.
Installed the front grilles (unmodified!)
Installed TIAL Q BOV.
Drained the old gas and changed the fuel filter.
Added a small "breather" filter on the end of the ICV hose just for the test drive. Need to make provisions to plumb this into the charge pipe.
Took the car for it's first official test drive. I threw a rough tune together for the new injectors.
Didn’t go over 65% throttle but still hit 3.6psi.
My ballpark was decent, as when rolling on the throttle from 3000rpm, it didn’t go leaner then my AFR targets.
However when I got on it at a lower RPM it immediately hit my (very conservative) AFR protect spark cut. Sounded like it shot a fireball when the ignition turned back on! Still LOTS of tuning work to be done.
New SPEC Stage 3+ clutch is VERY touchy when combined with the 7.5lb flywheel. Should get better as it breaks in though. Next time I'll wear my driving shoes instead of flip-flops.
Feels amazing to drive the car again after so long.
-
-
Other notes from the test drive:
Sunroof doesn't work, just makes a ratcheting sound in either direction. Bodyshop had it apart when they painted & replaced the headliner, so I will ask them to look at it.
BOV stays open at idle and cruise. Have since ordered the stiffest spring (Tial brown) which should be appropriate for the high vacuum levels I'm seeing at idle. (Although the car is idling high at around 1000rpm right now so this spring may end up being too stiff.) Better to keep the BOV closed and surge the turbo a little at low boost then suck unfiltered air into the intake. Can always change springs again if needed.
Air filter appears to be a "BMS Silicone Single Turbo Filter". It looks like the previous owner did not oil the filter as it should be. Going to dig through my old parts box to see if I have part of a K&N cleaning and recharging kit.
Going to re-torque the ARP Head Studs before I drive the car again, now that it has seen two heat cycles.
-
-
-
-
There is still plenty to do on the E30, and i'm not stopping until it's back together.
But maybe this is the right time to introduce the next project car? Meet my 1986 E28 535i
One more weekend of E30 wrenching. Point form again.
-
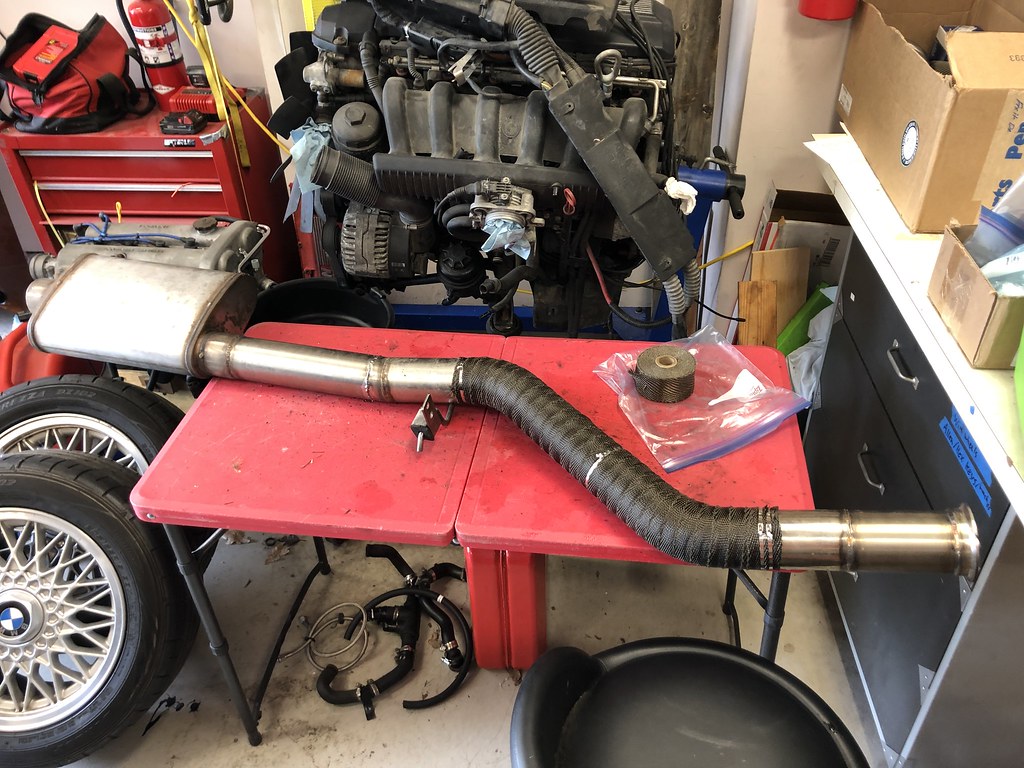
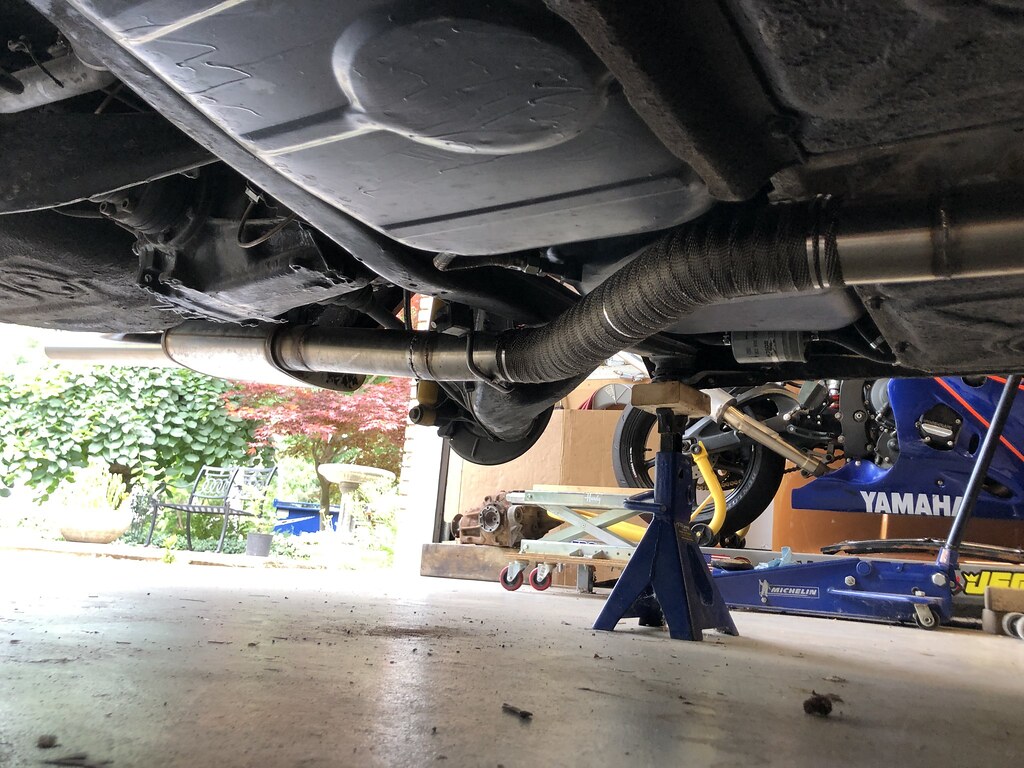
Wrapped the 2nd exhaust section where it is very close to the floor.
Wrapped the 3rd exhaust section where it passes under the gas tank (I don't have the heatshield anymore). Hit the back of the muffler with black header paint.
Installed a two-foot section of tubing as an exhaust tip. Will shorten this after rear valance is installed.
Made a 1/4" spacer for the trans mount.
Installed the 14point7 Spartan 3 wideband with LSU ADV sensor. Ran the sensor harness through the shift boot.
Made some wastegate dump pipes. They are satisfyingly parallel and equal length. Going to run the screamer pipes until I made exhaust version 2 with recirculating gates.
Found my fuel pressure would not increase over ~20psi regardless of what I did with the E36 3/2 valve FPR.
Installed an Aeromotive compact FPR (13136) with Aeromotive fuel pressure gauge (15633).
Still didn't have fuel pressure, found the in-tank pump hose was loose/disconnected. Used a piece of Gates hose for now, would like to get a submersible-rated line in the future.
Set the new FPR for 50psi. Will be removing one of the fuel pressure gauges now that I know the system is working properly.
Installed the removable core support.
Installed a Colourmatched CATUNED Billet Rad Mount (Thanks Delta Park Auto for throwing this one in!)
Installed the SPAL pusher fan.
Test fit the massive front mount intercooler, made some mounting brackets.
Test fit the cold-side pipes, immediately decided I didn't like the tarnished aluminum. Wrapped with DEI Reflect-A-Gold. Not sold on the look, I think it draws your eye too much. Will leave them for now, may end up taking the gold off and painting them black.
I also started trimming out the front valance for the intercooler. Went as far as I was comfortable, didn't want to get into any areas that will be visible when the front end is together.
I still need at least another 1/2" to get the fenders to line up properly. Will take another look with fresh eyes.
If I can find a thinner SPAL pusher fan that may help, as right now the back of the intercooler is touching the fan motor.
Only bit of bad news, I gave the car it's first paint scratch when carrying the valance to-and-fro. Caught the mirror with the edge and scratched right through the paint. Wish I had a bigger workspace. The car will be going back to the bodyshop to get the clear runs cut out; They can touch the mirror up at the same time.


 [
[


Leave a comment: