-
Most track orentated E36, E46, E90 runs square setup.
Most Rear / Mid engine Rear wheel drive cars are staggered.Last edited by moatilliatta; 09-17-2019, 10:22 AM.Leave a comment:
-
I did. Here's the thought process: I'm trying to fit as much tire as possible in order to balance the chassis to the impending S54 swap. Most performance FR cars run stagger, including the M3's from E36 and up. I believe this is done to help balance corner exit traction, but I've never talked at length to a chassis engineer about stagger, so your guess is as good as mine. Using Tire Rack's tread width measurement, the average stagger for M3's is about 1.2in across the E36-E92 range. It's important to look at the Tire Rack measurement and not the notoriously unreliable DOT width rating for the reasons outlined here: https://motoiq.com/how-to-properly-select-and-size-tires-for-performance/2/. Since the Touring has more ass weight that the M cars, it should need less stagger, so I made a scientific wild-ass guess and shot for 0.8in. I know I can fit a 9.5in tire in the rear, so now I just needed to match the fronts to that. In the Continental sizing, the 255 measures to a 8.8in, resulting in a 0.8in stagger. Perfect.
That said, the Conti 245/40 measures to 8.6in, which is very close, and has a 0.3in smaller diameter. The smaller diameter would only help fitment, and the chassis could be balanced out with bar and ride height tuning if necessary. If the 255's refuse to fit this could be an option.Leave a comment:
-
Why 255s? 245’s fit 17x9 better IMO.
Thought about going that route?Leave a comment:
-
-
Interesting, is that static or dynamic? With my 225/45R17s at et20 I clear that portion, but I haven't pushed the car yet.
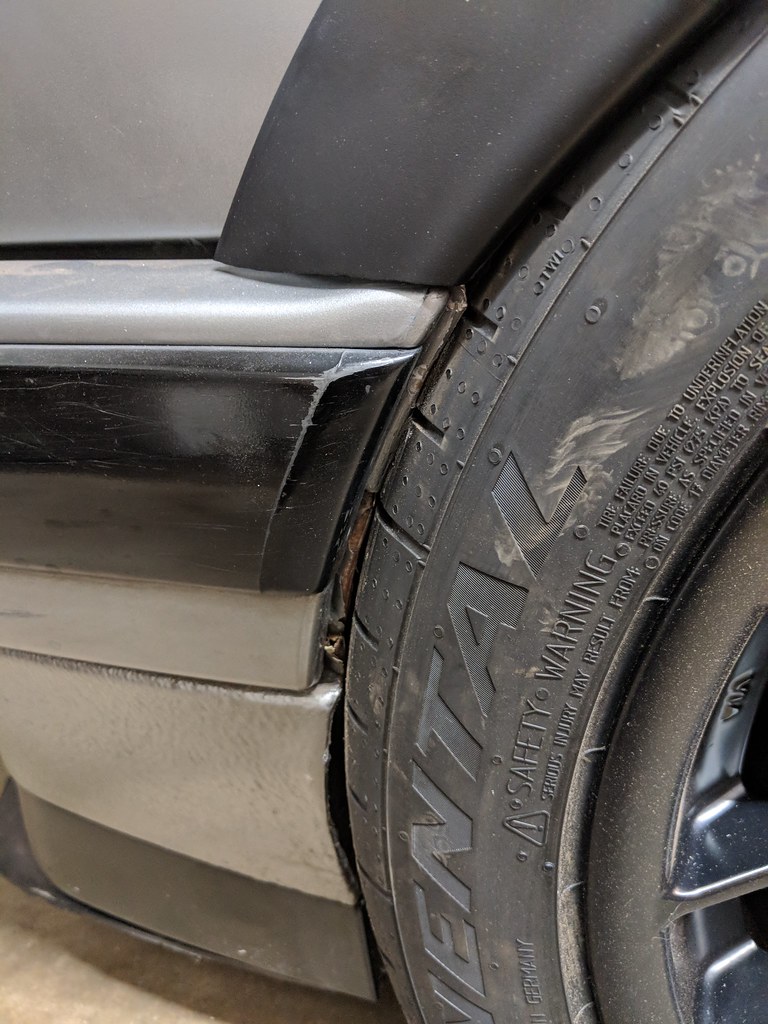
Speaking of which, I finally test drove the car sans flares. I had a very noticeable ticking-grinding noise coming from the left front during low-mid cornering which I figured might be the ARB rubbing on something. Turns out I was right about the control-arm-to-rotor clearance:
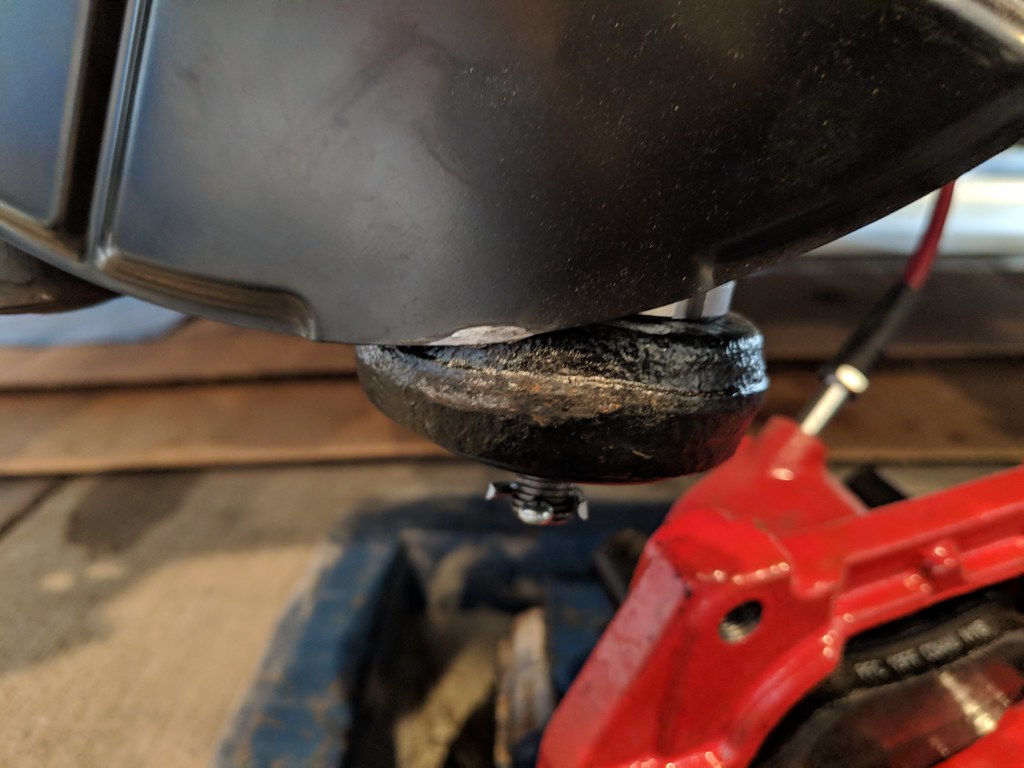

That'll buff out, right?
A slight grind and a lick of POR-15 and all was well with the front suspension. I got under the car and checked all the connections and components and all seems good.
The brakes, however, are still very soft but do generate pressure at the bottom of the pedal travel. This is despite seeing consistent clean fluid at all four corners. This could be one of two things. One: air in the system still. When I rebuilt the calipers on my Spec Miata it took four session->bleed cycles before all the air was out, and considering I replaced every line it's very likely that there's still air trapped. Two: the big-ass calipers require more fluid and therefore require a larger master cylinder. I haven't seen this mentioned in any of the Naseig/Elcoy kit threads, but it's possible I missed something. To anyone running this kit: is a 25mm MC needed to restore proper pedal travel?
The last thing left to properly install is the Kamotors flares. I initially hit them with SEM Trim Black when I was thrashing to finish the car for a work sponsored car show (which I didn't make), but I always intended on color-matching them.
I wet sanded the flares down, cleaned them, then hit them with SEM high-build primer. Which, of course, promptly reacted with the underlying layers, causing huge cracks in the finish. In a cumulative moment of frustration about this project fighting me every step of the way, I forgot to take a picture. However once it dried I rallied, stripped down the reacted bits, and got back to work.

Stripped, cleaned, ready for primer. Again. I used Dupli-Color Filler primer this time around and had no issues.

Primed, wet sanded with 320, cleaned, and a fresh base coat of PPG Lachsilber.

Third and final coat of SEM 1K Clear.
I had my local Painters Supply mix up the Lachsilber and put it into a spray can for me. Unfortunately the can started to give up on the final coat on the last flare, which made the metallic a bit uneven. If it looks as bad in the sun as I expect it will I'll have have to suck it up and buy a real gun.
Once the clear coat cures the flares go on and she'll finally be ready for the road again. I can't wait.Leave a comment:
-
You can always get more caster from the top as well if you need it. I wouldn't worry about losing the offset CABs too much.
Mine hit the front of the wheelwell where you mention. I gave it a whack with a hammer where the outboard liner screw is for maybe an extra 5mm of clearance. For reference, this was with 225/45R16's on a 16x8 et8, so your interference might be worseLeave a comment:
-
The centered CABs are definitely going on when I go to fit the 255s. The wheels are visibly sitting forward in the wheel well. Losing caster will be a bummer but having all the caster in the world is irrelevant if I can't drive it hard for fear of tire rub.
Once I get some centered CABs (that aren't blown out like my original stock ones) I'll experiment with seeing how much needs to be removed for proper fitment. The front fender liner had to be removed in order to get full steering but I'm going to try to make the main liner work (dirt road problems). Did your tires rub the metal structure that the liner bolts to?Leave a comment:
-
I would say cut the valence behind the bumper where you can't tell, but I think you'll hit the front of the wheelwell shortly after. I didn't interfere with the valence, but did hit the wheelwell... Maybe centered CABs could be an option?
Leave a comment:
-
That was my first thought, but then I realized that it wouldn't fix the valence clearance issue. The 255's could definitely fit if the valence is pulled/trimmed, but this project has been draining the life out of me for the past three months and I just want to get back on the road before the summer is over. That and I plan on the box flare conversion in the future and that'd be a perfect time to cut/trim/pull until it's just right.Leave a comment:
-
Any thoughts of running kamotors ultrawides instead to get the extra clearance? seems like the easiest routeLeave a comment:
-
That's what I keep telling myself in order to stay motivated, haha.This is going to be quite badass when its all done
It's been a long few weeks but progress has been made. I picked up some rod end dust boots for the anti-roll bar links by way of Seals-It.

I don't know why boots aren't included with every aftermarket adjustable link kit (OK I do: cost) but these should keep the BimmerWorld links clean and squeak-free for a long while.

I refurb'd the mounting bracket and used the supplied hardware. The links are a bit of a pain to install with the boots on, but worth it for the lubrication and corrosion protection.
I have yet to find a single good bushing on this car...
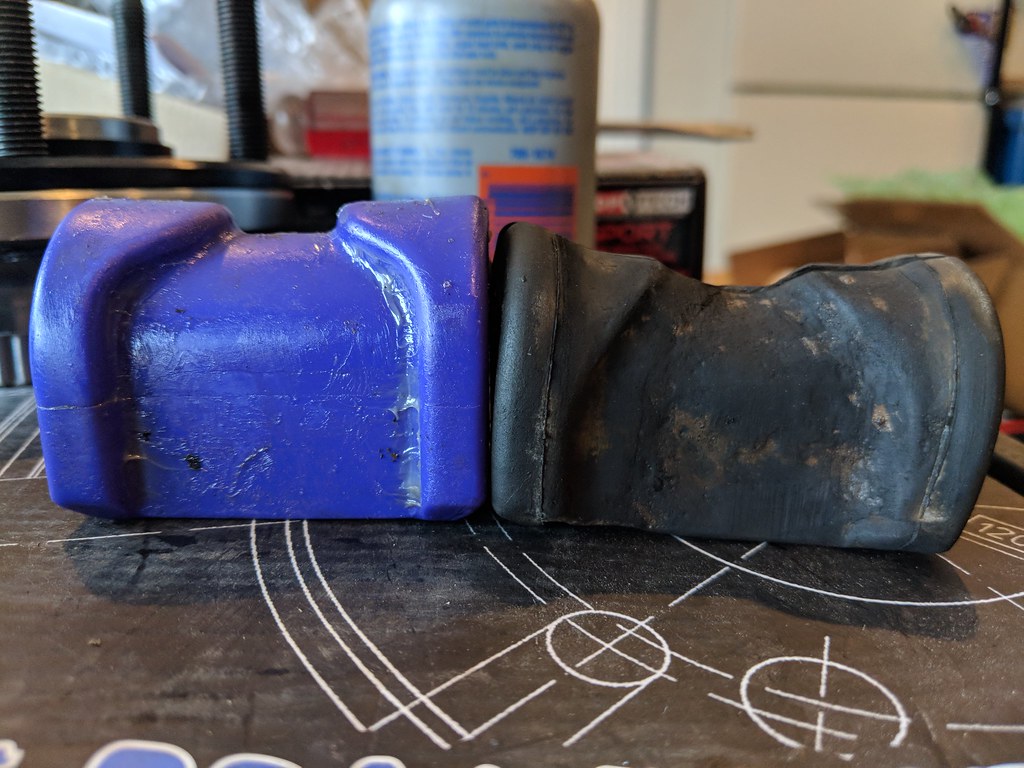
The only hiccup on the front bar install was the bushing. The bracket was so corroded on the rubber side that I couldn't get the poly bar bushing to fit. I reused the old bushing and bracket and will order OEM ones.
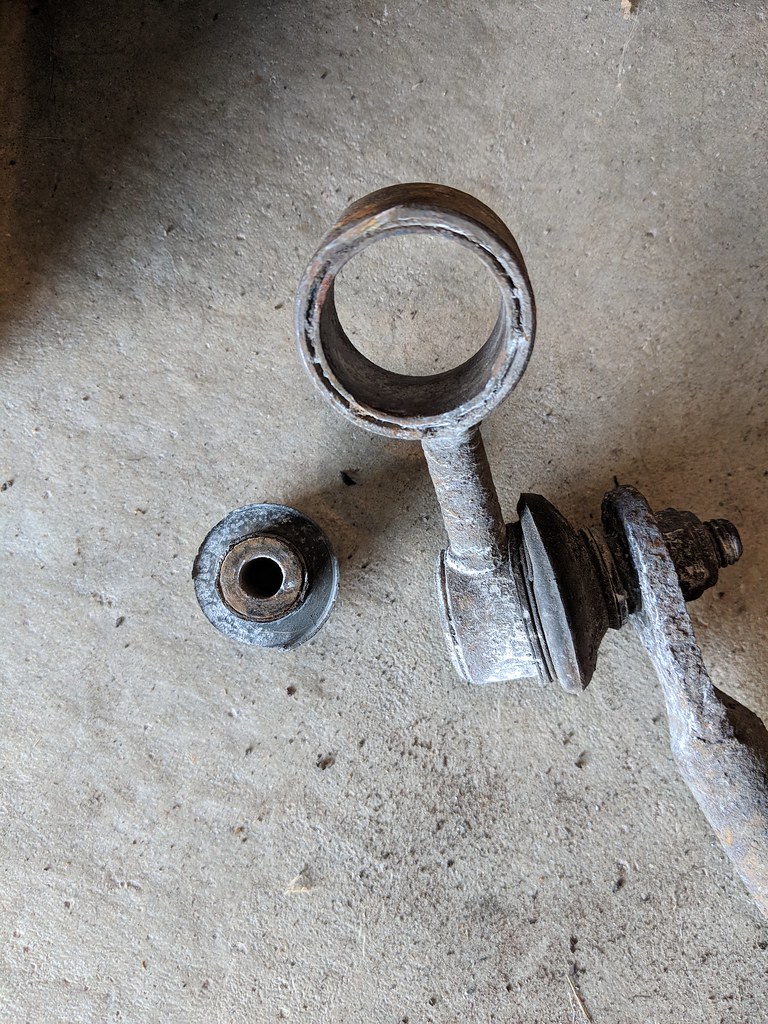
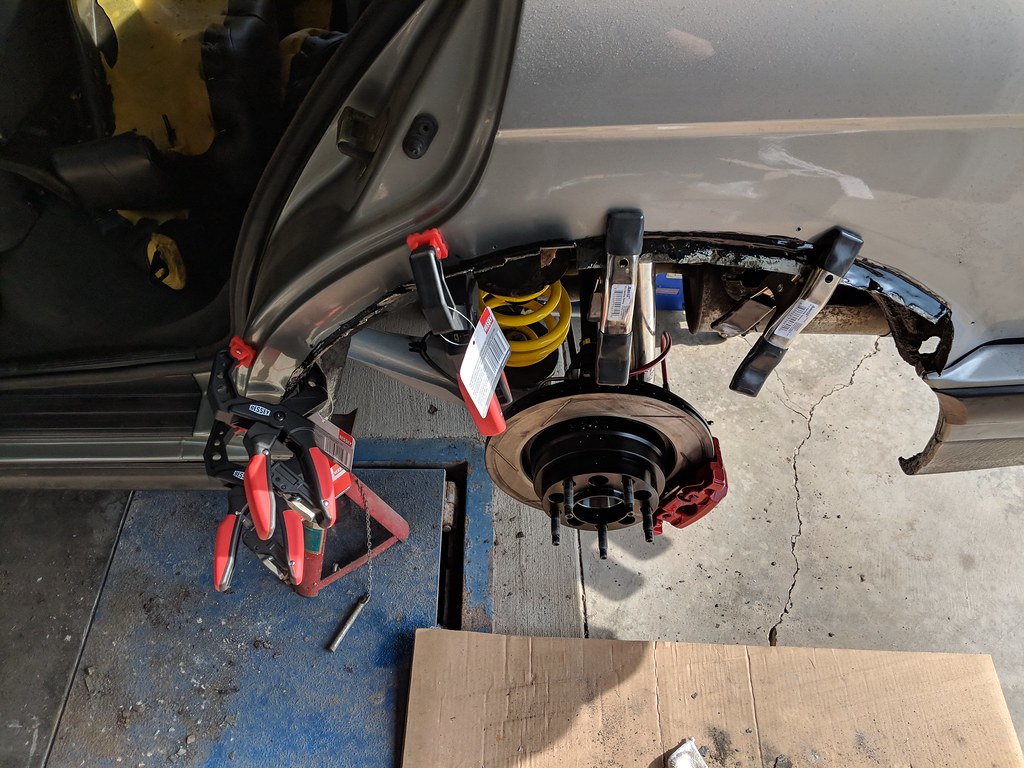
While the front bar was being installed I took the opportunity to install the MRT roll center correction kit. I must have been in get-shit-done mode because I have a distinct lack of pictures, but I did get these:

The outer ball joint needs to be replaced with the MRT supplied spherical. The old one put up a fight but the 20-ton press eventually won. It made a hell of a bang though.

Fully installed. The kit is well made and install was straightforward minus the ball joint removal. The control arm to rotor clearance is TIGHT though, and will likely need some grinding to be happy.
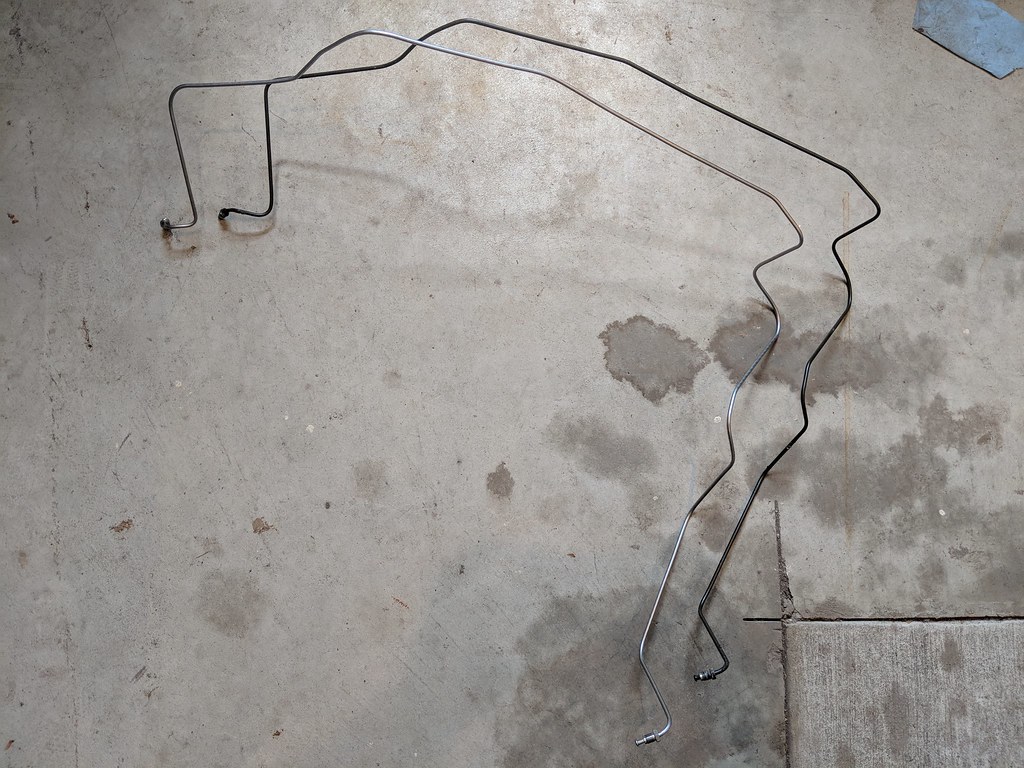
I also finished the last of the brake lines. The fronts were actually in decent shape except for the bit that pokes into the wheel well. I had the hard line, so screw it.
And now onto the hardcore stuff: fitting the KaMotors flares.

Step one: mock up and mark up

Step two: measure x100, and...

Cut once

Step three: fit the flare

Step four: swear are yourself for being overambitious with tire sizing
This is with 90deg of steering at the wheel and some moderate "massaging" of the valence. Not even close to fitting. Valence hacking or smaller wheels and tires are the only options here.

The steps for the rear are much the same


Inner fender skin trimmed

Inner fender bent up to meet outer

Most opt to weld at this point, but I figured I'd try something different. 3M panel bond is used in panel replacement in modern repairs as an alternative to welding, and should bond as strong as weld (except in peel, but the stresses on these panels definitely aren't peel). As usual with any glue application, prep is key.
It takes roughly four hours to set up but I kept the clamps on overnight. It seems plenty strong, but I'll still be keeping an eye on it. Worst case I grind it off and resort to welding.
 IMG_20190813_194905
For anyone cringing at cutting on a Touring: this is what I found under the left rear. It would have had to be cut regardless.
With the cutting done, I mounted the Arc-8's and got it on the ground for the first time in over two months. I was super excited to see it back on the ground, but a few minutes of fiddling will the steering wheel all but confirmed that these tires straight up wouldn't fit without significant hacking.
I was left with two options: be my stubborn self and keep cutting until they fit, or, get smaller wheels and tires. Ultimately I plan on an M3 body conversion which should be able to house the 255's. That, combined with my desire to just drive the damn thing lead me to picking up a different wheel and tire setup.

Sorry, Arc-8's you'll have to wait for some serious body work

In the meantime: TRMotorsport C4's in 17x8 et32 and 17x9 et45 (E90 fitment) wrapped in Michelin PS4S' in 225/45R17 and 245/40R17. 12mm spacer up front and 25mm spacer in the rear.
I'm not completely sold on the wheels after seeing them on the car but they'll get me on the road. I use TRMotorsports wheels on my Spec Miata and have no issues with bending (and I abuse curbs; if it's not grass or dirt, it's a racing surface, haha), so these should survive Michigan roads no problem.
As for the tires, I have a ton of miles on PS4S' from driving them on vehicles at work, and good God damn do they stick. It is straight up black magic how they're able to get that much grip in so many conditions, including snow. These are the tires I originally wanted, but they don't offer them in 275 and 17in so I opted for Conti's. I'm excited to see what these tires can do on an E30.
Next steps are shakedown runs to fully bleed the brakes, bedding brakes, verifying everything clears, and diff break-in.
Oh, and painting the flares. Definitely painting the flares.Last edited by -J-; 08-26-2019, 08:20 AM.Leave a comment:
-
Rear suspension is finally in.

My OCD is quite pleased
The install went smoothly, with the exception of the BimmerWorld rear ARB. This design must not have been tested on a Touring because this is what I found when I drilled the floor:

This little guy holds down a carpet piece that transitions the trunk to the rear seats
I got lucky and didn't hit the studs on either side. I ended up drilling the bracket so that the stud could pass through. The interior piece will need a light trimming as well.
The next issue was the bar bracket itself. It mounted snuggly when mocked up but I couldn't for the life of me get it to fit with the actual bar in place. Turns out that the tab that the OEM bracket uses for locating itself wasn't allowing the threads to line up. The new studs will provide more stiffness than that tab could ever hope to, so out came the hammer...

A few enthusiastic swings later, boom the bracket fits perfectly
With the rear in place I could finally test fit the 275 rears and see what I needed for spacing and cutting.

Tight, but doable

Yeah, the Kamotors flares are going to find their limit...
With the rear buttoned up I can move on to the MRT roll center kit in the front, then get to cutting. I'm realistically hoping I can drive this thing this weekend.Leave a comment:


Leave a comment: