If this is your first visit, be sure to
check out the FAQ by clicking the
link above. You may have to register
before you can post: click the register link above to proceed. To start viewing messages,
select the forum that you want to visit from the selection below.
Big Al's Revenge: an OEM+, MTech1 325e restoration
Congratulations on COTM! Well deserved prize for a fantastic job. Just read through the whole topic.
You're an inspiration for me and i also think for many others!
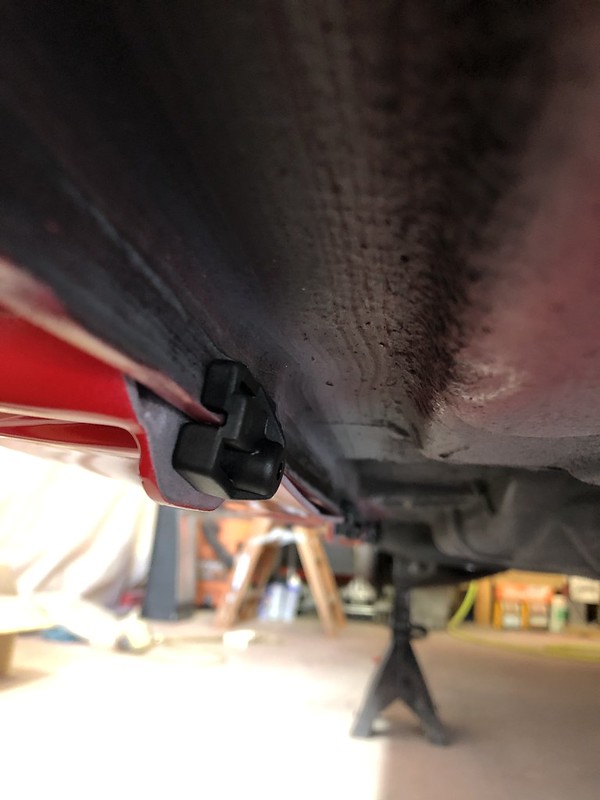
What do the hood stoppers do? Please don't answer 'stop the hood'
They just keep the metal hinge "halves" from touching directly when the hood is fully open. Necessary? No. Cool example of the how well the BMW engineers thought through all the details? Yes.
These tend to go missing over the years as they crack and fall out. The hood will still work just fine without them. Albie has done such an amazing job with the details that I had to tell him about these bits.
This is coming along SO nicely. I love the smaller details that make me say "wish I thought of that" like spray dying the panel in the trunk and those hood stoppers! I know you're moving on bit by bit, but if you ever get a chance to possibly post where you got that nice vinyl for that front headliner cover-- I'd be interested. Tried to re-glue what I have, but the existing material shrunk unevenly and won't fully cover the area :( There's a ton of different grains and degrees of black and grey out there, but yours looks spot on! Sent from my moto g(6) using Tapatalk
Lol, just a little. I love watching your build, definitely picked up a few pointers for my own.
Tzantushka will hopefully get the front install and mirror replacement posted up tonight/tomorrow, it's been a busy couple days getting it all put together!
After the sideskirts were done, I decided to get the rear out of the way. Unfortunately the PDF of the rear is too large a file to attach, but if you need it I can always send it via PM.
Here's the parts list for the rear bumper and for the apron:
All laid out:
You'll start by getting the bumper assembled and mounted on the car to get everything aligned properly.
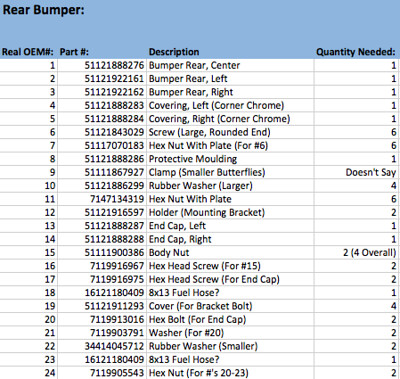
Attach the end pieces to the main middle piece using the round head screw (Part #6) and corresponding washer nut (Part #7), there are 2 per side, one on top and one through the front in the square holes. You have to get the top one in first, then put the chrome covering cap on over it, then insert the front bolt through the covering cap and through the bumper itself:
Keep these 4 only finger tight as you'll likely need the ends to flex a bit to attach the end pieces to the side of the fender using these body nuts (Part #15) and corresponding screw (Part #16)
Getting the bumper on is pretty self-explanatory. You get the two mounting brackets aligned with the holes you drilled in the rear valance (a few posts back if you want to go take a look) and screw them down. Make sure to use rubber washers on any of the screws that enter to trunk to prevent any water from getting in. Then lift the chrome bumper onto the brackets and screw them on. Last, You fold the end pieces in towards the body of the car (You left them loose, right?) and then screw in the ends, the hole runs through the trunk so you'll have to remove the trunk liner to get to it. I forgot to take pics of this so will add retrospectively.
Now you can get the bumper aligned and straight and snug everything down:
Now, remove the bumper. Don't remove the brackets and everything, just the 2 nuts that bolt the middle bumper to the brackets, as well as the 2 screws for the end pieces pictured above. In order to attach the MTech apron to the bumper, you'll need to slide these square plate screws (Part #13) into the grooves on the back side of the rubber bumper impact strip:
Then, basically align the bolt through the holes in the top of the apron and through the corresponding holes in the metal bumper, and fasten down with the proper washer nut (Part #14). It was tough to get pics of this as the bumper strip is like 8 feet long and I was going this by myself on the garage floor while not trying to scratch anything. In the below pic of when I test mounted it, you can see where the square plate screws will align, however now they're just inserted into the rubber strip first:
You'll see that not every hole in the apron has a corresponding hole in the bumper, and the above pic has only a few screws in there just for test fitting. In reality you use more, I believe I used 13. Once you get the apron and bumper next to each other you basically just put one wherever you have a hole that lines up.
Word of advice: Keep all the washer nuts loose once you get the bumper strip all the way on, the strip is exactly long enough and it needs to be equal on both ends otherwise the covering caps won't totally cover the ends. Keeping them loose will give you enough slack to slide the impact strip to one side or the other if needed. Get the ends as even as possible on both sides, and then start tightening the washer nuts from the center of the bumper out towards the ends, alternating sides to keep them the same. Once this is done, there is an additional rubber strip that inserts between the large impact strip and the chrome:
Before you can get the bumper/apron lifted into place, you'll have to modify and attach the end caps:
You need to cut off the bottom ridge of the cap to accommodate the apron, here's a great DIY of how to do it:
The groove on the end cap will fit into the corresponding grooves in the impact strip and the metal bumper, locking it in place:
Once you slide the end cap on, there's a small metal tab in the bumper that you pull inward with a screw driver to keep the end cap in place:
Now that your impact strip, apron, and bumper are all connected, you'll need to attach the tow hitch extension:
Followed by your exhaust cutout bracket:
Now, carefully lift the whole thing into place and get the bracket bolts screwed on followed by the end screws. To finish, there is a screw (Part #17 on the bumper part list) that screws through the inside of the rear fender and into a small hole in the rubber end cap (you can barely see the hole in the bottom left corner of the pic of the inside of the end cap above). Will add a pic of this retrospectively. Last, get the exhaust cutout bracket screwed in:
Again, I used rubber washers anywhere a screw was coming into contact with fresh paint. Last, get your MTech sticker placed, and you're done!
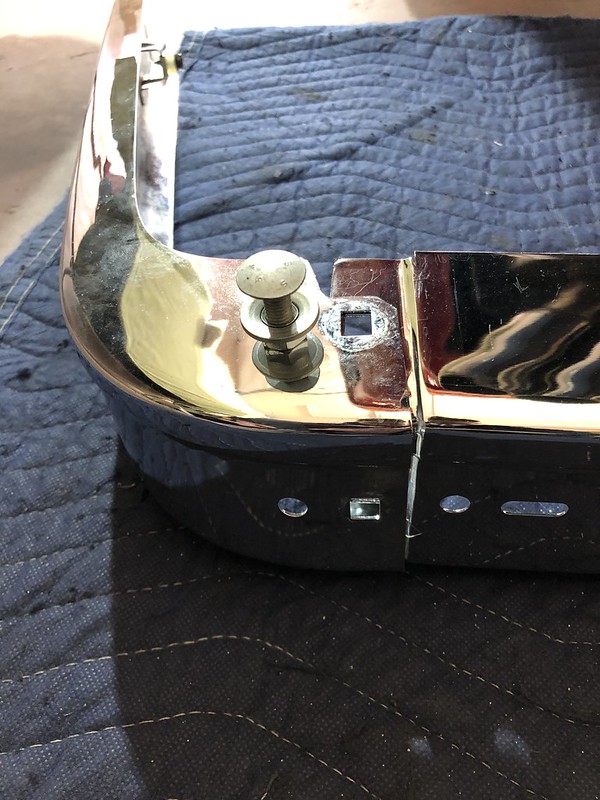
First thing you'll need to do is install the green grommets (Part #10) into the holes you drilled into the rocker panels. There are 7 per side (NOTE that the parts list above and the real OEM listing only lists needing 10):
Next, install the front wheel arch clamps (Part #17) into the holes you drilled in each arch:
Now, you'll need to install the white plastic plugs (Part #9) for the top half of the side skirts to attach to:
These will fit into the inside top edge of the skirt and correspond to the green grommets we installed earlier (total of 14):
I also installed 3M double sided tape along the top edge as well as the wheel arch edges. I had the OEM tape but it was 30 years old and I wasn't sure how good it was anymore:
I found it easiest to install all the white plugs first, then just get the notches in the side skirt aligned and pushed onto the plugs:
Next, there are 2 sheet metal screws that screw through the two holes in the side skirt wheel arch and into the two black clamps we installed earlier (Part #18):
For the rear wheel arch, you use 2 black plastic push rivets (Part #13):
I then peeled up the tape backing, be sure to get it started prior to getting the side skirt pressed on:
Last, for the underside of the side skirts you will need 4 black plastic clamps (Part #8) and corresponding sheet metal screws (Part #12) per side, as well as a single sheet metal screw for the front most hole that screws through the front fender hole and into the body of the car (can also use Part #12):
For all screws in this install, I decided to use a black rubber washer to prevent the metal of the screw washer from digging into the plastic or cracking the paint:
You put the screw through the outside edge of the skirt and into the black clamp which hooks around the edge of the rocker panel pinch weld to hold the bottom edge securely in place:
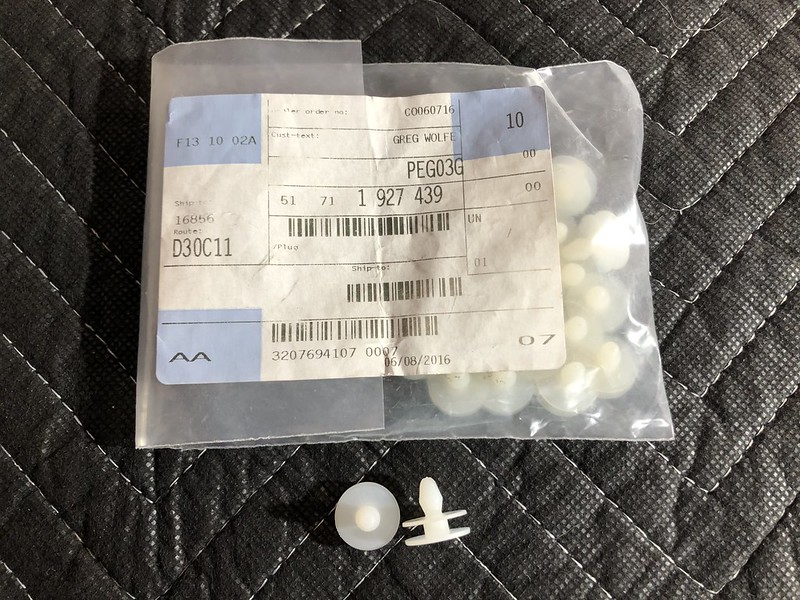
Install your MTech Sticker (Part #5) in the appropriate spot, repeat for the other side, and you're done!
One thing I would have done differently is I would have filled the old holes in the plastic for the wheel arches in the sideskirt prior to painting, and then re-drilled them to match the holes in the rear wheel arch and front plastic clamps once the skirt was on the actual car. They lined up pretty well, but I had to expand two of them for the arched part of the skirt to sit perfectly flush with the fenders. Luckily the washers on the screws cover up the holes I had to modify.
Perfect! I had to mention it because you have done such a great job with all the other details.
I feel for you on the prep/sanding dust, no matter how careful you are that stuff seems to creep in everywhere. Looking forward to the upcoming pictures/update.
Haven't posted much up over the last couple weeks, but have done a ton. I'm almost all done, trying to get pics organized for some short install DIY's. In the meantime, a quick update:
mjweimer I got the hood stoppers installed, thanks for the tip!
They were really tight to fit in there, it helped to actually partially close the hood a bit and install from the underside to get them to tuck in there properly:
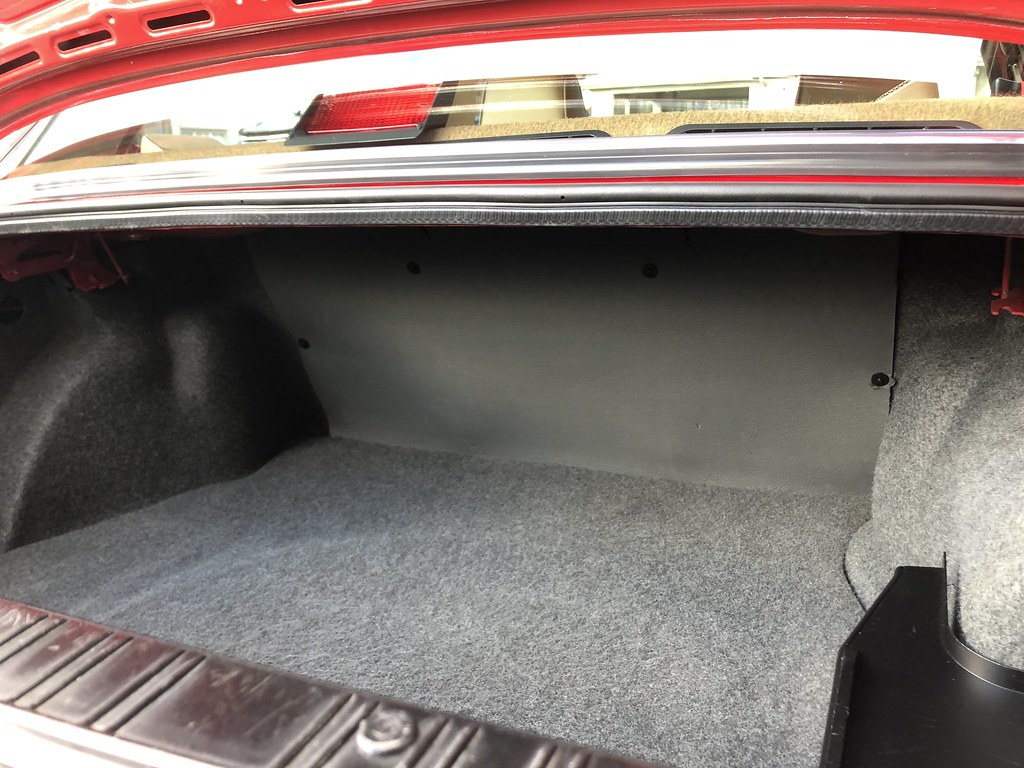
Next, my rear trunk trim cover looked a little rough. I touched it up with some charcoal gray vinyl paint:
Then got it and the carpeted sections reinstalled:
Last, I gave the undercarriage and engine bay a good spray down, it was covered in dust and overspray:
Small update, but the MTech Kit is completely mounted up, and aside from reinstalling some interior bits and some smaller trim items, the car is essentially done! Will be adding install pics over the next few days
Thanks guys! The paint looks really good, I'm very proud of how it turned out. Definitely not perfect, but the defects aren't glaring enough to notice unless you really take your time walking around the car in direct light.
15Michaeljoseph, If yours is only peeling by the mirror, you may be able to get away with just adding some new contact cement to that area and re-tacking it down with a heat gun or hair dryer. Mine was bubbling all over the place and vinyl itself was pretty shot.
If I had to do it again, instead of putting contact cement on the entire vinyl and cardboard section at once, I would have done it a little at a time. This would have made it easier to heat and stretch the vinyl into all the little corners. The adhesive I used was very strong, and once the two halves touched it was stuck and wasn't coming unstuck for any adjustments. There's a couple small areas that could have turned out better due to that but luckily nothing you can really see once installed. I also made the mistake of rolling the vinyl over all the edges and tacking it down to the inside of the cardboard. There's actually supposed to be a little excess vinyl left loose, maybe 1" on the sides near the door openings and 2" on the area facing the sunroof that is supposed to tuck under the door seals and wrap around the sunroof opening to tuck under the wind deflector. It had been so long since I removed the panel that I forgot about this. It still looks great installed but isn't technically "OEM" correct. If I come across another cheap trim panel I may try my hand at redoing it again, I only used like 18" of the 3 or so yards of vinyl that I bought.


Leave a comment: