-

-
Hah I know, it's kind of the perfect LSD, it gets the best of both worlds so that first gear won't go by too fast and fifth gear won't rev super high on the freeway. But i'll accomodate and deal with it later.
Like I said, the cluster is a mess right now. It's just beginning to get attentionin what year did they option a bent fuel needle? alpenis maybe?Comment
-
So i finally got a lead on the hardest part i've had finding yet, the wide-angle heated mirror. And not only did I get one, but I got two! I'll only be using one, but I'm still very lucky to have got them. Now from the original 20 that were left, they are NLA.
The 3 mirrors here are my regular wide angle mirror, and the two heateds.
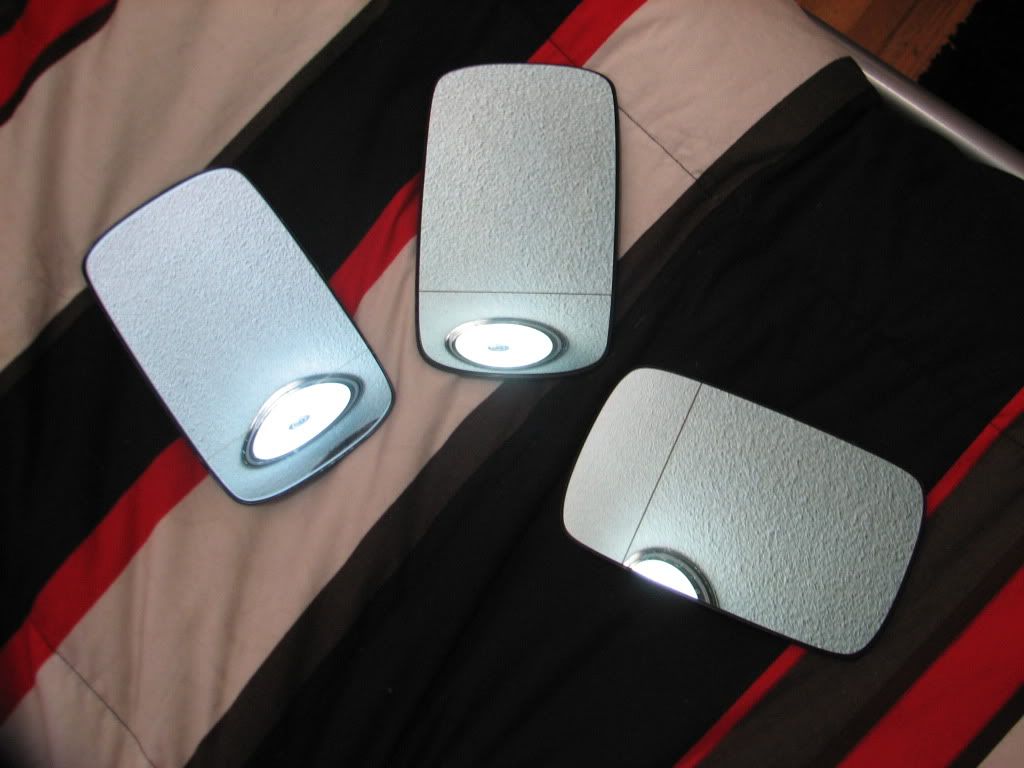
The difference between the two

The connections

Shrink-wrapped just like they should be (also ziptied)

I actually thought it needed a bit more insulation so I used black silicon glue around the connection area.

Using the wires from your power mirror, tap into the brown and blue ones (brown is obviously ground)

Then lead off it into the connections for the mirror


re-instal motor

Then connect mirror and there you go. It gets power on ignition since it's tapped into the power mirror switch. This is how the heated mirrors were installed from factory.
This is the only pic I have of it in action. To do a test to see if it works, stick it in the freezer for about 5 min, take it out, apply direct 12v and wait about 30 seconds. It starts heating from the center in, you can see here:

For those who don't know, the Diagnostic Cap (Red) is NLA, if you order one it will come back black. This is much like the intensive wash cap and the red screwdrivers. Every red one you find is brittle and snaps. This one was snapped but I did some careful sanding and epoxy and got it looking brand new with some plastic cleaner and polish. This will go on the m30 eventually.

Cleaned

Connected

Also, from the donor car it had a bootlid liner in it. And I was at a junkyard the other day and saw an e30 that had come with a bootlid liner, very uncommon. Anyways, on each side of the toolkit it had two foam blocks so the liner sits flush with the tool tray. Something mine was missing and it didn't look quite right. So I used the foam blocks from my donor and put them onto mine with some silicon.
Here is the gap I'm talking about

My liner on bottom, donor car liner with foam pads on top

My liner with foam blocks

Installed and sitting flush

Tomorrow the engine comes out of the e28. Big day!Comment
-
+1 you can pm with details and part # if you don't want to postOriginally posted by Matt-BComment
-
nando is also looking for some heated mirrors.sigpic
New website releasing soon www.gutenparts.com Guten Parts + Service | Facebook | Twitter
____________________________________
Levent
%20levent@gutenparts.com
____________________________________
Ladies:
1998 E36 m3/4/5 1988 325i 1989 325iTComment
-
wow, the mail got that cap to you pretty fast, I can't believe it cleaned up so nicely. well done.
Comment
-
Where did you get that quote from Matt-B? I was looking in the thread and I didn't find it. Just a bit confused hah.
Part number for the wide-angle heated mirror is 51161926853. It's NLA though.
Part number for the wide-angle mirror is 51161926845.
Part number for the heated mirror is 51161901177.
Part number for mirror is 51161901172.
I'm keeping the other wide-angle heated mirror for sometime in the future if I ever get another e30. Edit: WHEN I get another e30.Comment
-
51161926853 looks like was used on euro e23 and e28 cars, time to hit ebay lol.
51161926845 e21 part in us, and bunch of others in europe
51161901177 same as the 51161926853
51161901172 euro e12, e21, e23, e28, e30 carsMtech1 v8 build thread - https://www.r3vlimited.com/board/sho...d.php?t=413205
OEM v8 manual chip or dme - https://www.r3vlimited.com/board/sho....php?p=4938827Comment
-
keep up the awesome attention to detail, andrew. i am living vicariously through you because i don't have enough patience to care about all these things, but certainly appreciate them. :up:Comment
-
Here we go. Kind of hard to take pictures while you do this kind of work, but I snapped a pic when I could. Started with the car up on the blocks.

After fluids were drained and various parts came out, we started to hook it to the hoist


Slowly but surely coming out.


The tranny was stuck on the pilot bearing, we ended up getting a crow bar to shake it loose so we could pull the engine without the trans


Out


ZM Blue Devil, you were right, this stuff works great. I just sprayed pretty much the whole thing down and let it soak for a few minutes

Luckily we had access to a pressure washer at the time so pressure washing it did wonders


I haven't even begun to get in there with my hands yet and it's already looking good.
Tranny

Both Tranny and motor pressure washed

3.25 LSD before pressure washing

After, like I said, I haven't even begun to get in there that much. It's amazing how well pressure washing works.

So ironically, the way we got it from the shop to my house, is in my friends '64 Chevy pickup. With everything in the trunk, the driveshaft mount broke and AAA had to come tow us.


We made it home before dark but this photo pretty much sums up the day.

Thanks to all who helped! You know who you are.
With school starting on Tuesday and a procrastinated summer reading project, I may not have any updates for a few days. I'll keep you guys posted though.Comment
-
wow no one's posted on this yet.
Good start man. That stuff is going to clean up good.Comment
-
That cleaner does seem to do a good job. Hope that pressure washer didn't get water past any of the seals though.Comment
-
I got to cleaning a bit and got the engine harness off. Going to deal with any broken plug housings and order the new ones. The valve cover, intake manifold, and a few other pieces will left un-touched for a bit until I get them to the bead-blaster, then I'll get to painting them. When the intake manifold is done I think you guys are going to like it ;) .
Here is how it sat in my garage this morning.

Started slowly and carefully taking parts off. This is why I've ordered a FULL top and bottom end gasket set.

Injector rail off

Wiring Harness off, will deal with cleaning and getting the plug housings another time. Just wanted to get it off today

Engine how it sits now

Concentrated simple green was used as an all purpose cleaner, for heavier stuff I will use spray nine.

Distributor cap was pretty dirty

Along with the covers that go on it

Cleaned up nicely


Took the valve cover off to take a look at the inside of the head. It looks very promising. Somebody definitely did some work in the head after the engine fire. It all looks very nice and clean!

Also got the underhood foam. This will remain un-opened until the very end of the swap. I found it strange that when I ordered it, it has this square cut out in the middle. Why is that? The one I had on my car didn't have the square? Is that where the intake manifold is on the M20 or something and it's making space?

Comment


Comment