Announcement

Collapse
No announcement yet.

The MR E30 Project Thread - E36 M3 Edition

Collapse
X
 
  • Filter
  • Time
  • Show
Clear All
new posts

    June 19th, 2021

    Phase two of engine cleaning occurred, and it was easier than expected. The block cleaned up very nicely.

    I found an LS1 engine reassembly guide, and then another, and then another, online. So I read through them all to begin the reassembly process for my LM7.

    I also purchased a 3M Bristle Disc to clean up the block side of the head gaskets. It's similar to a paint stripping disc, just not as aggressive.

    Packed all of the openings with rags and shop towels and rotated the engine on the stand so that the surface I was working on was flat.

    Gingerly used the disc to remove all gunk, leaving the surface nice and shiny.

    Turned the engine upside down before removing all of the rags and towels.

    Used my air compressor to blow any remaining residue out of cylinders and coolant channels.

    Repeat for the other side.

    I was nervous about this part, so I was excited when it was done and I hadn't ruined anything.

    I chased the other mating surfaces on the block with the disc as well while I had it out.

    After that was done I continued with the engine assembly, reinstalling the oil pump, new pickup tube for the F-body pan, and front timing cover.

    The timing cover cannot be torqued down until it is appropriately set over the crank and harmonic balancer (HB), as that is what it seals to.

    So this forced me to determine what HB I wanted to use. There are 3 different depths depending on what vehicle the LS was installed in. The C5 corvette is the most shallow, so that's the HB that I went with. Ordered an OEM version.

    I also had to make sure this HB would work with the alternator relocation bracket I am going to use, as I will be running an electric water pump in place of the much larger and more cumbersome C5 corvette mechanical water pump.

    Everything checked out, so I ordered another handful of parts for delivery.

    Head bolts and a variety of other parts all arrived and are waiting their turn for installation.

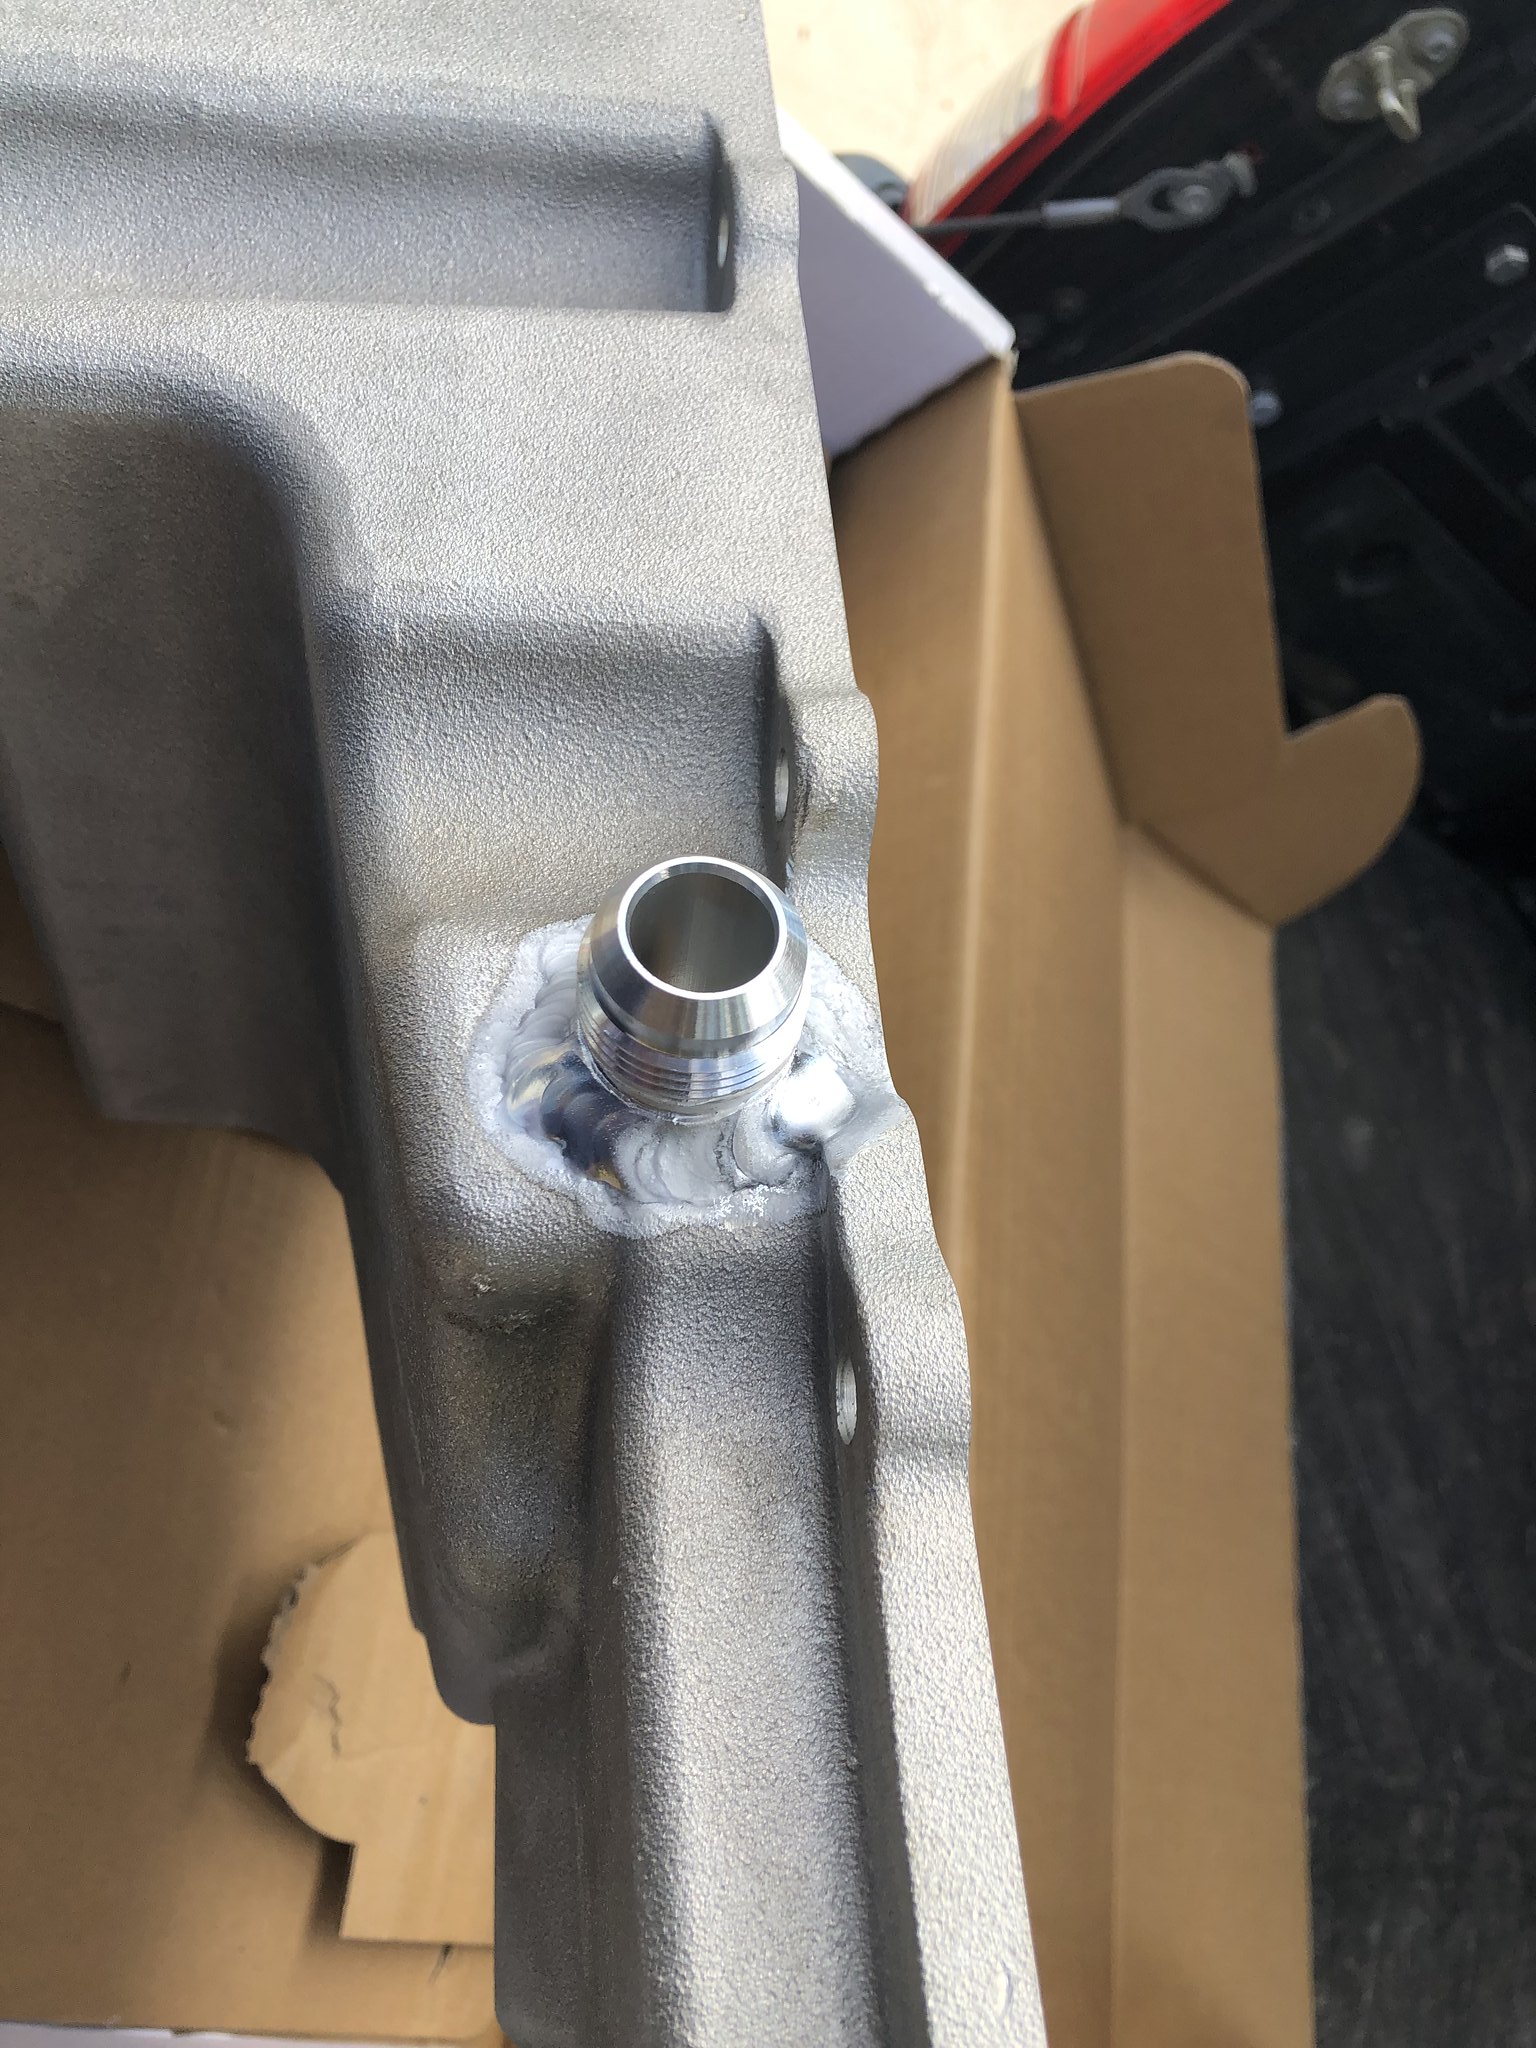
    I dropped off my F-Body oil pan to a local welding shop last week. They are welding on the -12AN bung to the passenger side of the oil pan for the turbo oil return line. They only do aluminum once a week so it will be done one day this upcoming week.

    I won't be able to install it until I torque down the front timing cover and verify it's spacing to the bottom of the block, as the pan seals to the bottom of that cover.

    No pictures, but I should have some soon enough.

    The 1,000 hp twin disc clutch has arrived. A thing of beauty it is.

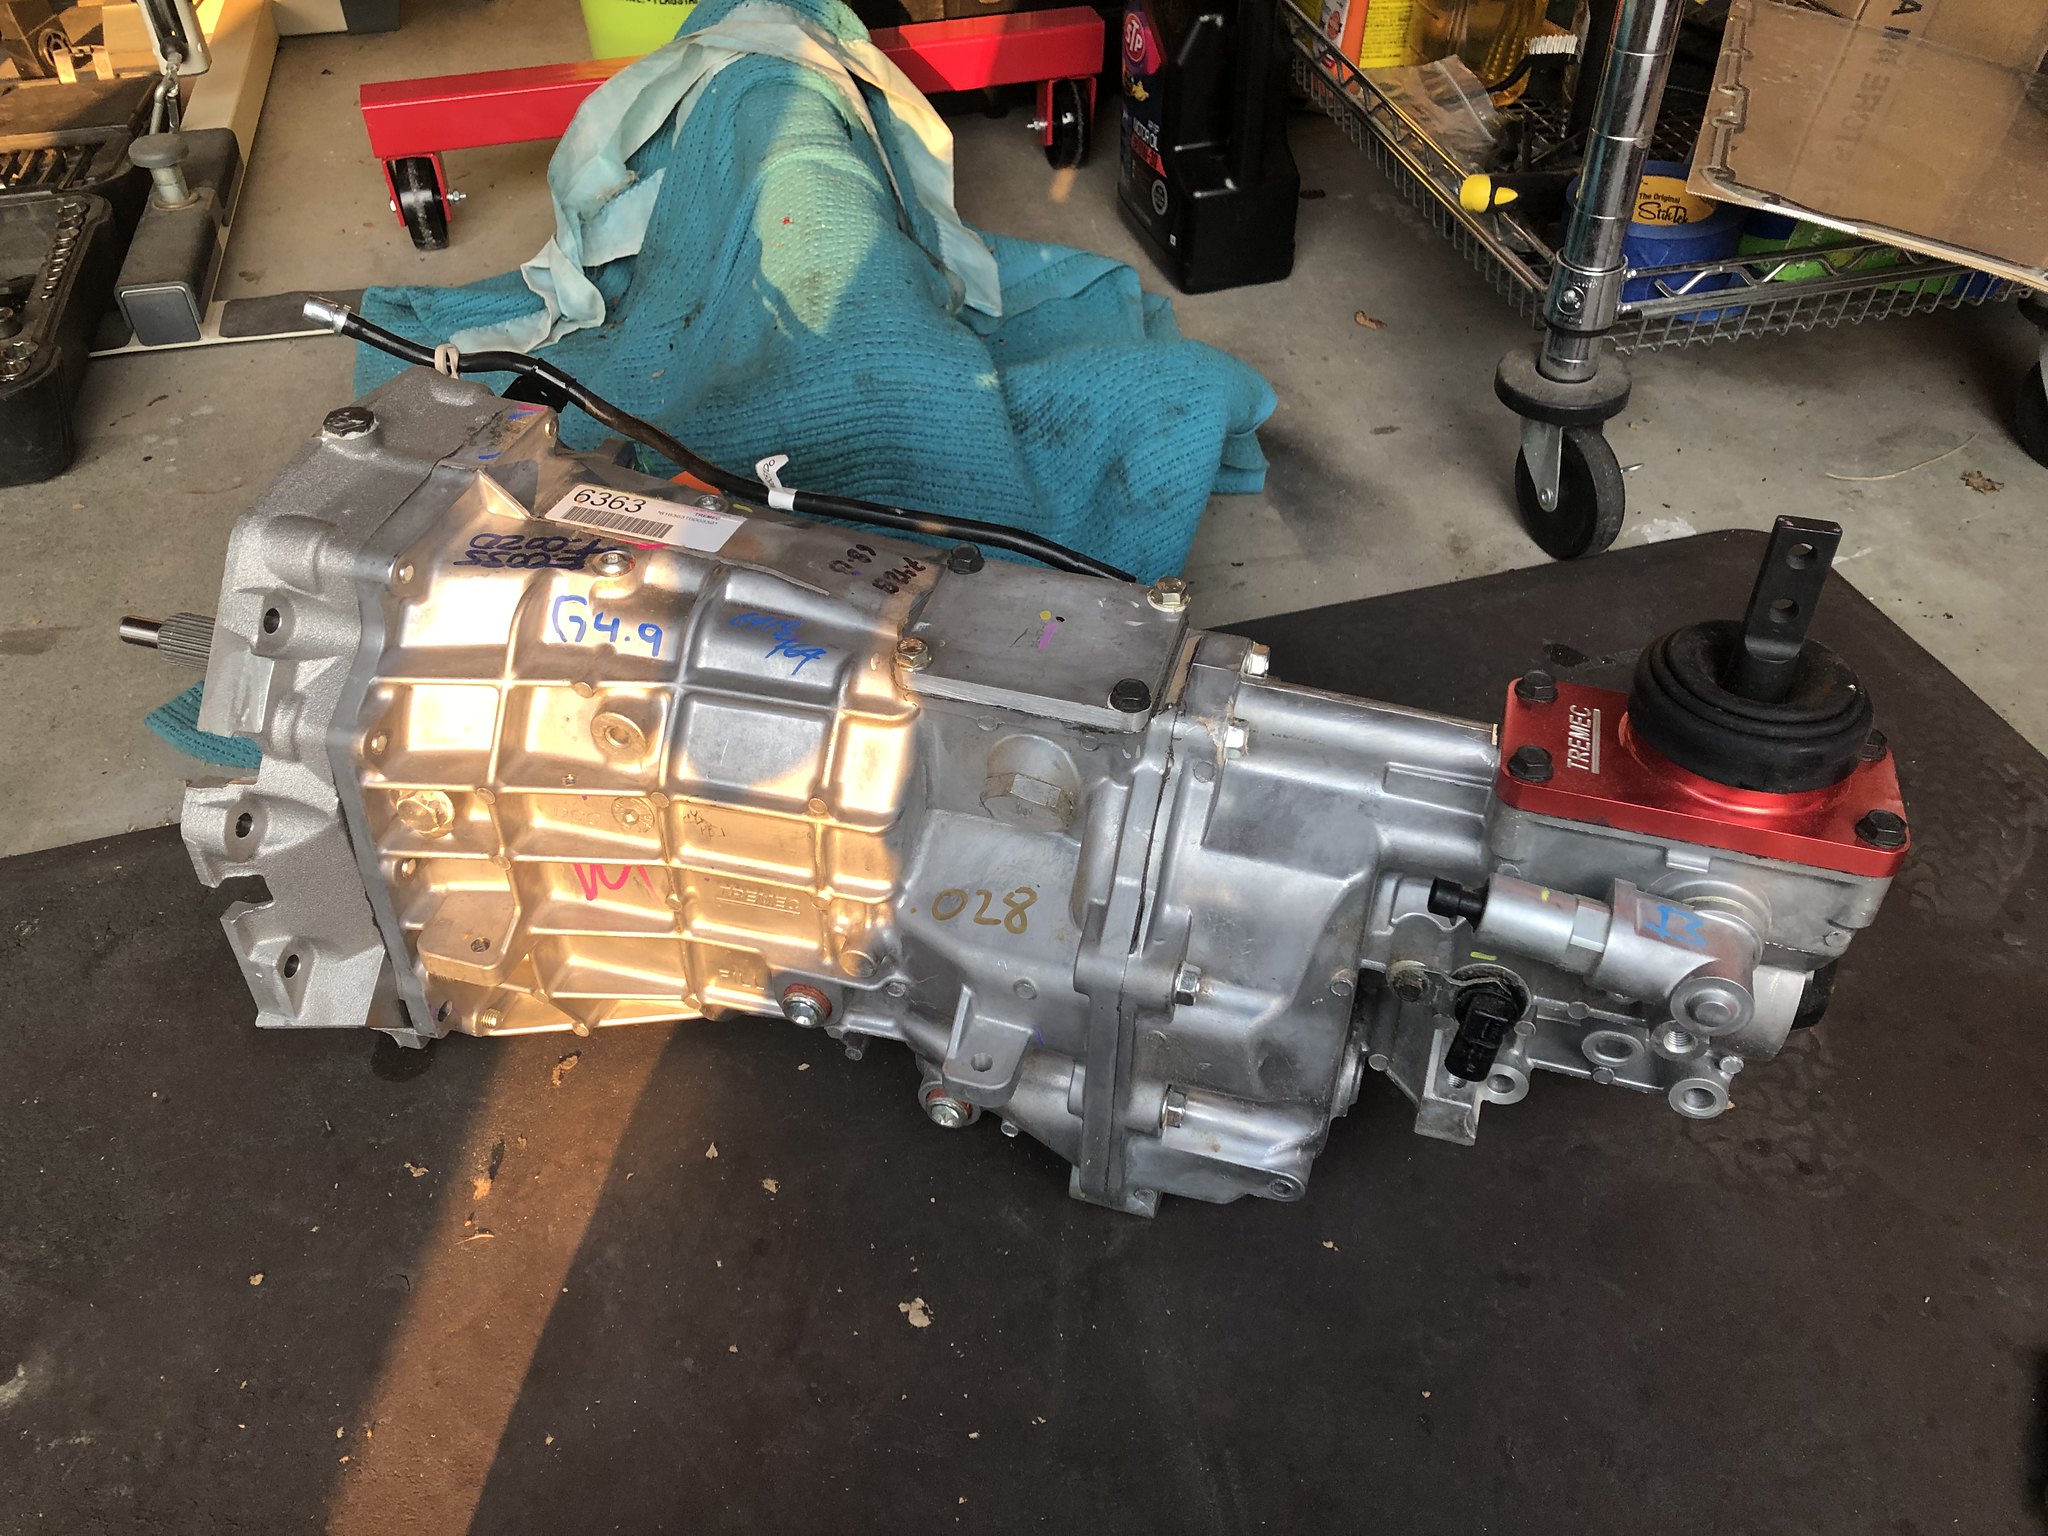
    The incredibly expensive Tremec T56 Magnum-F 6 speed manual transmission, with hybrid gear ratios, built to withstand over 700 ft*lbs of torque, arrives on Monday. I am VERY excited about this part.

    Approximate Hours Invested in Project Since Purchase: 442
    My previous build (currently E30-less)
    http://www.r3vlimited.com/board/showthread.php?t=170390

    A 2016 Toyota Tacoma TRD 4x4 Offroad in Inferno is my newest obsession

    Comment


      June 25th, 2021

      Alright, we have more progress since the last update.

      For starters, we have this thing of beauty

      M3 Work Round 12 by Michael Rickerd, on Flickr

      M3 Work Round 14 by Michael Rickerd, on Flickr

      Shiny flywheel goodness

      M3 Work Round 14 by Michael Rickerd, on Flickr

      Never had a twin disc before. I like it a lot. Did a bunch of research on how to install this properly, which was informative. Monster Clutches has a couple of custom ideas on their clutches. Also, this setup with the T56 requires the checking of two measurements to determine a tolerance between two locations. This is because the mechanism of disengaging the pressure plate actually lives within the throwout bearing itself, unlike BMW's traditional setup. These measurements ensure that the hydraulic TOB will function properly.

      Installing the flywheel so that I could then lock the crank with the flywheel locking tool was a bit difficult. The multi disc clutch has three positioning pins around the perimeter that stick out further than the arms of the engine stand. So I got out the hoist, took the engine off of the stand, and installed the flywheel that way.

      Insider tip: Keep your stock flex plate for just two days longer than I did. Could have locked the crank with that, but for some reason I went on a cleaning spree of the garage and threw mine out, as the clutch had arrived at that point.

      Anyways. Got that torqued down appropriately, using the tightening sequence I found online. Was a piece of cake.

      And now. The arrival of something awesome.

      Playing Peek-A-Boo

      M3 Work Round 12 by Michael Rickerd, on Flickr

      Ta-Da!

      M3 Work Round 12 by Michael Rickerd, on Flickr

      I've said it before, but I'll repeat it once more. Tremec T56 Magnum-F with hybrid gear ratios, good to 700 ft*lb of torque. Weighs in at ~140 lbs. Came with the short shifter, but not the shift level or handle, as those will be determined once it is installed.

      This manual transmission uses ATF.

      M3 Work Round 14 by Michael Rickerd, on Flickr

      So I researched and went with the brand that most people use. I also like how the drain and fill plugs are rotated with just a 3/8" ratchet. No fancy socket or anything like that. Just stick a 3/8" extension in there and call it a day!

      M3 Work Round 14 by Michael Rickerd, on Flickr

      With that completed I set the transmission aside for now.

      While on that note, my bellhousing (everything is modular so that the same transmission can go on Camaros, Firebirds, Corvettes, hell even trucks if you wanted, so the bellhousing isn't integrated into the transmission like BMW and others do) arrived, though it didn't come with any mounting hardware, which should arrive this Saturday. I also got my modified hydraulic TOB and new aluminum bodied clutch master cylinder as well. Need to get the clutch master installed before the engine goes in, will probably knock that out today.

      Also on that note: Monster Clutches recommends removing the clutch pedal return spring to aid in clutch pedal feedback. Another feature of the hydraulic TOB is that it has a spring integrated into it which resets the pedal by moving fluid once your foot pressure is released.

      I am not sure if I will do that yet. I need to research it. If the clutch master can be installed and the pedal return spring can be easily removed I'll leave it in for now, see how it feels, and experiment with removing it. If it can't be easily removed I will do more research before installing the slave master and make a decision now.

      So with that said, I have everything I need to put the engine and transmission combo into the E36 M3 chassis.

      So now it is time to get the engine ready!

      Had to purchase this 1/2" 250 ft*lb torque wrench

      M3 Work Round 14 by Michael Rickerd, on Flickr

      Because the main crank bolt is installed in a couple of steps.

      First, get a slightly longer version of the bolt (M16x2x120mm) to start the harmonic balancer onto the crank snout. I am going with C5 corvette front accessories, so the balancer is as close to the engine as it can be.

      Work this first bolt on a ways, checking to make sure the HB doesn't damage or catch on the front timing cover seal.

      Remove the longer bolt and use your old crank bolt (must be replaced with new) to finish pulling the HB onto the crank. Then tighten the old crank bolt to 240 ft*lb. Hence the new torque wrench.

      Once this is done, pull the old crank bolt out and check a distance. Mine was just smaller than needed, so I installed the new crank bolt and tightened it to 37 ft*lb. Then you need to crank it an additional 140 degrees. And that was a doozy. Biggest breaker bar I had with a two foot pipe on it.

      But we got it.

      M3 Work Round 14 by Michael Rickerd, on Flickr

      You do this with the front timing cover loose. Once the HB is all the way on, remove flywheel locking tool and spin engine to center the cover and its seal around the HB. Snug up two of the bolts and check the gap between the timing cover and bottom of the block for the oil pan seal. You need less than .02 inches with a feeler gauge. I couldn't even work the smallest feeler gauge I have between my straight edge and the block, so I tightened the timing cover down to 18 ft*lb.

      My oil pan still isn't done, will call Buddy's today, so I moved on to the heads.

      Installed lifters and lifter guide trays in preparation of head install.

      Prepped the block and each head for install.

      I went with head studs to secure the two for turbo reasons. So I worked those in very carefully. No binding issues with any of them, and they all protrude from the block equally, so my cleaning job of each hole was satisfactory.

      M3 Work Round 14 by Michael Rickerd, on Flickr

      Everything is ambidextrous, so I installed the head gaskets and each head.

      M3 Work Round 14 by Michael Rickerd, on Flickr

      I got the other head installed before calling it a night.

      I did not torque the heads down yet, as the angle gauge I bought was having issues tracking correctly when the wrench was turned very slowly. Thankfully I checked this prior to using it.

      I disassembled it this morning and I think I found the culprit. I lubricated the spring washer a bit with some soap, and now it functions properly at all twisting speeds.

      So today I will get the heads torqued down and the pushrods (Haha, sounds silly to mention this old school tech) and rockers and valve covers. Hopefully my pan is done as well.

      Still need to research proper orientation for Vorshlag tranny and engine mounts.

      Because as soon as the bellhousing to transmission and bellhousing to block bolts come in this assembly can get installed! Finally!

      Not out of the woods yet, but getting this into the chassis is a major step!

      More updates coming soon.

      Approximate Hours Invested in Project Since Purchase: 470
      My previous build (currently E30-less)
      http://www.r3vlimited.com/board/showthread.php?t=170390

      A 2016 Toyota Tacoma TRD 4x4 Offroad in Inferno is my newest obsession

      Comment


        July 2nd, 2021

        Since my last post I have completed the following:

        Torqued down both heads using the appropriate sequence and tightening pattern. No issues there. Used a sharpie to keep track of each step for each stud. Did not want to mess this part up. All in all it went together without any problems.

        Next up was installing my aluminum bodied clutch master cylinder to work with the hydraulic TOB I purchased from Vorshlag.

        This was a massive pain in the butt. I was kicking myself for not doing this while the dash and steering column were removed, because working up in that cavity was a nightmare.

        After three or four attempts at the right installation sequence, I finally got it all together with a bit of cursing, but no shed blood or thrown wrenches. No photos of that, as I was done being crammed down there by the time I finished. The end of the cylinder is ready to accept the feed line to the TOB once the engine/transmission combo is installed.

        Moving on.

        Buddy's RV and Welding did a stellar job on my turbo oil return bung.

        M3 Work Round 15 by Michael Rickerd, on Flickr

        This is a -12AN aluminum bung. I attached a full flow angled fitting to this bung for the return line to connect to. It is comically large looking in person, but this is a frequently recommended size (with -10AN being the absolute smallest anyone recommends).

        The install of the pan required the modification of the OEM windage tray, which I did not know about until I went to install the pan. This F-body pan is not as deep as the OEM truck pan, so the front 1/4 of the windage tray had to go.

        Unbolted it after marking it, pulled out the grinder with cutoff wheel, cut the chunk off, filed the edge, and reinstalled to 18 ft*lb.

        M3 Work Round 15 by Michael Rickerd, on Flickr

        With that done I could finally install the oil pan and flip the engine over!

        M3 Work Round 15 by Michael Rickerd, on Flickr

        Snugged each of the bolts after checking the tolerance at the back of the block. I did not torque them down, as I pulled the engine off of the stand and installed the bellhousing to ensure an exact fitment before torqueing down the oil pan bolts.

        The two lowest bellhousing bolts attach to the oil pan, so that's why this has to be installed in just the right place.

        Also, 4 beads of high temp gasket maker were used with the front and rear cover meet the block. Trying my best to follow all normal protocols to avoid oil leaks if at all possible.

        Flipped the engine over, pulled it off of the stand, and lowered it to the ground.

        The installation of the rocker arms requires rotating the crank, which can't happen with my multi-disc flywheel due to the locating pins interfering with the stand. So down it went.

        Lubed and installed the rocker arms per the instructions that I have been using this entire time. Not a difficult process whatsoever. More torqueing to ensure proper function once this gets fired up.

        Liberally lubed all the recommended areas prior to installing the valve covers.

        They went on with new gaskets all around.

        M3 Work Round 15 by Michael Rickerd, on Flickr

        It was at this point in time that the engine itself was left alone, as it is in the state it needs to be in to get the engine/transmission combo installed in the chassis.

        Time was then spent on the clutch and transmission.

        Due to the modular nature of these engines and bellhousings and transmissions, Monster Clutches sent both of the potential pilot bearings.

        Found a guide online that told me how to check which pilot bearing I needed.

        Ended up needing the smaller bearing (installed in picture), as my T56 input shaft extends .715" from the face of the bellhousing, so the larger bearing (in hand in picture) would have caused fitment issues.

        M3 Work Round 15 by Michael Rickerd, on Flickr

        Tapped the smaller bearing in (after orienting it the right way!) with a socket on an extension and a small hammer.

        Got that seated and pulled out the box for the remainder of the clutch!

        The location of these spacers, and their orientation, are very important. The engraving is very cool IMO.

        M3 Work Round 15 by Michael Rickerd, on Flickr

        After that you install one of the discs with the alignment tool. The other disc remained connected inside of the pressure plate and intermediate plate. You aren't supposed to disassemble that part or you void your warranty. So I left it well enough alone.

        You can see in the photo, the two discs are connected with a splined hub. New information to me, so suppose I should share.

        M3 Work Round 15 by Michael Rickerd, on Flickr

        Wiped down all of the mating surfaces with alcohol per the manufacturers recommendations.

        After all that it was rather easy to align the setup and get it torqued down in the right sequence and pattern.

        M3 Work Round 15 by Michael Rickerd, on Flickr

        Proceeded to install the bellhousing, as I will check those two measurements I still need to verify tomorrow morning.

        With the bellhousing torqued down there were no fitment issues with the clutch assembly. Excellent!

        Tomorrow is the big day. Getting the transmission bolted on and the entire assembly bolted into the chassis!

        It might be a pain, or it might go smoothly. Only time will tell!

        Until next time.

        Approximate Hours Invested in Project Since Purchase: 502
        My previous build (currently E30-less)
        http://www.r3vlimited.com/board/showthread.php?t=170390

        A 2016 Toyota Tacoma TRD 4x4 Offroad in Inferno is my newest obsession

        Comment


          July 3rd, 2021

          Well, the moment of truth finally arrived.

          ​LM7 Installed by Michael Rickerd, on Flickr

          It was time for the engine/transmission combo to be installed in the engine bay of the 1997 M3.

          I learned that I was a bit premature with the filling of the transmission, as it requires the driveshaft to seal the tail shaft of the transmission closed. So without the DS installed, the fluid would leak out of the back of the trans.

          And since I don't have the driveshaft ordered yet, I went ahead and drained the transmission. Surprisingly, the fluid was really, really clean! Haha

          I had to go purchase 6 bolts to complete the install. Two to hold the TOB to the transmission, and four to hold the trans crossmember to the chassis. My local Homco had everything I needed on hand.

          I placed the trans on top of one of my rolling toolboxes, which put it at a great height to mate with the engine.

          Slid them together, worked the input shaft into the clutch, and bam. It was together. All seven of the trans to bellhousing bolts tightened easily, so nothing is bound inside of that part of the setup.

          The remote bleeder and feed line for the TOB exit the trans via two holes in the trans and bellhousing. Got those tucked away for later.

          I jacked the front of the M3 up so its angle more closely matched the angle of the engine and trans.

          I left the lift plate on top of the engine, with the hoist attached at the middle location. This was surprisingly exactly where it needed to be.

          I read some troubling stories online about getting these engines into the engine bay, but I am happy to say that I had no such troubles.

          The same friend who helped me pull the engine out of the Tahoe in the JY came over to slip it into the M3. This time we stayed much cleaner!

          The process was fairly simple. Work the combo in over the front subframe (Vorshlag says you should completely disconnect the subframe to allow for maximum clearance, though this was not necessary in my case), get a jack under the back of the transmission to level it out, bolt the trans crossmember in, and then install the engine mounts.

          Done. It was much easier than I anticipated, and it would have been a piece of cake had I just cut the shifter hole way back in the day.

          Due to the location of the shifter on the T56, a small portion of the metal around the backside of the shifter hole was cut out and removed. I didn't want to do this, but it was unavoidable.

          Torqued everything down to spec and there it was, in all of its glory.

          ​LM7 Installed by Michael Rickerd, on Flickr

          Loads of clearance around the entire engine, and most importantly, the transmission tunnel did not have to get banged on or beaten out of the way.

          However, the area between the drivers head and the steering shaft is too close for my original turbo manifold idea. So I am scheming on a solution now. One has popped into my head, so we will see how it pans out after some more research.

          Garagistic is having an Independence Day sale, so I ordered up a clutch stop and aftermarket seat floor and side mounts from them. It's probably time to get a front seat into this thing!

          I am taking the car down to my brothers house and stashing it in his garage to continue working on it. I'll trailer it to his house this Tuesday.

          Intake manifold, fuel rails, and injectors are next on the list, followed by the starter, alternator, aftermarket alternator bracket, and the electric water pump. After that, the engine will be mostly complete, apart from turbo related items.

          Little by little.

          Approximate Hours Invested in Project Since Purchase: 512
          My previous build (currently E30-less)
          http://www.r3vlimited.com/board/showthread.php?t=170390

          A 2016 Toyota Tacoma TRD 4x4 Offroad in Inferno is my newest obsession

          Comment


            I like that you have room in the engine bay.
            Projects Hartge,Alpina & AC Schnitzer Builds.http://www.r3vlimited.com/board/showthread.php?t=280601
            http://www.r3vlimited.com/board/showthread.php?t=227993
            http://www.r3vlimited.com/board/showthread.php?t=289362

            DSC04926 by Raul Salinas, on FlickrDSC03413 by Raul Salinas, on Flickr

            Comment


              Originally posted by e30m3s54turbo View Post
              I like that you have room in the engine bay.
              Me too. There will be plenty going on in there, so that open-ness is exciting.
              My previous build (currently E30-less)
              http://www.r3vlimited.com/board/showthread.php?t=170390

              A 2016 Toyota Tacoma TRD 4x4 Offroad in Inferno is my newest obsession

              Comment


                July 15th, 2021

                We are coming up on the one year mark with this project. Which is both exciting, and depressing considering so far all I have done is clean it thoroughly, rebuild the front interior, all of the suspension, and the engine and transmission. Still so much to do!

                Anyways. Installed the appropriate starter into the rear passenger side of the block. Two bolts, one long and one short, torqued to 37 ft*lb was all that was required. Rock solid.

                Next, my ICT Billet alternator relocation bracket for the LS with electric water pump arrived.

                Beautiful piece, and very well packaged. Bought a 105 amp alternator at the same time. My local auto parts store have the 505K6 belt I need in stock.

                A couple of things I was unaware of when purchasing this setup.

                One is that I would have to drill a hole into the iron due to the engine being from a truck and not from a car. I initially was not confident about this, but after researching a bit I felt comfortable enough to give it a go.

                But that's when a second issue emerged. I was unable to fully rotate the alternator into position due to interference between the alternator and the engine block.

                You can see the misalignment here

                IMG-2412 by Michael Rickerd, on Flickr

                And the interference here

                IMG-2413 by Michael Rickerd, on Flickr

                Put together an email, and ICT responded within minutes saying that I needed to grind away a small portion of the block in that area due to the up close nature of the C5 Corvette assembly.

                Knowing that was the correct route, I pulled out the grinder and within 60 seconds of grinding it was clear enough to fit without issue, with a small bit of clearance for vibrations/slight shifts when warming up and driving. The iron is so malleable that grinding it was a piece of cake. That area was also just a thin lip, not a massive chunk, which made it even easier.

                Alright, the easier step was out of the way.

                Reinstalled everything and placed a blob of grease on the end of the bolt. Carefully fed it through the hole and pressed it against the block to mark the location of the hole.

                Pulled the assembly back off of the block.

                Hit a center punch with a hammer dead center in the mark left by the blob.

                Started with a very small bit. Marked the depth I needed with tape to ensure I go deep enough. Positioned my body as comfortably as possible so that I could drill as perpendicular as possible.

                Ran the bit in, it easily cut into and through the iron. Had some lubricating spray on hand, even though I read that the carbon content of this type of metal is very high, basically lubricating itself. Mainly used it to keep things cool, but probably wasn't necessary, as each bit only worked for 30-45 seconds.

                Went all the way up to 1/4". The 8.7mm bit to make the final hole before tapping the M10x1.5 arrives tomorrow, and I will do the final pass then. I have an appropriately sized tap that is ready to go.

                For giggles, I reinstalled everything and fed the 1/4" bit into the hole I had drilled. Lucky for me, it falls dead center in the upper hole for the alternator. So all I have to do is successfully drill one final hole with the 8.7mm bit and then, hopefully, tap the hole without issue.

                Though I've got this far, so I bet I'll knock it out without issue.

                I'll wrap that up tomorrow afternoon and then get on to ordering the next couple parts, the intake, fuel rails, and throttle body. Just need to figure out which one to go with first.

                Approximate Hours Invested in Project Since Purchase: 517
                My previous build (currently E30-less)
                http://www.r3vlimited.com/board/showthread.php?t=170390

                A 2016 Toyota Tacoma TRD 4x4 Offroad in Inferno is my newest obsession

                Comment


                  Last year I had to modify my alternator bracket and alternator on my s38. I like to see how resolve it.
                  Projects Hartge,Alpina & AC Schnitzer Builds.http://www.r3vlimited.com/board/showthread.php?t=280601
                  http://www.r3vlimited.com/board/showthread.php?t=227993
                  http://www.r3vlimited.com/board/showthread.php?t=289362

                  DSC04926 by Raul Salinas, on FlickrDSC03413 by Raul Salinas, on Flickr

                  Comment


                    Originally posted by e30m3s54turbo View Post
                    Last year I had to modify my alternator bracket and alternator on my s38. I like to see how resolve it.
                    I'll get some photos and type up an explanation next time I raise the hood!
                    My previous build (currently E30-less)
                    http://www.r3vlimited.com/board/showthread.php?t=170390

                    A 2016 Toyota Tacoma TRD 4x4 Offroad in Inferno is my newest obsession

                    Comment


                      bump lol
                      Simon
                      Current Cars:
                      -1999 996.1 911 4/98 3.8L 6-Speed, 21st Century Beetle

                      Make R3V Great Again -2020

                      Comment


                        Yeah what's happening with this?

                        Project Thread | Instagram | Phoenix, Arizona Events Thread

                        Comment


                          It has taken a back seat to the Tacoma build, but it still sits here, tucked away in my brothers garage. Another month or two and I'll return to dumping money into this thing.

                          It will live!
                          My previous build (currently E30-less)
                          http://www.r3vlimited.com/board/showthread.php?t=170390

                          A 2016 Toyota Tacoma TRD 4x4 Offroad in Inferno is my newest obsession

                          Comment


                            April 13th, 2022

                            It has been a while. A seriously long while, the M3 mostly neglected since my last update with the alternator. I did successfully drill the final 8.7mm hole. I bolted the alternator in place and installed the belt I purchased form the local auto parts store. It fits great, no issues there.

                            Alright, so why the delay? The answer is twofold. First is I moved to Phoenix due to a change in my personal life. Boring stuff.

                            Second is this: A 2021 Toyota Tacoma TRD Offroad 4x4 with a house (Alucab Canopy Camper) affixed to the back:

                            Mojave - Day 2 - 42 by Michael Rickerd, on Flickr

                            Mojave - Day 2 - 25 by Michael Rickerd, on Flickr

                            Random Photos by Michael Rickerd, on Flickr

                            It has both AC and DC power, solar, on-board on-demand water at ~20 gallons, loads of suspension upgrades, and plenty of other accessories that make it very comfortable and ridiculously capable offroad. It is the adventure mobile, and it takes the girlfriend and I many places, all while giving us a comfortable place to sleep at night.

                            I spent ~$87,000 on it in 1 year and 11 days. I recently paid it off, so the entire machine is mine, no liens or loans on any part of it. It is not quite complete yet, though most of all of the large $2,000+ components are purchased.

                            With that done, it's finally time to put a little bit of green in to the M3 and its restoration. I do more driving around town nowadays, and the truck gets a whole 12 mpg on average, so it's time to have something drivable that does a bit better than that. Even 18 mpg would be a blessing. Haha

                            I started earlier this week with the purchase of the Vorshlag T56 Magnum to 4 bolt input diff flange driveshaft. It takes 2-3 weeks to manufacture before it is shipped out. So I am anticipating receiving it in early May. After it arrives I will ship off my OEM half shafts to The Driveshaft Shop to have them build/upgrade them. Once those are done the entire drivetrain will be finished and ready to go.

                            I'll be buying one major component at a time, and waiting for it to arrive and be installed completely before I purchase another large component I need. Smaller orders (<$200) will continue to be purchased as I need them.

                            On that note, it was time to figure out what oil filter I needed. I purchased an oil pan for an F-Body Camaro from eBay, but an F-Body Camaro oil filter did not fit.

                            I did some digging and this is what I found (mainly sharing so I have a written record of the part numbers):

                            The eBay pan is basically a knockoff of a Holley 302-2 GM oil pan. I discovered this fact on Amazon for the same product from a different manufacturer. There are (3) different versions offered by Holley, so I matched the image of mine with the same looking variant from Holley (they are different enough that it's relatively easy to figure out which of the three you have).

                            The Holley site says I need an AC Delco PF48e oil filter, which I ordered from Amazon.

                            The site also says I need an LS3 dipstick and dipstick tube (PN's 12669528 and12625031, respectively). I ordered those from eBay.

                            They should all arrive by early next week, and I'll get them installed then.

                            For the first time in ~9 months, I rolled it outside to give it a bath, and to clean up underneath where it has sat, as leaves and dirt has blown in since I first put it in there.

                            First Time Outside in 2022 by Michael Rickerd, on Flickr

                            First Time Outside in 2022 by Michael Rickerd, on Flickr

                            Haven't washed something this small in a long time. Took less time to wash the entire M3 than it does to just wash the Alucab Canopy Camper on the back of the truck!

                            Still so far away from being done, but little by little I suppose. While I have the car lifted for the driveshaft installation I will also bleed the brakes and the hydraulic throwout bearing at the same time.

                            I'm excited to get this moving forward again, even if it seems overwhelming still.

                            Until next time (much sooner than another ~9 months!)

                            Approximate Hours Invested in Project Since Purchase: 521
                            My previous build (currently E30-less)
                            http://www.r3vlimited.com/board/showthread.php?t=170390

                            A 2016 Toyota Tacoma TRD 4x4 Offroad in Inferno is my newest obsession

                            Comment


                              Some good updates, looks like I Missed out on some Looking forward to more!

                              Interesting twin disk. And how they kept the self adjusting clutch... a bit weird.


                              I was up above it, Now I'm down in it ~ Entropy - A Build thread.
                              @Zakspeed_US

                              Comment


                                May 24th, 2022

                                My custom driveshaft has arrived from PST, ordered through Vorshlag.

                                New Driveshaft by Michael Rickerd, on Flickr

                                Its beautiful. It uses the T56 yoke at the trans output, and it uses the OEM BMW 4 bolt coupler at the diff input flange.

                                It didn't come with driveshaft bolts and nuts, so I ordered those from BMW Parts Deal . com. They misled me, saying I would receive them within 5-7 days, but I just received an email from them saying they won't get them until the middle of June, and then they would ship them to me.

                                So I'll keep the project slow until then. Not a huge concern, as I am busy with work anyways.

                                I am also saving up to supercharge my Tacoma, it needs more power to spin those heavy tires and carry that giant brick it has on its back.

                                Approximate Hours Invested in Project Since Purchase: 522
                                My previous build (currently E30-less)
                                http://www.r3vlimited.com/board/showthread.php?t=170390

                                A 2016 Toyota Tacoma TRD 4x4 Offroad in Inferno is my newest obsession

                                Comment

                                Working...
                                X