Announcement

Collapse
No announcement yet.

KwikBrik: Back from the dead after 13 years

Collapse
X
 
  • Filter
  • Time
  • Show
Clear All
new posts

    KwikBrik: Back from the dead after 13 years

    My 1989 BMW E30 328iSC (m52 swapped, IS trim)


    Before:


    So my silver coupe was wrecked, but I got a fat check AND I didn't have to buy the car back. I quickly decided I'd rather move everything to a new shell. So I picked up a white vert for $500, with less than 200k on it. Only downside was that it last drove in 2007 and had a broken timing belt.

    I've had the car for nearly a year at this point, just about touching every nut and bolt on the car. Here is what I've done to the car so far:
    • Swapped engine for an M52 + G260
    • M50 manifold swap
    • E91 brake booster + reservoir relocation
    • Oversized front sway bar
    • M3 control arm bushings
    • 3.73 LSD
    • Stock/new rear subframe bushings
    • Stock/new rear control arm bushings
    • Stock/new front control arms
    • Stock/new rear shock bushings
    • Rebuilt OBC unit (LED light bar)
    • New DEPO headlights
    • Repro Euro grilles
    • New trunk seal
    • IS rear spoiler
    • IS front air dam (WIP)
    • Brand new BBS 15" Euroweaves
    • Custom exhaust, S52 headers + E30 cat and muffler
    • Rebuilt shifter bushings + linkage
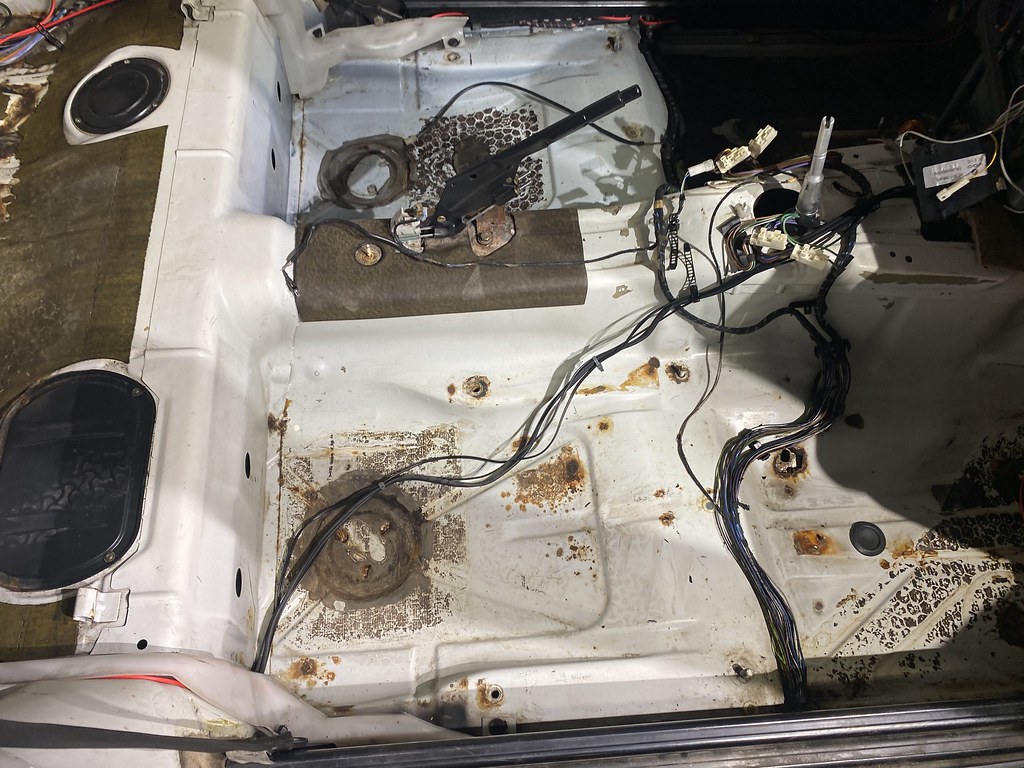
    • Rust repair in the typical spots (driver's side below gas pedal, passenger side below firewall)
    • Reinforced rear subframe mounting (on one side at least, see post #26)
    • New parallel flow condenser
    • Z3 fast rack
    • New power steering pump (still whines)
    • Complete respray of Alpine White II
    • DIY shadowline of trim
    • Replaced odo gears + cluster batteries
    • Rebuilt power antenna + new bushing
    • New trunk pressure equalizer seals
    • Shark fin/3rd brake light delete
    • New sound system with custom sub box
    • Replaced gas tank
    • OEM fuel pump
    • OE/Bosch fuel filter
    • Rebuilt blower motor
    • Garagastic X-brace
    • New leather on seats
    • Repainting all interior components back to the proper Natural Beige
    • New shift knob
    • New convertible top
    • New windshield + seal + locking ring
    • Wiper arm rebuild

    Whats coming up next is:
    • Leather wrap on steering wheel
    • New convertible top seals
    • Maybe head swap + s52 cams (or schricks, who knows)
    • New tail lights (if I can find them)
    • Properly fix glovebox
    • Add harness grommet for M52 harness
    • Replace A/C compressor + expansion valve
    Last edited by 128keaton; 07-18-2021, 09:01 PM.

    #2
    Well that was a mess. Dropped it pretty quick though. I’m going to be much more meticulous when removing my front subframe and engine. Broke a lot of stuff, which thankfully won’t be needed or can be repaired with parts from my car. Does anyone retain cruise control when they do an M52 swap? Sent from my iPhone using Tapatalk

    Comment


      #3
      Cleaned the engine bay up yesterday, will paint a few areas today:


      Click image for larger version

Name:	L0emJSr.jpg
Views:	629
Size:	121.9 KB
ID:	9954766

      Comment


        #4
        Cool to see another Save an E30 program.
        1 E30 totaled, 1 E30 Saved.

        Getting me motivated to tackle some rust one mine.

        Chassis doesn't look too terrible, I guess most the rust was from the interior out being a Vert?


        I was up above it, Now I'm down in it ~ Entropy - A Build thread.
        @Zakspeed_US

        Comment


          #5
          Originally posted by moatilliatta View Post
          Cool to see another Save an E30 program.
          1 E30 totaled, 1 E30 Saved.

          Getting me motivated to tackle some rust one mine.

          Chassis doesn't look too terrible, I guess most the rust was from the interior out being a Vert?
          Yeah it sat for a while in a yard without a rear window. Plus the top has plenty of "speed holes" in it. The rust on the driver's side is believed to be from a leaky master cylinder and is mostly cosmetic. Passenger side is another story, but overall very minor and can be cut and welded back pretty easily. The carpet and the foam holds the moisture so it just sits on the metal, rusting. Plus it lived its life in a very humid place (southern US woo)

          Comment


            #6
            Finished up cleaning the engine bay out and I went ahead and removed the front bumper/valence/whatever so I could get at the aux fan and condenser. Then I cleaned up the rest of the rust in the battery area as best as I could, then taped and spray painted the bay like my last car.

            IMG_7890 by keaton.burleson, on Flickr
            IMG_7888 by keaton.burleson, on Flickr

            Finished dropping the M52 today as well, and removed the harness so I could send it back off to receive modifications for a late model car.

            IMG_7892 by keaton.burleson, on Flickr


            Found the source of my annoying vacuum leak:
            IMG_7893 by keaton.burleson, on Flickr


            I also started looking at my starter/flywheel situation. I believe this is a M20B23 flywheel, but the starter I think is an M20B27 starter. Either way, the plunge differences are .02" and the teeth count are the same as my '89 M20B25 starter. Additionally, the teeth are spaced the same as my '89 M20B25 starter.

            Very weird. The 1989 325i flywheel seems to have more mass/material than this one, but the teeth mesh perfectly??
            Why wouldn't the starter then work?

            IMG_7897 by keaton.burleson, on Flickr

            If it is a B23 starter, it is the same as an E21 starter whose part number is superceded by the E30's later starter part number. If its a B27 starter, same situation, at least for a 1987 325/e. Kinda stumped on this one, I'd like to use a newer E30 starter since those are easier to replace, but I might have to bite the bullet on an M20B27 starter and hope it works fine.


            Comment


              #7
              Well I got some cool stuff yesterday. I was able to pickup an iS trunk spoiler and an iS cow catcher with brackets and fog lights!
              IMG_7907 by keaton.burleson, on Flickr

              IMG_7908 by keaton.burleson, on Flickr

              I got the rear subframe out of the silver car yesterday, no real drama there thankfully. Going to drop the rear subframe out of the white convertible later today.
              Last edited by 128keaton; 10-12-2020, 08:22 AM.

              Comment


                #8
                I dropped the starter off today at a local place for a rebuild. Turns out its an old mercedes starter, no idea why it works so well, but it does. The plunge is the same depth, and the teeth are the same size. Weird, but I'm still gonna use it since it works great on the flywheel.

                Comment


                  #9
                  So the engine is about ready to go in. Got the fan wired up, got the condenser mounted, and re-loomed the wires in the front valance. Got the AC stuff just about ready to go. The gas tank was junk so I got another one, just waiting on a few things before installing. Sent from my iPhone using Tapatalk

                  Comment


                    #10
                    I got the gas tank installed along with the rear subframe so the car is finally back on all four wheels. I got the wiring done in the engine bay, but I believe I have a bad ignition switch. Only keyless accessories work.

                    Heres a good before and after:
                    IMG_8167 by keaton.burleson, on Flickr
                    IMG_8168 by keaton.burleson, on Flickr

                    Comment


                      #11
                      Ignition switch should be in my hands by this weekend. In the meantime, I've turned my focus back to the interior. Cleaned (again) the inside floorpans in prep for patching the rust. Also took the time to run the stereo wiring from the headunit to the rear.

                      IMG_8193 by keaton.burleson, on Flickr
                      014D91A3-8B51-4CF3-A92A-BEE200A403CD_1_105_c by keaton.burleson, on Flickr


                      I also built the aftermarket stereo harness and wrapped it in loom tape:
                      IMG_8188 by keaton.burleson, on Flickr
                      IMG_8189 by keaton.burleson, on Flickr

                      Comment


                        #12
                        Received the 3.73 LSD yesterday. Also received the lenses. Waiting on the ignition switch and the correct E34 throttle cable. Sent from my iPhone using Tapatalk

                        Comment


                          #13
                          If I remember right, you are using the G260 trans and a 3:73 rear diff ratio, is this ratio a change form the other car?

                          Comment


                            #14
                            Originally posted by jbontke View Post
                            If I remember right, you are using the G260 trans and a 3:73 rear diff ratio, is this ratio a change form the other car?
                            I was using a 4.10 open with the G260. Now I have a 3.73 LSD. Tested the floor pan under the gas pedal. Oops. 
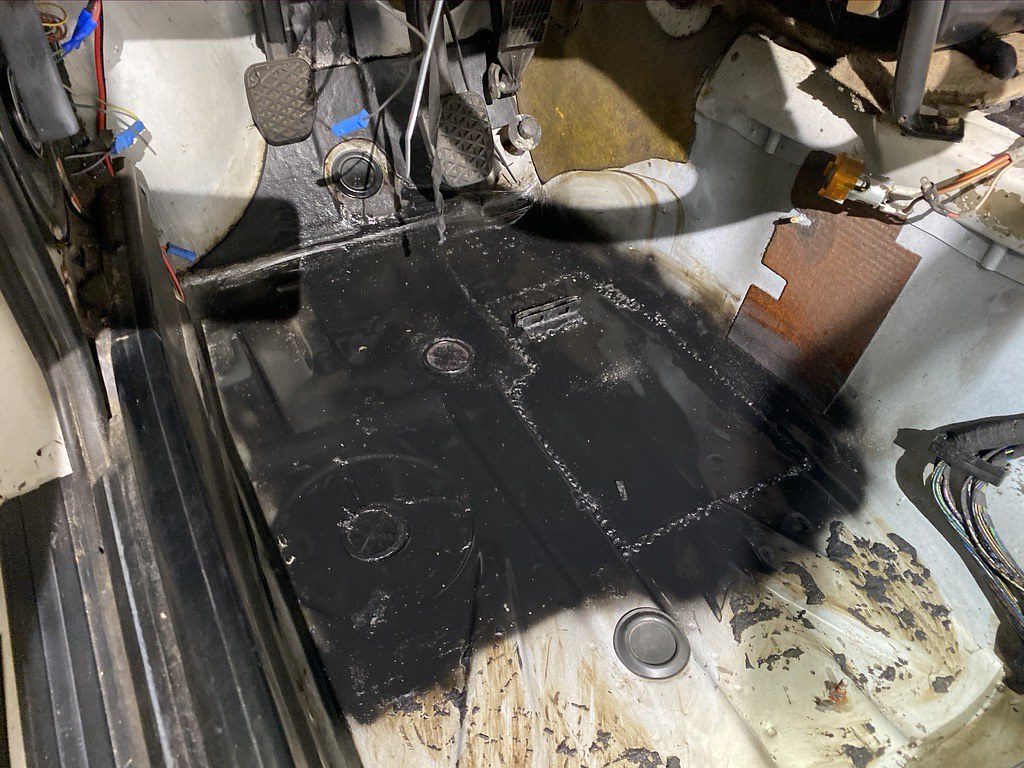
All better now. The other side was also patched. Also for anyone curious, you can cut down coupe carpet to fit a convertible: Sent from my iPhone using Tapatalk

                            Comment


                              #15
                              After fixing the rust, I had to paint the raw metal portions with some paint/rust inhibitor. The paint was designed for raw metal and rusted metal on frames and dries kinda rubbery, seemed to work fine enough.

                              Raw metal painted over by keaton.burleson, on Flickr

                              Raw metal painted over by keaton.burleson, on Flickr

                              Cabin overview by keaton.burleson, on Flickr

                              Rust painted over by keaton.burleson, on Flickr


                              I went ahead and removed 95% of all the factory sound deadening to make sure I wasn't missing any other rust spots. What a pain, but glad I did it. I was already going to have to redo some of it, might as well do all/most of it.
                              After letting the paint dry, I was ready to add all the sound deadening back. Took about an hour with a friend helping. The Kilmat I ordered was easy to work with.


                              Sound deadening installed by keaton.burleson, on Flickr

                              Sound deadening installed by keaton.burleson, on Flickr

                              Sound deadening installed by keaton.burleson, on Flickr

                              And finally, I was excited to see the carpet and seats in the vehicle so I threw them in. Much easier in a convertible.

                              Seat test fit by keaton.burleson, on Flickr


                              I also got the fuel lines flushed, but discovered a leak that needs to be addressed. Lines are clean now, though! Additionally, I finished mounting the radiator and attached the hoses. I found out I probably have a problem with my unloader relay or starter wiring, as my power mirrors, windows, and blower motor are non-functional. I did find out my rear defrost fan motor works, which is surprising considering how much crap flew out when it turned on.

                              So close by keaton.burleson, on Flickr

                              Comment

                              Working...
                              X