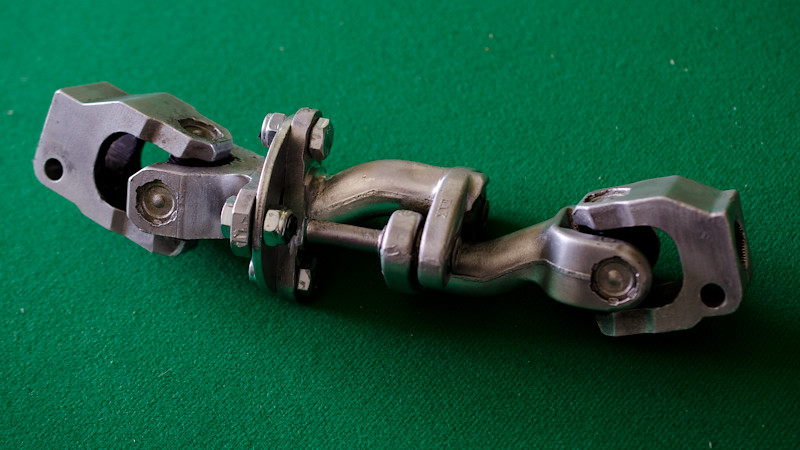
Announcement

Collapse
No announcement yet.

How To Guide - E36 Steering Rack Swap

Collapse
X
 
  • Filter
  • Time
  • Show
Clear All
new posts

  • mccor023
    replied
    I've now just used 2 spacers and bolted up the knuckle, I just don't understand why I had to do it this way.
    Like most of my projects Im concerned I did something wrong and will have to do it all over again in a day or two.

    Leave a comment:


  • mccor023
    replied
    I put the spacers on the top of the rack. I tapped the top half of knuckle as it would go, and basically the same for the bottom half. Click image for larger version

Name:	ImageUploadedByTapatalk1373393151.855204.jpg
Views:	1
Size:	37.1 KB
ID:	7157507

    I couldnt tap it down any further.

    Leave a comment:


  • KVF
    replied
    Edit... You did align them correctly... How far up the steering shaft did you go? Did you space the rack upward or downward?

    Leave a comment:


  • mccor023
    replied
    Originally posted by Todd Black 88 View Post
    I needed the spacers for my z3 rack install to my 92 e30 non airbag cabby.
    When mounting you rack to subframe which holes did you use? The original in the back, or the ones towards the front of the car?
    Thanks

    Leave a comment:


  • Todd Black 88
    replied
    I needed the spacers for my z3 rack install to my 92 e30 non airbag cabby.

    Leave a comment:


  • mccor023
    replied
    Can someone confirm knuckle spacers are still needed w/ late model non airbag an the Z3 rack? I installed the knuckle in halves, but now realizing why I couldn't install the whole thing together.
    Click image for larger version

Name:	ImageUploadedByTapatalk1373387770.534282.jpg
Views:	2
Size:	41.3 KB
ID:	7157505

    Leave a comment:


  • mccor023
    replied
    Originally posted by KVF View Post
    I think he's talking of installing the knuckle in halves to each of the shafts, then bolting the knuckle together... I suppose it could work, but I'd be very nervous about not being able to adequately torque the two halves together.
    Yes, I wa thinking of installing in halves. I removed my intake boot and have good access to them both. I was thinking this because I was worried I was not getting the knuckles firmly on the shafts.

    Leave a comment:


  • KVF
    replied
    Originally posted by Wanganstyle View Post
    I did this with Z4 steering rack; installed the z4 u joint to the car side then brought the rack up to meet it.
    I think he's talking of installing the knuckle in halves to each of the shafts, then bolting the knuckle together... I suppose it could work, but I'd be very nervous about not being able to adequately torque the two halves together.

    Leave a comment:


  • Wanganstyle
    replied
    Originally posted by mccor023 View Post
    Has anyone installed the top knuckle to steering shaft, rack to subframe w/ bottom half of knuckle, and then installed spacers/bolts to connect the knuckle?
    I am performing this mission solo and its been a pain in the arse trying to get the rack lined in the bottom and then into subframe..
    The only issue I see is having to rotate the top portion of the knuckle in order to line the knuckle up, but then I can just remove the steering wheel and straighten it.
    I did this with Z4 steering rack; installed the z4 u joint to the car side then brought the rack up to meet it.

    Leave a comment:


  • mccor023
    replied
    Has anyone installed the top knuckle to steering shaft, rack to subframe w/ bottom half of knuckle, and then installed spacers/bolts to connect the knuckle?
    I am performing this mission solo and its been a pain in the arse trying to get the rack lined in the bottom and then into subframe..
    The only issue I see is having to rotate the top portion of the knuckle in order to line the knuckle up, but then I can just remove the steering wheel and straighten it.

    Leave a comment:


  • jimmyv65
    replied
    Originally posted by RobertK View Post
    All good points....
    I should have said it originally, but thanks for your work on the initial write up. You've helped tons of folks with what you started. I am glad to contribute!
    Last edited by jimmyv65; 06-30-2013, 11:36 AM.

    Leave a comment:


  • RobertK
    replied
    Originally posted by MattAvino View Post
    I am very surprised that more people aren't doing this. This is what I'm going to be doing (I didn't even know that someone else had done it)
    This is by far the best option, especially when considering budget and time consumption.
    I like this!

    Originally posted by jimmyv65 View Post
    Points to mention:

    1) I think this parts list is off and it is much easier if you buy the spacer kit form e30tech or other vendors that sell a spacer kit. Here's my breakdown on the parts I actually needed from list. Keep in mind I bought the e30tech spacer kit.

    No--7/16 Bolt 2 Inches Long - - xxxxxxxxxxxx - - - - -x2 - - -$???
    No--Bolt M10x50 - - - - - - - - - 26111226737 - - - - x2 - - -$2.70
    No--Self Locking Nuts - - - - - - 07129964672 - - - - x2 - - -$0.60
    Yes--Copper Seals 14x20 - - - - -32411093596 - - - - -x4 - - -$0.68
    Yes--Copper Seals 16x22 - - - - -32411093597 - - - - -x4 - - -$1.04
    Yes, but just 2--Self Locking Nuts - - - - - - 07129922716 - - - - -x4 - - $1.20
    Yes--Power Steering Res. - - - - -32411097164 - - - - x1 - - -$19.50
    Yes, but better options exist--High Pres. PS Hose - - - - - 32411141953 - - - - -x1 - - -$74.00
    No--Spacer - - - - - - - - - - - -72118119268 - - - - -x1 - - -$2.05
    No--Spacer - - - - - - - - - - - -72111847480 - - - - -x2 - - -$1.92
    No--Nut - - - - - - - - - - - - - -72111977925 - - - - -x2 - - -$1.10
    Yes, but better options exist--LP PS Return Hoses - - - - - xxxxxxxxxxx - - - - - x2 - - -$14.50
    Yes--Bottle of ATF - - - - - - - - - - - - - - - - - - - -x1 - - -$2.50
    No--I did Nachos--Tacos - - - - - - - - - - - - - - - - -- - - - - - -x3 - - -$2.75

    2) Safety Loss--The mod that everyone does takes away the column collapse safety feature. I am interested in the method shown in post #856. I didn't do this one, but wonder if it would be the safer route.

    Watch the column come at the dummies head in this video on the old chevy at 49 seconds. Safety Video Sorry to be a Buzz Killington, but it is worth mentioning.

    3) You versus the steer knuckles -- The hardest part on this job by far is getting the steer column in an out. Aluminum and Steel will corrode together over time in a nasty way. The column knuckles are aluminum and the shafts are steel. In rust belt states, this corrosion is only going to be worse. As stated in post #855, heat is your friend. So is a tie rod fork or pickle fork. I had to cheat a flat crow bar plus the pickle fork in between the knuckle and the fire wall to get it to move.

    4) Getting the column back in..go deep on the shaft :) : The further on the shaft you get the knuckles, the better the column alignment. Be willing to go way past what looks normal. I like the option of using an M6 bolt on the rack side of the shaft and cheating that one further down. The deeper you get the knuckles on the shaft, the less you will have to grind away metal on the knuckle.

    For getting it in, some longer rods to tap with a hammer and help the knuckle back on the shaft really helped.

    5) Low Pressure Lines: 16 x 22mm Bulk Hose--I had trouble finding this tubing. I used 5/8" ID tubing from a hydraulic supply store. 16MM is .629 inches. 5/8" is .625. It worked just fine and was 4 dollars. I did the same with the smaller one. It was very close to a 1/2" line.

    6) Low Press Line Burst -- After I got it all together and started it, my clamp in the LP line from the rack popped off. On the 36 unit, the LP line has a stronger connection(like the HP lines) for it's first connection. If you use the LP line from an E30, I'd make sure you have a really good clamp or two in the LP line from the rack.

    7) High Pressure Hose: I used the line listed above and don't feel it is ideal(I think it is the e36 line). In hindsite, I'd either 1) get a new e30 hose or 2) bring my old e30 hose to the hydraulic supply guys and have them rebuild it. They rebuilt option would be less expensive! I wish I would have done that. They could reuse the banjo ends and clamp up fresh soft lines.

    I hope these notes can help anyone trying this project. And yes, it is a very nice improvement in steering.
    All good points, and eventually I will revamp this DIY once I get a chance to update some things.

    I will say the AKG kit is also a good spacer option and you don't have to replace the steering joint guibo with a solid one. That's just a personal preference.

    The high pressure hose also has some options. Honestly now when I do them I just bend the rack side of the stock E30 HP hose about 45 degrees out and it works just fine.

    Also, its worth mentioning that if you are doing a 24v swap and use an OBD2 Luk LF30 PS pump you have to use the E36 OBD2 HP hose because the ends are both different.
    Last edited by RobertK; 06-29-2013, 08:48 PM.

    Leave a comment:


  • Northern
    replied
    Good to know, thanks!

    Edit: I don't really see how rotating it 90 degrees would really affect the ujoint, as it would just bend the opposite way, would it not?
    Last edited by Northern; 06-29-2013, 03:18 PM.

    Leave a comment:


  • mr ilia
    replied
    Originally posted by Northern View Post
    What is the reasoning for the solid flex disc over just bolting the two pieces straight together?
    The holes need to be offset for u-joint to properly function, so it wont bind and lock itsef when turning the sterring wheel.

    Leave a comment:


  • jimmyv65
    replied
    My non-air bag experience

    Points to mention:

    1) I think this parts list is off and it is much easier if you buy the spacer kit form e30tech, AKG or other vendors that sell a spacer kit. Here's my breakdown on the parts I actually needed from list. Keep in mind I bought the e30tech spacer kit.

    No--7/16 Bolt 2 Inches Long - - xxxxxxxxxxxx - - - - -x2 - - -$???
    No--Bolt M10x50 - - - - - - - - - 26111226737 - - - - x2 - - -$2.70
    No--Self Locking Nuts - - - - - - 07129964672 - - - - x2 - - -$0.60
    Yes--Copper Seals 14x20 - - - - -32411093596 - - - - -x4 - - -$0.68
    Yes--Copper Seals 16x22 - - - - -32411093597 - - - - -x4 - - -$1.04
    Yes, but just 2--Self Locking Nuts - - - - - - 07129922716 - - - - -x4 - - $1.20
    Yes--Power Steering Res. - - - - -32411097164 - - - - x1 - - -$19.50
    Yes, but better options exist--High Pres. PS Hose - - - - - 32411141953 - - - - -x1 - - -$74.00
    No--Spacer - - - - - - - - - - - -72118119268 - - - - -x1 - - -$2.05
    No--Spacer - - - - - - - - - - - -72111847480 - - - - -x2 - - -$1.92
    No--Nut - - - - - - - - - - - - - -72111977925 - - - - -x2 - - -$1.10
    Yes, but better options exist--LP PS Return Hoses - - - - - xxxxxxxxxxx - - - - - x2 - - -$14.50
    Yes--Bottle of ATF - - - - - - - - - - - - - - - - - - - -x1 - - -$2.50
    No--I did Nachos--Tacos - - - - - - - - - - - - - - - - -- - - - - - -x3 - - -$2.75

    2) Safety Loss--The mod that everyone does takes away the column collapse safety feature. I am interested in the method shown in post #856. I didn't do this one, but wonder if it would be the safer route.

    Watch the column come at the dummies head in this video on the old chevy at 49 seconds. Safety Video Sorry to be a Buzz Killington, but it is worth mentioning.

    3) You versus the steer knuckles -- The hardest part on this job by far is getting the steer column in an out. Aluminum and Steel will corrode together over time in a nasty way. The column knuckles are aluminum and the shafts are steel. In rust belt states, this corrosion is only going to be worse. As stated in post #855, heat is your friend. So is a tie rod fork or pickle fork. I had to cheat a flat crow bar plus the pickle fork in between the knuckle and the fire wall to get it to move.

    4) Getting the column back in..go deep on the shaft :) : The further on the shaft you get the knuckles, the better the column alignment. Be willing to go way past what looks normal. I like the option of using an M6 bolt on the rack side of the shaft and cheating that one further down. The deeper you get the knuckles on the shaft, the less you will have to grind away metal on the knuckle.

    For getting it in, some longer rods to tap with a hammer and help the knuckle back on the shaft really helped.

    5) Low Pressure Lines: 16 x 22mm Bulk Hose--I had trouble finding this tubing. I used 5/8" ID tubing from a hydraulic supply store. 16MM is .629 inches. 5/8" is .625. It worked just fine and was 4 dollars. I did the same with the smaller one. It was very close to a 1/2" line.

    6) Low Press Line Burst -- After I got it all together and started it, my clamp in the LP line from the rack popped off. On the 36 unit, the LP line has a stronger connection(like the HP lines) for it's first connection. If you use the LP line from an E30, I'd make sure you have a really good clamp or two in the LP line from the rack.

    7) High Pressure Hose: I used the line listed above and don't feel it is ideal(I think it is the e36 line). In hindsite, I'd either 1) get a new e30 hose or 2) bring my old e30 hose to the hydraulic supply guys and have them rebuild it. They rebuilt option would be less expensive! I wish I would have done that. They could reuse the banjo ends and clamp up fresh soft lines.

    I hope these notes can help anyone trying this project. And yes, it is a very nice improvement in steering.
    Last edited by jimmyv65; 06-30-2013, 06:49 AM.

    Leave a comment:

Working...
X