Announcement

Collapse
No announcement yet.

VGT Turbo M20 Sleeper ('87 325 Sedan)

Collapse
X
 
  • Filter
  • Time
  • Show
Clear All
new posts

    #31
    Whoops, sorry for disappearing for a while! I think I had email notifications turned off...Thanks for all the kind words!

    Originally posted by downforce22 View Post
    great thread, thanks for posting your map. I was working on mine and added some timing in the 80 kpa region to match timing in the lower zones. I am also at 6000 feet asl in colorado springs and running a m20b31 stroker turbo with stock 885 head and 9.5:1 CR
    I'm also in Springs - I have a good buddy with a white iX (and a couple of other e30s - one to restore, one for parts). Maybe we should meet up sometime?

    tschultz,
    I am running two 3-port MAC solenoids: https://www.amazon.com/gp/product/B00YBN3DRO/
    I haven't gone to closed-loop control yet, but hardly drove the car all winter... now that the weather is getting nice again, I'll be driving more. I need to fix a leaking thermostat gasket before I do much more driving, though. If you're not planning to adjust your boost often, a simpler setup than PID would be to just use the solenoid like a switch. Run it in line with the bottom WG port, close it/vent it (prevent turbo pressure from opening the WG) until you hit 6psi. Of course there's no failsafe there, so make sure if you try that, you have overboost protection enabled! Although probably not too much worry at 6psi. If that's not aggressive enough, you might be able to plumb up a 4-port solenoid to switch between pressurizing the top of the WG below 6psi and then switching to venting the top and pressurizing the bottom above 6psi (for reasons I can't fully remember, two 3-port solenoids seemed to give me the best control, probably since they can be controlled fully independently).

    AWD_E30, I finally replied to your PM - didn't see that you were also planning for HE351VE. Might be a tight fit in an iX!

    Comment


      #32
      That would be cool to meet up, I assumed you were in denver, send me a PM and maybe we can chat e30 turbo sometime
      318iS Track Rat :nice: www.drive4corners.com
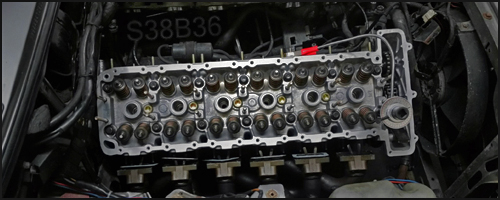
      '86 325iX 3.1 Stroker Turbo '86 S38B36 325

      No one makes this car anymore. The government won't allow them, normal people won't buy them. So it's up to us: the freaks, the weirdos, the informed. To buy them, to appreciate them, and most importantly, to drive them.

      Comment


        #33
        Updates!
        Car has been great so far, although it sat all winter. Last year it developed a couple small coolant leaks, with a few drops left on the ground after parking. Combo of thermostat o-ring (easy, fixed last year) and very old cracked radiator (not as easy). My car is a 4/87 build, just at the end of the early models, which means it had an early cooling system. Early radiators are now much more expensive than later radiators, so I decided to swap to the later system. This end up being… rather involved. Radiator inlet/outlet layout is almost exactly opposite locations, water pump is different, and of course the hoses are different too. I was already using a later style coolant reservoir, so that much was already done.

        With my water-air intercooler setup, I run the charge pipe across the engine bay directly behind the top of the radiator. With the old cooling setup it just barely cleared the hoses, and it became clear that with the set of new CATuning silicone cooling hoses there was no chance of “stock” hoses fitting (I should point out that the CATuning hoses don’t perfectly match stock rubber hoses, bends generally aren’t as tight, giving even worse clearance for my charge pipe). Combining that issue with my relocated oil filter living exactly where the passenger side radiator hose exits, my oil catch can living exactly where the other radiator hose exits, and some other minor challenges, I ended up with more work than planned to do the early-to-late cooling system conversion.

        After a lot of head scratching, I ended up using the stock rubber hose from thermostat to water pump (tighter bends than the silicone hose leaves it closer to the engine), and to snake around my charge pipe and intercooler I ended up making a stainless pipe to go from thermostat to driver side radiator nipple. I also had to remake that charge pipe from turbo to intercooler to make more space for the hoses. While I was doing all this, I ended up rerouting catch can hoses, turbo water feed, and plenty of other stuff (wiring, etc.).

        Also relocated the oil filter relocation kit from inboard side of passenger frame rail just behind radiator to the area where the AC receiver drier used to sit. Only ended up needing to modify one hose for that, which was a nice change of pace.

        Click image for larger version

Name:	IMG_2323.jpg
Views:	309
Size:	59.8 KB
ID:	10055427
        Click image for larger version

Name:	IMG_2325.jpg
Views:	278
Size:	69.5 KB
ID:	10055428
        Click image for larger version

Name:	IMG_2358.jpg
Views:	277
Size:	78.2 KB
ID:	10055429
        Last edited by mikey.antonakakis; 05-11-2022, 10:20 AM.

        Comment


          #34
          Another sub-project has been some exhaust work. Rerouted wastegate dump from screamer pipe to downpipe. Also swapped mufflers, welded up an entirely new muffler section, including a more e30-esque exhaust tip.

          Click image for larger version  Name:	IMG_2365.jpg Views:	0 Size:	69.0 KB ID:	10055431

          Click image for larger version  Name:	IMG_2367.jpg Views:	0 Size:	69.3 KB ID:	10055434

          Click image for larger version  Name:	IMG_2368.jpg Views:	0 Size:	76.2 KB ID:	10055432

          Click image for larger version

Name:	image_166423.jpg
Views:	274
Size:	77.3 KB
ID:	10055435


          Click image for larger version  Name:	IMG_2373.jpg Views:	0 Size:	69.4 KB ID:	10055433

          Comment


            #35
            Also replaced the "churning butter feel" old shifter setup with Garagistic chassis mounted shifter. New DSSR and selector joint from Garagistic too. This is the medium length shift lever with delrin knob.

            Click image for larger version

Name:	IMG_2303.jpg
Views:	301
Size:	64.2 KB
ID:	10055438 Click image for larger version

Name:	IMG_2306.jpg
Views:	275
Size:	65.4 KB
ID:	10055439

            Comment


              #36
              This thing is quite the sleeper!... Have you dyno'd it yet? and what tires are holding this together?
              Simon
              Current Cars:
              -1999 996.1 911 4/98 3.8L 6-Speed, 21st Century Beetle

              Make R3V Great Again -2020

              Comment


                #37
                Originally posted by 2mAn View Post
                This thing is quite the sleeper!... Have you dyno'd it yet? and what tires are holding this together?
                No dyno yet, but hopefully soon! Was going to try scheduling for the next week or so but this has been very much a “while I’m in there…” refresher session so it’s been 2 weeks almost nonstop work on it. Everything from new tie rods and strut caps to new door/sunroof/truck seals, pulling the old nasty purple tint (even with a steamer it came off in fingernail-size pieces that would disintegrate if the wind blew on them).

                I just received a Deatschwerks DW300c fuel pump in the mail today to replace the 12+ year old Walbro that has been getting super loud lately. 340lph should be sufficient for e85 I think. Been running around 12psi lately. Also been kicking myself lately for using eta pistons in this motor, wondering if that’s going to leave power on the table from lower knock threshold. Regardless, I at least want to get a few pulls with the current setup just to see if the “moderate boost with good top end power” concept I based this build on will pay off. (60mm turbo with something like 26cm^2 nozzle area when VGT is fully open, 280/280 cam, etc). Maybe e85 will be enough of a bandaid until I can build a new bottom end.

                I’ll call the dyno shop tomorrow :) and at least try to get decent in-car footage in the meantime. Maybe drag strip too.

                Oh, and Direzza star specs. Was on 195/60-R14 with bottlecaps, but my rack is worn and chewed up the fronts (Z3 rack arrived today too). Swapped those for 205/60-R15 Direzzas the other day, stole them from my crusty 1602. I know wider is better, but stickier is much more better, and the Direzzas are very sticky. And the wheel/tire combo is pretty lightweight… getting very hard to find good 14” tires in stock lately so I may permanently keep the 15” wheels (Kosei K1, I like the look on the e30 a lot more than I thought I would although I lose some sleeper points).

                Comment


                  #38
                  DW300c 340lph fuel pump is in! Being an early model, my car has the dual fuel pump setup. Old Walbro was running from the in-tank wiring, 1.0mm^2 (17AWG). Honestly it never caused any issues but it’s definitely marginal.

                  I managed to track down the splice from the 2.5mm^2 wire from the fuse box, that feeds the external pump (2.5mm^2 for that pump). Ran some 14AWG wire from the original external pump, routed along top of fuel tank alongside the fuel lines. Snipped off the in-tank connector and spliced it into the new 14AWG wire, only leaving about 2” of the original 1.0mm^2 wire remaining, which will be fine.

                  Also deleted the external pump, used 1/2” to 5/16” barb fitting in its place, fit perfectly.

                  Pump primed just fine but didn’t start the car yet.

                  Comment


                    #39
                    Fuel pump working just fine, car got new tint yesterday. I imagine the tint that was on there was done 25-30 years ago, it was BAD. So bubbly and purple. Also finally installed window lock strips for the first time since I've owned the car. Looking a little better now, still needs paint like 10 years ago, don't think I've washed the car in 8+ years because I'm afraid the paint will wash off!


                    IMG_2468 by Mikey Antonakakis, on Flickr

                    IMG_2467 by Mikey Antonakakis, on Flickr​​​​​​​

                    Comment


                      #40
                      Started wiring up a pressure sensor for wastegate dome pressure control to replace my manual boost controller. Needed to remove my custom OBC/dash display and open it up to run a few more wires for the pressure sensor, route those through the firewall, and wire up the connector for it. Need to update the dual solenoid plumbing slightly as well. Mostly done with all that, should finish up later tonight.

                      This will be a nice upgrade, mainly because it will make the combination of boost control and VGT control more elegant. Currently I use the Megasquirt boost target map to feed boost target into my VGT algorithm - need more boost? Close the VGT. Need less? Open it. Hit boost target? Open VGT fully. It's more complex than that, but that's the basic idea. The current shortcoming is that I need to tune my boost target map in Megasquirt to match the manual boost controller setting. In other words, the MS boost map is driven by the manual boost controller. This makes it a pain to tune and leaves it open to variability.

                      With the planned dome pressure control, I'll instead use the MS boost map to drive the actual boost level. I'm already set up with compressed air and dual solenoids, so the last piece is to add a pressure sensor to monitor dome pressure, and remove the manual boost controller altogether. With wastegate dome pressure being measured and controlled by the dual solenoids, I can implement a PID control loop to directly control wastegate dome pressure. For those not familiar, this is a super effective way to control boost. Rather than trying to control actual boost level (very difficult because the whole engine system influences boost level), you just control the the pressure in the top chamber of the wastegate. With zero pressure in the wastegate dome, you are simply running on wastegate spring pressure. Any pressure added to the dome adds to your boost level, in a nearly linear relationship. If wastegate spring pressure is, say, 8psi, set wastegate dome pressure to 10psi and now you're making 18psi of boost (again, more or less). It's much easier to control pressure in a nearly fixed-volume pressure chamber than the entire turbo engine.

                      The other benefit is one that I've already implemented in the car - you can modify the PID loop to do things like send full compressed air pressure to the wastegate dome to make sure it stays fully closed while the turbo is spooling, super important for my VGT setup since closing the VGT can cause enough exhaust manifold pressure to unseat the wastegate and kill the spool (especially true if you're using a weak wastegate spring).

                      Comment


                        #41
                        DIY dome control PID controller is functional! Needs a little more tuning and testing before I fully integrate it into the VGT/dash display code.

                        This quick video is testing/tuning code that only does wastegate dome control. Top pair of lines are dome pressure target vs actual, bottom is the control signal (viewed in two slightly different scales to validate the code is working as I expected). This is running on the in-dash hardware with the compressor, wastegate, solenoids all installed in the car - the nice thing is I can bench tune it without the engine running, let alone needing to drive the car.

                        Last edited by mikey.antonakakis; 05-16-2022, 05:24 PM.

                        Comment


                          #42
                          Freshly-printed OBC touchscreen housing. Originally I printed it from PLA, but that doesn’t have great heat resistance and got a little saggy over time. This one is PETG, which should handle the heat a little better.

                          Dash display by Mikey Antonakakis, on Flickr

                          E30 touchscreen OBC by Mikey Antonakakis, on Flickr


                          Forgot to snap a pic of the 12-pin bulkhead connector, but here’s the old housing as it came out of the car the other day. Total of 17 wires coming into/out of the housing, as well as a USB cable to handle reflashing microcontroller and display firmware:

                          E30 Touchscreen OBC bulkhead connector by Mikey Antonakakis, on Flickr


                          Currently, the following stuff lives in this housing:
                          -powered by ignition-switched 12V
                          -switching regulator inside to run the system on 5V
                          -3.3V power provided for analog sensors
                          -contains CANBUS interface
                          -pulls data from Megasquirt via CAN (it can access I think over 200 parameters from Megasquirt)
                          -reads data from analog oil pressure sensor
                          -reads data from analog fuel pressure sensor
                          -reads data from analog wastegate dome pressure sensor
                          -contains VR signal conditioner to read turbo shaft speed
                          -takes various parameters via Megasquirt CAN to feed into VGT control algorithm
                          -sends VGT commands to turbo via CAN
                          -reads data from turbo (received VGT position command, actual VGT position, VGT control loop data, VGT actuator temperature)
                          -sends data collected from pressure sensors and turbo back to Megasquirt via CAN
                          -controls wastegate solenoids, now with PID dome pressure control algorithm (almost fully integrated now)
                          -runs touchscreen OBC
                          -creates and conditions signal for econometer to function with Megasquirt and 700cc injectors

                          Touchscreen OBC includes recreation of the stock OBC with functional buttons to access various gauges, such as:
                          -boost
                          -oil pressure
                          -fuel pressure
                          -AFR
                          -stock-style analog clock
                          -combo turbo data gauge (boost, VGT position, turbo speed)
                          -maybe more to come soon
                          Last edited by mikey.antonakakis; 05-17-2022, 06:43 PM.

                          Comment


                            #43
                            some really cool stuff in here, nice work. the CAN bus stuff is awesome.

                            I have an arduino and little OLED screen that i have been meaning to do something similar with my mega, just data display would be my goal for the time being. You might have enthused me to spend some more time on that..

                            Comment


                              #44
                              Originally posted by e30davie View Post
                              some really cool stuff in here, nice work. the CAN bus stuff is awesome.

                              I have an arduino and little OLED screen that i have been meaning to do something similar with my mega, just data display would be my goal for the time being. You might have enthused me to spend some more time on that..
                              I have something that might help you with that:
                              Megasquirt CAN Protocol with Arduino. Contribute to mantonakakis1/MegaCAN development by creating an account on GitHub.


                              I wrote an Arduino library to handle the Megasquirt CAN protocol. You'd still need to run a normal CAN library to handle the actual communications, and when you receive a CAN message this library will process the message (Megasquirt uses a unique protocol) and give you access to all the values. I'd be happy to help implement it, the github repository is a little sparse on "getting started" examples right now.

                              Comment


                                #45
                                oh. much appreciated for the link. and i will definately take you up on the offer if i get stuck

                                Do you have any recomendation for a CAN reciver module?

                                Comment

                                Working...
                                X