-
I too have seen brand new engines do this. Even when all tolerances are correct the rings can cause some very very small markings. Just enough to be seen through the hone exactly as pictured. Varg, I would put a few thousand miles on that engine and the re check just for measure. -
I once built a 4g64 and had almost this same thing happen (compression, and vertical scoring), and freaked out. I was told by some meticulous engine builders (english racing) that there was something slightly askew. But was told by everyone else to send it. I sent it. The compression evened out once I got to the 500mi break in oil change, and was fine at 500whp for another 5+ years.Leave a comment:
-
You aren't the only person to say something like that, but it's not happening. The goal here is a daily driver that will occasionally go fast but will be relied on for years with as little excess maintenance as is possible with such a highly modified car, not a pile of junk or a weekend car. I didn't spend all this money on new parts to run an engine that is scuffed up and outside of any OEM or aftermarket compression test spec just so it can fail at an inopportune time, these results are worse than my E30 engine which has completely unknown mileage, pitted cylinder walls and glittery oil. I would have turbocharged a used M52B28 with cams and a cut ring head gasket if I were going to cut corners like that.Leave a comment:
-
I would not care. Ensure that injectors are good and send it.Those are quite minor scratches and compression is good.Leave a comment:
-
A lot has happened since the last update. I installed the condenser fan and got a break-in drive per the Metric Mechanic protocol done, discovered an ac control issue and a heating issue, fixed the heat issue by wiring the fans to the ECU to switch them on when I want instead of when the thermoswitch on the cold side of the radiator decided it was 178° or 190°F, discovered it resonates in the cabin at idle and probably needs a longer tailpipe and maybe an exhaust butterfly, got another break-in cycle run, found that the flex joint scrapes a little on one of the speed bumps in my neighborhood, took the car on one 10mi drive... noticed something a little off. My tuner's ear told me that the idle, despite holding 13.3-13.5afr, was a little bit unsteady and maybe a little weak on one cylinder. I got worried so I parked it, did an oil change, saw more ferrous metal than I expected including 4 very thin 3-5mm slivers and decided to test compression. Bad news. A picture is worth a thousand words.

The subsequent borescope images:
Cylinder 6:


Cylinder 1:

They all have some scuffing and scoring. I don't know what I did wrong. What I do know is that:- I oriented the rings per instructions
- I staggered the ring gaps
- I didn't put them in dirty bores
- I didn't put them in dry, and I even dropped 5cc of oil down the bores before cranking to build oil pressure (4x 10 second cranks, longer than I would like)
- I didn't over rev it (I had a limiter set for 5,000rpm)
- They weren't scratching the bores when I installed them and turned the engine over by hand with the head off so I doubt my deburring wasn't thorough enough
- bore wash - during the first few minutes of idling and revving to troubleshoot the misfire, the wideband didn't work because of a loose pin in the connector
- #6 injector sticking open or leaking since injector 1 stuck closed, I can't test them until I pull the intake because they don't clip in
- breaking it in too hard - it saw 4psi boost a few times because the throttle pedal was not moving smoothly, but was tuned conservatively and under 12.5:1 AFR
- taking too long to prime the for the oil I put in the bores during assembly and before cranking
- stalling too many times once hot during the break in cycles (I was interrupted by traffic and rain and the idle settings were too aggressive when hot)
Last edited by varg; 06-13-2023, 04:20 AM.Leave a comment:
-
Big news! I got it running on all cylinders today. I called FIC and got a particularly helpful employee who recommended that I pulse the injector for a couple of minutes and tap on it with a mallet, that it's basically what they do with a stuck injector that sat in the box for too long. I wanted to do this in the rail so I tapped on it while using output test mode to give it 2ms pulses, around the tenth tap on the rail the injector started ticking. I let it cycle a few more times then promptly grabbed my cameras and started the car. It runs on all six cylinders now, what a relief. Who knows, it may have cleared up on its own with more running but I didn't want to take the chance and only ran the car for 3-4min total yesterday.
It's easier to tell what it sounds like now, it's a little raspy, and not as deep and burbly as my M20, but I'm also not idling at 875rpm here; 1100-1200rpm cold idle. I didn't rev above about 2,800rpm in this video, it may sound better under load at higher RPM. It's not too loud, which is nice. That was a concern of mine with a 3.5" turbo back exhaust. It's pretty responsive for a base tune, that lightweight flywheel is making itself known.
The radiator leak, which drips about once per 15s with the car off, I didn't get the cooling system pressurized today so I don't know what it's like at full temp. Same with the freeze plug, which barely dripped during the 3min or so it ran today.

And my simple and adjustable fix for the broken clip on the dashboard vent, a common E34 problem. Yeah, clear epoxy and AL filler wire. Not the most high tech or professional but it makes a good adjustable clip that does the job nicely and can be bent to fit nice and tight. Totally invisible with it installed. If BMW had glued a piece of filler wire to the vent from the factory, E34s wouldn't have had dash vents that pop up and bounce around.

Once I get the leaks fixed and install the brushless condenser fan, it'll be ready for engine break-in and tuning.Leave a comment:
-
It runs!
But only on 5/6 cylinders. These were not cheap injectors at $800 for a set and not only do they not fit without extra parts but my cyl 1 injector isn't firing. The injector has the appropriate resistance but it just won't click when tested independent of the ECU, I tried reversing polarity to unstick it because sometimes that works to unstick an old injector and got nothing. I also have a dripping freeze plug which has me pretty steamed, and a leaking radiator. The radiator is a brand new Nissens 540i radiator, I'll be testing FCP euro's replacement policy on this one I guess. I was tempted to try and re-crimp the area that leaks, but I didn't because I don't want it to hurt my chances of an exchange. You can't even pay for quality these days it seems. I have a couple of videos but there's no point in posting videos of it running on 5cyl, I'll post up when I have 6. I'm glad these problems didn't stop me from taking this car on my road trip in November because I would be way more angry at these issues than I am now.
Post run engine bay shot. The turbo is a big pain to install with the short S-pipe coming off of it and going to the intercooler. I am going to have to re-work that. It took way too much time cramming silicone couplers onto the turbo and intercooler, but space is very tight there, it's up against the wheel well and the AC lines. There's not even enough space for a tight cast aluminum 90° coming off of the turbo if I wanted to do that. I may modify my S pipe and intercooler to take one of those expensive aluminum clamped flanges that are so trendy right now but pointless for most applications. We'll see. I'm just hoping I don't have to take the turbo off for the freeze plug fix, the wastegate pipe is in the way and I don't think it can be removed without getting at the flange from the top.

Wastegate blanket. I thought this was pretty neat, I bought it to help keep the radiant heat off of the valve cover gasket area and oil return line (which has a sleeve, but still). It's kind of a pain to install and I hope I don't have to remove the wastegate any time soon.

Priming the oiling system. It still took about 40 seconds of cranking cumulatively, 10s at a time, to get the dummy light to go off. Pouring fresh oil into the galleries directly through the center tube gave me a little bit of peace of mind though.

Looking forward to driving it, but that can't happen until I get a new radiator and replacement fuel injector.Last edited by varg; 10-21-2023, 03:01 PM.Leave a comment:
-
There's going to be a huge inconsistency in photo quality here and I apologize. My iphone's camera has been messed up for a little over a month now, the focal plane is rotated and the image stabilization just twitches like mad so it can't take a good photo. As a result some of these are taken with my DSLR, which is very inconvenient to have in the garage while working, and others are iffy phone images. The E34 is getting close to being on the road now. There have been some delays, like damaging the O2 sensor bung and having to cut a patch out and weld it on my downpipe with a new fitting. The downpipe slip joint also got ovalled out from all of the clearancing and welding, so I had to weld a new one on. I could not find a single shop around here with a pipe expander that can do 3.5" pipe. Then while welding the new one on it started to oval a bit too, so I bought a pipe expander kit from harbor freight anyway making the rework feel like a waste of time it wound up fitting in the end, I haven't even opened the HF expander yet and may return it if I don't need it for the final assembly. This welding also altered the wastegate pipe fit, so I had to re-work that as well. No pictures of any of it.
This week I finished off the interior, the gauge pod next to the A-pillar is the CAD I was working on before, it's a weird looking pod but it was necessary to retain all functionality. It has a defroster vent, and it holds both gauges far enough away from the windshield that I can use a reflector. A pillar pods aren't available for the E34 and I didn't want to attach anything to the dash through adhesive of any other means, so this was the solution. Also, in place of the OBC, there's an oil pressure gauge. Just like my E30. The other printed parts aren't visible here, plugs for the holes the auto shifter was bolted into, and the ring that holds the shift boot in the surround. I also epoxied a piece of bent aluminum filler wire to the bottom of the big dashboard center vent to replace one of its broken clips. Seems to be a common problem in E34s that the clips break and that big vent sticks up from the dash. While we're at it in the interior, the twin disc clutch is super heavy and will take some getting used to.

Here's the current state of the engine bay. The downpipe and turbo need to be installed, fluids added, EBC solenoid wired, and it's ready to run. The radiator straps are the other type of CAD from before, I decided to change the way they attached. The intercooler has mounts welded to it that drop into the stock radiator mount cups, they were very ugly, I didn't take any pictures. the radiator and intercooler need to be securely mounted so they don't slide back and hit the pulleys, clearance is very tight. Also not pictured; a duct that fills the gap between the condenser and the radiator below the intercooler, so cooling air doesn't go around the radiator. It's just made out of corrugated plastic from signs. It's buried so it doesn't have to be pretty, just functional.

The radiator fans are an interference fit. The passenger side fan touches its hose clamps and the driver's side fan comes close to everything.


The radiator fans are controlled by a relay I added to the E34's convenient relay box, which contains the condenser fan relays. I like to scavenge BMW relay holders from junkyard cars that are ready to be crushed or not likely to be a harness donor for someone. The stock condenser fans relays will be needed for my big brushless delta pag condenser fan.

Getting a little out of sequence here, but I had to torque the crank bolt down to the M50's ridiculous 300lbft figure and that required a counterhold tool. They're ridiculously expensive, so I drew one up in CAD and had it cut, for something like $35 shipped. A block of wood against the AC compressor mount served as the brace point. Easy.


I probably would have had this thing running last weekend if it weren't for the fuel injector issue. Turns out the plastic manifolds don't butt up against the injectors, they just have a smooth bore, so Fuel Injector Clinic's direct fit application injector for an E36 M3? Not direct fit at all since it has no clips and doesn't bottom out. The injectors will pop out of the rail and spray fuel everywhere, which I found out when I tested the system for leaks after installing the new fuel pump and lines.

I was going to make some spacers but I was too busy this week so I wound up just fitting the nice spacers I ordered for just this problem from RallyRoad. Silver ring, visible at the bottom of the injector. A friendly PSA to anyone searching in the future, Fuel Injector Clinic's E36 M3 1200cc High Z injectors will not fit your M50 or S52 without spacers and a modified injector harness box (it hits the valve cover because the connectors are lower). Just like everyone else, their service seems to have gone down the tubes since COVID too. They didn't have spacer rings and didn't have upper spacers with clip grooves and a ridge for the necessary dual clips.

The fuel pump fit is pretty easy, luckily. you just slide the stock pump out of its plastic case, slice the case open to fit the much thicker DW400 pump, and slice most of the bottom of the case off so the pump can rest on the remaining portion and fit its sock. Wiring harness connector needs changing as well, of course.

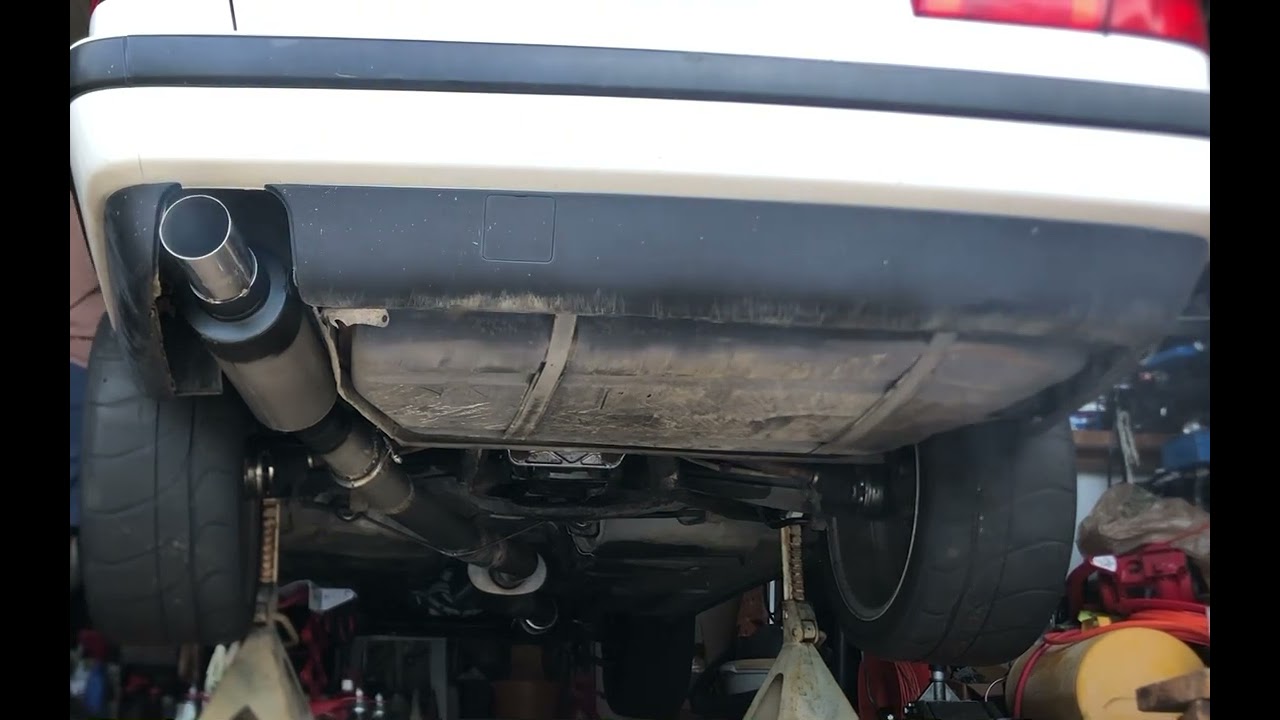
Finally, a rear view showing the rear muffler and single tip. I may fabricate a dual 2.5" tip for this later, I would really like to since it would look better. I just need to figure out how I'll go about that. The brown paper taped to the hatch is to keep it from hitting the garage door when the car is lifted higher, which already happened once and left a scratch.

Fingers crossed, I should be able to install the condenser fan, fill up the fluids, and have it on the road tomorrow.Leave a comment:
-
sub'd as I am doing an e34 turbo project as well. Nice clean work so far!Leave a comment:
-
Thanks guys. I've not been too happy with the results of my fab work here, and the blowoff valve fitup went really poorly and looks like a mess, I swear that coped vband fitting for the BOV was contaminated in some way. That will be for the next update though.
I think the E34 is like the best kept secret of the classic BMW world. Nobody seems to talk about them or appreciate at all, I hardly ever see them at meets, but it is a great car and I fell in love with it once I fixed the transmission and AC issues. As much as I love my E30 and initially wished I could fit an E30 wagon into my budget instead of an E34 I now am glad I got an E34 wagon, its larger size is an advantage for this being a utilitarian but fast DD. The car is well built, it's quiet, it fits big 275 nittos with no body mods, it handles well, the steering feels great for box setup, the AC is way better than E30 AC, and it is definitely better looking than an E30 wagon imo. The proportions of an E34 wagon are so are pleasing to the eye, even at stock ride height. It has the classic long and low look that modern cars lack, and it is far more aerodynamic and quieter at highway speed than an E30. I would not want an M20 powered E34 though unless a swap was the plan, the M20 is just too small and underpowered, the M50 was borderline and it makes 10% more torque. A 3,700lb car (I haven't weighed mine yet) should not have a 2.5L engine. FWIW I chose it over a Volvo 7/940 wagon because they have super weak rear suspension and axles, a ford 8.8 swap and aftermarket suspension arms with reinforced pickup points are mandatory for the kind of power I wanted.
It has its problems, it is fancier than an E30 and a more modern design so there is more to go wrong.- The door cards are a pain in the ass
- The extruded sections that clamp onto the window glass and engage the regulator are prone to coming off of the glass for some reason
- The hatch wiring harness disintegrates and is a pain to re-wire
- The door bottom clip on trim/seal is an absolutely moronic design
- The hatch glass struts are hidden under the headliner so I don't feel like replacing them
- There is weird one piece plastic trim around the window frame on the interior that is a nightmare to remove an reinstall
- The door seals are possibly worse than the shrinking E30 door seals
- The electric lock system leaves me paranoid I'll be locked out if the battery dies and the "override" lock technique doesn't work (I wouldn't be, the hatch lock is mechanical and you could get in through it)
- The differential uses a different case than an E30 (it's a far superior design) that is far less common in good ratios (as far as I was able to find, there are no 2.93LSDs, which are basically mandatory with a ZF's dumbass 1:1 top gear imo)
- The solenoid based heater valve system is failure prone and expensive to replace
- Door bottoms are rust prone, I got lucky
- Slicktops are rare and the double sunroof is 100% a liability, I only bought this car because it was the only slicktop I found, otherwise the paint and body work it needs would have sent me elsewhere
- ZF310/320s became rare and expensive at some point over the past few years, I blame the fact that they seem to be a fairly common swap in drift car projects especially since so many Japanese cars have absolutely ass or extremely expensive transmissions
Last edited by varg; 03-30-2023, 02:29 PM.Leave a comment:
-
That aluminum welding is way nicer than any I've ever done and I've had mine for like 5 years now.
I've been next-car shopping for a year now and keep bouncing around various newer touring options, but this thread really makes me want to find a clean E34 touring.Leave a comment:
-
Current status:

I'll start with the downpipe. This was super tricky with this car. My modified AC lines gave me a lot of extra room vs tock, but just not enough. The 3.5" pipe basically has to make a sharp 95° turn then angle back toward the firewall again to go between AC line and header primary. This required some CAD. Here's the bend partway though modification on its cardboard template.

One of dozens of trial fits. Unfortunately the pipe is currently an interference fit. It gets pinched between the header and the AC lines, so I'm going to have to dent the sides a bit and surround it with heat shielding to keep from cooking my AC lines.

This is the tacked up downpipe, complete with a couple of overheated welds. I basically learned the basics of stainless TIG the hard way here. It's a two piece downpipe out of necessity. A V-band, nor any other flange, will not fit down between the header and AC lines, installation requires snaking the small end of the slip joint down there, pulling the downpipe toward myself and rotating it to clear the frame rail, then rotating it more and fitting the marmon flange to the turbo. It's not ideal, but it works. Regrettably, the O2 sensor has to go after the slip joint, because the bung will interfere with the rotation required for installation. The wastegate provision also has to be attached to the bottom half of the downpipe, so real-estate is limited all around. If you're going to do this yourself, run complete custom AC lines including the firewall side fittings, point it straight down the firewall then hug the frame rail. I may do this in the future depending on how I like the job the heat shields do. As an aside, yeah, that's a homemade weight bench and squat rack made out of lumber, I DIY everything I can. That was a pandemic build, and it gave me a decent home gym for less than the cost of a year at a commercial gym.

I got some aluminum welding practice before the next part. It's not easy, but it's a lot easier than the 0.063" stainless exhaust pipe.

On to the intercooler. This was another space-constrained design. In the interest of keeping it realistically achievable as I learned aluminum TIG welding, I made the end tanks as simple as possible. Inlet on the right, outlet on the left. They had to be offset so much because as you can see in the first image in this post, they have to clear the V8 E34 radiator end tanks. In hindsight, the hot side pipe would have been simpler if I took about 1.25" out of the offset on the right, but I didn't have the benefit of hindsight a few months ago when I drew up these end tanks in CAD (computer CAD, not cardboard CAD this time).


These end tanks were a flat-pack design. I had them water-jet cut by a local engineering firm on 3/16" aluminum, and tacked them up using some 3D printed spacers.

Out of fear of burning a hole in my beautiful and expensive Garrett intercooler core, I built up a bead around its perimeter to give me a thicker piece to concentrate my heat on and help me bridge the small gaps that were unavoidable in fit up of the end tanks to the welds already on the core.

I had images of the tanks splitting at the seams in my mind, because of my low quality welds and the pressure they may see (30psi+). To mitigate these fears I welded a 3/8" reinforcement rod at the center of pressure of each tank. This will be under tension when the plates are under pressure, it should take a lot of the load off of the welds and probably outright eliminate tank deformation.

Welding the tanks on went OK. The results weren't pretty, but I think I expect too much of myself for someone with torch time not even measurable in the dozens of hours. I did make a couple of mistakes that had to be filled in, but luckily none on the core, which was the last part I welded. I still had to stop-start weld this, I'm not at the point where I can do a nice 12" long continuous stretch, at least not with the workbench setup I'm using.

Coming soon:
More CAD

 Last edited by varg; 03-26-2023, 05:14 AM.
Leave a comment:
-
I really let this thread go. Progress has been slow but the wagon is almost there, I basically only have to finish the interior (gauge pods, shifter trim installation, etc), finish welding the exhaust up, install the driveshaft and heat shields, and weld my intercooler end tanks and piping. Then it will be ready to run. I'll go chronological on the updates until I'm caught up.
I assembled the engine and painted it.


I had ForcedFirebird rebuild and put the E30 2.93 LSD I bought inside an E34 case, and I painted it.

Old greasy 275,000mi engine out!

Engine bay cleaned

Shiny new M50B30 in!


More to come, there is still a backlog of pictures and updates. The slow progress and parts issues have really sapped that non-stop build drive I had when I built my E30. Progress is progress.Leave a comment:
-
The modified lines installed.
And the downpipe stand-in. A piece of 4.25" OD flexible dryer duct. Very close, but it fits. Will not be fun to fabricate. The downpipe crossover tube will also be a real treat.
While I had the AC apart I cleaned an ungodly amount of gunk and debris out of the radiator support and passenger side frame rail, and got rid of the grungy old tube and fin condenser.
Replaced with a nice junkyard find; a parallel flow condenser.
And the result, cold AC even in traffic at 88°F and 71% relative humidity.
I'm going to paint and assemble the longblock over the next couple of weeks and use that time to make my intercooling decision. I do not know which path I will take.- Air to air between condenser and radiator
- Air to water with a heat exchanger between condenser and radiator.
Leave a comment:

Leave a comment: